Programming NDS with NetWare Loadable Modules (NLMs), Part 1
Articles and Tips: article
01 Apr 2000
Adapted from a DeveloperNet University Tutorial
Welcome to the White Pages Application course. This is one of a series of DeveloperNet University courses which helps you learn Novell Directory Services (NDS) programming.
This course takes you through the process of programming a "White Pages" application. The purpose of a "White Pages" application is to allow developers to build a Hello World application, Internet access and NDS development.
CodeWarrior is used in each of these examples to create an NLM:
The Hello.NLM is used to verify that the install of tools was successful and that the developer can quickly build, load and unload an NLM on a NetWare server.
The ServSock.NLM opens a server socket that will communicate to programs on the Internet with a TCP/IP connection.
The BookMark.NLM builds attributes in NDS and then creates a class in NDS.
The NDS.NLM authenticates, sets context, creates, modifies and then delete the object in NDS using DSAPIs.
The LDAP communication with an NLM is being developed for a future release.
- Creating an NDS Object--Task Description and Requirements
- When To Write an NLM
- CodeWarrior
- NLMs Compared to DLLs (Dynamic Link Libraries)
- Starting NLM Programming
- Coding Example 1
- A Simple Debug Decision
- Create a Class In NDS
Creating an NDS Object--Task Description and Requirements
This lesson includes the following objectives and requirements:
Objectives:
Use CodeWarrior to build an NLM application
Build a simple NLM and load the NLM on a NetWare server
Access program with TCP/IP sockets
Create, modify, and delete object entries in an NDS directory
Prerequisites:
Entry-level C programming skills
A basic understanding of directories (classes, objects, attributes, syntaxes, values)
Ability to use ConsoleOne to verify relationships between objects in the directory
CodeWarrior by Metrowerks with NetWare CD installed
Required Items:
Win32 development environment
Novell's SDK for C and documentation installed. Installs providing SDKs for C are available free from the Novell Developer Kit
Novell's ConsoleOne NDS Administration tool is also available free along with a DeveloperNet subscription from http://developer.novell.com/ndk/
Required Setup:
NetWare Client32-enabled Windows 95 or NT client
Network access to at least one NetWare 5 server
When To Write an NLM
NetWare is unique in that you can modify the operating system. You as a developer can actually expand or extend the operating system to perform the functions that your business may need.
Novell's printing solution is a series of NLMs that are used to print from a client to the attached printer. An NLM is the executable that runs only on NetWare. You can only create an NLM with CodeWarrior. Since an NLM communicates directly with NetWare, it must be built so that NetWare can understand it. A UNIX executable does not work in Windows. MetroWerks provides the tool for building NLMs. That tool is called CodeWarrior. This is a limitation to developing an NLM. The benefit is that CodeWarrior works closely with Novell to include changes that need to be made. NLM programming is one of the few places that you can modify the operating system. When writing an NLM you need to make the executable run as fast as possible. Since an NLM has complete control of the CPU when executing, you need to make the program quick and not hold the processor for long periods of time. Having complete control of the operating system (OS) gives you the total control not available on many systems. As an NLM programmer you must test your program for more possible problems that may occur. A bug in your NLM program may cause the entire server to need to be shut down.
NDS Programming with an NLM
Programming to Novell Directory Service (NDS) with NLMs resembles the actual code that DS.NLM uses. This means that it is the fastest directory programming available. You also get the most information back from an NDS error. There are almost endless application programming interfaces (APIs) that you can use to access many areas inside NetWare. These APIs are used in many areas of programming. One of the API sets accesses NDS.
CodeWarrior
In the past, you needed a Watcom compiler to create NLMs. Making an NLM was very tedious and MAKE files were difficult to use. Since CodeWarrior has become available, learning to build an NLM is easy. CodeWarrior has a Graphical User Interface (GUI) that will help you develop your NLM quickly and require little time to learn.
There is an abundant amount of sample code available on the CodeWarrior for NetWare CD. This sample code is available when you install CodeWarrior for NetWare. DeveloperNet also has a great deal of sample code available for you to download as part of the Novell Developer Kit.
Let's look at NLMs in more detail now.
NLMs Compared to DLLs (Dynamic Link Libraries)
We have discussed what an NLM is in a general sense. We will now look a little deeper into NLM programming. A well-known OS such as Microsoft Windows has both .EXE executables and Dynamic Link Libraries (DLLs) programs. You could think of an NLM as either a .EXE or a .DLL. In Windows programming, you can convert a .DLL to an .EXE program. NLMs can be loaded by hand from the server or by a program. When your NLM is loaded on the system you can communicate with other NLMs. You start a thread process that communicates with the operating system. You can make your NLM accessible to other programs just like a DLL. Many developers write NLMs so that other programs can access their NLM with APIs. These APIs expose the functions for using their product. For example, you could write an NLM to access a new hardware device that your company makes. You can communicate to printers, fax machines, and many other devices. If you have written a DLL you could write an NLM to perform the same function.
Since you can modify the OS, you can configure the NetWare server to meet any of your customer needs. You are limited only by your skill and imagination. While many operating systems block you from access to functions, NetWare is open to you through NLM programming.
Starting NLM Programming
To use an NLM, you need a NetWare server. You will need to create an NLM with CodeWarrior from Metrowerks. Copy the .NLM file on your client to the SYSTEM location on the server. Next, view the NLM files that exist in the SYSTEM directory on the server. You can now load the NLM by typing LOAD and the name of the NLM on the server command line. The NLM should load and begin executing.
Install the Sample Code
First, download the tutorial at http://developer.novell.com/education/tutorials/nlm_nds/index.html. Next, run the executable NLM.EXE, as shown in Figure 1.
Figure 1: Running NLM.EXE.
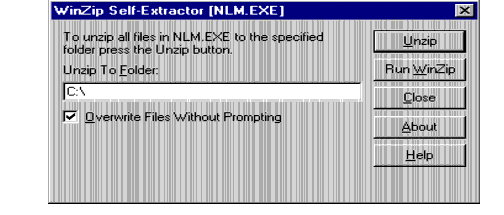
Check to see if the projects were installed into the BIN directory of CodeWarrior. The path is \Program Files\Metrowerks\CodeWarrior\Bin. Four directories should be installed. The projects are Hello, Bookmark, NDS, and ServSock.
Open the project files in CodeWarrior to verify that you were able to access the .MCP files. This is accomplished by clicking on File and then Open.
Search for the ServSock.mcp,the Bookmark.mcp, and the NDS.mcp files. For ServSock.mcp, you should see the CodeWarrior window shown in Figure 2.
Figure 2: Opening ServSock.
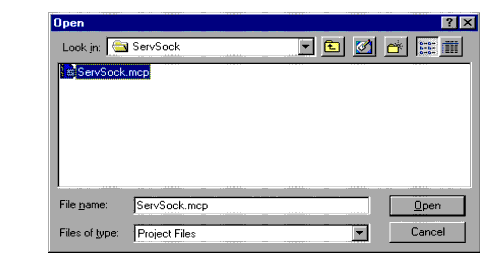
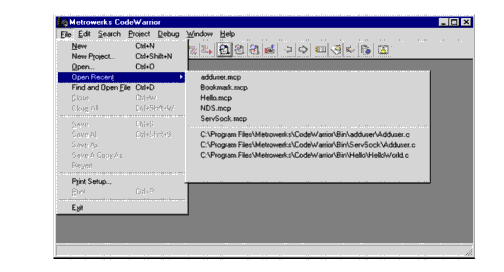
When you have accessed all projects from the install, you should see the CodeWarrior screen shown in Figure 3:
Figure 3: All projects accessed from th intall.
If you cannot find these files, search your client for the ServSock.mcp file. Open each .MCP file using CodeWarrior by searching for the location on the client where you ran NLM.EXE program.
Coding Example 1
You should have a CodeWarrior IDE icon on your desktop after installing CodeWarrior. You should have installed the NetWare CD for CodeWarrior to develop NLMs. NLM.EXE should be installed at this time. Select the CodeWarrior IDE icon to start CodeWarrior. CodeWarrior should be displayed.
To create your first application, select File in CodeWarrior. Next, select New Project.
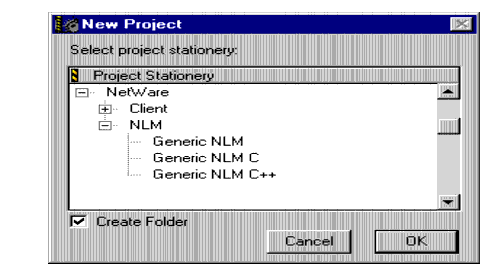
Select the "+" next to NetWare, as shown in Figure 4.
Figure 4: Selecting project stationery.

Select the "+" next to NLM; then select Generic NLM C, as shown in Figure 5.
Figure 5: Selecting Generic NLM C.
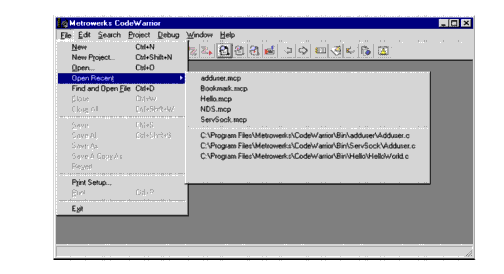
Click OK, type HELLO in the File Name window, and save. CodeWarrior should now generate the Hello.mcp project. Replace the Hello.mcp project if it already exists. You can also bring up the project file using Open Recent in the drop down, as shown in Figure 6.
Figure 6: Using Open Recent to access the project file.
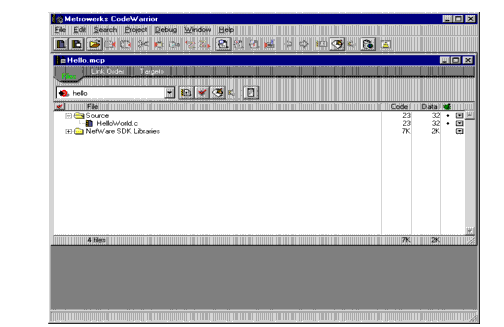
Next, select the "+" next to Source, as shown in Figure 7.
Figure 7: Accessing HelloWorld.c.
Select HelloWorld.c to open the code.You should see the following code:
/*
 * Hello World for CodeWarrior
 * © 1998 Metrowerks Corp.
 *
 * Questions and comments to:
 * <mailto:support@metrowerks.com>
 * <http://www.metrowerks.com>
 */
#include <stdio.h>
int main (void)
{
printf ("Hello World from CodeWarrior!\n\n");
return 0;
}
printf is imported from CLIB.NLM to process the request to the display.
The following should display when Load Hello is executed on the server:
|
Hello World from CodeWarrior |
Build the NLM by pressing the F7 key. You can also select Project and then Make to build the project. Next copy the file Hello.nlm from the hard drive on the client to the \system directory on the NetWare server. You may have to look for the Hello.nlm file to complete the copy.
On the NetWare server, type "Hello" to execute the program.
Note: On a NetWare 4 server type "Load Hello" to execute the program.
You now have created a bug-free NLM. This is a simple example, but you should now understand how to create and load an NLM.
A Simple Debug Decision
The following paragraphs give three ways to debug an NLM. Since this is an introduction to the NLM programming course, only an overview is given. A complete course is needed to cover debugging. The more requests that we get for a subject; the greater the chance that we will be able to allocate resources to develop course material. With that in mind, let us look at three methods available for debugging an NLM.
First, use print statements that output information to the server screen. This way you can tell where the program last completed an area of code.
Second, use RDEBUG, which runs on the client and allows you to set breakpoints.
Third, use NDEBUG, which is useful when you have an abnormal end or abend on the server.
The following URL provides more information about internal NetWare debugging:
http://support.novell.com/techcenter/articles/ana19950604.html#o12bqpk
After receiving an ABEND, you may wish to use the NetWare Debugger. To enter the NetWare Debugger, press and hold the following keys in order on the NetWare server: <Alt< <Left Shift< <Right Shift< <Esc<. Once in the debugger, bring up the help screen by typing "H" <RETURN<.
Coding Example 2
The Internet, as you know, has an almost endless amount of data available. It is much easier to access the Internet than to use a modem between machines. I prefer using Internet communications to ATDT commands on a modem. Let's now look at an example that accesses the Internet in an NLM.
You should have a CodeWarrior IDE icon on your desktop after installing CodeWarrior. You should have installed the NetWare CD for CodeWarrior to develop NLMs. NLM.EXE should be installed. Click on the CodeWarrior IDE icon to start CodeWarrior.
Server Socket Application
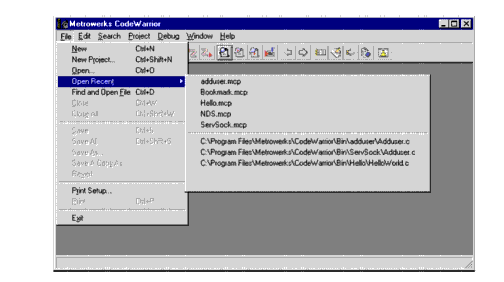
To use your first application, select the Open Recent section; then select the ServSock.mcp, as shown in Figure 8.
Figure 8: Selecting ServSock.mcp.
By selecting ServSock.mcp you should be ready to examine the code in Adduser.c Open Adduser.c again by double clicking on the icon in the IDE project. You should see the following:
/***************************************************************************
Copyright (c) 1998 Novell, Inc. All Rights Reserved.
THIS WORK IS SUBJECT TO U.S. AND INTERNATIONAL COPYRIGHT LAWS AND TREATIES. USE AND REDISTRIBUTION OF THIS WORK IS SUBJECT TO THE LICENSE AGREEMENT ACCOMPANYING THE SOFTWARE DEVELOPMENT KIT (SDK) THAT CONTAINS THIS WORK. PURSUANT TO THE SDK LICENSE AGREEMENT, NOVELL HEREBY GRANTS TO DEVELOPER A ROYALTY-FREE, NON-EXCLUSIVE LICENSE TO INCLUDE NOVELL'S SAMPLE CODE IN ITS PRODUCT. NOVELL GRANTS DEVELOPER WORLDWIDE DISTRIBUTION RIGHTS TO MARKET, DISTRIBUTE, OR SELL NOVELL'S SAMPLE CODE AS A COMPONENT OF DEVELOPER'S PRODUCTS. NOVELL SHALL HAVE NO OBLIGATIONS TO DEVELOPER OR DEVELOPER'S CUSTOMERS WITH RESPECT TO THIS CODE. ****************************************************************************/
/*
* Example server for NetWare TCP/IP Socket API.
*
* This example server accepts a connection on port 2001,
* and calls a function to handle the connection (for purposes
* of simplicity, there is no multithreading, although normally this
* implementation would allow multiple connections via daughter threads)
*
* The function reads data from the socket and echoes it to the server
* console screen and sends it back to the client until the client closes.
* Then it closes the connection
 * and returns. The main function is never
 * ended, so an unload signal function must close the listen socket.
*
*/

#include <stdio.h>
#include <stdlib.h>
#include <errno.h>
#include <sys/types.h>
#include <sys/socket.h>
#include <netinet/in.h>
#include <io.h>
#include <process.h>
#include <signal.h>

// Functions
int read_connection();
void unloadProcedure( int );
void exit_error( const char * );

// Globals
SKT listen_skt = 0,
connect_skt = 0;
int NLM_mainThreadGroupID; /* clib context handle */
struct sockaddr_in server_sockaddr;
struct sockaddr_in client_sockaddr;

main()
{
int rc,
arg;
/* Save off main thread group ID for unload process */
NLM_mainThreadGroupID = GetThreadGroupID();


/* Register the unload process for asynchronous user unload. */
signal( SIGTERM, unloadProcedure );

/* Create a socket */
listen_skt = socket( PF_INET, SOCK_STREAM, 0 );
if ( listen_skt == -1 ) exit_error( "socket" );

server_sockaddr.sin_family = AF_INET;
server_sockaddr.sin_port = htons( 2001 );

/* bind socket to port */
rc = bind( listen_skt, ( struct sockaddr * ) &server_sockaddr,
sizeof( server_sockaddr ) );
if( rc == -1 ) exit_error( "bind" );

/* Start listening for client connections */
rc = listen( listen_skt, 5 );
if( rc == -1 ) exit_error( "listen" );

for ( ;; )
{
printf( "\n\nTCPIP Echo Server Waiting...\n\n" );
arg = sizeof ( client_sockaddr );

/* accept returns the new socket so that we can continue */
/* listening on the original socket */
connect_skt = accept( listen_skt, (struct sockaddr *) &client_sockaddr, &arg );
if( connect_skt == -1 ) exit_error( "accept" );
/* Call function to handle new connection. Ideally a new */
/* thread would be spawned so that multiple processes can */
/* operate simultaneously. For simplicity, this is a */
/* single-process server */
rc = read_connection();
if( rc == 0 )
{
printf( "\nError, server going down" );
exit( 1 );

}
}
}

int read_connection()
{
int rc;
char iochar;

/* Read a char, print it out, write it back */
while( rc = recv( connect_skt, &iochar, sizeof ( iochar ), 0 ) )
{

if ( rc == -1 )
{
exit_error( "recv" );
}
putchar( iochar );

rc = send( connect_skt, &iochar, sizeof( iochar ), 0 );
if ( rc == -1 )
{

perror( "send" );
raise( SIGTERM );
exit( 1 );
}
}
close( connect_skt );
connect_skt = 0;
return( 1 );
}

void unloadProcedure( int i )
{
int handlerThreadGroupID;

/* Store this thread's context and setup clib context */
handlerThreadGroupID = GetThreadGroupID();
SetThreadGroupID( NLM_mainThreadGroupID );

/* Release socket resources */
if ( connect_skt )
{
printf ( "Closing connect socket\n" );
close( connect_skt );
connect_skt = 0;
}
if( listen_skt )
{
printf( "Closing listen socket\n" );
close( listen_skt );
listen_skt = 0;
}

/* Restore Context */
SetThreadGroupID( handlerThreadGroupID );
}

void exit_error( const char * str )
{
perror( str );
raise( SIGTERM );
exit( 1 );
}
Build the NLM by pressing the F7 key (or by selecting Project and then Make). Next, copy the file ServSock.nlm from the hard drive on the client to the \system directory on the NetWare server. You may have to look for the ServSock.nlm file to complete the copy. This information is shown on the server screen when the NLM executes. Finally, save.
Bring up the code Adduser.c. You will notice that AddUser.c is not the code that adds a user to NDS. This code come from the download area on DeveloperNet. I have copied that code over the Adduser.c file to demonstrate that the code will build and run from the example code found on DeveloperNet.
Lets examine the code
#include <sys/socket.h<
#include <netinet/in.h<
These two header files contain the APIs that are needed to access the Internet.
listen_skt = socket( PF_INET, SOCK_STREAM, 0 );
Socket programming requires a program to listen on one port and then communicate on another port. That way the listen port is always available for another connection. You should notice that the socket is in stream mode and not block mode. The program sends one character of information in each packet.
server_sockaddr.sin_port = htons( 2001 );
We are going to access on port 2001. To communicate we need to access on port 2001 on our client. To use a socket we must know the IP address of the server socket and the port number. Much like a telephone, you must have the complete telephone number to communicate with that telephone. There are two points to think about. First, this is an example program, and you should not hard code a port in an NLM. Your NLM should have several numbers that it can use if a given port is unavailable. This requires a little more effort on your part but resolves many issues on a customers server.
Second, you should use port numbers greater then 7000. Lower numbers are available but are often in use by other programs. I like to use numbers like 9797. This avoids others numbers that increment from a hundreds number like 7000,7001, 7002, etc.
rc = bind( listen_skt, ( struct sockaddr * ) &server_sockaddr, sizeof( server_sockaddr ) );
You need to bind the socket and verify that you are able to access that port number. A bind will hold that port number for your program when succesful.
printf( "\n\nTCPIP Echo Server Waiting...\n\n" );
/* accept returns the new socket so that we can continue */
/* listening on the original socket */
connect_skt = accept( listen_skt, (struct sockaddr *)
The program prints the message "TCPIP Echo Server Waiting" and executes the accept command. The server will display this message and the NLM will wait for a client to connect.
This NLM communicates with TCPIP.NLM provided with NetWare 5 and NetWare 4. TCPIP.NLM must be loaded for this program to communicate.
while( rc = recv( connect_skt, &iochar, sizeof ( iochar ), 0 ) )
{
putchar( iochar );
rc = send( connect_skt, &iochar, sizeof( iochar ), 0 );
When we get a valid connection, we will receive a packet of information. Then, print it to the server screen and return the information back to the client. Understand that we are sending many packets with one character at a time. To send blocks of data we need to change the socket command. This is only an example program. It might be useful for a game programmer to use for sending information quickly, but a LanAnalyzer trace would show intense traffic if a large number of users were using this socket type.
Building ServSock.nlm
Select the Target setting icon in the project screen. Next, select NLM Target. You should see the screen shown in Figure 9.
Figure 9: The ServSock.mcp screen.

Name this NLM ServSock.NLM.
Rename the output file to be ServSock.NLM.
Change the initial screen to be TCP/IP Server Socket.
Change the description to be TCP/IP Server Socket Example.
Click on the Save button. Click on the "x" to close the window.
Build the program by pressing the F7 key.
Copy the ServSock.NLM executable to F:\system for the server to use.
On the server command line type "ServSock" to start the program. Use <ALT<<ESC< to change screens on the server to the "TCPIP Echo Server Waiting . . ." message. The client will now use Telnet to attach to the IP address and port number. This socket will transmit and receive information using the TCP/IP protocol.
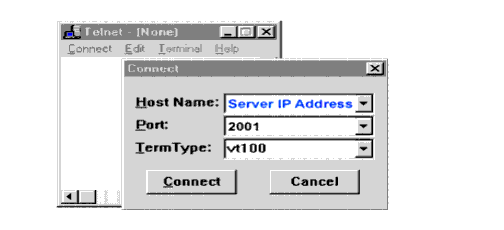
On the client, type "telnet" in a DOS prompt. Get the IP address of the server by typing "config" on the server console. Enter the IP address in the Host Name box in the telnet program. Change Port to 2001 and Term Type as vt100. You should now see what you type in telnet on the server console, as shown in Figure 10.
Figure 10: Telnet input appears on the server console.
Type a few lines in Telnet. You will notice that the server receives the information as programmed. Close Telnet and Unload ServSock.NLM. From these examples you now know that an NLM can communicate to any program on the Internet. All of these different worlds are able to communicate to NDS through an NLM.
Create a Class In NDS
Directories have become popular because of the large amount of information that is needed on individuals and equipment attached to a network. Since NLMs and NDS were developed on the same OS and within Novell, they communicate faster than any other method. So if you need fast access to the directory, you need to write an NLM. Lets look at an NLM example that creates a class in NDS. This is an advanced example. Reading and writing to NDS is also in this code example that you can download.
Start CodeWarrior and open recent project Bookmark.mcp, as shown in Figure 11.
Figure 11: The Bookmark.mcp screen.

Select the Target setting ICON in the project screen. Select NLM Target. You should see the screen shown in Figure 12.
Figure 12: NLM Target settings.
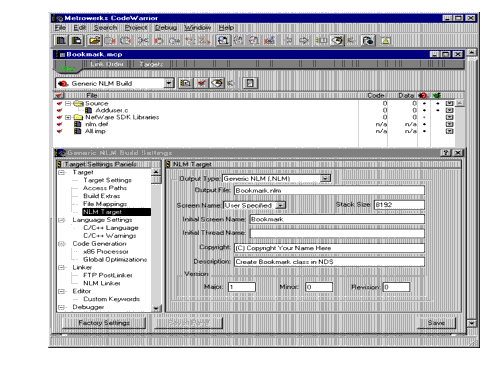
Rename the NLM to BookMark.NLM in the target setting in CodeWarrior.
Close the Generic NLM Build Setting window.
Build BookMark.NLM with the F7 key in CodeWarrior.
Copy Bookmark.nlm to the servers \system directory.
I will not explain this code in detail. You will only run the code in this example. I will walk through the code in the NDS.NLM example. I want you to focus on what is happening in NDS.
void CreateClass(NWDSContextHandle con) {
We need to have the context that we are going to create the class in.
cCode = NWDSBeginClassItem(con, classBuf))
Use the NWDSBeginClassItem API to create an area for building the user class.
cCode = NWDSPutClassItem(con, classBuf, "Top") cCode = NWDSPutClassItem(con, classBuf, "Organization") cCode = NWDSPutClassItem(con, classBuf, "CN")
Then add Common Name to the class. The class will be of type Organization from Top. Top and Organization are NDS types. We will use ConsoleOne to view this data upon completion.
printf("Bookmark Class added.\n");
The print statement shows that you have completed the bookmark class creation. Get the context name for the server by typing the following command on the server:
config
Type the following on the server:
Load Bookmark
Login using .admin.organization. For example, your server may have a context of Novell. You would type the following and press return:
.admin.novell
Use the password for admin. The password is specific for your server.
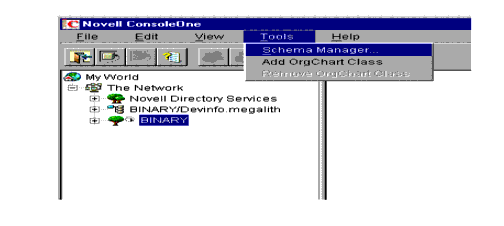
ConsoleOne exists on the server. ConsoleOne should have already been installed on the client from the NDK. Using ConsoleOne we verify that the bookmark class has been created. Select Schema Manager from ConsoleOne, as shown in Figure 13.
Figure 13: Selecting Schema Manager from ConsoleOne.
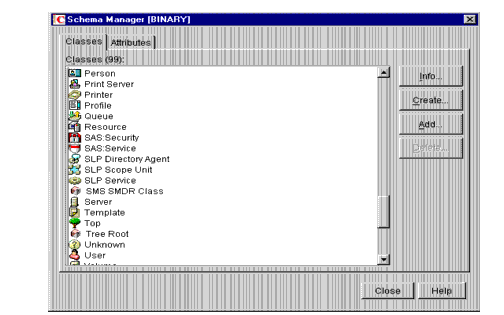
Look for Test:Bookmark in Schema Manager, as shown in Figure 14.
Figure 14: The Schema Manager screen.
Now, you should be ready to code an NDS NLM, which is discussed in Part 2 of this series.
* Originally published in Novell AppNotes
Disclaimer
The origin of this information may be internal or external to Novell. While Novell makes all reasonable efforts to verify this information, Novell does not make explicit or implied claims to its validity.