Novell ScriptPages (NSP): Uncovered
Articles and Tips: article
Senior Software Engineer
Novell Platform Group
Novonyx Engineering
01 Feb 2000
Peeks under the hood of NSP, covers some of its internal workings, and shows you some tricks for developing and debugging your own Web applications. Includes sample code.
- Introduction
- Novell ScriptPages (NSP)
- Embedding Script Code into HTML
- The NSP Parser
- The NSP Objects
- NSP in Action
- NSP and Security
- Conclusion
Introduction
Several months ago, I wrote an article titled "Building Web Database Applications Using Novell Script for NetWare " (Developer Notes, Aug 99). This article introduced three Novell technologies"Novell Script for NetWare (NSN), Novell ScriptPages (NSP), and NetWare Data Object (NDO)"and explained how they can be used to create a Web-based database application.
These technologies are now being shipped with NetWare 5.1 and will run right out of the box. I've titled this article "Novell ScriptPages: Uncovered" because it is more technical and goes into more depth on just one of these technologies, Novell ScriptPages. This article peeks under the hood of NSP, covers some of its internal workings, and shows you some tricks you can use while developing and debugging your own Web applications.
Novell ScriptPages (NSP)
NSP lets you create powerful Web applications by embedding script code directly into your Web page's HTML code. Standard HTML in a Web page displays static content. In other words, using HTML tags, you can create a page that contains typical elements such as text, graphics, buttons, and entry fields. This is sufficient as long as you never intend for your page's contents to become outdated or obsolete. Unfortunately, such is rarely the case in today's Internet environment where information is continually updated and modified. The data contained in a Web page needs to reflect such changes.
The Web server that is serving up the Web page is also capable of providing much more than just streaming bits down a wire. Services such as databases, directories, and other server-side components can be accessed and utilized to bring dynamic content to a Web page. The script code that is embedded into the HTML is executed on the server before the page is sent to the browser. This means that the entire power of the Web server is at your disposal. You can take full advantage of the gigabytes of information stored on the server's file system. Programs and services can also be accessed to service a request from the browser. The code remains secure because the script code is run on the server and only the output is sent to the browser.
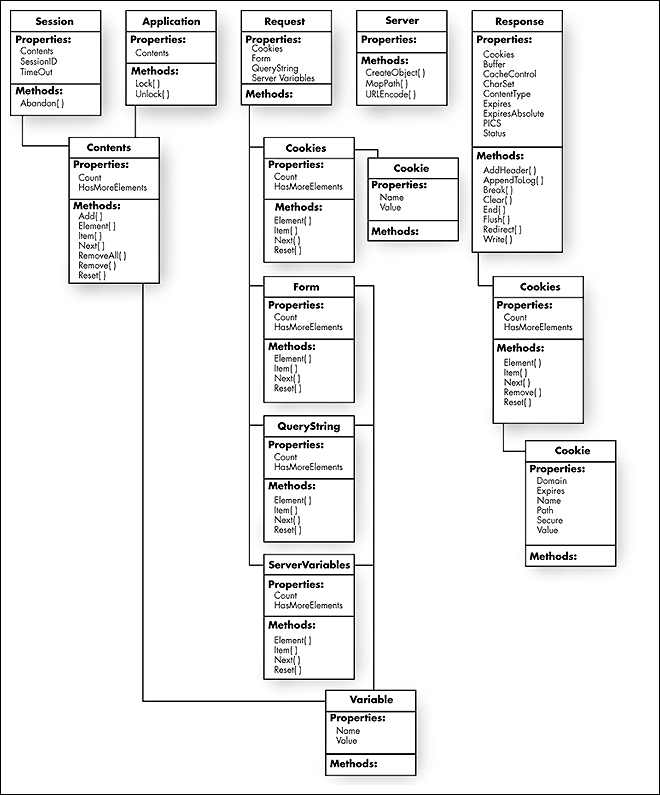
But where NSP is concerned, embedding script code into HTML is only half the story. NSP also provides you with five objects that let you take advantage of Web server services from within a script.
|
Object
|
Description
|
|
Application |
Stores shared information that can be consumed by all users of a given application. |
|
Request |
Retrieves the values that the browser passed to the server during an HTTP request. |
|
Response |
Sends output to the browser. |
|
Server |
Allows access to the Web server services and attributes. |
|
Session |
Stores information about a particular user-session. |
Using these objects, the Web developer can:
Store and retrieve information about the Web application
Store and retrieve information about a specific user session
Retrieve data sent by the browser to the Web server
Access server variables generated by the Web server
Send data back to the browser
Redirect the browser to a different location
Access information about the Web server
Access information about the browser
Control caching and page expiration
Send, receive, and manage cookies
Embedding Script Code into HTML
You can develop NSP pages using any standard HTML authoring tool. The NSP page development for this article was done using Microsoft FrontPage 98. Authoring tools allow you to quickly and easily build the static content of a page, then insert the script tags that contain your script code.
NSP supports two methods for embedding script code into your HTML code: <SCRIPT> tags and <%> tags. The first method is through the standard <SCRIPT>...</SCRIPT> tags. The following example shows embedded script code using these tags.
<script language="NScript">

response.write "Hello World"

</script>
The language in this example is set to NScript which indicates to NSP that the script code that follows is written using Novell Script for NetWare (NSN). Because NSN is VBScript compatible (see "Building Web Database Applications Using Novell Script for NetWare," Developer Notes Aug 99), the language parameter could have been set to VBScript rather than NScript. NSP interprets both of these language indicators identically. NSP also understands JavaScript and Perl and interprets them appropriately.
There is one caveat when specifying a language. NSP does not let you mix server-side languages within a page. For example, when NSP parses a page looking for script code, it decides how that page will treat the code based on the first language specifier it finds. If the first specifier is NScript or VBScript, NSP will treat any other server-side script code as NSN code. So if all of the script code is being treated the same way, why specify a language at all? Because NSP will let you mix languages between server-side script and client-side script. In addition to the server-side NSN code embedded in your page, you can also have some client-side JavaScript. When NSP encounters client-side script code, it treats it as if it were HTML and sends it to the browser "as-is" rather than executing it at the server. Therefore, your page might contain several "SCRIPT"..."/SCRIPT" tags. So while some of your script code might be server-side NSN code, some of it might also be client-side JavaScript and client-side VBScript.
NSP also understands the RUNAT=<Server/Client< parameter. This is how you tell NSP where the script code should be run. Because NSN and Perl code can only be run on the server, there is no need to use the RUNAT parameter when the specified language is NScript or Perl. But if the language parameter is set to VBScript or JavaScript, NSP will assume that the code should be sent to the browser <as-is< unless the RUNAT parameter is set to <Server<.
The second method for embedding script code into HTML is by surrounding the code with the <%...%< tags. These tags also tell the NSP parser that everything between them should be treated as script rather than HTML. Unlike the <SCRIPT< tag, the <%< tag assumes that the script code is server-side and of the default NScript language type or the language specified by the Language= parameter. These tags effectively evaluate expressions and send the results to the browser. This example shows embedded script code using these tags.
<head> <title>Report List for <%=FirstName & " " & LastName%> - Novell Expense Reporter</title> </head>
In this example, the contents of the variables FirstName and LastName are concatenated together and sent to the browser to be displayed in the title bar. You can also use the <%< tag to perform a quick calculation and send the result back to the browser or store it in a server variable to be used later. One thing to remember when using the <%< tag to embed script code is the <=< symbol. Note the <=< symbol immediately following the first <% tag in the above example.
The "=" symbol tells NSP that the data value produced by evaluating and executing the code should be sent as output to the browser. In this example, the data value that was produced by executing the code was the contents of the two variables FirstName and LastName concatenated together. If the "% tag is used without the "=" symbol, NSP assumes that the evaluation of the code as a whole does not produce a value that should be returned to the browser. This does not mean that the code between the tags doesn't output data to the browser. The script code can still contain Response.Write() method calls to output data. It only means that the code as a whole does not produce an output value.
You can also specify a language using the <%> tag by placing the statement <%@ LANGUAGE = "<Language Type>" %> at the beginning of your NSP page. When NSP encounters this statement, it assumes that all server-side script code will be of that language type.
The NSP Parser
Each NSP page must be parsed and formatted before it can be sent to the appropriate script interpreter for evaluation. This is the job of the ScriptPages parser. While there are several ways to invoke the parser on an NSP page, the easiest is to add the .ASP extension to the NSP file itself. When a request is made from a browser to view a page that has an .ASP extension, the Web server passes this request off to the NSP parser. An .NSP extension on the file works just like an .ASP extension.
Another way to invoke the parser is to use the /sp prefix as part of the URL. When the Web server encounters this prefix, it assumes that the virtual path that follows should be processed by the NSP parser. The following three URLs would cause the requested page to be processed by the NSP parser:
http://<server-name>/myNSPPage/index.asp
http://<server-name>/myNSPPage/index.nsp
http://<server-name>/sp/myNSPPage/index.htm
As an NSP page is parsed, one of the things that the parser looks for is the language type. Once a language type has been determined, NSP knows what to do with any server-side script code it encounters. The key symbol statements that the parser looks for are:
<SCRIPT LANGUAGE="Language-Type" RUNAT="Server/Client" > ...</SCRIPT>
<%=...%>
<%@LANGUAGE="Language-Type" %>
<!--#INCLUDE FILE="File-Path" VIRTUAL="Virtual-Path"-->
So far, we have discussed all of these key symbol statements except for <!--#INCLUDE -->. This statement allows you to specify another file whose contents should be inserted into the page and parsed along with the current file. For example, assume you have a standard header or footer that should be included in all NSP pages. Rather than replicating the header or footer code in each page, simply define it once in its own file and include that file into each NSP page. This is also true for script code.
Suppose you have a code snippet or function that should be included or reused in each of your NSP pages. This code snippet could be placed in a separate file and included in each NSP page by using the <!--#INCLUDE statement. One of two parameters can be used to specify the file that should be included. If the #INCLUDE statement contains a FILE="File-Path" parameter, the "File-Path" is a physical path on the file system to the file that should be included. If the statement contains the VIRTUAL="Virtual-Path", the "Virtual-Path" contains a path to a virtual directory and file.
Simply put, the output of the parser is a script. The parser takes an NSP page and reformats it into a script of the appropriate language type. The output script is written to a temporary file and the corresponding script interpreter is invoked to run the script. All of the output that is sent to the browser is a result of the code that is executed by the script interpreter. Once the interpreter has executed the script, the temporary file is removed.
During development and debugging, however, it might be handy to see exactly what the ScriptPages parser has produced. There are two ways to view the results of the parser. The first is to insert a debug statement as the first line of the NSP page. For example, placing the statement <%Debug.On%> as the first statement in your NSP page causes the NSN interpreter to invoke the built-in debugger (see "Building Web Database Applications Using Novell Script for NetWare" Developer Notes, Aug 99).
Because the NSN interpreter invokes the debugger, the script code viewed by the debugger is actually the code produced by the ScriptPages parser. At this point, you can scroll through the code, view the contents of the variables, or step through it line by line to find a problem. One benefit is that the evaluation and execution process has effectively been stopped. Therefore the temporary file produced by the ScriptPages parser has not yet been removed. You can view this file or copy it from the SYS:\NSN\WEB\NSP directory on the server.
Obviously, this only applies to NSP pages that use NSN as the server-side scripting language. But there is another way. The ScriptPages parser also looks for the keyword "REMOVE_TMP_FILE" in the CGI environment. If this keyword has been defined, it bypasses deleting the temporary file, thus allowing you to view it after the NSP page has been processed. The easiest way to define this keyword in the CGI environment is through the Web server's OBJ.CONF configuration file. This file can be found in the SYS:\NOVONYX\SUITESPOT\HTTPS-"server-name"\config directory. It is a text file that can be edited using any text editor. This file contains an initialization statement that looks similar to the following:
Init fn="lcgi_map_init" PERL_ROOT="<root-dir>" CONFIG_DIR="<config-dir>"
By adding REMOVE_TMP_FILE = "NO" to the end of this line, then restarting the Web server, the keyword will automatically be added to the CGI environment. One word of caution, do not modify the OBJ.CONF file on a production server. This debugging method is only recommended for non-production development Web servers.
The ScriptPages parser does something else as it parses the page. Any posted form data or query string data that was passed back to the server from the browser by means of values in an HTML form or name-value pairs added to the URL line are automatically added to the temporary script as global variables. For example, assume you have an HTML page which includes a data entry form and the action assigned to the submit button is to call an NSP page. All of the data entered into this form will appear in the temporary script as global variables.
To see the definition of these global variables, place the <%Debug.On%> statement as the first statement in your NSP page as described above. Once the NSN built-in debugger has been invoked, scroll the contents of the debugger window back to the top of the file. The first lines of the file will contain the definitions of the global variables with their assigned values. This makes it easy to access data values passed back from the browser.
The NSP Objects
Session Object
The purpose of the Session object is to store information for a particular user-session. Name-value pairs stored in the Session object are not discarded when the Web request is finished or when the script terminates. Instead these name-value pairs persist for as long as the user-session remains alive. NSP automatically creates a Session object and the persistent storage for the name-value pairs when a user requests an NSP page of an application for the first time. A session ID is assigned to the session and passed back to the browser in a cookie.
Figure 1: The NSP objects.
The server destroys and cleans up the session persistent storage when the session expires, terminates, or is abandoned. One common use for the Session object is to store user preferences. For example, if a user indicates that they prefer not to view graphics, you could store that information in the Session object. Then, as the browser makes each subsequent NSP page request, the server can check the user's preferences stored in the Session object and only send the type of information that the user requested.
Properties
|
Contents |
This collection contains all the items that have been added to the session through a script command. A script can use this collection to obtain a list of name-value pairs that have been given session scope, or to specify a particular name-value pair to be the target of an operation. See the Contents collection object below. Return Value: Reference to a Contents object. |
|
Session ID |
Returns the session identifier. Each session has a unique identifier that is generated by NSP when the session is created. Value Type: Returns a Long value. |
|
TimeOut |
Specifies the timeout period assigned to the Session object, in minutes. If the user does not refresh or request a page within the timeout period, the session is terminated. Value Type: Sets or returns an Integer that specifies the timeout in minutes. |
Methods
|
Abandon |
Destroys all the variables stored in a Session object and releases their resources. If the Abandon method is not called explicitly, NSP destroys these variables when the session times out. Return Value: None. |
Adding, removing or accessing a name-value pair stored in the Contents collection of the Session object, can be done through default properties. In other words, the script does not have to explicitly reference the Contents collection to manipulate the name-value pairs. For example, the following code snippets are equivalent:
Session.Contents.Add("MyValue", "My dog is blue")"
Response.Write(Session.Contents.Item("MyValue").Value)"
Or
Session("MyValue") = "My dog is blue""
Response.Write (Session("MyValue")"
In the second snippet above, the code does not explicitly reference the Contents collection or any of its methods or properties. When a value is assigned to a new element of the Session object, it automatically calls the Add() method to add the new name-value pair to the collection. When an existing element of the Session object is referenced, it automatically calls the Value property of the element within the Contents collection. This is done to not only save the programmer from writing more code, but to allow NSP to optimize these calls internally. If NSP can make a few assumptions about the object that is being referenced, it can save the script interpreter from having to evaluate multiple method calls or property accesses and therefore save time.
Application Object
The main purpose of the Application object is to allow a Web application to share information among all users of the given application. An NSP-based application is defined as all the NSP files in a virtual directory and its subdirectories. Because more than one user can access the contents of the Application object, there are Lock() and Unlock() methods to ensure that multiple scripts do not try to alter a property simultaneously. For example, the Application object might be used to store the connection string used to connect to a database for the Web application. No matter who the user is that is requesting an NSP page, the connection string used to connect to a database remains the same.
Properties
|
Contents |
This collection contains all the items that have been added to the application through a script command. A script can use this collection to obtain a list of name-value pairs that have been given application scope, or to specify a particular name-value pair to be the target of an operation. See the Contents collection object below. Return Value: Reference to a Contents object. |
Methods
|
Lock() |
This method blocks other clients from modifying the variables stored in the Application object, ensuring that only one client at a time can alter or access the Application name-value pairs. If you do not call the Unlock method explicitly, the server unlocks the locked Application object when the NSP file ends or times out. Return Value: None. |
|
Unlock() |
This method enables other clients to modify the variables stored in the Application object after it has been locked using the Lock method. If you do not call this method explicitly, the Web server unlocks the Application object when the NSP file ends or times out. Return Value: None. |
When accessing or manipulating the name-value pairs contained in the Contents collection of the Application object, the same default property assumptions as was explained above for the Session object, are made in the Application object. Because the Application object has a global scope, it implements Lock() and Unlock() methods to make sure that multiple scripts do not try to manipulate the name-value pairs simultaneously. Of course, it falls to the Web script developer to ensure that the Lock() and Unlock() methods are called at the appropriate times.
Request Object
The purpose of the Request object is to retrieve data that was passed to the server from the browser during the HTTP request. It provides an easy and convenient way for the script to access posted form data or query string data. When the browser requests a page and data is sent along with that request, the data is passed to the script as a CGI environment variable. To avoid requiring the script developer from having to parse the CGI variable for each name-value pair, NSP handles the parsing automatically. NSP also handles decoding any encoded characters before the data is added to the appropriate collection.
The Request object is primarily made up of properties and does not support any methods calls. These properties return a reference to a collection of name-value pairs that correspond to the method in which the data was passed from the browser. For example, all of the cookie values that are returned by the browser are stored and can be accessed through the cookies collection. All of the data collected through form input on the browser is stored and accessed through the Form collection etc. Each collection represents a set of name-value pairs returned in the browser request.
Properties
|
Cookies |
Collection that contains the values of the cookies sent in an HTTP request. Value Type: Returns a Cookies Object. |
|
Form |
Collection that contains the values of the form elements posted to the HTTP request body by a form using the POST method. Value Type: Returns a Form Object. |
|
QueryString |
Collection that contains the values of the variables in the HTTP query string. The HTTP query string is specified by the values following the question mark (?) on the URL line. Value Type: Returns a QueryString Object. |
|
ServerVariables |
Collection that contains the values of predetermined CGI environment variables. Value Type: Returns a ServerVariables Object. |
Name-value pairs stored in these collections can be retrieved in one of two ways. Values can be retrieved by either explicitly specifying the name and collection or by simply requesting the value that corresponds to a name. For example, suppose that part of the data returned from the browser included posted form data. One of the fields on the form is named FIRSTNAME. This value can be retrieved from the Request object through the following statement:
MyValue = Request.Form("FIRSTNAME")
Or
MyValue = Request.Form.Item("FIRSTNAME").Value
This tells the Request object to search only the Form collection for the value that corresponds to the name "FIRSTNAME". The same result could be achieved by this statement:
MyValue = Request("FIRSTNAME")
This statement will also return the value that corresponds to the name "FIRSTNAME". But that value may not be returned from the Form collection. If the collection is not specified, the Request object will search each collection until it finds the first occurrence of the name. The order it searches the collections is QueryString, Form, Cookies and ServerVariables. In this example, if a value for "FIRSTNAME" were also passed through the URL line as query string data, that value would be returned rather than the value posted from the form.
Response Object
The purpose of the Response object is to send data back to the browser. This object allows you to specify not only the content of the page that is being returned, but also attributes that specify how the page will be handled by the browser as well as proxy servers. You have the ability to modify the header, send cookies, or insert a string into the Web server's log.
Properties
|
Cookies |
The Cookies collection sets the value of a cookie. If the specified cookie does not exist, it is created. If the cookie exists, it takes the new value and the old value is discarded. Value Type: Returns a Cookies Object. |
|
Buffer |
The Buffer property indicates whether to buffer page output. When page output is buffered, the server does not send a response to the client until all of the server scripts on the current page have been processed, or until the Flush or End method has been called. The Buffer property cannot be set after the server has sent output to the client. For this reason, the call to Response.Buffer should be the first line of the NSP file. Value Type: Returns a Boolean which specifies whether or not to buffer page output. It can be one of the following values. FALSE: No buffering. The server sends output to the client as it is processed. This is the default TRUE: The server does not send output to the client until all of the NSP scripts on the current page have been processed, or until the Flush or End method has been called. |
|
CacheControl |
The CacheControl property overrides the Private default value. When you set this property to Public, proxy servers can cache the output generated by NSP. Value Type: Sets or returns a String that specifies the cache control header to be either Public or Private. Private: Only private caches may cache this page. This is the default value. Most proxy servers will not cache pages with this setting. Public: Public caches, such as proxy servers, will cache pages with this setting. |
|
Charset |
The Charset property appends the name of the character set (for example, ISO-LATIN-7) to the content-type header in the response object. Value Type: Sets a string that specifies a character set for the page. The character set name will be appended to the content-type header in the Response object. |
|
ContentType |
The ContentType property specifies the HTTP content type for the response. If no ContentType is specified, the default is text/HTML Value Type: Sets a string describing the content type. This string is usually formatted type/subtype where type is the general content category and subtype is the specific content type. For a full list of supported content types, see your Web browser documentation or the current HTTP specification. |
|
Expires |
The Expires property specifies the length of time before a page cached on a browser expires. If the user returns to the same page before it expires, the cached version is displayed. Value Type: Sets the time in minutes before the page expires. |
|
ExpiresAbsolute |
The ExpiresAbsolute property specifies the date and time at which a page cached on a browser expires. If the user returns to the same page before that date and time, the cached version is displayed. If a time is not specified, the page expires at midnight of that day. If a date is not specified, the page expires at the given time on the day that the script is run. Value Type: Specifies the date and time on which the page will expire. The value sent in the expires header conforms to the RFC-1123 date format. The time value is converted to GMT before an Expires header is sent. |
|
PICS |
The PICS property adds a value to the pics-label field of the response header. Value Type: Sets a string that is a properly formatted PICS label. The value specified by PICSLabel will be appended to the PICS label field in the response header. |
|
Status |
The Status property specifies the value of the status line returned by the server. Status values are defined in the HTTP specification. Value Type: Sets a string that consists of both a three-digit number that indicates a status code and a brief explanation of that code. For example, 310 Move Permanently. |
Methods
|
AddHeader(Name, Value) |
The AddHeader method adds an HTML header with a specified value. This method always adds a new HTTP header to the response. It will not replace an existing header of the same name. Once a header has been added, it cannot be removed. Name: A String that corresponds the name of the new header variable. Value: A String that corresponds to the initial value stored in the new header variable. Return Value: None. |
|
AppendToLog(String) |
The AppendToLog method adds a string to the end of the Web server log entry for this request. You can call it multiple times in one section of script. Each time the method is called it appends the specified string to the existing entry. String: A String that corresponds the text to append to the log file. Return Value: Return Value. |
|
Clear() |
The Clear method erases any buffered HTML output. However, the Clear method only erases the response body; it does not erase response headers. Note that this method will have no affect if Response.Buffer has not been set to TRUE. Return Value: None. |
|
End() |
The End method causes the Web server to stop processing the script and return the current result. The remaining contents of the file are not processed. Return Value: None. |
|
Flush() |
The Flush method sends buffered output immediately. This method will have no affect if Response.Buffer has not been set to TRUE. Return Value: None. |
|
Redirect(URL) |
The Redirect method causes the browser to attempt to connect to a different URL. URL: A String that corresponds to the Uniform Resource Locator that the browser is redirected to. Return Value: None. |
|
Write(Value) |
The Write method writes a specified string to the current HTTP output. Value: A String that corresponds to the output to be sent to the client. Return Value: None. |
When sending data back to the browser, there are a few things to remember about header information. Because the header must be sent before any HTML content, some of the Request object's methods and properties only work at certain times during the processing of a script. For example, a script cannot expect to send output back to the browser using the Write() method and then try to add a cookie value to the cookies collection. All cookie information must be passed to the browser as part of the header data. As soon as the Write() method is called for the first time, the Response object formats, packages and sends all of the header information that it is currently holding. Any data added to the cookies collection after this point, will be ignored.
The properties and methods that are only valid before any output is sent to the browser includes: Cookies, CacheControl, CharSet, ContentType, Expires, ExpiresAbsolute, PICS, Status and AddHeader(). But there is one exception. By default, page buffering is turned off. This means that as data is output from the script, it is immediately sent to the browser.
By setting page buffering to TRUE, all output will be held by the Response object and not sent until the Flush() or End() methods are called or when the script terminates. Because the output is held by the Response object in a buffer, header information can be added or modified at any time before the first Flush() or End() method is called. Setting buffering to TRUE must be the first statement made in your script. After output has been sent to the browser, the Response object will ignore any changes to the Buffer property and immediately flush all output to the browser.
Server Object
The purpose of the Server object is to provide access to methods and properties on the server. Most of these methods and properties serve as utility functions.
Methods
|
CreateObject(ProgID) |
This method creates an instance of a server component. Server components can also be created by calling the CreatObject() function directly. This method is only provided for compatibility. ProgID: A String that represents the server components to be created. Return Value: Object reference of the new component. |
|
MapPath(Path) |
This method maps the specified relative or virtual path to the corresponding physical directory on the server. This method does not check to make sure that the path returned is valid or even exists on the server. Path: Specifies the relative or virtual path to map to a physical directory. If Path starts with either a forward (/) or backward slash (\), the MapPath method returns a path as if Path is a full virtual path. If Path doesn't start with a slash, the MapPath method returns a path relative to the directory of the file being processed. Return Value: String value that contains the physical path. |
|
URLEncode(String) |
This method applies URL encoding rules, including escape characters, to a specified string. Return Value: String value that contains the encoded string. |
Standard Collection Objects
The purpose of a collection object is to hold a collection of similar objects. Specifying the name or index of the item within the collection can retrieve each object held in the collection. This section describes the common methods found in the collection objects that can be derived from the above objects. Not all of the properties and methods that are included have been implemented in every collection. Refer to the object model diagram above for a list of properties and methods that correspond to each collection object.
Properties
|
Count |
Returns the total number of objects in the collection. Value Type: Returns a Long value. |
|
HasMoreElements |
Indicate whether the current object pointer has reached the end of the collection. Value Type: Returns a Boolean value. |
Methods
|
Add() |
Adds a new name-value pair to the collection. Return Value: Returns an object of the collection type. |
|
Element(Key) |
Retrieves the object that corresponds to the Key. Key can be either the name of the object or an index. Key: A String that corresponds to the name of an object or an Integer value representing the index with in the collection. Return Value: Returns an Object. |
|
Item(Key) |
Retrieves the object that corresponds to the Key. Key can be either the name of the object or an index. Key: A String that corresponds to the name of an object or an Integer value representing the index with in the collection. Return Value: Returns an Object. |
|
Next() |
Retrieves the next object in the collection. Return Value: Returns an Object. |
|
Remove(Key) |
Removes the object that corresponds to the Key from the cookies collection. Key can be either the name of an object or an index with in the collection. Key: A String that corresponds to the name of an object or an Integer value representing the index with in the collection. Return Value: None. |
|
RemoveAll() |
Deletes all objects in the collection. Return Value: None. |
|
Reset() |
Resets the current object pointer to the beginning of the collection so that the next call to Next() retrieves the first object in the collection. Return Value: None. |
Not all of the properties or methods described in this section are implemented in all of the collections used in NSP. Refer to the object diagram for each collection to determine which properties and methods apply.
Cookie Object
The purpose of the cookie object is to hold the cookie values either retrieved from or being sent to the browser. The object diagram above shows two types of cookie objects. The difference between them is the number of properties that they support. The cookie object that is returned from the Request object is a read-only object. A script can only read the cookie values that are returned by the browser. These values cannot be changed. But cookie objects in the Response object are created by the script and passed back to the browser.
Before the header information is sent to the browser, cookie name-value pairs can be added, modified, or removed from the Response object's cookies collection. Other attributes can also be set for these cookies so the browser knows what to do with the cookie once it is received.
Properties
|
Domain Response object only. |
If specified, the cookie is sent only to requests to this domain. Value Type: Sets or returns a String value. |
|
Expires Response object only. |
The date on which the cookie expires. Value Type: Sets or returns a Date value. |
|
Name |
The name of the cookie object Value Type: Sets or returns a String value. |
|
Path Response object only. |
If specified, the cookie is sent only to requests to this path. If this attribute is not set, the application path is used. Value Type: Sets or returns a String value. |
|
Secure Response object only. |
Specifies whether the cookie is secure. Value Type: Sets or returns a Boolean. |
|
Value |
Value of the cookie object. Value Type: Set or returns a String. |
All cookies sent to the browser through the Response object must be added to the cookies collection before the first output statement is sent. The page header must be the first bit of information sent to the browser. Because cookies are part of the header information, all cookies must be defined and added to the cookies collection before the header is sent to the browser. There is one exception. By default, the page buffering property of the Response object is set to FALSE.
This means that as the script writes out data, that data is immediately sent to the browser. If the page buffering property is set to TRUE (which must be the first statement in a script) NSP holds all of the output in a buffer until the Flush() or End() methods are called. Before that point, the header information including name-value pairs contained in the cookies collection can be added to, modified, or removed.
Variable Object
The Variable object is a simple data object that holds a single name-value pair. Generally, it is not referenced directly by a script. The collection objects typically use the Variable object to encapsulate the name-value pairs internally.
NSP in Action
NetWare 5.1 ships with Novell ScriptPages ready to run. Several sample NSP pages are included under the directory SYS:\NOVONYX\SUITESPOT\DOCS\SAMPLES\NSP and can be run from any browser given the following URLs:
HTTP://<your-Web-server>/samples/nsp/helloworld/helloworld.asp
HTTP://<your-Web-server>/samples/nsp/form/form.asp
HTTP://<your-Web-server>/samples/nsp/randomad/randomad.asp
Some of these samples might look familiar. They are standard samples taken from other platforms to show ASP functionality. All of these samples are implemented using Novell Script for NetWare (NSN) as the scripting language. The same results could be achieved using JavaScript or Perl. These are simple examples and are meant to show the basic functionality of NSP. For a more full-featured example that shows how to use Novell ScriptPages (NSP) and the NetWare Data Object (NDO) to build a Web-based expense reporting tool, see "Building Web Database Applications Using Novell Script for NetWare " Developer Notes, Aug 99. Let's look into these samples and see how NSP is used to produce dynamic Web pages.
To begin, let's look at the classic HelloWorld page. HelloWorld is probably one of the most implemented programs in the world. It has probably been implemented in every programming language on every existing platform.
This sample is very simple. It takes a string, "Hello World", and outputs it seven times to the browser. Each time the string is sent to the browser, the font is increased by one point size.
Figure 2: Using NSP to produce dynamic Web pages.
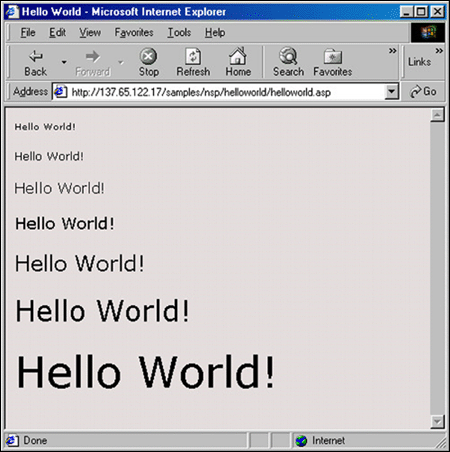
The script code begins by specifying the default language. In this case, the language is VBScript which is equivalent to NScript or NSN. On the second line, we define how to handle errors. "On Error Resume Next" states that if any errors occur while processing this script, return the error information as properties of the ERR object and continue processing the next line.
This way the code can handle errors on its own rather than causing the script interpreter to terminate the script. The next five lines are standard HTML tags that start the page output and define the title for the title bar. The next line begins a For...Next statement. Inside the For...Next statement is a series of HTML tags that are repeated seven times. These HTML tags define the background color, font size and type and the actual text that is sent to the browser. The Final four lines terminate the For...Next statement and close the HTML page.
HelloWorld.asp
<%@ LANGUAGE = "VBScript" %>
<% on error resume next %>

<html>

<head>
<title>Hello World</title>
<meta name="GENERATOR" content="Microsoft FrontPage 4.0">
</head>

<% For i = 1 To 7%>

<body bgcolor="eadfdf">
<font SIZE="<% = i %>">

<font face="verdana, arial, helvetica">

<p>Hello World!<br>
</font><% Next %> </p>
</font>
</body>
</html>
That's all there is to it! 16 lines of HTML and script code allow you to produce a page that looks like a much longer program when it finally reaches the browser. By changing the number of iterations in the For...Next loop, the font type or the output text, you completely change the way that this page looks without adding a single line of code.
Our next sample shows how to extract the posted form data from the Request object so it can be used to create a new page. This is actually a single NSP file that is capable of producing two Web pages. The first page contains a simple HTML form that prompts the user for information about movies. When the user clicks the submit button, the data is posted back to the same .ASP file but this time instead of showing the form, it shows the results of the submit.
Figure 3: Creating a new page by extracting the posted form data from the Request Object.
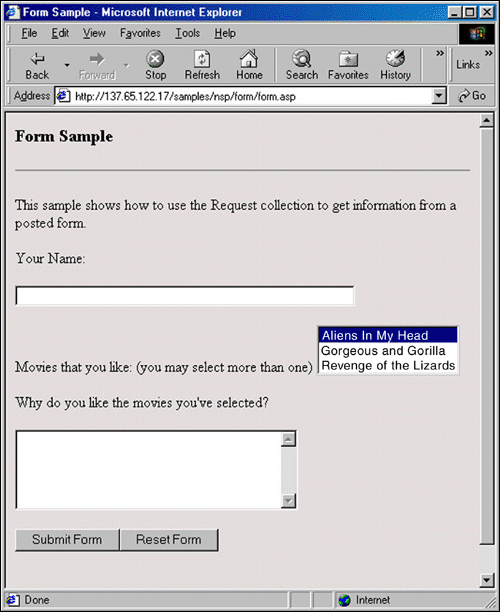
Form.asp
<html>
<head><title>Form Sample</title></head>
<body BGCOLOR="#eadfdf">
<h3>Form Sample</h3>
<hr>

<%
On Error Resume Next

If Request.Form("hname") = "" Then

    ' This part of the script allows a person
    ' to enter data on an HTML form.
%>


        <p>This sample shows how to use the Request collection
        to get information from a posted form.
        <form METHOD="POST" ACTION="form.asp">

        <p>Your Name:

        <p><input TYPE="TEXT" SIZE="50" MAXLENGTH="50" NAME="name"><br>

        <p>Movies that you like: (you may select more than one)
        <select NAME="movies" MULTIPLE SIZE="3">
        <option SELECTED> The Lion King
        <option> Beauty and the Beast
        <option> 101 Dalmations
        </select>

        <input TYPE="HIDDEN" NAME="hname" VALUE="hvalue"><br>

        <p>Why do you like the movies you've selected?

        <p><textarea NAME="describe" ROWS="5" COLS="35"></textarea><br>

        <p><input TYPE="SUBMIT" VALUE="Submit Form"><input TYPE="RESET" VALUE="Reset Form">
        </form>


<%  Else

    ' This part of the script shows a person
    ' what was selected.
%>


        <%  If Request.Form("name") = "" Then %>
    <p>You did not provide your name.
        <%  Else %>
            <p>Your name is <b><%= Request("NAME") %></b>
            <%  End If %>

    <% set req = Request.Form.Item("Movies")%>
            <%  If Req.Count = 0 Then %>
    <p>You did not select any movies.
        <%  Else %>
    <p>The movies you like are: <b><%= Request("Movies") %></b>

    <%  If Request.Form("describe") = "" Then %>
    <p>You did not say why you like the movie(s) you have selected.
    <%  Else %>
        <p>Your description of why you like the movie(s) is:
        <b><i><%= Request.Form("describe") %></b></i>
    <%  End If %>
        <%  End If %>
<%  End If %>

<br>
<br>
</body>
</html>
The most interesting part of this NSP page starts after the "On Error Resume Next" statement. This is where a decision is made based on the posted form data. The "If" statement is simply checking to see if any data was sent by the browser as the result of a post. If no data was sent, the result of this page is to simply display the movie survey. If data was sent, then the script is going to extract the data from the Request object and create a new page that displays the results. In the "Else" part of the statement, the script code is evaluating the data that was returned from the browser through the form.
The returned data determines what the new page should say. For example, if the user did not enter a name, the script will simply state, "You did not provide your name." rather than returning "Your name is..." with nothing after it. This creates a much more user-friendly outcome. The same type of decision is made when the movie results are processed.
If the user actually selected their favorite movies, the list of favorite movies is displayed on the results page. After all of the data has been extracted and evaluated, the script terminates and the user is shown the results of their selections. Again, this was all done in a single NSP page even though the user sees two completely different Web pages.
The third sample shows how to take advantage of other services that are available on the server. This example displays a rotating banner ad much like those you've seen on Internet portal sites. A set of four animated GIF files produce the banners for this sample. Because most of the work is done by the Ad Rotator component, the script code is simple and short.
Figure 4: A rotating banner produced by four animated GIF files.
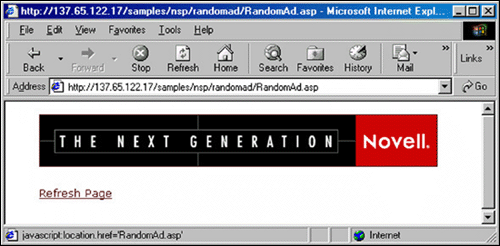
RandomAd.asp
<%@ LANGUAGE="VBSCRIPT" %>
<% on error resume next %>

<html>
<head>

</head>
<BODY bgColor=#ffffff leftMargin=40 link=#500000 vLink=#505050>

<%Set ad = Server.CreateObject("MSWC.AdRotator")%>

<%= ad.GetAdvertisement(server.mappath("/samples/nsp/randomad/RandomAd.txt")) %>
<br><br>
<FONT FACE="Verdana, Arial, Helvetica" SIZE=2>
<a HREF="javascript:location.href='RandomAd.asp'">Refresh Page</a>
<br><br>
</font>

</body>
</html>
You probably recognize the first set of statements from the HelloWorld sample. These statements are specifying the default language, telling NSP how to handle errors, and starting the Web page output. Then, using the CreateObject() method of the Server object, the script creates an instance of the Ad Rotator object. This is a UCX component that was written in C and compiled into an NLM.
Its purpose is to read a text file called "Randomad.txt" that contains a list of banner ads to display. It then chooses an ad at random and displays it on the Web page. Finally a hyperlink that invokes a client-side JavaScript statement redirects the browser back to the same NSP page and starts the whole process over again. Each time the user clicks the hyperlink, the ad rotator component chooses a new banner ad to display on the page.
Another interesting part of this script is the use of the Server Object's MapPath() method. The GetAdvertisement() method of the Ad Rotator components needs to have the physical path and filename of the random ad configuration file. Because the RandomAd.asp file does not know exactly where it is being executed from, hard coding a path into this page cause it to fail if the file is ever moved to a different root location. Therefore, this script uses the MapPath() method to construct a physical path to the file. The result of the MapPath() call is sent to the GetAdvertisement() method so that the configuration file can be opened and read. The Ad Rotator UCX component is just one of the many components which can be referenced from an NSP page. For a list of all of the components, refer to the Novell Script for NetWare documentation.
NSP and Security
NSP must enforce some security rules for two reasons:
The script code that is embedded in an NSP page is executed on the server before the page is sent to the browser.
Many of the UCX components that can be invoked from an NSP page provide access to the NetWare file system as well as other server resources.
No NSP page can be executed on the server unless the actual NSP file or the directory that contains the NSP file has been marked with the Execute attribute. This prevents a user from uploading and executing an NSP page that may contain script that could potentially damage the Web server.
Before an NSP page can be executed, the system administrator must set the Execute attribute through the NDS administration services provided by the Enterprise Administration Server. Each file and directory on the NetWare server has associated with it access control rights and attributes such as read, write, hidden, and system. Included in this list is the Execute attribute that can be assigned to any file or directory.
Note: The Execute attribute is not the same as the Execute Only attribute.
When an NSP page is requested through the Web server, NSP first checks to see if the Execute attribute has been set on the file. If it hasn't, it then looks to see if the Execute attribute has been set on the directory that contains the NSP page. If neither the file nor the directory has the Execute attribute set, the user is denied access and the NSP page is not executed. If the administrator has set the Execute attribute on the directory rather than on each individual file, any page in that directory will be executed regardless of whether or not it has the Execute attribute set. The administrator should set this attribute on a directory only if other NetWare security measures have been taken to prevent a user from uploading and executing a malicious NSP page.
Conclusion
NSP provides a powerful and easy way to create dynamic Web applications. The samples that were discussed here are just the tip of the iceberg when it comes to what you can do with NSP. Combining script code with HTML and taking advantage of the services that are available through the many UCX components on NetWare means there is no limit to what you can do. Many applications that are currently implemented as client-server applications, can be turned into three-tiered Web applications that require only a browser. This frees users from having to be at a specific workstation in order to run an application. Now any computer that has a browser installed on it can be used to run your Web-based NSP application.
* Originally published in Novell AppNotes
Disclaimer
The origin of this information may be internal or external to Novell. While Novell makes all reasonable efforts to verify this information, Novell does not make explicit or implied claims to its validity.