The Novell Controls for ActiveX and Visual Basic: Writing NDS Field Values
Articles and Tips: article
Software Engineer
Novell DeveloperNet University
01 Dec 1999
Shows how to write data values to NDS fields. Fifth installment in a series on Novell Directory Services (NDS) programming, using the Novell Controls for ActiveX and Visual Basic.
- Introduction
- Fields, Entries, and Layouts
- NDS Rights
- Example Program: WriteField
- WriteFieldForm
- Still Want More?
Introduction
This article is the fifth installment in a series on Novell Directory Services (NDS) programming, using the Novell Controls for ActiveX and Visual Basic. So far, we've talked about setting up your development environment, logging in to a directory, and reading and searching NDS field values. This article shows how to write data values to NDS fields.
|
Objective |
Using this lesson as a guide, a Visual Basic programmer will be able to use the Session and Directory controls to write a string value to an NDS field. |
|
Prerequisites |
Entry-level Visual Basic programming skills, a DeveloperNet subscription (Electronic Level subscription available free at http://developer.novell.com), successful completion of SearchField task in previous article. |
|
Required Items |
See "Required Setup." |
|
Optional Items |
None. |
|
Required Setup |
A NetWare 4 or 5 server, a Win32 workstation (Windows 95/98/NT) with installed software: the appropriate Novell Client for the operating system, Microsoft Visual Basic or Visual Studio, and the Novell Controls for ActiveX. |
|
Development Environment |
The procedures discussed in this article were tested using a 200 MHZ Pentium-based workstation with 64 MB RAM, running Windows NT 4.0, a NetWare 5.0 file server, the NetWare Client for NT 4.60, Microsoft Visual Studio 6.0, and the Novell Controls for ActiveX 1/25/99. |
Fields, Entries, and Layouts
If you've been reading the articles in this series, by now you've probably caught on to the fact that I've been gently introducing NDS concepts with each article, rather than expecting you to know all about NDS from the beginning. The previous article in this series ("The Novell Controls for ActiveX and Visual Basic: Searching NDS Field Values," Novell Developer Notes, October 1999) introduced you to the structures that comprise the NDS directory: fields, entries, and layouts. If you missed that article or need a review, you can find that article on the DeveloperNet Web site, http://developer.novell.com/research/devnotes.htm.
Once you understand fields, entries, and layouts, you know most of everything there is to know about NDS, except for a subject we've been avoiding up to this point: rights.
NDS Rights
NDS has a highly granular rights model. Rights to entries are separate from rights to the entry's fields. This means, for example, that users can be granted the right to read all fields in their own directory entries, but only those fields in other user's entries that the network administrator chooses to grant them access to. User's can be permitted to change their own password fields, but prohibited from changing their job titles.
The following tables summarize the rights that can be assigned to entries and fields.
Entry Rights
|
Value
|
Type
|
Description
|
|
1 |
EntryBrowse |
Grants the ability to see the entry in the NDS directory. |
|
2 |
EntryAdd |
Grants the right to create subordinate entries of this entry (applies only to container entries). |
|
4 |
EntryDelete |
Grants the ability delete a directory entry, and its subordinate entries in the case of container entries. |
|
8 |
EntryRename |
Grants the ability to change the name of a directory entry. |
|
16 |
EntrySupervisor |
Grants all rights to an entry and its fields. |
Field Rights
|
Value
|
Type
|
Description
|
|
1 |
FieldCompare |
Grants the ability to compare the field to see whether it contains a given value, but not to read the value. |
|
2 |
FieldRead |
Grants the ability to read a field value (having this right also implies having FieldCompare). |
|
4 |
FieldWrite |
Grants the ability to add, delete, or modify a field value (having this right implies having FieldSelf). |
|
8 |
FieldSelf |
Some fields take entry names as their values (for example, group membership lists). This right grants the ability to add or delete one's self as a field value. |
|
32 |
FieldSupervisor |
Grants all rights to the field. |
There's a lot more to NDS rights, especially in the area of how rights are inherited from a container to its subordinate objects, but we'll save that for another article. The example programs I've given so far haven't dealt with the question of rights, because they have just read and searched for data in the directory. Now that we want to write to directory fields, rights become an issue. You may be able to read a field but not have rights to change its value. The problem is that it is not a simple matter to determine what rights you have to a specific entry or field. Your program could require the user to be logged in as Admin, but this is impractical and undesirable in some situations. Of course, if your program can see an entry in the directory, you know that you have the browse right to the entry. But if you can read a field, how do you know if you have the right to change the field's value? In this situation, it is best to apply the adage, "it is easier to get forgiveness than permission." Rather than go through the complex process of determining what rights the user has to a field, it is easier to try to write a value to the field, then handle the resulting error, if any, as illustrated in the WriteField example program.
Example Program: WriteField
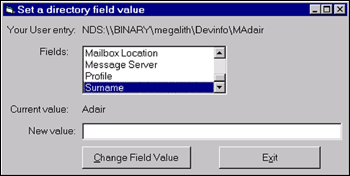
WriteField allows you to write a value to a selected field in your user entry. As with the last two programs in the ActiveX series, WriteField begins by displaying a list of Directories you are logged in to, and gives you the option of logging in to other Directories on the network. After you have selected a directory, WriteField displays a dialogue box that allows you to select one of your user entry's fields (for purposes of simplicity, only single-valued text fields are displayed) and enter a new value for the selected field. Figure 1 shows how WriteField looks when executing.
Figure 1: WriteField setting the value of a user entry's Surname field.
To build the WriteField program:
Start Visual Basic and create a new "Standard EXE" project.
Add the Novell Directory and Session controls to your project:
Open the Components dialog by selecting "Components" from the Project menu, or by right-clicking the Toolbox and selecting "Components" from the pop-up menu.
Scroll down the list of components and check the boxes next to "Novell Directory Control" and "Novell Session Control."
Click "OK."
WriteField consists of three forms and one code module. As mentioned earlier, two of the forms can be copied from the ReadField program.
ConnectionsForm, LoginForm, and Module1
The previous article in this series, "The Novell Controls for ActiveX and Visual Basic: Searching NDS Field Values" (October 1999), had instructions for designing and writing the associated code for two forms, ConnectionsForm and LoginForm, and one code module, Module1. You will need to make one small change to each of the two forms, so you should create a new directory for the SearchField program and copy ConnectionsForm.frm, LoginForm.frm, and Module1.bas to this new directory. After copying the files, do the following:
Add Module1 to the project by selecting "Add Module" from the Project menu, clicking on the "Existing" tab, and selecting the Module1.bas file that you just copied.
Add the forms to the project by selecting "Add Form" from the Project menu, clicking on the "Existing" tab, and selecting the ConnectionsForm.frm and LoginForm.frm files that you just copied.
For each form, double-click anywhere on the form to open the associated code and change the line of code that says SearchFieldForm.Show to WriteFieldForm.Show
Make ConnectionsForm the project's startup form by opening the project's property sheet from the Project menu, then selecting "ConnectionsForm" from the Startup Object drop-down menu.
WriteFieldForm
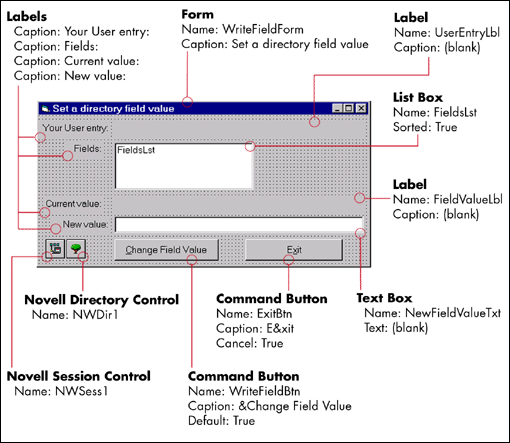
After you have selected the directory that WriteField is to operate on, WriteFieldForm loads and allows you to change the value of fields in your directory entry in the selected tree. To create WriteFieldForm, add a new form to your project by selecting "Add Form" from the Project menu and clicking the "Open" button with the "Form" icon selected. Resize the form and add the components and associated attributes as shown in Figure"2.
Figure 2: Components and attributes placed on WriteFieldForm.
When WriteFieldForm loads, it needs to build a list of single-valued fields associated with the user's entry in the directory. To enter the code that does this, open the form's form load procedure by double-clicking anywhere on the form. Enter the code for the form's Form_Load procedure, as shown below.
Private Sub Form_Load()

    Dim fieldName As Variant


    ' Set session's default context to the selected Directory

    NWSess1.DefaultFullName =

    NWSess1.DefaultFullNameFromTreeName(DefaultTree)

    NWDir1.FullName = NWSess1.DefaultFullName


    'Clear out the current list of Field names

    FieldsLst.Clear


    UserEntryLbl.Caption = NWSess1.DefaultFullName + "\" +

                                   NWSess1.LoginName(DefaultTree)


    'Now put in the names of Fields in the User entry

    Set entry = NWDir1.FindEntry(UserEntryLbl.Caption)


    For Each fieldName In entry.Layout.Fields

        'But only fields that are single-valued strings

        If (fieldName.TypeName = "String") And

     (NWDir1.FieldTypes.Item(fieldName.Name).SingleValued = True) Then

             FieldsLst.AddItem fieldName.Name

        End If


        If FieldsLst.ListCount > 0 Then

            FieldsLst.Selected(0) = True

        End If

    Next fieldName

End Sub
This procedure assigns the user's entry to a variable called "entry." This variable must be declared in the general declarations for the form, so that the form's other components can reference it. Declare this variable by selecting (General) from the form's object drop-down list and entering the following declaration:
Dim entry As NWEntry
The exit button should end the program when you click on it. Double-click on the exit button and enter the code associated with it:
Private Sub ExitBtn_Click()

    End

End Sub
When you click on a field in the fields list, the program should display the current value of the field in the field value label. Double-click on FieldsLst and enter the code for the FieldsLst_Click procedure:
Private Sub FieldsLst_Click()

    FieldValueLbl.Caption = entry.GetFieldValue(FieldsLst.Text, "No Value")

End Sub
Finally, when you click on the Write Field button, the program should change the value of the selected field to the value you have entered in the New Value text box. To enter the code that does this, double-click on the Write Field button and enter the code for the WriteFieldBtn_Click procedure:
Private Sub WriteFieldBtn_Click()

    'ErrorHandler will handle insufficient rights error

    Err.Clear

    On Error GoTo ErrorHandler


    If NewFieldValueTxt.Text = "" Then

        valueset = entry.SetFieldValue(FieldsLst.Text, Null)

    Else

        valueset = entry.SetFieldValue(FieldsLst.Text, NewFieldValueTxt.Text)

    End If


    If valueset << True Then<
        entry.Abort

        MsgBox "Unable to change field value"

    Else

        entry.Update

        FieldsLst_Click

    End If

Exit Sub


ErrorHandler:

    If Err.Number = 672 Then

        MsgBox "Insufficient rights to change field value"

    Else

        MsgBox "Unrecognized error " + Err.Number +

               " while changing field value: " + Err.Description

    End If

End Sub
Still Want More?
The next article in this series will show how to create new directory entries. The example program that will accompany the article is pretty cool (if I say so myself). It reads a list of organizations, organizational units, and user names from a file, then creates a complete directory tree containing the specified entries.
* Originally published in Novell AppNotes
Disclaimer
The origin of this information may be internal or external to Novell. While Novell makes all reasonable efforts to verify this information, Novell does not make explicit or implied claims to its validity.