Configuring Your Client Application for LDAP Secure Binds
Articles and Tips: article
Senior Research Engineer
Developer Information
01 Nov 1999
Client-side LDAP applications that establish authenticated binds (authenticated SSL connections) to LDAP directory servers are relatively easy to write, as explained in the "Obtaining an Authenticated Connection"LDAP" DeveloperNet University lesson at:
http://developer.novell.com/education/nds/ldap/authconn
However, the setup to distribute necessary certificates in a form usable by the LDAP runtime needed by the client application can often be complicated. This article is intended to help you through this process for applications written to run with Netscape's LDAP runtime, nsldapssl32v30.DLL as used in Novell's DeveloperNet University series.
The procedure below first describes how to configure an NDS server to export a certificate for use by an LDAP client-side application. It then describes how to add the exported certificate to a Netscape certificate data-base for use by applications which run with Netscape's nsldapssl32v30.DLL.
The following procedure will require version 5.1.1 or better of the NWAdmin application and version 4.06 or later of Netscape Navigator.
1. Create the "Certificate Authority" Object for your server.
In NWAdmin, select the "Security" object at the root of your tree (Figure 1). Double-click on it. If there is a "Certificate Authority" contained by the "Security" object, delete the "Certificate Authority" so that we can start from scratch.
Figure 1: Create a Certificate Authority object.
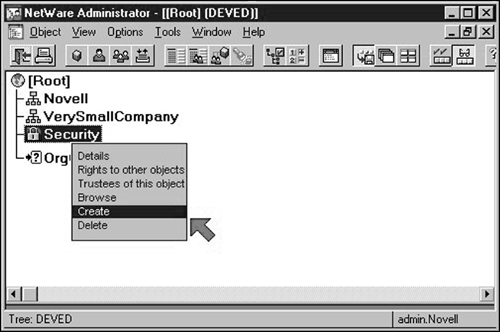
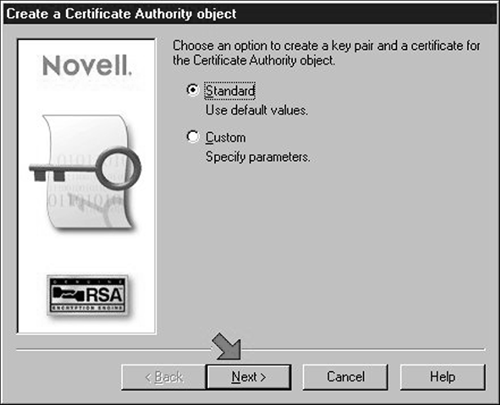
Right-click your mouse over to "Security" object and select the "Create" item in the resulting popup menu. The wizard dialog shown in Figure 2 should be displayed. Click "Next" to accept the "Standard" values and proceed to the second page of the wizard.
Figure 2: Use the default values when creating a key pair and certificate for the Certificate Authority object.
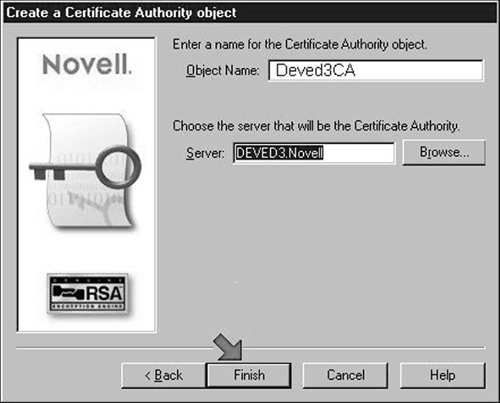
In the second wizard page, click the "Browse" button to locate and select the "Server" object representing the server for which you are creating a certificate. This sever object is often located in the same container as the "admin" user object. Once you have selected the "Server" object, give it a name that reflects which server you selected (as shown in Figure 3). Then, click "Finish" to create the "Certificate Authority" object inside of the "Security" object.
Figure 3: Name the Certificate Authority and associate it with the target server's object in the tree.
2. Create a "Key Material" object for your server.
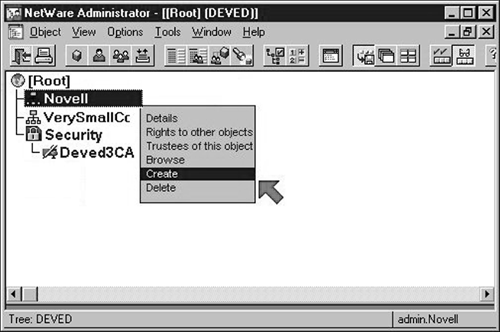
Select the object containing the "Server" object you selected in 3.c and right-click it to allow you to select the "Create" item in its popup menu (Shown in Figure 4).
Figure 4: Create a Key Material object.
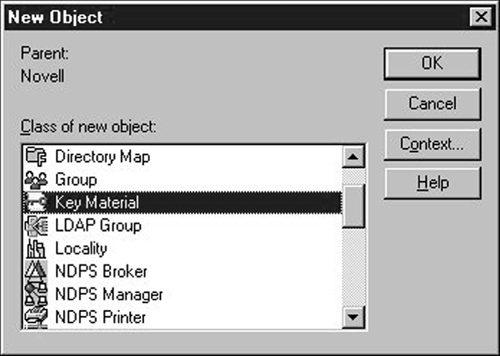
Create a "Key Material" object as shown in Figure 5. Accept the "Standard" values in the first page of the resulting wizard by selecting its "Next" button.
Figure 5: Select the Key Material object class.
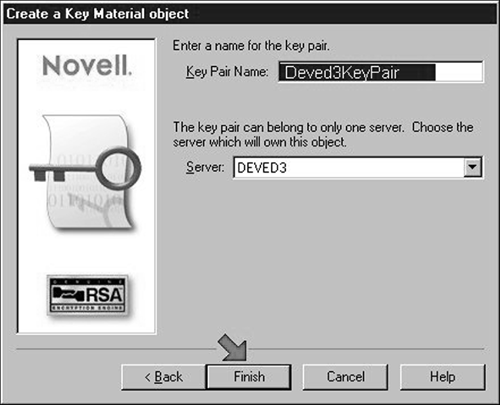
In the wizard's second page, enter a name for the "Key Material" object that reflects its server, (shown in Figure 6). Then, select the appropriate server in the server field and click "Finish" to create the "Key Material" object.
Figure 6: Name the Key Pair and associate it with the target server.
3. Export an SSL Certificate for your server.
Double-click the "Key Material" object that you created in step 2 to display its property pages. Select the "Trusted Root" page and click the "Export" button to display the "Key Material" object's "Trusted Root Certificate Export" page.
Figure 7: Export a Trusted Root certificate for the target server.
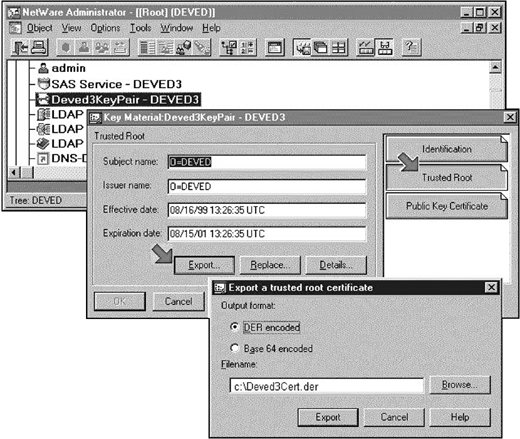
In the "Trusted Root Certificate Export" page, enter a name that describes the relationship between the certificate and its server as shown in Figure 7 (later, the unique name will help you find the certificate) and then export it to a location that you will remember.
4. Configure the Server's LDAP Objects for SSL Connections.
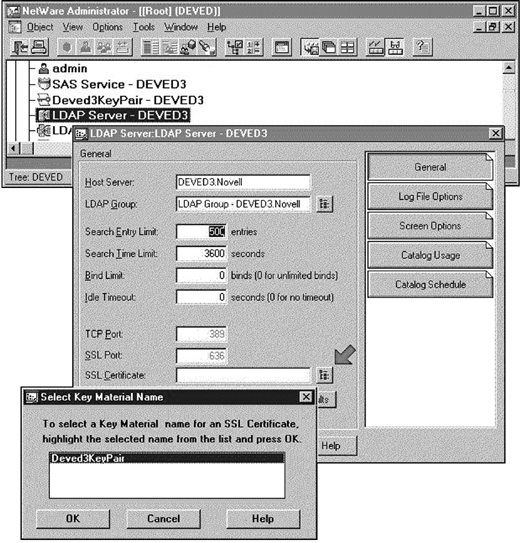
Find and select the "LDAP Server" object for your server. Click the browse button next to the "SSL Certificate" entry to display the "Key Material Selector" dialog as shown in Figure 8. Accept the "Key Material" object that you created in step 2.
Figure 8: Select the Key Pair to be used by LDAP for SSL connections to the target server.
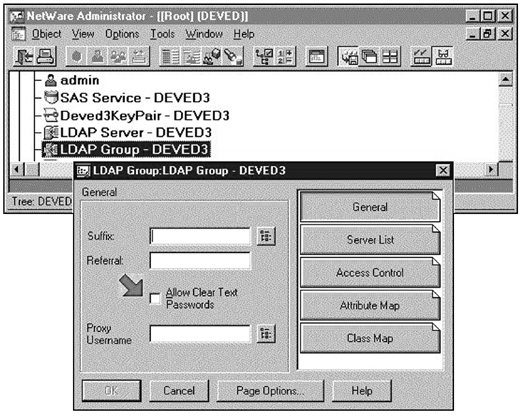
Find and select the "LDAP Group" object for your server. Select the "General" page. Make sure that the "Allow Clear Text Passwords" checkbox is cleared as shown in Figure 9.
Figure 9: Deselect "Allow Clear Text Passwords"
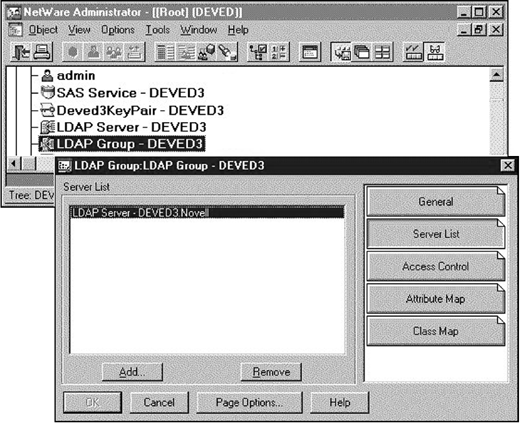
Select the "Server List" page in the "LDAP Group" object. Make sure that your server is included in the "Server List" as shown in Figure 10.
Figure 10: Add the target server's NDS object to the LDAP Group object's Server List.
5. Map LDAP Schema to the NDS Schema.
The LDAP schema elements (attributes and classes) that you want to access with your application must be mapped to pre-existing equivalents in the NDS schema. If your application accesses LDAP schema elements which are already mapped to pre-existing NDS schema elements, you can skip step 5. If not, you need to map your LDAP target classes and attributes to their NDS counterparts.
Note: This article doesn't address how to extend the schema (which can't be done with the current version of LDAP). So, if you need to extend the NDS schema for the schema elements you will access via LDAP, refer to the DeveloperNet University site at developer.novell.com for various ways that you can do this.
In order to provide you with a more concrete example of how to map LDAP schema elements to NDS schema elements, the following two substeps assume that you have extended the NDS schema for three new attribute definitions and one new class definition that you will access with an LDAP application called OrgChart.
The OrgChart class is named:
DNU:OrgChart
The OrgChart attributes are named:
DNU:OrgChart:Picture DNU:OrgChart:Manager DNU:OrgChart:Member
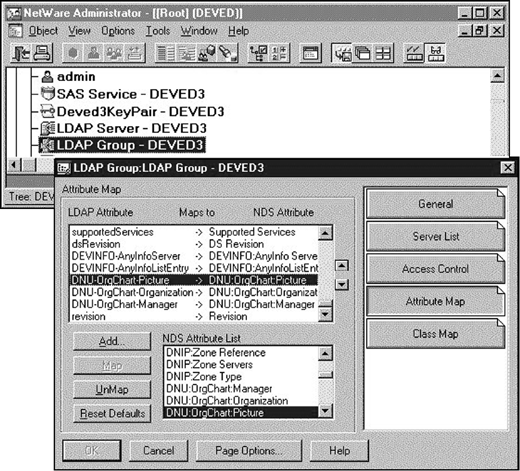
Select the "Attribute Map" page in the "LDAP Group" object. Click "Add" for each of the OrgChart attributes. The LDAP attribute names can be different than the NDS attribute names, but must contain no spaces (spaces are delimiters in LDAP). Then, select the appropriate NDS attribute name and click "Map" as shown in Figure 11.
Note: The LDAP names used in this example, use `-' characters in place of `:' characters because `:' characters are illegal in LDAP names but common in NDS names.
Figure 11: The "DNU:OrgChart:Picture" attribute has been mapped to an NDS attribute with the same name.
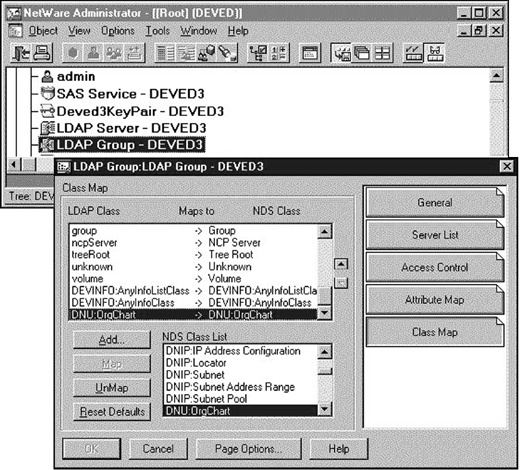
Select the "Class Map" page in the "LDAP Group" object. Click "Add" for the DNU class that you added to the NDS schema for the OrgChart application. The LDAP class name can be different than the NDS class name, but must contain no spaces (spaces are delimiters in LDAP). Then, select the appropriate NDS class name and click "Map" as shown in Figure 12.
Figure 12: Selecting the NDS class name.
6. Obtain a Netscape Certificate Database.
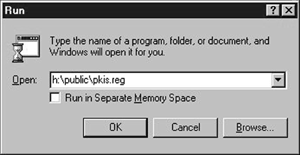
In the SYS volume of your target NW5 LDAP server, find and run "Pkis.reg" in the "public" directory in the Windows "Run" window as shown in Figure 13. This enters information into your Window's registry that enables your browser to understand the certificate that you created in step 3.
Figure 13: Running Pkis.reg.
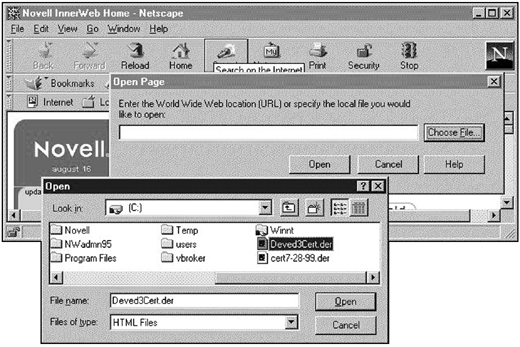
Select "Open Page" under Netscape's File Menu. In the "Open Page" dialog, select "Choose File". In the "Choose File" dialog, select the certificate you created in step 3 (shown in Figure 14). Click "Open" when you return to the "Open Page" window.
Figure 14: Selecting the certificate.
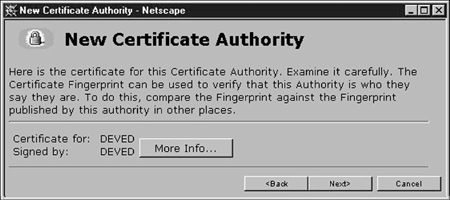
Netscape will respond to your certificate selection by displaying a "New Certificate Authority" wizard. Click "Next" until you arrive at the page shown in Figure 15. Verify that your target LDAP server is specified.
Figure 15: Verifying that the target LDAP server is specified.
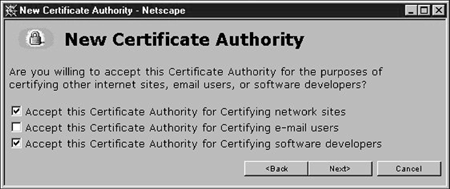
Continue clicking "Next" in the "New Certificate Authority" wizard until you arrive at the page shown in Figure 16. Select the "Certifying network sites" and "Certifying software developers" checkboxes.
Figure 16: Certifying sites and developers.
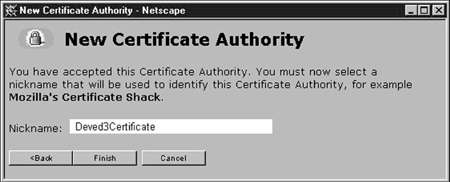
Continue clicking "Next" in the "New Certificate Authority" wizard until you arrive at the page shown in Figure 17. Enter a name for the certificate that you will associate with your target LDAP server. Then click "Finish".
Figure 17: Selecting a nickname.
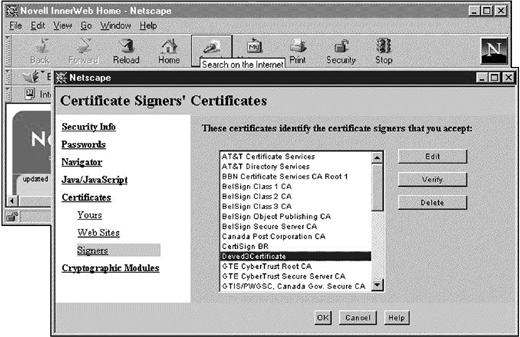
Select "Security Info" under Netscape's "Windows"menu. Then select "Signers" as shown in Figure 18 to verify that your certificate has been accepted into Netscape's certificate database.
Figure 18: Selecting signers.
7. Commit Your Configuration Changes.
Exit from Netscape to commit your added certificate to Netscape's certificate database.
Down the newly configured LDAP server and bring it back up to allow it to make the necessary configuration associations needed to accept the new certificate.
Copy Netscape's new certificate database named "Cert7.db" from your user directory in the Netscape directory (probably inside of "Program Files").
Put a copy of the new certificate database inside of the directory of every LDAP application you write. The LDAP runtime DLL will load the database and find your certificate in order to establish authenticated binds with your target server.
* Originally published in Novell AppNotes
Disclaimer
The origin of this information may be internal or external to Novell. While Novell makes all reasonable efforts to verify this information, Novell does not make explicit or implied claims to its validity.