The Novell Controls for ActiveX and Visual Basic: Reading Field Values
Articles and Tips: article
Software Engineer
DeveloperNet University
01 Sep 1999
Shows how to write a VB program that reads the value of a specified field in an NDS entry. Third in a series of articles on NDS programming with Visual Basic, using the Novell Controls for ActiveX. Also contains an overview of NDS terms and concepts applicable to the VB developer.
- Introduction
- Directories (Trees) and Entries
- Identifying Entries: Full Name
- Identifying Entries: Context and Short Name
- Fields, Types, and Layouts
- Example Program: ReadField
- Want More?
Introduction
This article is the third installment in a series on NDS (Novell Directory Services) programming with Visual Basic, using the Novell Controls for ActiveX. Previous articles covered setting up your development environment ("Programming with the Novell Controls for ActiveX and Visual Basic: Getting Started," June 1999) and logging in to NDS from a VB program ("The Novell Controls for ActiveX and Visual Basic: Logging In," July 1999).
In this article, we (finally) start reading data from fields in the NDS database. The first part of the article contains an overview of NDS terms and concepts. If you have experience administering or using NDS, you may still want to read this part, because ActiveX uses different terms than you may have encountered before (for example, what most NDS documentation refers to as attributes are called fields in the ActiveX world). The second part of the article tells, step-by-step, how to write a VB program that reads the value of a specified field in an NDS entry.
|
Objective |
Using this lesson as a guide, a Visual Basic programmer will be able to use the Session control to log in to an NDS directory. |
|
Prerequisites |
Entry-level Visual Basic programming skills, a DeveloperNet subscription (Electronic Level subscription available free at http://developer.novell.com). |
|
Required Items |
See "Required Setup." |
|
Optional Items |
None. |
|
Required Setup |
A NetWare 4 or 5 server, a Win32 workstation (Windows 95/98/NT) with installed software: the appropriate Novell Client for the operating system, Microsoft Visual Basic or Visual Studio, and the Novell Controls for ActiveX. |
|
Development Environment |
The procedures discussed in this article were tested using a 200 MHZ Pentium-based workstation with 64 MB RAM, running Windows NT 4.0, a NetWare 4.11 file server, the NetWare Client for NT 4.60, Microsoft Visual Studio 6.0, and the Novell Controls for ActiveX 1/25/99. |
Directories (Trees) and Entries
Novell Directory Services is a tree-structured database containing objects that represent users, groups of users, servers, workstations, printers, etc. Each database on a network is referred to as a Directory or Tree. Each tree typically contains one or more Organizations, which in turn, contain a hierarchy of Organizational Units. Organizations and organizational units are referred to as containers, because they can contain other objects. There are also country and locality containers, but they are rarely used. Objects that cannot contain other objects (User and Printer objects, for example), are called leaf objects.
NDS terms can sometimes be confusing, because there are frequently two or more terms that mean the same thing. For example, an NDS database can be referred to as a "directory," a "tree," or even a "directory tree," and the entities in a tree can be called either "objects" or "entries."
If you have used network administration tools like NWAdmin or ConsoleOne, you have seen representations of directories like the one shown in Figure 1.
Figure 1: ConsoleOne's view of a directory.
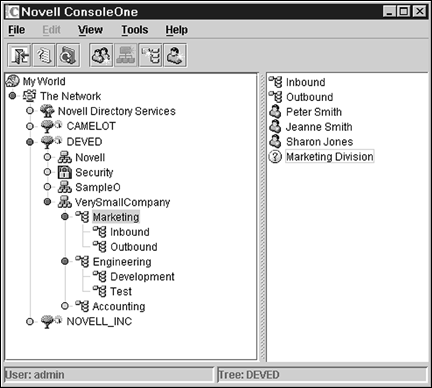
Figure 1 shows a tree named DEVED that has three organizations. The organization named VerySmallCompany is expanded to show the structure of organizational units with the organization. The Marketing organizational unit has been selected to show that it contains two organizational units, Inbound and Outbound; three User entries, Peter Smith, Jeanne Smith, and Sharon Jones; and one entry of unknown type called "Marketing Division."
Identifying Entries: Full Name
The way to unambiguously identify an entry in a directory is by the entry's full name. There are two ways to specify the full name of an object. The first method can be used for any directory entry and contains:
The name of the directory service (NDS).
The names of all containers between the entry and the root of the tree.
The name of the entry.
For example, in Figure 1, the user object "Sharon Jones" would have the full name:
|
NDS:\\DEVED\VerySmallCompany\Marketing\Sharon Jones |
The second way to specify the full name of an object applies only to file servers and volumes and subdirectories in the file server's file system. With these objects, you can use the UNC (universal naming convention) path as the entry's full name. For example, if you have a file server named "GUINEVERE," the full name of the server's SYS volume would be:
|
\\GUINEVERE\SYS |
Identifying Entries: Context and Short Name
In the article "The Novell Controls for ActiveX and Visual Basic: Logging In" in the July '99 issue of Novell Developer Notes, I discussed the concept of NDS context. An object's context is the full name of its container in the directory. In the tree shown in Figure 1, the context of Sharon Jones' user object is:
NDS:\\DEVED\VerySmallCompany\Marketing
The Novell client maintains a current context, which is the full name of a container in a directory. If you refer to objects by their short name (the name of the object without the tree and container names that make up the full name), it is assumed that you are referring to objects in the current context. Your Visual Basic program can get the current context from the Novell Session Control's DefaultFullName attribute.
Fields, Types, and Layouts
Directory entries are data structures with a number of fields that may be mandatory or optional. Each field in an entry has a name and type (the type of a field is also called its syntax). The rules that define the type of each field and whether the field is mandatory or optional are the entry's layout. For example, a user object has two mandatory fields, CN (common name) and Surname; and many optional fields, including Account Balance, Email Address, and Telephone Number. The Surname field has a type or syntax of "Case Ignore String."
It is possible to add new types, fields, and layouts to the directory. A future article will show how to do this in Visual Basic.
Example Program: ReadField
Create a new "Standard EXE" project.
Add the Novell Directory and Session controls to your project:
Open the Components dialog by selecting Components from the Project menu, or by right-clicking the Toolbox and selecting Components from the pop-up menu.
Scroll down the list of components and check the boxes next to "Novell Directory Control" and "Novell Session Control."
Click "OK."
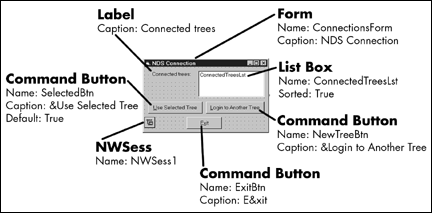
ConnectionsForm
The project's startup form will display a list of NDS trees the workstation is connected to, and allow the user to either select a tree from the list or click a button to bring up another window to log in to another tree.
Name this startup form "ConnectionsForm" and place controls with the attributes shown in Figure 2.
Figure 2: ConnectionsForm controls and attributes.
Double-click on the form to open ConnectionsForm's Form_Load procedure. Insert the code shown below that creates the list of connected trees.
Private Sub Form_Load()

    'Add name of each connected tree to list box

    For Each connectedTree In NWSess1.ConnectedTrees

        ConnectedTreesLst.AddItem connectedTree

    Next connectedTree


    'Select the name of the first tree in list

    If ConnectedTreesLst.ListCount > 0 Then

        ConnectedTreesLst.Selected(0) = True

    End If

End Sub
Double-click on the "Use Selected Tree" button to open the button's Click procedure. Insert the code below that will be executed when the user clicks on the button.
Private Sub SelectedBtn_Click()

    'Grab the name of the selected tree and save it

    'in a global var

    DefaultTree = ConnectedTreesLst.Text


    'Switch to the ReadField form

    ReadFieldForm.Show

    ConnectionsForm.Hide

End Sub
The program will be a little friendlier if we make it so the user can just double-click on the name of a tree in the ConnectedTreesLst to select it. To make your program do that, open the ConnectedTreesLst control's DblClick procedure:
Select "ConnectedTreesLst" and "DblClick" from the pull-down menus at the top of the ConnectionsForm code window.
Insert the code shown below.
Private Sub ConnectedTreesLst_DblClick()

    'Double-clicking a tree name is the same

    'as clicking on the Select button

    SelectedBtn_Click

End Sub
Double-click on the "Login to Another Tree" button to open the button's Click procedure. Insert the code shown below, that brings up the LoginForm to allow the user to log into another directory tree.
Private Sub NewTreeBtn_Click()

    'It could take awhile to assemble the list of all

    'available servers, so change to an hourglass cursor

    ConnectionsForm.MousePointer = vbHourglass


    'Switch to the login form

    LoginForm.Show

    ConnectionsForm.Hide


    'Change back to the default cursor if user cancelled

    'login and came back to this form

    ConnectionsForm.MousePointer = vbDefault

End Sub
Finally, double-click on the "Exit" button to open the button's Click procedure. When the user clicks on this button, the code shown below terminates the program.
Private Sub ExitBtn_Click()

    End

End Sub
Module1
We need to declare a global variable to store the name of the tree the user selects.
Add a new module to your project by selecting "Add Module" from the Project menu, then clicking on the "Open" button.
Add the line of code shown below:
Public DefaultTree As String
LoginForm
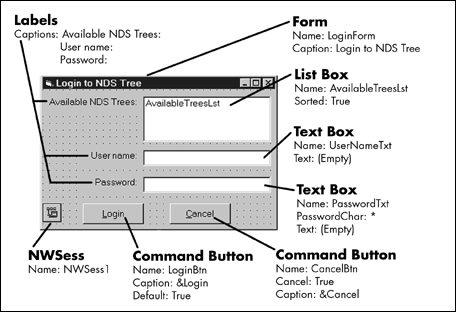
When the user clicks on the "Login to Another Tree" button, the LoginForm will load.
Add a new form to your project by selecting "Add Form" from the Project menu and clicking the "Open" button with the "Form" icon selected. Add the controls and associated attributes shown in Figure 3.
Figure 3: LoginForm controls and associated attributes.
Double-click on the LoginForm to open the form's Form_Load procedure. Add the code shown below that builds the list of all the available directory trees on the network.
Private Sub Form_Load()

    'Add names of every tree on the network to list

    For Each availableTree In NWSess1.TreeNames

        AvailableTreesLst.AddItem availableTree

    Next availableTree


    'Select the first name in the list

    If AvailableTreesLst.ListCount > 0 Then

        AvailableTreesLst.Selected(0) = True

    End If

End Sub
Double-click the "Login" button to open the button's Click procedure. Enter the code show below, that will log the user in to the tree they have selected from the AvailableTreesLst box.
Private Sub LoginBtn_Click()

    'Grab name of the selected tree and save it in a global var

    DefaultTree = AvailableTreesLst.Text


    'Log in to the selected tree

    loggedIn = NWSess1.Login(NWSess1.DefaultFullNameFromTreeName(DefaultTree),

UserNameTxt.Text, PasswordTxt.Text, False)

    If loggedIn Then

        'Switch to the ReadField form

        ReadFieldForm.Show

        LoginForm.Hide

    Else

        MsgBox "Unable to log in to tree " + DefaultTree

    End If

End Sub
Double-click on the "Cancel" button to open the button's Click procedure. Enter the code shown below, that will return the user to the ConnectionsForm if they decide not to log into another tree.
Private Sub CancelBtn_Click()

    'Go back to the Connections form

    ConnectionsForm.Show

    LoginForm.Hide

End Sub
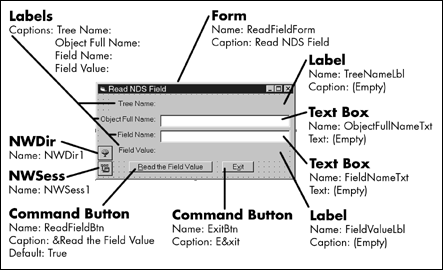
ReadFieldForm
Once the user has selected a directory tree, either from the list displayed on the ConnectionsForm, or by logging into a new tree on the LoginForm, the program will load the ReadFieldForm to get the information needed to read the value of a specific field in the directory.
Add a new form to your project by selecting "Add Form" from the Project menu and clicking the "Open" button with the "Form" icon selected. Add the components and associated attributes shown in Figure 4.
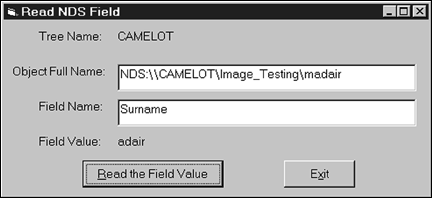
Figure 4: ReadFieldForm controls and associated attributes.
Double-click ReadFieldForm to open the form's Form_Load procedure. Insert the code below that sets the default values of the fields.
Private Sub Form_Load()

    'Set session's default context to the selected tree

    NWSess1.DefaultFullName = NWSess1.DefaultFullNameFromTreeName(DefaultTree)

    TreeNameLbl.Caption = DefaultTree


    'Set default object name: user's full login name

    ObjectFullNameTxt.Text = NWSess1.DefaultFullName + "\" +

NWSess1.LoginName(DefaultTree)


    'We know user object will have a Surname field, so

    'set default name of field to read to Surname

    FieldNameTxt.Text = "Surname"

End Sub
Double-click on the "Read the Field Value" button to open the button's Click procedure. Insert the code shown below that reads the value of the directory entry field the user specifies in the "Entry Full Name" and "Field Name" text boxes.
Private Sub ReadFieldBtn_Click()

    Dim MyEntry As NWEntry


    On Error GoTo ErrorHandler

    Err.Clear


    'Read Field value

    Set MyEntry = NWDir1.FindEntry(ObjectFullNameTxt.Text)

    FieldValueLbl.Caption = CStr(MyEntry.GetFieldValue(FieldNameTxt.Text, "Not

Found"))

Exit Sub


'Minimal error handling (hey, this is just an example program)

'Most likely error is that user typed in name of entry or field that doesn'Lt exist

ErrorHandler:

    Select Case Err.Number

        Case 601    'Directory Entry Not Found Error

            MsgBox "Directory Entry " + ObjectFullNameTxt.Text + " Not Found"

        Case 603    'Directory Field Not Found Error

            MsgBox "Directory Field " + FieldNameTxt.Text + " Not Found"

        Case Else   'All other errors

            Msg = "Unanticipated error " & Err.Number

            Msg = Msg & ": " & Err.Description

            MsgBox Msg, vbExclamation

    End Select

End Sub
Finally, double-click on the "Exit" button to open the button's Click procedure. Add an End statement to terminate the program when the user clicks on the button.
Private Sub ExitBtn_Click()

    End

End Sub
When you have completed the preceding steps, save the project and run the program to verify that you have typed in the code correctly. The program should allow you to select a directory (tree) that you are already logged in to, or log in to another directory. Once you have selected a directory, the program will allow you to specify an entry in the directory (by full name) and the name of one of that entry's fields to read. The program supplies the Surname field of your User entry as the default, as shown in Figure 5.
Figure 5: Running the ReadField program.
Want More?
The next lesson in this series will show how to search a directory for entries with a specified attribute value.
These lessons and the accompanying programs will be on Novell's DeveloperNet University Web site at http://developer.novell.com/education.
We will provide information there on NDS programming using various programming languages, directory access methods, and development tools.
* Originally published in Novell AppNotes
Disclaimer
The origin of this information may be internal or external to Novell. While Novell makes all reasonable efforts to verify this information, Novell does not make explicit or implied claims to its validity.