Using BulletProof's JDesignerPro 3.0 to Build Java Applications on NetWare 5
Articles and Tips: article
01 Jun 1999
In this first part of a two-part article we will discuss a new tool for NetWare 5 that helps you build and deploy real Java interfaces to your data, even over NDS information, without have to write a line of Java code. JDesignerPro is a drag and drop, visual Java application builder that is integrated with NDS.
Introduction
Although Java has become a hot ticket for NetWare 5 developers, many readers will have little or no Java knowledge. In this article we will discuss a new tool for NetWare 5 that helps you build and deploy real Java interfaces to your data, even over NDS information, without having to write a line of Java code. The tool is JDesignerPro 3.0 from BulletProof Corporation.
JDesignerPro 3.0 is a drag and drop, visual Java application builder that is integrated with NDS. In this first part of a two-part article, we are going to walk you through the development of a simple application screen consisting of a master-detail form and chart of some sales and store information for a book business. Similar step-by-step tutorials are available on the Manual menu inside JDesignerPro.
JDesignerPro 3.0 for NetWare 5 is available as a free 30-day trial download from BulletProof at http://www.bulletproof.com.
About JDesignerPro
BulletProof Corporation has been an important player in Java development tools and application servers since 1995. The firm's customers include Fortune 1000 businesses universities, and state agencies around the world such as FedEx, MCIWorldcom, Disney, Notre Dame and AT&T. Shipping since 1996, BulletProof's flagship product JDesignerPro, now version 3.0, has become a customer-tested and proven system for delivering networked Java solutions. In January 1999, JDesignerPro received Novell YES, Tested and Approved status and will be included in the Novell Developer Kit starting in April 1999.
JDesignerPro 3.0 is a drag and drop, visual Java application builder that is integrated with NDS. It is designed to be easy to use while offering all the needed features to build standards-based, professional Java solutions over NDS and Oracle on NetWare 5. JDesignerPro 3.0 does not require Java expertise. BulletProof has made it as easy as possible by automating the basic coding required to finish a working Java application. JDesignerPro does this with a visual layout tool, detailed application wizards, the Deployment Manager and built-in database access features.
However, advanced developers also use JDesignerPro 3.0 because it includes many components such as smart Grid, Charting, Reporting, Tree Result list, Search and Sort panels up to 40 others. The pure Java code the tool produces is commented and accessible to be modified by the developer. JDesignerPro also has an Integrated Data Wizard, Code Editor, SQL Wizard, debugger and the only visual server-side application builder on the market.
JDesignerPro 3.0 includes the BulletProof Enterprise Server which handles connection pooling for scalability, user authentication based on NDS user profiles, database access, application delivery among other things. The BulletProof Enterprise Server is integrated seamlessly as part of the whole tool set to minimize the complexities associated with deploying Java application servers and three-tier web or Intranet solutions.
In order to follow along, you will need to download and install JDesignerPro either on your NetWare 5 server or a Windows client.
Installation
First we open the JDesignerPro application builder through a browser from an install on NetWare 5 or from a windows client machine. Since JDesignerPro is written entirely in Java, the tools and management interfaces can all be loaded through browsers remotely. We login using our NDS user name and password.
The application builder is similar to a typical IDE in that it has an objects palette, a layout view and properties sheet, but that's about as far as the similarities go. We'll start building our form with the master-detail first. The steps outlined in this article are very similar to those used for all the Wizard and Data components in JDesignerPro, each of which employs the Data Wizard.
Step 1
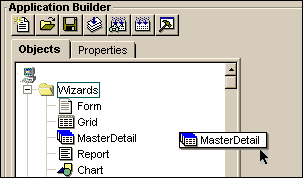
Choose which type of form you want to build and drop it on the screen. We have chosen to do a master-detail form. Open the Wizard folder in the Objects Tree and drop the MasterDetail object on the blank form to the right.
Figure 1: The Wizards folder shown in the Objects tree.
Step 2
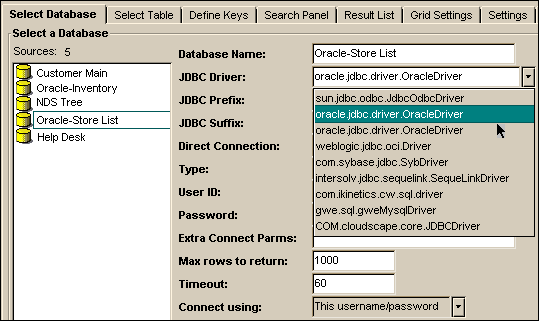
Select the target data for the form. When a Wizard or Data object is dropped on the screen JDesignerPro automatically opens the data wizard to help you build your form. The first screen in the wizard is always Select Database and is where you determine which database is the target for this form. If your database is not yet visible in the list, we select New and fill out the required JDBC driver information. All databases that have been used previously or are setup as ODBC System Datasources will appear in the list.
Here we are adding a new Oracle database to the list. In this case we choose the Oracle driver from the pull-down, enter the correct parameters and login information in the wizard and select Connect.
Note: If you do not have the same tutorial database as used in this article, you can use any datasource, such as the Oracle sample data. Use two similar tables to the ones used here that are joinable. Substitute your tables and columns for similar ones outlined in the article.
Figure 2: The Select a Database tab.
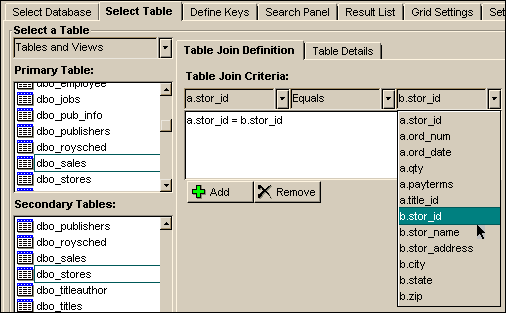
Once the BulletProof Enterprise Server(also known as JAGGServer) has found the datasource, JDesignerPro displays all the tables under Select Table. Since we're doing a master-detail we must select the two tables involved. We have all the tables listed in two columns. The table selected in the top one, the Primary List, will be the detail of the form. Then we can select any number of additional tables in the Secondary List as master information for the form. Tables chosen for the master will be automatically disallowed in updates since that is the task for the detail part of the form.
Here we choose two tables. We are building a master detail to show us sales by store. So we want the order information to be the detail, which can be edited, and the store information as the master fields. We select dbo_sales in the Primary List and dbo_Stores in the Secondary List. Once selected, their column aliases appear in the join criteria pull downs and we can attach the tables by the unique key they share. The aliases "a." and "b." are used only here to make it easier to choose from the pull downs. The "a." signifies a Primary table and "b.", "c.", etc. will signify any Secondary tables that are selected.
Step 3
Join the two tables. To join the two tables, choose a.stor_id = b.stor_id (or similar columns in your data) and select Add.
Figure 3: Use the Select a Table tab to join tables.
Select Accept to save your settings and move to the next tab, Define Keys.
Here we define the unique keys of the tables. Simply select the keys from the list by checking the boxes next to them. Select Accept to go to the Search Panel and Result List setup.
Throughout the JDesignerPro Wizards, select the Accept button only after all the settings have been defined on the current tab, not after each setting.
Step 4
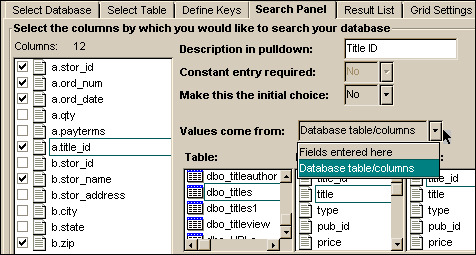
Choose the columns to include in the Search Panel. On the Search Panel tab we decide what columns we will allow users to select during a search. You can choose any number of the columns shown in the list by checking the corresponding boxes. The columns chosen will appear in a pull-down list in the finished Search Panel.
For each column chosen there are a number of settings to narrow what the end user can do in the search. In the screen shot shown, we are defining the search criteria for the title ID field to come from another table by choosing Database table/columns in the "Values come from" list. We choose (1) dbo_titles as the table, (2) the title column to display to the user and (3) title_id to actually use in the search SQL. This will display the title of the book to the user but when the search is actually performed it will use title_id, which will be much more efficient since it is an indexed column and unique key in the database. This way the user can search by book name instead of having to remember the title_id numbers of the books. You can do similarly with any of your suitable columns.
Figure 4: The Search Panel tab determines which columns users are allowed to search.
Your application can also allow searches by search term. To do this choose Yes under "Constant entry required." JDesignerPro will also limit the number of rows to return so a an overly large search doesn't bog down the network. The maximum number of rows to return to the client after a search is determined on the Select Database tab.
Select Accept to go to Result List setup.
Step 5
Define how the Result List will display results from the Search Panel to the user.
One of the unique features of JDesignerPro is the Result List. Instead of giving the user "VCR" buttons, which force them to select next and back buttons to scroll through records, JDesignerPro includes a powerful Result List object. The Result List automatically displays the records returned by a search. The results can be shown in a simple list or in a multi-branch tree structure. The user merely clicks one of the items in the Result List and the form is populated with the data from the record. The tree structure is an effective way to allow users to drill down visually through data sets.
The first step is to choose which columns you would like to use to sort the search results. In the figure below we've chosen stor_id, ord_num, qty and title_id. This means they result list tree will show any of the columns as the first branch in the list and the tree will expand from there. A pull down is included in the finished product so the user can dynamically change the result list sorting.
Figure 5: The Results List tab.
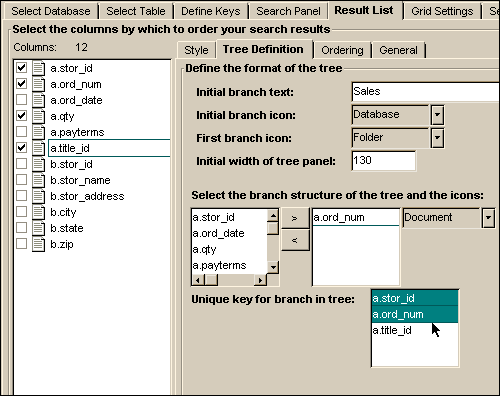
In this case we've chosen to do a tree structure instead of a simple list. We want the tree structure to open the first branch and display order number in the second branch. For example, the user can search by all stores, get a list of stores and then open each store in the tree to select one order record with which to populate the master-detail.
Under Tree Definition, we define the branch text and icons. Below we select which column to show as the branch, in this case it's order number. We can even set a different icon for the branch entries. Below that you must choose which unique keys affect the tree. Here we need to select stor_id and ord_num, but title_id does not pertain, so we de-select it. Select Accept to move to the Grid Settings tab.
Step 6
Layout the Grid, or detail, part our master-detail interface. Perhaps the most important part of any master-detail is the detail object, in this case it's a smart grid component. The detail is the "business end" of the master-detail where records are modified and added to update the database.
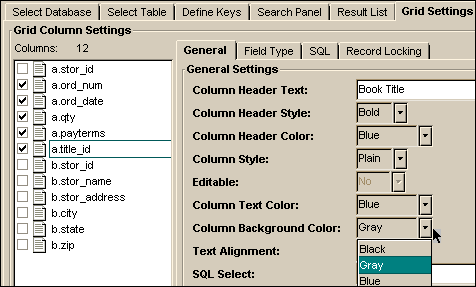
First we choose which columns to include in the grid. It only makes sense to show columns that (1) can be or should be updated and (2) include data unique to the record being displayed. Any other information is best placed in the master form. Here we choose order number, order date, quantity, payment terms and title ID.
As each is selected in the list, we also set its colors, type faces, title etc. For each column a separate SQL select statement can be entered to narrow what is displayed if desired.
Figure 6: General Grid Column Settings.
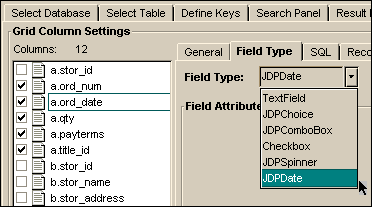
JDesignerPro also allows objects to be put into grid rows. Any one of the columns can be made to display itself as a list drawn from another table, a JDPChoice component, or a combo box, spinner, check box or calendar pull down. In the image below we show these choices as we choose to show the date column as a JDPDate object which will make a month calendar appear in the grid for easy date selection. We'll also choose to make title ID a pull down so the user sees the book names but the title ID itself is returned to the database, as we did in the search panel.
Figure 7: Set Field Type in the Grid Column Settings tab.
Selecting Accept will store our grid layout and move us to the Settings tab.
Step 7
Determine the settings for the fields on the master part of the form. Similar to the grid settings, we can change the colors, type faces, backgrounds, etc. of each of the fields to appear on our master form. The same objects such as pull-downs and date boxes can be used in the form. However those objects don't really make sense here because no part of the master allows editing anyway. It is for display purposes only.
One powerful part of the Settings area is the ability to limit at a field level whether or not a column should be included in an update SQL. This also applies to forms that are not part of a master-detail where edits are allowed. This gives JDesignerPro developers control over each column on the final form to maintain any necessary data integrity.
Figure 8: The Select Field Settings tab.
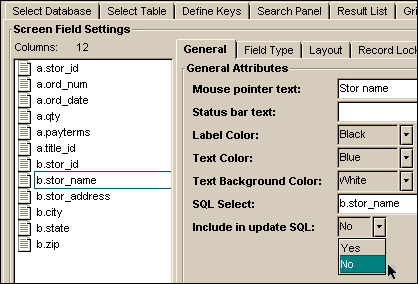
To change the settings we simply select each column in the list and change it's settings. Remember, the settings are automatically stored from column to column even before selecting Accept.
Step 8
Layout the master fields on the form. JDesignerPro handles form layout differently than any other tool. It is an innovative method of employing the pure Java layout managers that ensures your finished product will execute identically in all browsers on all platforms without requiring more development. The Java layout managers do not allow fields to be placed in exact coordinates, rather they are placed in relation to each other. JDesignerPro's layout system uses these layout principles while allowing you to do it visually.
To build our form we simply click on the field we wish to add first and then choose the placement of each subsequent field. Your placement options are to have the next field appear on a new line, on the same line without its label or a new line with the label. The fields can be selected from the list in any order.
Figure 9: Construct the screen layout.
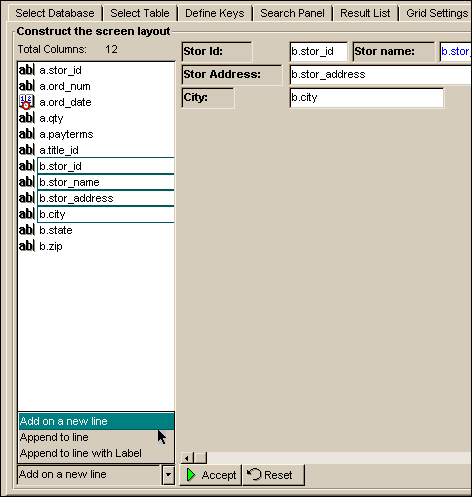
To change a placement, deselect the field in the list then reselect it later where you want it.
Once complete, select Accept. Now the master-detail is finished and JDesignerPro will create all the Java code and build your form for you. The product will appear in the Application Builder window and the Wizard will disappear.
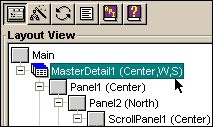
If you decide that any of the settings are not right, you can go back through any part of the wizard to change them. To do this, select the main object in the Layout View display and then select the Wizard button, the second from the left in the button group above Layout View. In our case, the main object is MasterDetail1, which was the object originally dropped on the screen from the Wizard folder in the Object Tree.
Figure 10: Make setting changes via the Layout View display.
When you do this, the Wizard will re-appear at the Select Database tab. You do not need to redo all the wizard screens. Skip right to the one you want to change, such as Grid Settings, by clicking its tab. Make your changes. From here you must select Accept on this and each following screen all the way through the Layout tab, but you do not need to change any of the settings or layout on those tabs, simply select Accept on each and JDesignerPro will regenerate the form.
Step 9
Add a chart to the form. Once our form is complete, we decide to add a chart to it. We would like the chart to appear below the master-detail. To do this we need to change the Java layout manager setting for Main, the base panel at the top of Layout View.
Highlight Main in Layout View and select the Properties tab. Pull down Layout and select GridLayout. The grid layout manager allows us to split the panel into any number of pieces simply by adding the desired number of new objects. The default rows and columns are 2 each. We'll leave those settings as they are.
Figure 11: Adding a chart to the form.
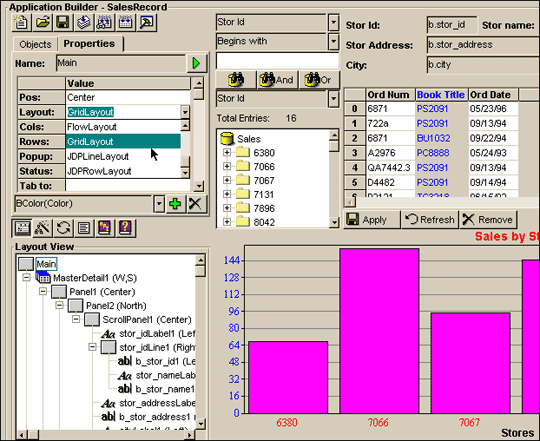
To add the chart, we now drop the Chart object from the Data folder onto Main. This will bring up the Wizard for charts. Step through the wizard by selecting the data to chart. Follow the description of the Chart wizard in the online manual if necessary.
Once complete your chart will appear below the master-detail.
Step 10
Compile and test your new screen. We are ready to do a preliminary compile to see if our application functions as we want it to. Select the Preliminary Compile button, the fourth from the left in the group above the Objects Tree. This will compile the Java code and bring up the finished form, live and ready to work.
Try running a search, then select a record in the result list. You should see how the data loads into the form when one of the branches is selected. Feel free to update a row in the detail grid and select Apply. Watch the status bar at the bottom to see that the record has been updated properly.
Congratulations! You have built your first Java application screen with JDesignerPro. Stop for a moment and ask yourself, "How much Java code did I have to write to build this screen?" Hopefully you are pleasantly surprised by the answer, especially considering the functionality in this one interface.
In Part II of this article we will deploy this application to users. We will show you how to securely distribute it to users through a browser interface while maintaining your NDS authentication system, all using simple steps in JDesignerPro's Deployment Manager. If you want to deploy it now, go through Tutorial 4 of the online JDesignerPro Manual.
* Originally published in Novell AppNotes
Disclaimer
The origin of this information may be internal or external to Novell. While Novell makes all reasonable efforts to verify this information, Novell does not make explicit or implied claims to its validity.