Developing NLMs with Metrowerks CodeWarrior
Articles and Tips: article
Senior Research Engineer
Developer Information
01 Jan 1999
Discusses how CodeWarrior for NetWare provides an integrated development environment for NLM developers that supports the development cycle through coding, compiling, linking, and debugging.
- Introduction
- Installing CodeWarrior
- CodeWarrior Installation Options
- IDE
- Creating a New NLM Project
- Project Stationery
- Compiling and Linking
- Linker Settings
- Descriptions of Linker Options
- Debugging
- Using CodeWarrior for NetWare: Examples
Introduction
At BrainShare `98, Novell and Metrowerks announced plans to release a version of Metrowerks CodeWarrior for NetWare developers. CodeWarrior for NetWare, which began shipping May 19, 1998, provides an integrated development environment (IDE) for NLM developers that supports the development cycle through coding, compiling, linking, and debugging, with version control for program maintenance.
If you ever used Base Technology's NLM SDK (which is, sadly, no longer available) with Borland C/C++, you have a feel for how an IDE can simplify the development process by managing all the compiler, linker, and library settings that are involved in building an NLM. CodeWarrior for NetWare goes beyond the Borland/Base solution by incorporating source-level debugging and version control. CodeWarrior targets multiple platforms, so if you develop for Macintosh, Solaris, Java VM, or other platforms in addition to NLMs, you can use CodeWarrior as your primary development tool.
Installing CodeWarrior
CodeWarrior's set-up program gives you several options for installing CodeWarrior, depending on the languages, target platforms, and documentation you want to have available. The table below shows the included features and disk requirements for a few set-up options.
CodeWarrior Installation Options
|
Installation Option
|
Components Included
|
Disk Space Required (approximate)
|
|
Custom (minimum install for NLM programming in C) |
IDE and Required DLLsMetrowerks Standard LibrariesNetWare SDK (no GroupWise SDK, OSA Java SDK or DDKs)Novell Remote Debugger |
82 MB |
|
NetWare Heaven |
IDE and Required DLLsMetrowerks Standard LibrariesNetWare SDKGroupWise SDKOSA Java SDKLAN DDKSAS DDKRdebug DebuggerBooks: Java, C, C++, CodeWarrior, Windows 95 |
276 MB |
|
CodeWarrior Heaven |
IDE and Required DLLsMetrowerks Standard LibrariesNetWare SDKGroupWise SDKOSA Java SDKLAN DDKSAS DDKLibraries and stationery for NLM, Java, Win32, and Win32-MFC targetsRdebug DebuggerBooks: Java, C, C++, CodeWarrior, Windows 95 |
617 MB |
After installing CodeWarrior for NetWare, you should also install the update that is available at http://www.metrowerks.com/(click on the "Downloadable Updates" link).
IDE
The CodeWarrior IDE, like other IDEs, combines a source code editor, compiler, linker, and debugger. There is also a class browser for Java and C++. As with other IDEs, CodeWarrior uses a project file to manage dependencies between source and object files. CodeWarrior projects can have multiple "targets." Each target is a separate build with its own settings. This allows you to create debug and release versions of a product within a single project file.
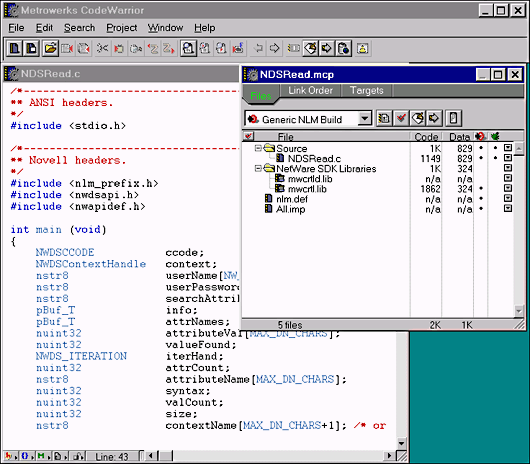
Figure 1 shows the CodeWarrior IDE with an example project.
Figure 1: CodeWarrior IDE.
Creating a New NLM Project
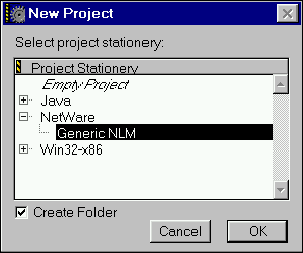
When you select "New Project" from CodeWarrior's File menu, it allows you to select a project stationery file to use as a template for your project (see Figure 2).
Figure 2: Project stationery dialog.
If you do the complete "CodeWarrior Heaven" install, you will have project stationery for the following projects:
Java application
Java applet
Java application/applet (an application with an applet wrapper)
Java libraries
Win32 console applications written in C or C++
Win32 applications with or without MFC, in C or C++
Win32 DLLs in C or C++
WinSIOUX (Standard Input Output User eXchange a standard I/O console library that facilitates application porting between Windows and Macintosh) applications in C or C++
Generic NLM
Project Stationery
Project stationery files are templates that you can use to quickly create a new project. When you create a new project or open a project stationery file, the CodeWarrior IDE creates a new project and, optionally, a new folder for the project. It then copies all the files related to the stationery project to the new folder.
A stationery project includes:
One or more targets.
Editor, compiler, linker, and debugger option settings for each target.
Files associated with each target: source code files, .obj files, libraries, the NLM linker definition (.def) file, NLM symbol import (.imp) files, internationalized help (.hlp) files, or internationalized message (.msg) files.
When you use a stationery file to create your project, all the necessary files can be put into a new folder with the same name as your project. After creating your new project from stationery, you can open it and begin writing code in the CodeWarrior IDE.
Creating Your Own Project Stationery
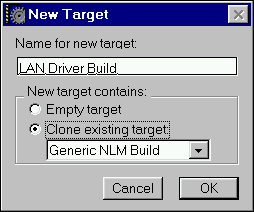
You can create a unique stationery file that includes the files and options you want to have for a starter project. This stationery project can be reused whenever you are creating a new project, so that you always start from your own customized settings. For example, suppose you develop LAN driver NLMs. You can create a stationery file with a LAN driver target (see Figure 3), and include a source code file that contains template source code for a LAN driver, which can be customized when you create a new project.
Figure 3: Creating a LAN driver target.
In essence, any CodeWarrior project you have can become a stationery project. To qualify as a stationery project it must: (1) be located in the Stationery folder, and (2) have its associated source files stored with it. When your project stationery is chosen in the New Project dialog, CodeWarrior duplicates the project and source files associated with the stationery project using the new project name.
To create your own custom stationery from scratch, start by creating a new project from an already available set of stationery or just create an empty project. Save the new project to the Stationery folder. Then, modify the stationery project's settings to best suit your requirements. For example, you will probably want to set the copyright notice string for NLMs created with your NLM stationery (see Figure 4). Be sure to add and remove files as necessary to create the exact base project you want. Also, make sure a copy of all its source files are present in the new stationery project's folder, otherwise, the source files will not be copied to any new projects created with that project stationery. Make sure to save all your changes.
Figure 4: NLM build settings.

By saving your stationery in one of the subdirectories, you will have your stationery available the next time you use the New Project command. The next time you want to create a new project, choose your custom project stationery. All of its project and source files are copied to the new project's location, ready for modification.
Compiling and Linking
Since the CodeWarrior IDE manages all the compiler and linker options, compiling and linking an NLM is straightforward. Simply select "Make" from the Project menu. CodeWarrior then compiles any new or modified source files and links a new NLM according to the settings for the current target.
One item not mentioned in the documentation for CodeWarrior for NetWare: the program update (which you can download from Metrowerks' Web site) includes a header file for NLMs called nlm_prefix.h. You should include this file before any other Novell header files in your NLM project.
Linker Settings
If you have used Watcom C/C++ to develop NLMs, you are probably familiar with NLM linker settings. They go in a linker command (.def) file, then the name of that file is passed to the linker. With CodeWarrior, you can set most linker options in the Build Settings dialog for the target. There are a few exceptions, and these commands (if you need to use them) must go in a linker command file, which is included as part of the project. For your convenience, a skeleton linker command file is included with the generic NLM project stationery. These commands are:
IMPORT. Most IMPORTs are handled by including import (.imp) files in the project.
EXPORT. If your NLM exports symbols (for example, if you want to allow other NLMs to call a function provided by your NLM) you must put EXPORT directives in a linker command file.
MODULES. NLMs that must be loaded before your NLM is loaded, including NLMs that export symbols that your module imports. You can also specify a file containing a list of NLMs with an @ followed by the file name containing the list.
DATE. The NLM's build or release date, which is displayed when the NLM loads.
HELP. Specifies the file path to an internationalized help file. (This command is unnecessary with CodeWarrior, since .HLP files can be added to a project.)
MESSAGES. Specifies the file path to an internationalized message file. (This command is unnecessary with CodeWarrior, since .MSG files can be added to a project.)
STAMPEDDATA. Include a specified file in the linked executable, with a specified linker stamp (this command is rarely necessary).
XDCDATA. Specifies a path to a file containing Remote Procedure Call (RPC) descriptions for functions in the NLM at runtime. The RPC compiler has not yet been released.
The table below describes the linker options as shown on the NLM Settings and NLM Target panels of the Build Settings dialog. These settings correspond to commands that go in the linker command file. If you prefer to use the linker command file approach, see the CodeWarrior manual "Targeting NetWare" for the exact syntax of each command.
Descriptions of Linker Options
|
Settings
|
Description
|
|
NLM Type |
Specifies the kind of service the NLM provides. The recognized types and file name extensions are: NLM Generic NLM (default) LAN LAN driver DSK Disk driver NAM Name space support module NLM Utility or support program MSL Mirrored Server Link NLM OS NLM NLM Paged high OS NLM HAM Host Adapter Module (works with Custom Device Module) CDM Custom Device Module (works with Host Adapted Module) NLM OS Reserved NLM OS Reserved NLM OS Reserved |
|
Stack |
Specifies the size of the stack, in bytes, at runtime. The minimum stack size is 2KB (2048 bytes). Over 4KB (4096 bytes) is recommended. The default is 8192. |
|
Screen Name |
Specifies which screen name to use. The options in this pop-up menu are: User Specified the linker uses the screen name specified in the Initial Screen Name field. Console the NLM uses the console for the screen name. No Default no screen name appears for the NLM. |
|
Initial Screen |
Specifies the NLM's name as it appears in the NLM's first screen, which is created when the NLM is loaded. This option is only available if "User Specified" is selected from the Screen Name popup. The screen name is displayed at the top of the console when the Alt key is pressed, and displayed in the list of current screens when the Alt+Esc keys are pressed. The screen name is restricted to 71 characters or less. |
|
Initial Thread |
Specifies the names of the NLM's threads. The first 12 characters of initialThreadName are used to create names for threads for the NLM. For example, if initialThreadName is SockProcess, then the threads created in the NLM would be named SockProcess 1, SockProcess 2, and so on. Thread names can be displayed by using the .P option in the NetWare Internal Debugger, and in the Monitor NLM's Processor Utilization screen. |
|
Copyright |
Specifies a copyright message to display on the server console screen when the module is loaded. |
|
Description |
Specifies the text (up to 127 characters) to be displayed on the console screen when the NLM is loaded. |
|
Version |
The version number consists of a major version, minor version, and an optional revision number. It displays on the console screen when the NLM loads. The major version can be any number. The minor version must be from 0 to 99. The revision parameter must be from 0 to 26. If it is 0 no revision character appears when the NLM loads. If it is 1 through 26, its corresponding alphabetic character appears. |
|
Generate Link Map |
If checked, the linker generates a text file listing information about what was linked while creating the program. |
|
Generate CV Sym file |
If checked, the linker generates a Code View-compatible symbol file for use with the Novell debugger. |
|
Allocate Unitialized Data in File |
Specifies when to allocate uninitialized static variables. Static and global variables that aren't explicitly initialized are initialized to zero by default. When selected, the linker will allocate space for the uninitialized data in the NLM file and fill that space with zero values. When deselected, the linker doesn't allocate space for the data in the NLM file; instead, it assumes that the runtime library will allocate memory at run time. If this option is deselected, make sure to enter "_mw_Prelude" (without the quotes) in the Start field of the NLM Linker setting panel. This routine allocates and zeros the appropriate memory for the uninitialized static variables, as well as any other initialization tasks for the NLM. |
|
Generate Internal Debugger Records |
When this box is checked, the linker creates debugging records for the NetWare Internal Debugger. The debug records contain all internal data and procedure names. |
|
Entry Points |
|
|
Start |
Specifies the name of a routine in the NLM where execution should start. If the "Allocate Uninitialized Data in File" option is selected, enter _Prelude in this field. If "Allocate Uninitialized Data in File" is deselected, enter _mw_Prelude in this field. |
|
Exit |
Specifies the name of the routine to call before exiting the program. This procedure should assure that all resources have been released and all threads terminated before the NLM unloads. If this option si not used, Stop is the default. The default exit procedure, _Stop, is defined in prelude.obj. |
|
Check |
Specifies the name of a function in the NLM that will be executed when the console operator attempts to unload the NLM using the UNLOAD console command. This function should return 0 if the NLM can be unloaded, and nonzero if the NLM does not want to be unloaded. |
|
Flags |
|
|
Reentrant |
When selected, specifies that the NLM will be loaded into memory only once, but may be executed many times from that same memory image. |
|
Multiple |
When selected, specifies that the NLM can be loaded more than once. |
|
Synchronize |
When selected, specifies that the load process sleeps until the NLM calls the SynchronizeStart function, preventing any other console commands (particularly LOAD) from being processed while the module is being loaded. |
|
PseudoPreemption |
When selected, specifies that the OS may force the NLM to relinquish control if the NLM doesn't do so often enough. The amount of time that is allowed to pass before the NLM is forced to relinquish control is set by the console command "Set Pseudo Preemption Time." When the NLM exceeds this time limit, the OS regains control on the next file read or write system call that the NLM makes. |
|
OS Domain |
When selected, specifies that the NLM is loaded into the operating system's domain. |
|
AutoUnload |
Indicated that the NLM should be unloaded when none of its entry points are in use by NLMS. |
Debugging
CodeWarrior for NetWare includes the Novell Remote Debugger (formerly known as Rdebug). The Novell Remote Debugger is a source-level debugger that allows you to debug an NLM from a remote workstation. Communication between the server and the remote debugging station can run over a serial cable or Ethernet. Currently, the only Ethernet card supported for remote debugging is the Novell/Eagle NE2000.
Documentation for the Remote Debugger is available at Novell's DeveloperNet Web site: http://developer.novell.com/ndk/rdebug.htm.
Using CodeWarrior for NetWare: Examples
We at Novell Developer Notes always like to provide example programs to illustrate how to use programming techniques and tools. We're confident that the information given in this article is sufficient to get you started using CodeWarrior for NetWare for your NLM development, especially if you have previous NLM development experience. In fact, you probably will find CodeWarrior's development environment much easier to use than anything you've worked with previously. We will be using CodeWarrior for NetWare in our future NLM development. Watch for example projects at our DeveloperNet University Web site:http://developer.novell.com/education/.
Disclaimer
The origin of this information may be internal or external to Novell. While Novell makes all reasonable efforts to verify this information, Novell does not make explicit or implied claims to its validity.