AnyInfo Example 7: Using JDBC to Access an Oracle8 Database
Articles and Tips: article
Senior Research Engineer
Developer Information
01 Dec 1998
This article explains how to access the database management system by creating an Oracle8 end-tier database service for AnyInfo and accessing it using Java's Database Connectivity (JDBC).
- Introduction
- Part 1: Brief Review of AnyInfo's Distributed Architecture
- Part 2: How Does JDBC Work in AnyInfo?
- Part 3: Installing and Running Oracle8
- Part 4: Finally, the Source Code Listing and Explanation
- Conclusion
Introduction
This article discusses the seventh example in the series, The Transformation of API_Info into AnyInfo, a Multi-Tiered, Data Base Application, introduced in the July issue.
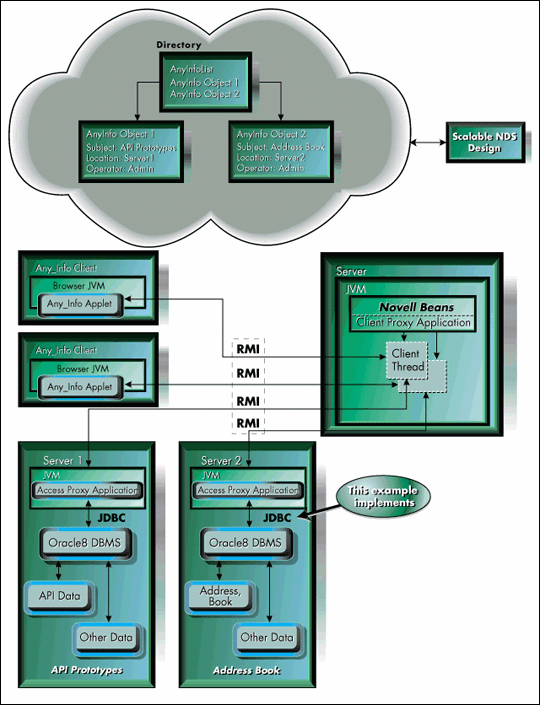
Novell is now shipping a five-user version of Oracle8 free with NetWare 5. As shown in Figure 1, this example explains how to make use of this potent database management system by creating an Oracle8 end-tier database service for AnyInfo and then accessing it using Java's Database Connectivity or (JDBC) package.
Figure 1: The AnyInfo example discussed in this article uses Java's Database Connectivity (JDBC) APIs to access an Oracle8 database.
This article is divided into four parts:
Part 1 briefly reviews the purpose and parts of AnyInfo.
Part 2 describes how JDBC is used in AnyInfo.
Part 3 describes the NetWare Oracle8 install and run process.
Part 4 presents the code listing and explanation for AnyInfo's JDBC usage.
Part 1: Brief Review of AnyInfo's Distributed Architecture
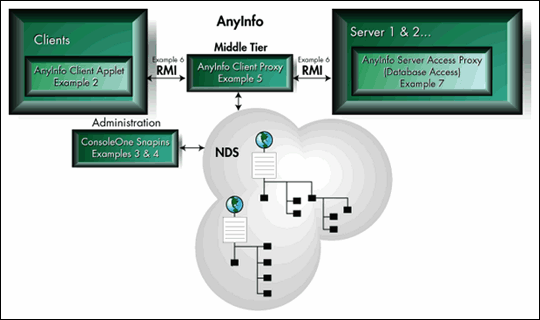
As shown in Figure 2, the AnyInfo application consists of four main pieces:
The NDS administration snap-ins (currently implemented with the ConsoleOne snap-ins described in examples 3 & 4 of this series).
The client Applet (described in example 2 of this series).
The Client Proxy Application (described in example 5 of this series), which uses NDS directory information access to allow the user to select and connect to any number of AnyInfo database servers anywhere on the network.
The Database Access Proxy Application (described in this example) explains how to use JDBC to access an Oracle8 database.
Figure 2: Because AnyInfo uses Applets, there is no client installation or maintenace.
AnyInfo examples 2, 3, 4, 5, 6, and 7 are written in Java. Each piece of code runs in a separate JVM.
Note: If you would like more information on the user interface and operation of the AnyInfo sample application, refer to example 5 from the September,1998 issue of Novell Developer Notes.
Part 2: How Does JDBC Work in AnyInfo?
In earlier AnyInfo examples, a simple lab NLM called API_Info was used to access a text file containing AnyInfo's simple database information. Although this was pretty fast, it didn't accurately demonstrate real-world database access. This AnyInfo example replaces the API_Info database access service with a simple Oracle8 database access service using Oracle's JDBC thin driver.
The standard Java package java.sql contains APIs which can be used to control JDBC drivers to access data from database management systems (DBMSs). JDBC drivers are usually provided by the DBMS vendor.
Oracle8 on NetWare ships with two types of JDBC drivers:
OCI drivers: Because Oracle's OCI-based JDBC drivers must go through native code (NetWare NLMs) to call the Oracle DBMS directly, they can only be run on the server. Oracle says that the OCI drivers provide the highest compatibility with the different versions of the Oracle database. Also, because much of the functionality in the OCI drivers is implemented by NLMs, they will be very fast. This makes the OCI drivers ideal for AnyInfo's architecture (AnyInfo's database access proxy runs on the database server where the OCI NLMs would run). However, time constraints motivated our use of the thin drivers for now. Look for an article on the Oracle's OCI drivers in a later issue. Oracle's OCI drivers are compatibly with Java 1.1 and work with Oracle release 8.0.3 and above.
Thin drivers: Oracle's thin drivers are pure Java. They use SQL*Net on top of Java sockets to connect to the Oracle DBMS. Because they are pure Java, they can be run from anywhere on the network provided you point them at the target Oracle8 server with the right JDBC URL (discussed later). In fact, they can even be downloaded as part of an applet. This location transparency makes them ideal for two-tiered architectures. However, AnyInfo uses the thin driver because of its reputation for reliability. Oracle has thin driver versions for Java 1.0 and 1.1 which work with Oracle's release 7.3.2 and above.
Note: With NetWare 4.11, Service Pack IWSP5b needs to be installed before installing the Oracle JDBC drivers using the Oracle Installer.
Part 3: Installing and Running Oracle8
Follow the steps below to install and run Oracle8.
Note: There are scripts called ORASTART and ORASTOP that you can use but I couldn't get Oracle to work completely with them. You might give them a try first before attempting the lengthy procedure below.
Installing and Running Oracle8 on NetWare:
Install Oracle8 carefully and make no assumptions. Make sure that you record the password that you specify during installation.
Once installed, [Oracle volume name]:\ORANW803\jdbc\lib\classes111.zip will contain the Oracle driver classes (or classes102.zip if that is the version of Java that you are working with). Add this path to your CLASSPATH each time you run Oracle by typing:
envset CLASSPATH=$CLASSPATH;[Oracle volume name]:\ORANW803\JDBC\lib\classes111.zip
or by entering:
CLASSPATH=$CLASSPATH;[Oracle volume name]:\Oranw803\JDBC\Lib\classes111.zip
at the bottom of the file SYS:\etc\java.cfg.
Once installed, Oracle's NLMs need to be put in your server's search path. To make sure that they are there:
Type NWCONFIG at your server to load the NWConfig NLM.
Select NCF Files Options
Select Edit AUTOEXEC.NCF File
Check that the line
SEARCH ADD 1 [Oracle volume name]:ORANW803\NLMis in the file, where [Oracle volume name] is the volume on which you installed Oracle.
If not, add it.
Also, if you wish to launch Oracle every time you launch the server, enter ORALOAD at the bottom of the AUTOEXEC.NFC file and save it.
Exit NWConfig.
Reboot the server.
After rebooting, you need to load the DBMS. If you didn't add ORALOAD to your AUTOEXEC.NCF file, type ORALOAD at the server now.
After loading the DBMS, check to make sure that an Oracle listener is activated. Without a listener, the DBMS will not be able to communicate. To check for a listener:
Type EASYCFG at your server to load Oracle's easycfg.nlm.
Select Configure the Listener.
Select Configure Listener Addresses.
Select View Listener Addresses (move cursor with arrows and select with space bar).
You should see a TCP listener listed. If you do, exit from easycfg. If you don't see a TCP listener, go back to the previous panel and select Add Listener Address. Then select TCP/IP by moving the cursor and pressing the space bar and enter to add the TCP/IP listener.
Once a listener is activated, you must bind a database instance to the DBMS. To bind a database instance with the DBMS:
Check that the file [Oracle volume name]:ORANW803\Database\Initorcl.orais present.
If you find it, make a copy in the same directory and name it init.ora.
Type NWDBM80 to load Oracle's NWDBM80 NLM.
Enter the password that you specified during installation.
Select Instance Information.
Select Startup Database.
Wait for the dialog resulting from step E; then press the F10 key to start up the default database instance (comes with install). Give NWDBM80 a chance to initialize the instance.
Exit NWDBM80.
NetWare Oracle8 installs two sample users for the sample database. One is accessed with the username scott and password tiger and the other is accessed with the username system and the password manager. Once the database instance is activated, you should confirm that you can access the default system database locally at the server before attempting to access Oracle remotely. To do this:
Load Oracle's SVRMGR30 NLM.
Type connect.
Enter the username system and the password manager.
SVRMGR should print out CONNECTED. If not, something is wrong and you may wish to roll back this configuration process or reinstall.
Once you have connected to the database, type Select * from USER_TABLES; don't forget the ;). SVRMGR should respond with a slew of data from the default database. If you received the data on the server's monitor, then you were able to establish a local connection.
Note: SVRMGR30 is a handy way to test your SQL on Oracle8 before you add it to your code.
Finally, you need to test the ability to access the default database remotely using the thin driver from a client platform. You can run this test from any machine (your development machine for example) that has subnetwork access to the server hosting Oracle8, because of the thin driver's location transparency.
Create a small Java application using the source below.
In the JDBC URL, change the IP address component from 123.12.123.123 to the IP address for your Oracle8 server host.
Build and run the ConnectTest application.
If ConnectTest executes and exits without a problem, then the thin client is probably going to be able to access the database without a problem. If an exception is thrown during the ConnectTest constructor or a machine locks up, you may wish to roll back this configuration process or reinstall.
import java.util.*;

import java.sql.*;


public class ConnectTest

{ public static void main(String[] args)

    { ConnectTest test = new ConnectTest();}


    public ConnectTest()

    { try

       {  DriverManager.registerDriver(new oracle.jdbc.driver.OracleDriver());

            String jdbcURL =

                     "jdbc:oracle:thin:@123.12.123.123:1521:orcl", "system", "manager";

        Connection conn = DriverManager.getConnection( jdbcURL );

        conn.close();

    }

    catch(SQLException ex)

    {

       ex.printStackTrace();

       System.out.println(ex.getMessage());

    }

    catch(Exception ex)

    {

      ex.printStackTrace();

      System.out.println(ex.getMessage());

    }

  }

}
If you made it this far, you are ready to write some code.
Part 4: Finally, the Source Code Listing and Explanation
Below is a source code listing for AnyInfo's JDBC access. All data types and methods belonging to the JDBC package are in bold. The large, underlined numbers correspond to the explanations presented after the code listing.
1      /************ interface DBAccessProxy *******************/

       public interface DBAccessProxy extends java.rmi.Remote

           public Vector getTopicList(String tableName ) throws java.rmi.RemoteException;

           public String deleteRecord (String anyInfoName, String tableName )

                                              throws java.rmi.RemoteException;

           public String updateRecord(String anyInfoName, String newData, String tableName )

                                              throws java.rmi.RemoteException;

           public String getRecord(String anyInfoName, String tableName)

                                              throws java.rmi.RemoteException;

           public String createRecord(String anyInfoName,String anyInfoData, String tableName)

                                              throws java.rmi.RemoteException;


/************  class JDBCDBAccessProxy implements DBAccessProxy*******************/

               import java.sql.*;

               public class JDBCDBAccessProxy extends UnicastRemoteObject implements DBAccessProxy

               {   Connection conn = null;


2               public static void main ( String[] args )

                /*If the code below fails, try making the following change to the file - SYS:ETC\HOSTS

                  CHANGE 127.0.0.1       loopback   lb    localhost

                  TO:    127.0.0.1       loopback   lb

                         123.12.123.123  localhost  #replace number with your server IP addr */


               {  InetAddress thisInetaddress = null;

                  try {   thisInetaddress = InetAddress.getLocalHost();   }

                  catch( java.net.UnknownHostException e )  {   fail ( e );  }

                  String thisIPAddress = thisInetaddress.getHostAddress();


    // setup RMI to use the current local address

                  Properties currentProperties = System.getProperties();

                  currentProperties.put("java.rmi.server.hostname", thisIPAddress);

                  System.setProperties(currentProperties);


             // Create and install a security manager

                  System.setSecurityManager(new RMISecurityManager());


        try

        { JDBCDBAccessProxy remoteObj =

                           new JDBCDBAccessProxy( thisIPAddress,args[0],args[1] );

          Naming.rebind("//"+thisIPAddress+"/"+"JDBCDBAccessProxy", remoteObj);

          System.out.println("JDBCDBAccessProxy bound in registry");

        }

        catch (Exception e)      {   fail ( e );  }

      }


    public JDBCDBAccessProxy ( String thisIPAddress, String database, String password)

                                                         throws RemoteException

   {  super();

3               try

               {   DriverManager.registerDriver(new oracle.jdbc.driver.OracleDriver());

           String jdbcURLString = "jdbc:oracle:thin:@"+thisIPAddress+":1521:orcl";

           conn = DriverManager.getConnection(jdbcURLString,database,password );

                                 conn.setAutoCommit(true);

       }

       catch( Exception e)   {   fail ( e );  }

    }


    public static void fail ( Exception e  )

    {  System.out.println(e.getMessage());

      e.printStackTrace();

      System.exit ( 1 );

    }


4    public void finalize( ) throws IOException

    {   if( conn != null )

        {   try {   conn.close();   }

            catch( SQLException e){ }

    }

 }


5    public Vector getTopicList( String tableName ) throws RemoteException

    {  Vector topicList = new Vector();

        try

        {   Statement stmt = conn.createStatement();

            String sql = "Select AnyInfoName from "+tableName;

            ResultSet rs = stmt.executeQuery(sql);

            while( rs.next() )

            {   String name =  rs.getString("AnyInfoName");

                topicList.addElement(name);

            }

             stmt.close();

        }

        catch( SQLException e)   {   doSQLError(e);   }

        return topicList;

    }


6    public String deleteRecord( String anyInfoName, String tableName)throws RemoteException

    {   String result = "";

        try

        {   Statement stmt = conn.createStatement();

            String sql = "delete from "+tableName+" where AnyInfoName = '"+anyInfoName+"'";

            stmt.executeUpdate(sql);

              stmt.close();

    }

    catch( SQLException e)   {   doSQLError(e);   }

     return result;

 }


7    public String getRecord( String anyInfoName, String tableName) throws RemoteException

    {   String result = "";

        try

        {   Statement stmt = conn.createStatement();

            String sql = "select AnyInfoData from "+tableName+

                                           " where AnyInfoName = '"+anyInfoName+"'";

            ResultSet rs = stmt.executeQuery(sql);

            rs.next();

            result =  rs.getString("AnyInfoData");

            stmt.close();

        }

        catch( SQLException e)   {   doSQLError(e);   }

         return result;

    }


8    public String updateRecord( String anyInfoName, String newData, String tableName )

                                                                 throws RemoteException

    {   String result = "";

        try

        {   Statement stmt = conn.createStatement();

            String sql = "update "+tableName+" set AnyInfoData = '"+newData+

                                         "' where AnyInfoName = '"+anyInfoName+"'";

            stmt.executeUpdate(sql);

            stmt.close();

        }

        catch( SQLException e)   {   doSQLError(e);   }

        return result;

 }

 9      public String createRecord( String anyInfoName,String anyInfoData, String tableName)

                                                                     throws RemoteException

     {   String result = "";

         try

         {   Statement stmt = conn.createStatement();

             String sql =

                 "INSERT INTO "+tableName+" VALUES('"+anyInfoName+"','"+anyInfoData+"')";

         stmt.executeUpdate(sql);

           stmt.close();

     }

     catch( SQLException e)   {   doSQLError(e);   }

      return result;

  }


  private void doSQLError( SQLException e)

  {   System.out.println( e.getMessage() );

      e.printStackTrace();

  }

}
AnyInfo's JDBC Source Code Explanation
Before we begin to dissect the sources above, we should describe the structure we used to create database tables for AnyInfo.
CREATE TABLE ADDRESSBOOK

(

 AnyInfoNameCHAR        (256),

 AnyInfoData CHAR       (1024)

);
As you can see in the typical example above, an AnyInfo database is really nothing more than a two column table which maps key names to string values. We kept it simple because this series is about connecting different pieces of a distributed application, not about SQL.
Note: Because AnyInfo's database is simple, the structure of each result (its fields and values) is known by the DBAccessProxy application. For this reason, JDBC's powerful metadata capabilities won't be needed.
In the previous example, AnyInfo's single middle-tier client proxy application used buffers to communicate with remote DBAccessProxy applications because they fronted instances of AnyInfo's legacy lab database service NLM which required a buffer as input. Now that we are using Oracle instead of the legacy NLM, we can expose AnyInfo's database operations as remote RMI methods instead of using buffers.
The DBAccessProxy interface defines an RMI object that will be instantiated to front a database service on every AnyInfo database server in the system. AnyInfo's Client Proxy server will hold references to these objects as their databases are selected and accessed by the client applets. In this example, notice that this interface has many more methods than it did in previous examples.
RMI allows us to virtually ignore the mechanics of network communication. With RMI, you can call a method in an object on another machine just as if it were in the same address space. For example, instead of packing and unpacking a buffer with a request to get information from a record, by using RMI the AnyInfo client proxy can now simply call the getRecord( ) method in the DBAccessProxy application on the server hosting the Oracle8 database.
The DBAccessProxy application requires a database username and password as inputs to its main( ) routine. These values will be used later during the constructor when a connection to the database is obtained.
Note: The username and password are entered on the command line which loads the main class of the DBAccessProxy application.
For example:
java JDBCAnyInfoClasses.DBAcessProxy system manager
In the process of initializing itself for RMI, the DBAccessProxy application's main( ) routine instantiates its remote object and registers it with the RMI name registry on the server.
Note: For more information on how RMI is used in AnyInfo, refer to example 6.
During the DBAccessProxy constructor, an attempt is made to obtain a connection to the database.
The first thing that JDBC's registerDriver( ) method does is load the main class for the target driver (in this case Oracle's).
Note: Often, you will see a JDBC driver loaded with a call like Class.forName(oracle.jdbc.driver.OracleDriver);. However, the forName( ) method will build fine even if its String parameter doesn't actually lead to a valid class. For that reason, I prefer the registerDriver( ) method because it will fail during a build if its class can't be found by the compiler. Check to see that the driver classes actually exist.
After the driver classes are loaded, the next thing that registerDriver( ) does is to register the loaded driver with Java's JDBC DriverManager class.
The JDBC URL string in the DriverManager.getConnection( ) method can be broken into the following components:
Transport
JDBC
Database Driver
oracle:thin
Server ID
thisIPAddress
Port
1521
Database ID
orcl
Note: The port 1521 and database ID orcl are part of the default setup in the ORA configuration files in the Oranw803\ Net80\Admin\ directory.
During the getConnection( ) method, the DriverManager goes out with a connection request over IP to the specified IP address and port. In the case of this example, the request never leaves the server so we don't have to deal with SSL to encrypt the password. The Oracle listener picks up this request and attempts to authenticate the database username and password with the DBMS.
If the request can be authenticated, a connection is granted to the requesting DriverManager.
Just before the DBAccessProxy object is garbage collected, it will close the database connection to release the resources allocated for it.
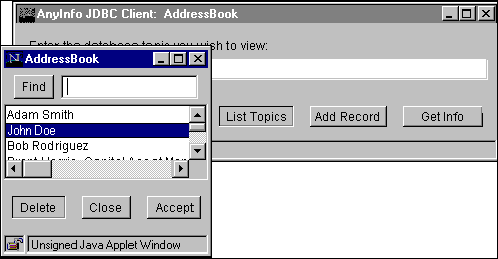
The DBAccessProxy's getTopicList( ) method will be called when the client Applet user clicks the List Topics button on the client Applet's main window, as shown in Figure 3. The DBAccess object should respond by returning a list of topics for the Applet to put into its AddressBook window. Pressing AnyInfo's List Topics button displays a list of topics from the database table selected with the Select DB button. Topics can then be deleted.
Figure 3: List Topic button on the client Applet's main window.
To build this list, DBAccessProxy's implementation of getTopicList( ) first creates a Statement object for the connection. This statement will contain the SQL that will be given to the DBMS to obtain the list data.
The client applet knows which AnyInfo database its user is interested in. It passes the name of the AnyInfo database as the tableName parameter to the database operation methods in the DBAccessProxy object. Each database operation method builds the tableName into its SQL statement. This allows the same methods to target multiple AnyInfo databases running under the same DBMS.
The getTopicList( ) method's SQL statement selects all of the values in the specified AnyInfo database's AnyInfoName column. This statement is sent to the DBMS with the executeQuery( ) method to obtain a result set containing the requested data.
Because only AnyInfoNames were requested, all of the entries in the result set will be AnyInfoNames. getTopicList( ) sequences through each returned entry to build the topic list and returns it to the client applet which puts it into the AddressBook window you see in Figure 3.
The client Applet will pass the highlighted topic name from its topic list window to DBAccessProxy's deleteRecord( ) method when its Delete button is selected, as shown in Figure 3.
The SQL in deleteRecord( ) deletes the row from the database while the Applet deletes the name from its locally displayed list.
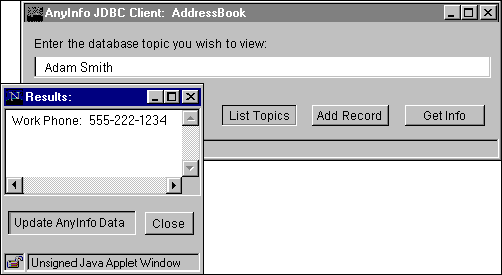
The client Applet will pass the name from the database topic field in its main window to DBAccessProxy's getRecord( ) method when its Get Info button in the Applet's main window is selected, as shown in Figure 4. Pressing AnyInfo's List Topics button displays a list of topics from the database table selected with the Select DB button. Obtained data can then be updated with the Update AnyInfo Data button. Obtained data can then be updated with the Update AnyInfo Data button.
Figure 4: Get Info button in the Applet's main window.
The SQL in getRecord( ) obtains the value in the AnyInfoData column that is associated with the anyInfoName in the AnyInfoName column. Even though we already know that there will only be one value returned, the rs.next( ) method is needed to select it in the ResultSet before the String value can be obtained with getString( ).
The updateRecord( ) method will be called when the Update AnyInfo Data button in the applet's result window is selected, as shown in Figure 4.
The SQL in updateRecord( ) finds the row containing anyInfoName in the AnyInfoName column and replaces the data in the row's AnyInfoData field with the newData value.
The client Applet will call the createRecord( ) method when the Add Data button in the Applet's add record window is selected, as shown in Figure 5. A new entry can be added by pressing the main window's Add Record button. The new entry can then be committed to the database with the Add Data button.
Figure 5: "Add Data" button in the Applet's add record window.
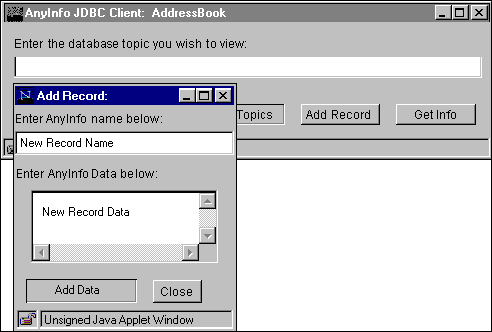
The SQL in createRecord( ) creates a new row containing anyInfoName in the AnyInfoName column and anyInfoData in the AnyInfoData column of the table specified by the tableName parameter.
Conclusion
In this article we implemented AnyInfo's five simple database operations by using JDBC to replace the legacy API_Info database service NLM inherited from previous examples. As you have seen, JDBC coupled with RMI is a very powerful marriage. In the future, look for a JDBC driver for NDS from Novell.
For more information about other examples in this series, refer to: http://developer.novell.com/education/
To download the project corresponding to this article, refer to:http://www.novell.com/coolsolutions/tools/15620.html
Disclaimer
The origin of this information may be internal or external to Novell. While Novell makes all reasonable efforts to verify this information, Novell does not make explicit or implied claims to its validity.