Configuring LDAP Services for NDS
Articles and Tips: article
Senior Technical Writer
Developer Information
01 Nov 1998
Details how to configure version 3 of Novell's LDAP Services for NDS. Explains how to place the LDAP catalogs on your network and some of the concepts you must understand in order to configure your LDAP server. Third in a series of LDAP articles.
- Introduction
- Adding Snap-ins to NWAdmn32
- Installing LDAP Services
- Configuring the Default LDAP Services on the NetWare 5 Server
- Customizing LDAP Services
- Refreshing LDAP Configuration Information
- Viewing the Catalog Summary and Manually Querying the Catalog
- Conclusion
Introduction
As part of the LDAP series, I promised to tell you how to configure version 3 of LDAP Services for NDS. This article fulfills that promise. The other articles in the series were "Developing an LDAP Client for NDS," in Novell Developer Notes, July 1998, and "Differences in LDAP versions 2 and 3 Protocols" in Novell Developer Notes, August 1998.
This article goes into detail about configuring version 3 of Novell's LDAP Services for NDS. If you don't want the details or the explanation, the online help for NWAdmin's LDAP plug-ins can help you configure LDAP services.
As you use this article, be certain that you're configuring LDAP services for NDS on a NetWare 5 server and not on a NetWare 4.x server. The NetWare 5 NWAdmn32 uses LDAP plug-ins that are installed when you install NetWare 5. Also, be certain that you're using the NWAdmn32 that came with your NetWare 5 software. Other NWAdmin and NWAdmn32 versions don't use the same LDAP plug-ins. NWAdmn32.exe is located in the sys:public\win32 directory.
If you reinstall LDAP services, you must first delete these objects in NWADMN32:
LDAP Server object
LDAP Catalog object associated with that server
The reinstall process does not write over these objects. Also, keep in mind that if you delete or reinstall NDS, you must reinstall LDAP services.
Adding Snap-ins to NWAdmn32
If you are using an older version of NWAdmin and don't want to lose any customized snap-ins, add your snap-ins to the NWAdmn32 on your NetWare 5 Server.
To add snapins to NWAdmn32, complete the following steps:
Put your snapins in the public/win32/snapins directory.
Resource dlls and help files go into the public\win32\nls\<lang< directory.
NWAdmn32 automatically loads the snap-in dlls, help and resource files in its default directories.
If you have installed NetWare 5, the snap-in files are already in the correct directories, and NWAdmn32 includes the snap-ins.
Installing LDAP Services
Because an LDAP server can browse the entire NDS tree, you currently need to install only one LDAP server per geographic location. However, if you must use two different LDAP catalogs, you must install two LDAP servers because each LDAP server uses at most one catalog. Keep in mind that LDAP catalogs can consume large amounts of disk space.
The only issues you must immediately resolve when you install LDAP services are:
Whether to enable the use of the LDAP catalog on the server. Choosing to enable the use of the LDAP catalog on the server means that an LDAP catalog will be loaded on the server you are creating. You don't always want to choose this option because multiple LDAP servers can share the same catalog.
How to search the LDAP catalog.
When you install LDAP, you automatically install Catalog Services.
What Is an LDAP Catalog?
A catalog is a flatfile database that contains selected NDS database information. It's stored as a stream attribute on an NDS object and provides rapid access to the selected directory data. Searching a catalog instead of an entire directory especially speeds searches in networks where some NDS objects are only accessible across a WAN link. Searching across those links takes time and network bandwidth. A catalog also speeds searches because it contains only an indexed subset of data.
When you install a catalog, it installs with a default filter that defines the objects and attributes the catalog stores and its indexes. You can change this default configuration in the LDAP Catalog object. For example, you could build a catalog that is essentially an address book, containing only employee names, telephone numbers, addresses and E-mail addresses. See "Specifying the Objects the Catalog Will Contain" later in this article.
You can also create different LDAP catalogs. For example, you could create an LDAP catalog for administrators to use and a different catalog for the users to use. The administrator's catalog might contain all the attributes for all user objects. The users' catalog might contain only the username, telephone number, and E-mail attributes. Each of these catalogs would have to be used by a different LDAP server.
Some applications create their own catalogs. For example, Novell's Contextless Login creates a catalog of users' common names and their telephone numbers.
LDAP catalogs are unique to the NDS tree, not the server. This means that all LDAP catalogs for a given set of information generated for any LDAP servers in the tree are identical. The LDAP catalog can be very large and can be replicated either by NDS or by a slave catalog. Therefore, other LDAP catalogs that contain the same objects and attributes and are generated for this tree merely waste disk space. As a general rule, if you want to search a local copy of the LDAP catalog, install either an NDS or a slave catalog replica onto your server rather than generate a new one.
A slave catalog is a copy of a master catalog. Each catalog requires a master catalog; slave catalogs are optional. The master catalog updates its information to the slave catalog. This means that the dredging of the catalog information occurs only once. The master catalog then copies the information to the slave catalog. This method saves the network bandwidth required by the dredging process. Dredging refers to the process of searching for the information to be put in the catalog.
Determining Whether to Enable Using the LDAP Catalog
The first LDAP issue you must resolve happens during the NetWare 5 installation process and involves the use of the LDAP catalog. If you choose to install LDAP services on the Additional Products and Services page and click Next, the LDAP Services for NDS Installation page displays the following message:
Generally, you should only enable the use of one LDAP catalog per geographic location. LDAP catalogs are stored as NDS objects and thus, can be replicated. If a replica of an LDAP catalog on another server is available locally, you should configure LDAP to use the replicated catalog using NetWare administrator after the installation is complete.
Do you want to enable the use of the LDAP catalog on this server?
Clicking the help button displays:
If you decide to enable the use of the LDAP Catalog, a unique LDAP Catalog object will be created. This enables LDAP users to access NDS data from a catalog rather than from the entire NDS database. The use of the LDAP Catalog object provides significantly faster access, especially in an NDS tree that is widely distributed geographically or a tree that is structurally flat with large number of objects per container.
As these messages tell you, you don't always want to load the LDAP catalog on the LDAP server you are creating. Whether you answer yes or no to the question Do you want to enable the use of the LDAP catalog on this server?depends upon your network. Keep in mind that if you don't want to load the catalog on this server, you can assign a catalog to your LDAP server in the LDAP Server Object's Details pages. See "Specifying the LDAP Catalog Search Options" later in this article.
Selecting Yes to Do you want to enable the use of the LDAP catalog on this server?causes an LDAP catalog to be generated and installed on your LDAP server. This catalog will contain a default set of information that you can change when you configure the LDAP Catalog object. Selecting No means that no LDAP catalog will be stored on that LDAP server. As a general rule, select No if you have already installed an LDAP catalog that is identical to the one you want this server to use. When you configure LDAP servers, you can assign the catalog to the server. However, if you want to create a different LDAP catalog, select Yes.
Placing LDAP Catalogs on Your Network
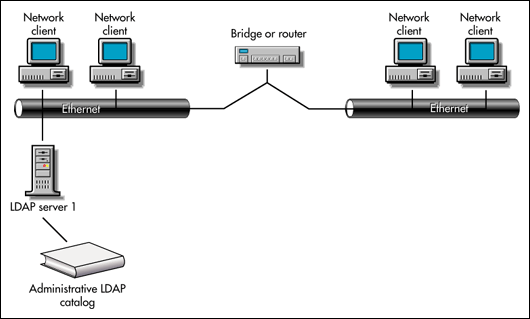
The next illustrations show catalog placement options for LDAP servers. Novell generally recommends that you install only one LDAP catalog and one LDAP server per geographic location. Keep in mind that for the best resource management, you should generally have a server use the LDAP catalog over a short distance rather than to load a catalog locally on servers. Catalogs consume a large amount of disk space. However, also remember that the closer the server is to the catalog, the faster your searches will be. So, as a general rule you will want one LDAP server with a local catalog per geographic location, as shown in Figure 1.
Figure 1: One LDAP catalog and one LDAP server.
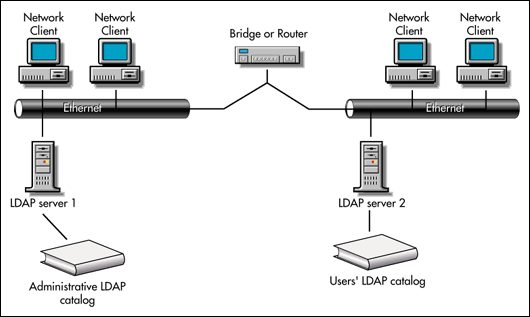
However, if your implementation requires two different LDAP catalogs, such as one version for administrators and one version for users, you would install two LDAP servers, each with their own catalog. Figure 2 shows this.
Figure 2: LDAP servers and catalogs in the same geographic area.
The next illustrations show the various ways you can configure the LDAP server to use the LDAP catalog across a WAN link.
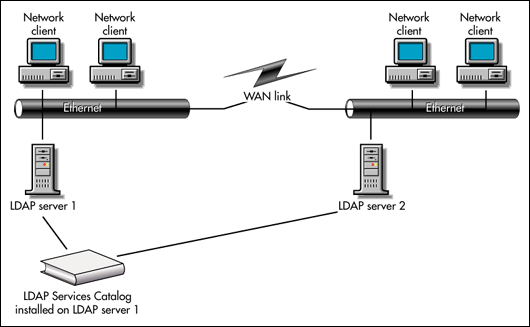
Figure 3 shows two LDAP servers on a WAN, the servers are all sharing the LDAP catalog held by LDAP server 1. Each time LDAP server 2 searches the catalog, it must cross the WAN link. For many networks, this is not a good configuration because searching across a WAN link requires too many network resources.
Figure 3: LDAP servers sharing the LDAP catalog across a WAN link.
To speed searching over a WAN link, you could consider one of the following configurations at each geographic location:
An NDS replica that contains the catalog
A slave LDAP catalog
Each of these options lets you avoid searching over a WAN link. If you have an NDS replica that contains an LDAP catalog, you don't need to load a slave local catalog. NDS replicates the LDAP catalog when it synchronizes the replicas. Installing a slave catalog lets you avoid synchronizing an entire NDS replica over a WAN link, if the LDAP catalog is the only information you want to replicate. Catalog services synchronizes the slave catalog.
Figure 4 shows LDAP servers across a WAN link with an NDS replica of the LDAP catalog. This is a good solution if you have replicas of the same NDS partition on both sides of the WAN link. LDAP server 2 doesn't have to cross the WAN link to search the LDAP catalog. NDS synchronizes the LDAP catalogs across the WAN link at the same time that it synchronizes the entire replica across the WAN link. Keep in mind, this means that the LDAP catalog replica might not be as current as the LDAP catalog's NDS master replica. An NDS replica of a catalog will only update when NDS updates the entire replica.
Figure 4: An NDS replica of the LDAP catalog on a WAN.
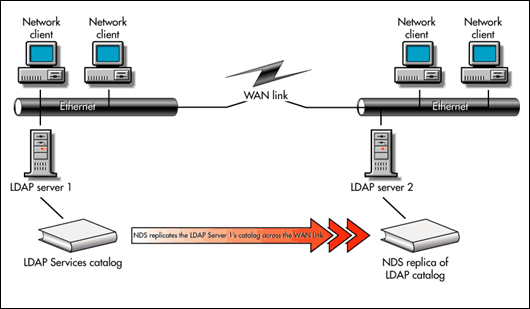
Figure 5 shows an LDAP services master catalog installed on one side of the WAN link and a slave catalog installed on the other side of the WAN link. Choose this method when you don't want to place an entire NDS replica across the WAN link. See the "Defining Master/Slave Catalog Relationships" section, later in this article, for more information about setting this up. Also, the "Defining the LDAP Catalog Update Schedule" tells you how to set the schedule so that you can update your slave catalog across the WAN link at the best time for your network.
Figure 5: Master and slave catalogs across a WAN link.
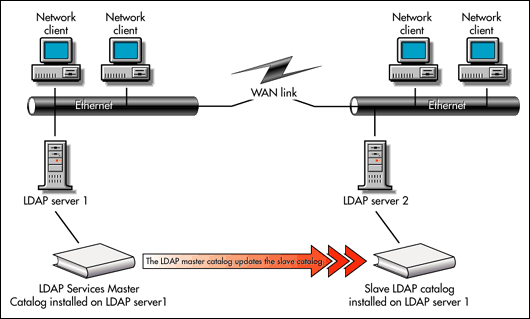
If you install a local copy of an identically configured catalog on each side of the WAN link, both catalogs rebuild themselves independently, and they could walk the tree across the link whenever they rebuild or update themselves. The rebuild process is also known as refreshing. Rebuilding the catalog uses significant network bandwidth. So, even if the catalog only rebuilds itself once every twenty-four hours (the default), you probably want to minimize the rebuilding across the WAN link and use either an NDS replica or a slave catalog instead. In this example, the catalogs each rebuild, but contain identical information.
Installing local catalogs across the WAN link could make sense, if the catalogs are different. Figure 6 shows this option, using our example of Administrator and User versions of an LDAP catalog. Keep in mind that both catalogs could rebuild across your WAN link, depending on how you configure their search scopes. For more information about configuring the catalog's search scope, see "Specifying the Objects the Catalog Will Contain."
Figure 6: Local LDAP catalogs installed on both sides of a WAN link.
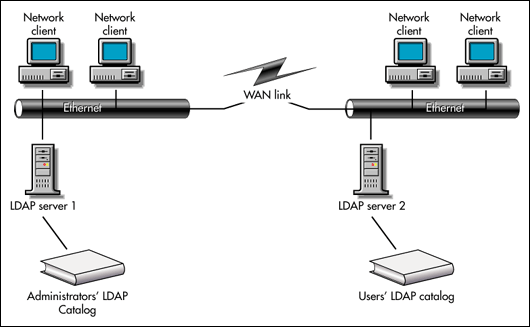
Keep in mind that in the scenario shown in Figure 6, any client that must search the Administrator's LDAP catalog must search across the WAN link. If clients will also be searching the catalog across the WAN link you should either install another LDAP server and a local replica of the catalog or reconfigure your LDAP catalogs.
Whether you choose the solution presented in Figure 4, 5, or 6 depends upon your WAN configuration and your needs. If you only need to update the LDAP catalog across the WAN link once or twice a day, the NDS replica of the LDAP catalog or an LDAP slave could work very well for your network. If your network users use different catalogs, you should install local LDAP catalogs on each side of the WAN link. And, you can use combinations of the different scenarios.
To conserve disk space if you install more than one LDAP catalog, make certain that you don't have several locally installed catalog with identical information. The servers should do one of the following:
Use the closest LDAP catalog
Hold an NDS replica of one of the LDAP catalogs
Hold an LDAP slave catalog
Hold a locally installed LDAP catalog
To create a catalog, you must have the following minimum rights:
Supervisor file right to the server that holds the catalog builder NLM.
Write rights to the Catalog List property of the NetWare Server object
You tell an LDAP server which catalog to use on the LDAP Server object's Catalog Usage page. This article's "Specifying the Search Options for the LDAP Catalog" section tells how to configure an LDAP server to use a specific LDAP catalog.
Searching the LDAP Catalog
If you choose to load the LDAP catalog on your server, you must then select either of these options:
Search catalog exclusively
Search NDS if requested attributes are not in catalog
Understanding the contents of an LDAP search request can help you understand these options.
An LDAP search request contains two different elements: the Filter information and the Requested information. The Filter information tells the LDAP server what type of objects and attributes to look for. The Requested information tells the LDAP server which specific attributes to return. For example, a client might request the Employee ID, UID, Telephone Number and Address of all User objects. In this example, the User object is the Filter information. The Employee ID, UID, and telephone number attributes are the requested information.
If you configure the LDAP server to search the catalog exclusively, the server will return only the information it can find in the LDAP catalog. In our example, if the catalog contains only the Employee ID and the Telephone Number attributes, but not the UID attributes, the server will return only the Employee ID and telephone number values. It will not return the UID attributes.
If you configure LDAP services to search NDS if the requested attributes are not in the catalog, LDAP services checks both the attributes in the search function's search filter and the attributes the search is requesting returned. Basically, LDAP services first checks that all the attributes in the search filter are in the catalog. Then, it searches for the entry as follows:
If one or more filter attributes is missing, LDAP services searches within NDS for entries matching the filter and their attribute information.
If the catalog contains all of the filter attributes, LDAP services uses the catalog to locate the entries matching the filter.
If the catalog contains all the attributes the search is requesting, LDAP services reads the attribute information from the catalog for each catalog entry matching the filter.
If the catalog does not contain all the attributes the search is requesting, LDAP services reads the attribute information from NDS for each catalog entry matching the filter.
For example, if the client requests the Employee ID, UID, Telephone Number, and Address of all User objects whose common name (CN) matches "A*", LDAP services checks if the catalog contains the CN attribute. If the catalog does not contain the CN attribute, LDAP services finds the information within NDS. If it does LDAP services locates all user entries whose CN matches "A*". It then checks if the catalog contains the Employee ID, UID, Telephone Number and Address attributes. If it does not, LDAP reads the requested attribute information directly from NDS for each catalog entry whose common name matches the search filter "A*".
Select search catalog exclusively if:
Clients will not be searching for attributes that are not in the LDAP catalog
Clients need fast searching capability and can accept partial data
You can change how the server uses the catalog to search in the LDAP server object. The LDAP Server object Details Catalog Usage page contains these two options and also lets you check one additional option, Search NDS exclusively. Selecting this option means that the LDAP server does not search the LDAP catalog at all, it goes directly to NDS. See this article's "Specifying the LDAP Catalog Search Options" section.
The options you select on this page are automatically selected on the LDAP Server Details Catalog Usage page.
When you are finished with this page, click Finish.
Configuring the Default LDAP Services on the NetWare 5 Server
Now that LDAP services is installed, you only have to configure the Secure Socket Layer with NWADMN32 Only use an NWADMN32 from a NetWare 5 server that has LDAP services installed. That is the only NWADMN32 that has the correct plug-ins. If you have custom snap-ins for NWAdmin, add them to the NetWare 5 NWAdmn32.
Configuring the Secure Socket Layer
Installing LDAP automatically installs Novell PKI services and Secure Authentication Services (SAS), even if you don't select them. You must have SAS to have a secure connection to the LDAP server.
After you load your LDAP server for the first time, you will probably see this message:
LDAP has not been configured with a valid SSL certificate. SSL connections will fail until configured. See Novell PKI Services and LDAP Services for NDS help for more information.
If you want to use a secure connection, the first thing you must configure is the Secure Socket Layer (SSL) certificate. The SSL certificate allows LDAP services to open secure connections. By default, without an SSL certificate, LDAP services will not allow any connection to NDS that requires a password. This means that LDAP clients will be allowed only public rights and will not be allowed to see non-public data.
To configure the SSL, you must:
Create the Certificate Authority object
Create the Key Material object
Creating the Certificate Authority Object. If your tree does not have a Certificate Authority (CA) object below the root, you must create one. Only one server in the NDS tree can run the CA service. This server should be:
Highly accessible
A permanent server in your network
Placed in a physically secure location
To create a Certificate Authority object, complete the following steps:
Right-click on the Security object below the Root and select Create.
Double-click Certificate Authority.
Note: If the New Object page does not contain Certificate Authority, you have either not installed PKI, or NWAdmin does not have the PKI plug-in installed.
Select Standard (this is the default selection). Clicking Standard creates the Novell CA.
Click Next.
The Create a Certificate Authority Object page pops up. Figure 7 shows this page.
Figure 7: Create a Certificate Authority object page.
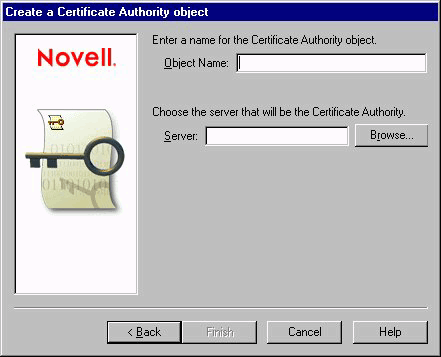
In Object Name, enter the name of the certificate. You can choose any name, but if you put "CA" in the name, you'll always recognize the object as a Certificate Authority object.
In Server, Choose the server you want to be the certificate authority in your tree. The Browse button lets you browse the tree for the server.
Click Finish.
To create a custom Certificate Authority object, complete the following steps:
Right-click on the Security object below the Root and select Create.
Double-click Certificate Authority.
Select Custom
Fill out the following information:
Size of the public key
Name of your organization
How long the certificate will be valid
The signature algorithm the CA should use to sign the key material's certificate.
Click Finish.
After clicking Finish:
A key pair and a public key certificate are created.
NICI's certificate authority signs the public key certificate.
The key pair and the public key certificate are stored in the new Certificate Authority object located in the Security container.
If you are renewing, replacing or recreating the NDS tree CA's public key certificate, it replaces any previous public key certificate stored in the NDS tree CA.
You should now see a Certificate Authority object under the Security object. Once installed, the Certificate Authority object remains in the Security container. Now, you must create the Key Material object.
Creating the Key Material Object. A server must have a key pair associated with it. All security applications should also have their own key pairs. This is why you must create a separate key pair for LDAP services.
To create a Key Material Object, complete the following steps:
Right-click the container object that contains the LDAP server and select Create.
Double-click Key Material.
Select Standard (this is the default selection) if you want the certificate to be signed by Novell's certificate authority. Selecting custom allows the certificate to be signed by another certificate authority, such as Entrust or Verisign.
Click Next.
The Create a Key Material object page pops up. Figure 8 shows this page.
Figure 8: Create a Key Material object page.
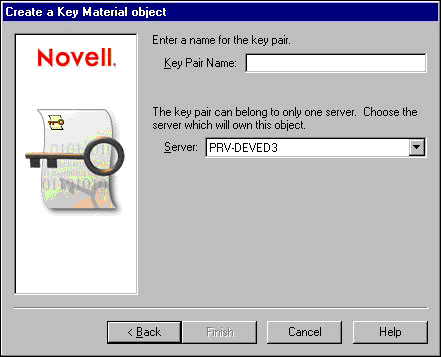
In Key Pair Name, enter a name for the Key Pair. This is a name that you choose. If you choose a name that describes what object it is associated with, you will always be able to recognize it. Key pair names often use the terms "KMO" or "Key" in the names to make them easier to recognize as key pair objects.
In Server, choose the server that will own the Key-Pair object.
Click Finish.
To create a Custom Certificate Authority, complete the following steps:
Right-click the container object that contains the LDAP server and select Create.
Double-click Key Material.
Select Custom
Fill out the following information:
Public key size
Key material's certificate's distinguished name
Whether the tree CA or a CA external to the tree will sign the key material's certificate
Signature algorithm the CA should use to sign the key material's certificate
Trusted root to be stored in the Key Material object. You can choose either:
Organization's. Selecting this means the NDS tree CA's self signed public key certificate is placed in the Key Material object. This public key certificate is specific to your organization and does not chain back to the Global Root for Novell, Inc.
Global Root for Novell, Inc. Selecting this means Novell.com's global root's public key certificate is placed in the Key Material object. This is the trusted root Novell uses to provide a common point of cross-enterprise security validation. The Global Root for Novell, Inc. is functional across products, platforms, and enterprises.
You should only chose Novell, Inc.'s global root if the public key certificate in this Key Material object will be used with software that can process the Novell Registered Attributes.
Click Finish.
After you click Finish:
The key pair is created on the selected serve.
A public key certificate is created.
The NDS tree signs the public key certificate.
The key pair, the public key certificate, and the chosen trusted root certificate are stored in the new Key Material object.
If you are renewing, replacing or recreating a public key certificate for a Key Material object, the public key certificate and the chosen trusted root certificate replace any previous certificates stored in the chosen trusted root object.
Once you have created a Key Material, you should not move or rename it because LDAP services will reference the key pair name you entered.
Using a Secure Connection with a Browser
To let network browsers use the LDAP server to browse the NDS tree, you must configure your network browser to use the LDAP server's SSL certificate.
To configure network browsers to use the SSL certificate, complete the following steps:
Note: This section may not work exactly as written for every browser. However, it should be similar for any browser. I configured Microsoft Internet Explorer with this procedure.
The PKIS.REG file in the sys:public directory updates NetScape Navigator so that it can understand certificate (.der files). Treat PKIS.REG as a DOS executable. For example, if you are using Windows 95, you can open the Run window, browse to PKIS.REG and run it.
In NWAdmn32, double-click the Key Material object and select the Trusted Root page.
Select a directory and name for the certificate.
Click Export
Click Cancel because no changes have been made to the Key Material object.
On the browser's menu bar, select File | Open.
Enter your certificate file name.
Select the services you want to use this certificate for.
Click OK.
The browser should now be able to browse the NDS tree over a secure connection.
Tell the LDAP server which SSL certificate to use on the LDAP Server object's Details General page. For more information, see this article's "Selecting an SSL Certificate" section.
Extra LDAP Group Objects
Now you have done all that's required to configure LDAP Services with one final note: Every time you install LDAP Services, you also install a new LDAP Group object. For administrative purposes, you probably want all of your LDAP servers in one LDAP group. So, if this is not the first LDAP server on your tree, you will want to open the LDAP Group object that you are using and add the new LDAP Server to its server list. Now delete the new LDAP Group object your installation just created. For more information, see "Assigning LDAP Servers to the LDAP Group" and "Deleting Unwanted LDAP Group Objects."
Your LDAP server should be operational at this point, and you can quit reading this article unless your network configuration requires you to customize LDAP services.
Customizing LDAP Services
Your network configuration might require you to configure other options for LDAP services. The rest of this article explains these options. Customizing LDAP services is really only a matter of configuring:
LDAP Group object
LDAP Server object
LDAP Catalog object
Customizing the LDAP Group Object
Use the LDAP Group object to:
Define the search context and specify the referral address.
Specify whether to allow cleartext passwords.
Define the proxy user name.
Assign LDAP servers to the group.
Configure LDAP Services's ACLs.
Configure the attribute and class maps.
Delete unwanted LDAP Group objects.
To configure the LDAP Group object, use its Details pages. To display these pages, double-click on your LDAP Group object.
Defining the Search Context and Specifying the Referral Address. Use the LDAP Group object's Details General page to define the search context and specify the referral address. The General page is the first page in the LDAP Group object's Details pages, as shown in the next illustration.
Figure 9: LDAP Group object's general page.
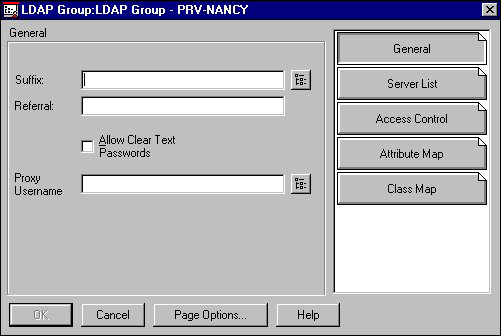
Generally, you will want to accept the defaults in the Suffix and Referral boxes. Only configure these boxes if you want to restrict the LDAP client to searching only a portion of the NDS tree or force the client to use another server to search a portion of the NDS tree.
The Suffix box specifies the portion of the NDS tree that LDAP services will search. If the Suffix box is empty, the LDAP server searches the tree from the root down. The Browse button helps you select the context for the search. The LDAP server won't search beyond the context entered in this box. If a client requests a search outside of the context in the Suffix box, LDAP Services returns an error and the referral address specified in the referral box. An LDAP version 2 client sees the referral as part of the error message. An LDAP version 3 client simply receives a referral result.
The Referral box specifies the address (URL) or alternate LDAP server that is to handle any search request that could not be resolved within the context specified in the suffix box. If a client requests a search outside of the context in the Suffix box, LDAP Services returns an error and the referral address specified in the referral box. The client can then forward its request to the referral server.
To set the referral address, enter the referral LDAP server's URL in the Referral text box using this format: ldap://hostname. You can enter a referral address that is outside your NDS tree. Currently, this address must be entered manually and is "hard-coded" through this box.
If you do not specify a referral address, the search function will return an error message and not search anywhere else if it cannot find the requested object within the context specified in the Suffix box.
Deciding Whether to Allow Cleartext Passwords. Checking the Allow Cleartext Passwords box means bind requests that include passwords can be sent over non-secure, or unencrypted, connections. A cleartext (or unencrypted) password can be captured by network monitoring equipment and can pose a security risk, depending on your environment.
The default setting for this box does not allow cleartext passwords. This means that LDAP servers will only accept authenticated connections (connections with passwords) on secure (SSL) connections. On non-SSL connections, they reject all binds that include passwords. This means that on a non-SSL connection only anonymous binds are allowed.
Novell recommends that you only check the Allow Cleartext Passwords box in areas that don't have security needs or in which the LAN is extremely secure from unwanted connections.
Defining the Proxy User Name. Use the Username option to configure a separate identity (other than [Public]) for anonymous binds. An anonymous bind is a user connection that doesn't have a user name and password.
The Proxy Username is the name of an NDS User object. The Proxy User cannot require a password and is assigned to all anonymous binds. The proxy user also should not be allowed to create or change the password. If you want to limit where the Proxy User can log in from, use the Network Address Restrictions page of NWAdmin to set address restrictions for the Proxy User object.
If the Proxy Username box is empty, all anonymous requests are validated to NDS as the [Public] user. This means that a user with an anonymous connection has NDS public rights. Because the same NDS rights granted to [Public] for LDAP access are also granted to all NDS users.
If a Proxy Username is assigned to the LDAP Group object, all anonymous requests are validated to NDS with the proxy username you select. This allows you to create an NDS user who has exactly the rights you want to give to your LDAP clients. You can use the proxy username for applications and clients that have no network rights or password and need basic access to the network. For example, browsers commonly have public rights. If you want to either restrict a browser's rights or grant a few more to it, you would set it up to use the proxy user name with anonymous binds.
LDAP anonymous binds do not have passwords, so any bind that includes both a user name and a password is treated as an NDS user bind. You can enter any NDS user name into the Proxy Username box, but LDAP PROXY is common.
Assigning LDAP Servers to the LDAP Group. Clicking the Server List button pops up the Server List page. This page contains a Server List window. Adding servers to the list in the Server List window assigns those servers to this LDAP group. Usually you only need to do this if you are adding additional LDAP servers to your group.
To associate LDAP Server objects with LDAP Group objects, complete the following steps:
In the LDAP Group object's Details pages, click Server List.
Click Add Server. Clicking Browse lets you browse the tree for your LDAP server.
After you have entered your LDAP server name, click OK.
Click OK on the Server List page.
To remove a server from the LDAP Group object's Server List, complete the following steps:
Select a server on the Server List.
Click Remove.
Configuring LDAP Service's ACLs. You can use an LDAP ACL to restrict an object's NDS access through LDAP. You can't use an LDAP ACL to grant more rights to an object or attribute than NDS allows. In other words, if an object does not have the NDS rights to read a particular attribute, you cannot assign an LDAP ACL that will give it the rights to read that attribute. But, you can use an LDAP ACL to remove that object's NDS right to read the attribute.
To add an ACL to the LDAP Group object, complete the following steps:
In the LDAP Group object's Details pages, click Access Control to display the Access Control page. This page contains a list of ACL names and the objects those ACLs allow access to. Adding ACLs to this list assigns those ACLs to this LDAP Group object.
Click Add. The LDAP ACL page pops up. The next illustration shows this page.
In the LDAP ACL Name box, enter a name for the ACL.
Fill out the Access To options. The Access To options define the objects and attributes that the objects in the Access By list can access. These options also define the rights to the objects and attributes that the objects in the Access By list have to the objects in the Access To list. The on-line help can assist you in filling out these options.
In the Access By list, click Add to select the objects you wish to have access to the objects and attributes in the Access To list. To add objects that use this ACL, you fill out the LDAP ACL Access By Entry page, shown in the next illustration. The on-line help can assist you in filling out this page.
Click OK.
To delete or edit an LDAP Group object ACL:
You can delete or edit LDAP Group object ACLs by selecting an ACL and clicking the Delete and Edit buttons on the LDAP Group object's Access Control page.
You can also map additional LDAP attributes and classes to the NDS attributes and classes.
Configuring the Attribute and Class Maps. LDAP services' default configuration maps a predefined subset of LDAP attributes and classes to a subset of NDS attributes and classes. If you want to change this default map, you must use the LDAP Object's Attribute Map and Class Map pages. You might want to change the maps for these reasons to manually change it because:
The LDAP directory and the NDS directory schemas have different base schema names.
You cannot automatically define how the LDAP directory schema maps to the NDS directory schema.
Figure 10: LDAP Group object's ACL creation page.
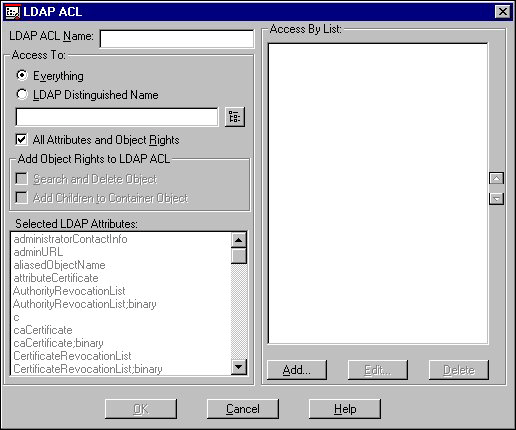
The default map does not contain some supported LDAP and several NDS classes and attributes. Your implementation might require some of the non-default classes and attributes or new NDS schema extensions.
Although the relationship between the LDAP attributes and classes and the NDS attributes and classes is usually intuitive, your implementation might require a different LDAP-NDS association than the default map.
Once the schemas are mapped, the server will return the corresponding NDS attribute or class in response to an LDAP client's request for an LDAP attribute or class. The next list illustrates this.
Figure 11: Requesting an LDAP attribute.
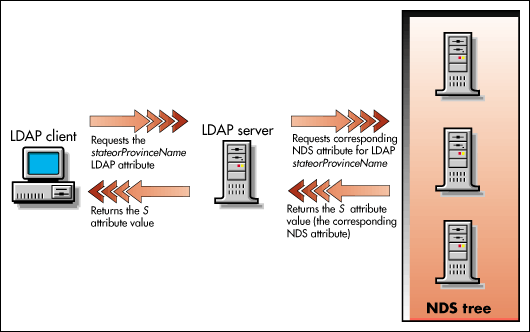
For attributes:
The following table shows you how the LDAP attributes map to the NDS attributes by default.
|
LDAP Attribute
|
Maps to NDS Attribute
|
|
aliasedObjectName |
Aliased Object Name |
|
c |
C |
|
countryName |
C |
|
cn |
CN |
|
commonName |
CN |
|
description |
Description |
|
dn |
dn |
|
distinguishedName |
dn |
|
facsimileTelephoneNumber |
Facsimile Telephone Number |
|
givenName |
Given Name |
|
initials |
Initials |
|
l (lower-case L) |
L |
|
localityname |
L |
|
|
Internet Email Address |
|
member |
Member |
|
o |
O |
|
organizationname |
O |
|
objectClass |
Object Class |
|
ou |
OU |
|
organizationalUnitName |
OU |
|
owner |
Owner |
|
physicalDeliveryOfficeName |
Physical Delivery Office Name |
|
postalAddress |
Postal Address |
|
postalCode |
Postal Code |
|
postOfficeBox |
Postal Office Box |
|
role Occupant |
RoleOccupant |
|
seeAlso |
See Also |
|
sn |
Surname |
|
surname |
Surname |
|
st |
S |
|
stateOrProvinceName |
S |
|
street |
SA |
|
telephoneNumber |
Telephone Number |
|
title |
Title |
|
uid |
CN |
|
adminURL |
NSCP: adminURL |
|
administratorContactInfo |
NSCP: adminstratorContactInfo |
|
installationTimeStamp |
NSCP: installationTimeStamp |
|
mailAccessDomain |
NSCP: mailAccessDomain |
|
mailAternate Address |
NSCP: mailAlternateAddress |
|
mailAutoReplyMode |
NSCP: mailAutoReplyMode |
|
mailAutoReplyText |
NSCP: mailAutoReplyText |
|
mailDeliveryOption |
NSCP: mailDeliveryOption |
|
mailForwardingAddress |
NSCP: mailForwardingAddress |
|
mailHost |
NSCP: mailHost |
|
mailMessageStore |
NSCP: mailMessageStore |
|
mailProgramDeliveryInfo |
NSCP: mailProgramDelivery |
|
mailQuota |
NSCP: mailQuota |
|
mgrpRFC822mailmember |
NSCP: mgrpRFC822mailmember |
|
nsLicensedFor |
NSCP: nsLicensedFor |
|
nsLicenseStartTime |
NSCP: nsLicenseStartTime |
|
nsLicenseEndTime |
NSCP: nsLicenseEndTime |
|
nsaclrole |
NSCP: nsaclrole |
|
nscreator |
NSCP: nscreator |
|
nsflags |
NSCP: nsflags |
|
nsnewsACL |
NSCP: nsnewsACL |
|
nsprettyname |
NSCP: nsprettyname |
|
serverHostName |
NSCP: serverHostName |
|
serverProductName |
NSCP: serverProductName |
|
serverRoot |
NSCP: serverRoot |
|
serverVersionNumber |
NSCP: serverVersionNumber |
|
subtreeACL |
NSCP: subtreeACL |
|
CertificateRevocationList;binary |
LDAP:CRL |
|
CertificateRevocationList |
LDAP:CRL |
|
AuthorityRevocationList;binary |
LDAP: ARL |
|
AuthorityRevocationList |
LDAP: ARL |
|
caCertificate;binary |
LDAP: caCertificate |
|
caCertificate |
LDAP: caCertificate |
|
crossCertificatePair;binary |
LDAP: crossCertificatePair |
|
crossCertificatePair |
LDAP: crossCertificatePair |
|
UserCertificate; binary |
LDAP: UserCertificate |
|
attributeCertificate |
Entrust: AttributeCertificate |
|
entrustUser |
Entrust: User |
|
employeeNumber |
EmployeeNumber |
Some LDAP attributes have alternate names. For example, cn, common name, and UID, are all common LDAP names for the same attribute. Currently, cn, commonName, and UID map to the NDS attribute CN. When you change the default map be certain that you map the appropriate LDAP name you will be using for a specific attribute.
The list order matters in a search if you search for all attributes, (*). In this case, you will get back the value for the first corresponding NDS attribute that search finds. For example, the LDAP attributes cn and commonName are mapped to the NDS attribute CN by default. In the default list, cn comes before commonName. If LDAP is searching for all attributes, it will return the LDAP cn attribute. If you want the commonName attribute, you must rearrange the list order so that commonName comes first.
You probably don't want to change the "UID" mapping because LDAP Services treats the UID attribute as a special case. The LDAP UID attribute is not a common LDAP name for CN, but is a separate attribute. So, for compatibility with NDS applications and schema, LDAP Services maps the LDAP UID attribute to CN by default. When it returns values for the LDAP cn and commonName attributes, LDAP services returns all CN values. In contrast, it returns only the "UID" attribute value as the naming CN value. If a search request all attributes (*), LDAP Services returns both the CN and UID attributes, instead of the first value it finds.
Use the LDAP Group's Attribute Map page to define the relationship between LDAP and NDS attributes. The next picture shows this page.
Figure 12: LDAP Group object's Attribute map page.
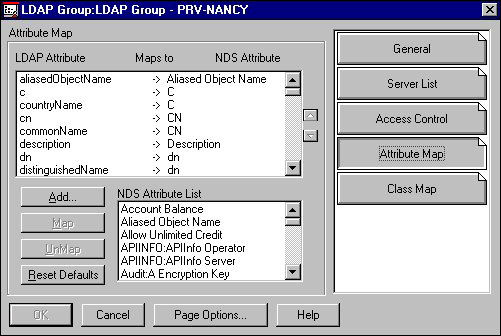
On this page, the list of LDAP attributes includes all the LDAP attributes that the LDAP server supports. The NDS attributes that appear in this list are only those attributes that have already been mapped or assigned to an LDAP attribute. The NDS Attribute List at the bottom of the page is the list of NDS attributes you can map.
To add an LDAP attribute to the attribute map list, complete the following steps:
In the LDAP Group object's Details pages, click Attribute Map.
Select the LDAP attribute you want the new item to precede.
Click Add.
Enter the name of the LDAP attribute.
Select the NDS attribute from the NDS Attribute List and click the Map button.
Select the LDAP attribute in the upper list.
Select the NDS attribute in the lower list.
Click Map.
To map an LDAP attribute to an NDS attribute, complete the following steps:
In the LDAP Group object's Details pages, click Attribute Map.
Select the LDAP attribute in the LDAP Attribute list.
Select the NDS attribute in the lower NDS Attribute list.
Click Map.
To map multiple LDAP attributes to the same NDS attribute, complete the following steps:
In the LDAP Group object's Details pages, click Attribute Map.
Select the LDAP attribute in the LDAP Attribute list.
Select the NDS attribute in the lower NDS Attribute list.
Click Map.
Select the mapping for the LDAP class that will receive the NDS attribute value.
Use the arrow buttons to the right of the attribute map to position the selected mapping above the other class mappings for this NDS attribute.
Note: Remember that if another LDAP attribute name is already mapped to the same NDS attribute, a search for all attributes (*) will return the first attribute in the list.
To delete an LDAP attribute from the Attribute List, complete the following steps:
In the LDAP Group object's Details pages, click Attribute Map.
Select the attribute to be deleted in the LDAP Attribute list.
If the attribute is mapped, select the attribute to be unmapped in the LDAP Attribute list.
Click UnMap. The UnMap button changes to Delete.
Click Delete.
To restore the default Attribute Map:
Clicking the Reset Defaults button on the Attribute Map page removes any special mappings you have added and returns the map to the state it was in when you first installed LDAP Services.
For classes:
The next table shows you the default map for the LDAP and NDS classes.
|
LDAP Class
|
Maps to NDS Class
|
|
alias |
Alias |
|
country |
Country |
|
groupOfNames |
Group |
|
inetOrgPerson |
User |
|
locality |
Locality |
|
organization |
Organization |
|
organizationalPerson |
User |
|
organizationalRole |
Organizational Role |
|
organizationUnit |
Organizational Unit |
|
person |
User |
|
residentialPerson |
User |
|
top |
Top |
|
groupOfUniqueNames |
NSCP: groupOfUniqueNames |
|
mailGroup |
NSCP: mailGroup |
|
Netscape Server |
NSCP: NetscapeServer |
|
NetscapeMailServer |
NSCP: NetscapeMailServer |
|
rfc822mailGroup |
NSCP: groupOfUniqueName |
|
cRLDistributionPoint |
entrust: CRLDistributionPoint |
In most instances, the LDAP class to NDS class mapping is a one-to-one relationship. Use the LDAP Group's Class Map page to define the relationship between LDAP and NDS classes. Figure 13 shows this page.
Figure 13: LDAP Group object's Class Map page.
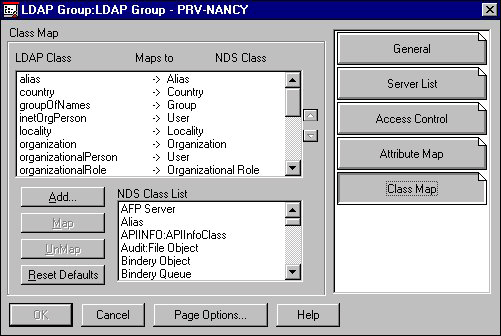
On this page, the list of LDAP classes includes all the LDAP classes that the LDAP server supports. The NDS classes that appear in this list are only those classes that have already been mapped or assigned to an LDAP class. The NDS Class List at the bottom of the page is the complete list of NDS classes.
Note: The default mappings for this release of LDAP Services for NDS have changed from the version 3.0 release and are stored in a different attribute.
To add an LDAP class to the map list, complete the following steps:
In the LDAP Group object's Details pages, click Class Map.
Select the LDAP class you want the new item to precede.
Click Add.
Enter the name of the LDAP class.
Select the NDS class from the NDS Class List and click the Map button.
Select the LDAP class in the LDAP Class list.
Select the NDS class in the lower NDS Class List.
Click Map.
To change the map of an item already in the list, complete the following steps:
In the LDAP Group object's Details pages, click Class Map.
Select the LDAP class in the LDAP Class list.
Select the NDS class in the lower NDS Class List.
Click Map.
To delete an LDAP class from the map list, complete the following steps:
In the LDAP Group object's Details pages, click Class Map.
Select the LDAP class to be deleted in the LDAP Class list.
If the class is mapped, select the class to be unmapped in the LDAP Class list.
Click UnMap. The UnMap button changes to Delete.
Click Delete.
To restore the default class map:
Clicking the Reset Defaults button on the Class Map page removes any special mappings you have added and returns the map to the state it was in when you first installed LDAP Services.
You have finished configuring the LDAP Group object. Click OK to exit the LDAP Group Details. Now, you should make sure that you have only one LDAP Group object.
Deleting Unwanted LDAP Group Objects. Every time you install LDAP services, it creates a new LDAP group. So, if you have installed more than one LDAP server, you have more than one LDAP group. Your tree only needs one LDAP group and all the LDAP servers should belong to it. Before you configure the LDAP Server object, you should delete any extra LDAP groups.
To delete LDAP group objects, complete the following steps:
Under your organization object, right-click the LDAP Group object you want to delete.
Select Delete.
Click Yes to Do you really want to delete the object?
Note: After clicking Yes, you might see a warning that server objects are still associated with this group. Before continuing, you might want to select No and remove the associated server from the LDAP Group object Server List. The section "To remove servers from LDAP Group objects" tells you how to do this.
Customizing the LDAP Server Object
Use the LDAP Server object to:
Assign it to an LDAP group.
Select an SSL certificate.
Configure the log file.
Configure the screen options.
Specify how it searches the LDAP catalog.
Define the catalog's update schedule.
To configure the LDAP Server object, use its Details pages. To display these pages, double-click on your LDAP server object. Be certain that you click on the LDAP server object and not the server object.
Assigning the Server to an LDAP Group. Use the LDAP Server object's Details General page to assign this server to a different LDAP group. The General page is the first page, as shown in Figure 14.
Figure 14: LDAP Server object's General page.
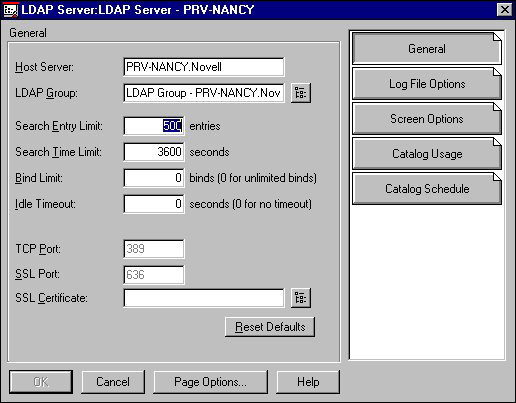
Because you have already associated the LDAP Server object with the LDAP group object when you configured it, the LDAP Group box should already have the correct LDAP group in it. If it does not, you must enter the LDAP group name. You will also need to enter the SSL certificate name on this page.
To select the LDAP group, complete the following steps:
In the LDAP Server object's Details pages, click the Browse button next to LDAP Group.
Double-click the group you want your LDAP servers to belong to. You can use the Change Context button to search for the LDAP Group objects.
You can also select an SSL certificate on this page.
Selecting an SSL Certificate. Before you can select an SSL certificate, you must create the Certificate Authority and the Key Material object this server will use to authenticate its connections.
To select the SSL certificate, complete the following steps:
In the LDAP Server object's Details pages, click the browse key next to the SSL Certificate box.
In the Select Key Material Name page, double-click the Key Material object that you want to associate with this LDAP server.
Now you're ready to configure the LDAP log file.
Configuring the Server's Log File. If you want to keep a record of the LDAP server's events, you must enable logging and configure the file. In the LDAP Server object's Details pages, click the Log File Options page to enable logging and choose the events to be logged.
This page has a box for the log filename. To enable logging, specify a name for the log file in this box. You can find the log file in the LDAP server's SYS:\ETC directory. If you do not enter a file name in this box, the LDAP server will not keep a log file.
When the log file reaches the size indicated in the Log File Size Limit box, the LDAP server renames the log file to the name specified in the Backup Log Filename box. It then creates a new log file using the name specified in Log Filename. You can find this file in the LDAP server's SYS:\ETC directory. If you do not enter a backup file name, the LDAP server will not create a backup log file, and it will write over the original log file data when the maximum log file size is reached.
Setting the Log File Size to zero specifies an unlimited file size. This means that the log file could take up the available storage space.
Choose the events to record in the LDAP server's log file by clicking those events in the event list on this page. The on-line help contains more information about the events in the event list.
Remember that logging uses processing resources. So, for optimum server performance, do not enable the logging.
Configuring the LDAP Server's Screen Options. In the LDAP Server object's Details pages, use the Screen Options page to choose the events that will display on the LDAP server's console. Click the events you want the LDAP server to display on its monitor. The on-line help contains more information about the events in the event list.
Remember that the more events reported on the screen, the more processing resources the server uses. So, for optimum server performance, be careful what events you report on the screen.
Specifying the LDAP Catalog Search Options. Use the Catalog Usage page to specify how the LDAP server will search the LDAP catalog on behalf of the LDAP client. Figure 15 shows this page.
Figure 15: LDAP Server object's Catalog Usage page.
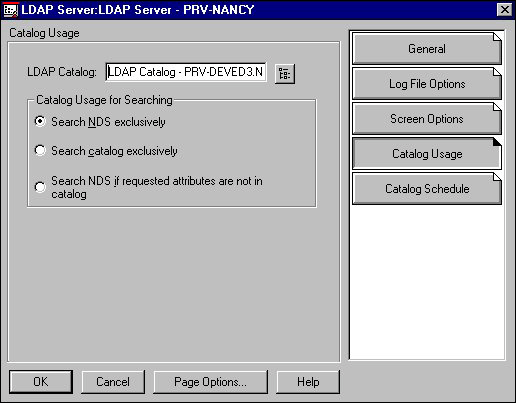
On this page, you can assign a catalog to a server and specify how the server will search the catalog.
To assign an LDAP catalog to an LDAP server, complete the following steps:
In the LDAP Server object's Details pages, click Catalog Usage.
Click the Browse button next to the LDAP catalog box to find and select the LDAP catalog you want this server to use.
To specify how the LDAP server will search the catalog, complete the following steps:
In the LDAP Server object's Details pages, click Catalog Usage.
If the LDAP catalog box is empty, click the Browse button to find and select the LDAP catalog you want to use.
Click one of the following options:
Search NDS exclusively. Selecting this means that the LDAP server will only search NDS.
Search catalog exclusively. Selecting this means that the LDAP server will only search the LDAP catalog. LDAP services will not return information for any attributes it can't find in the LDAP catalog.
Search NDS if requested attributes are not in catalog. Selecting this option means that the LDAP server will search the catalog if it contains all the filtered and requested attributes. It will search NDS if the catalog does not contain the filtered and requested attributes.
For more information about how LDAP Services searches the LDAP catalog and NDS, see "Searching the LDAP Catalog" earlier in this article.
Defining the LDAP Catalog Update Schedule. Use the Catalog Schedule page to specify when catalog services will update (refresh) the LDAP catalog. The information you specify on this page is stored on the LDAP catalog object. In fact, the LDAP Catalog object's Catalog Schedule page is identical to this page. Figure 16 shows the LDAP Server object's Catalog Schedule page.
Figure 16: LDAP Server object's Catalog Schedule page.
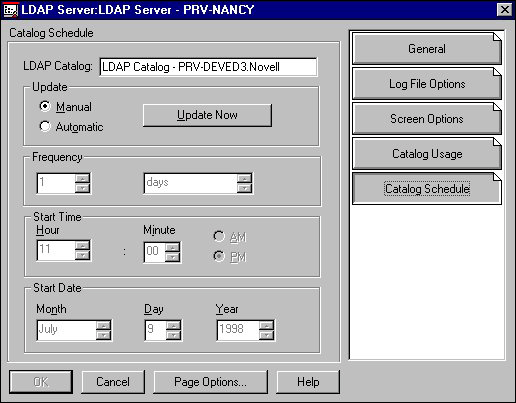
If you have filled out the Catalog Usage page, the LDAP Catalog Name box will already be filled in.
To define the LDAP catalog's update schedule, complete the following steps:
In the LDAP Server object's Details pages, click Catalog Schedule.
Select either:
Manual. Selecting Manual means you must update the catalog manually by clicking the Update Now button on this page. If you select the Manual option, the Frequency, Time and Start Date boxes will gray out. You can click OK and exit this page. This is the default setting.
Automatic. Selecting Automatic means the LDAP server will automatically update the catalog. If you select this, you must set the Frequency, Time and Start Date.
In the Frequency section, select how often you want to update or refresh the Catalog object. The default is every twenty-four hours.
In the Start Time section, select the time of day to update the catalog. The default is 11:00 p.m. of the current day.
In the Start Date section, select the Date you want the update schedule to start. The default is today's date.
You have finished configuring the LDAP Server object. Click OK to exit the LDAP Server Details.
Customizing the LDAP Catalog Object
Use the LDAP Catalog object to:
Customize the catalog's identification information.
Specify the objects the catalog will contain.
Select the attributes to store in the catalog.
Define any Master/Slave relationships
To configure the LDAP Catalog object, use its Details pages. To display these pages, double-click on the LDAP Catalog object.
Customizing the Catalog's Identification Information. Enter the information that identifies the catalog on the LDAP Catalog object's Details Identification page. The Identification page is the first page as shown in Figure 17.
Figure 17: LDAP Catalog object's Identification page.
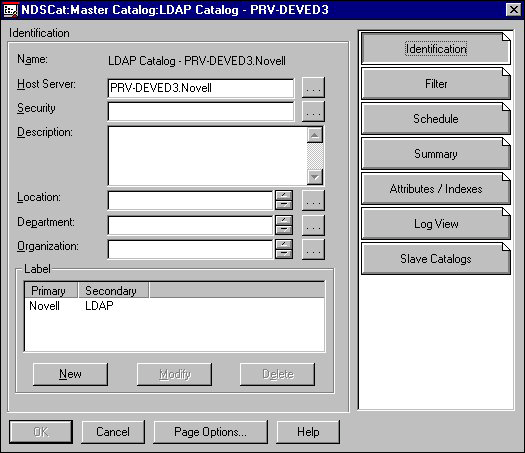
Note: Clicking the Schedule button on this page brings up a page that is identical to the schedule page on the LDAP Server object. If you choose to configure the LDAP catalog's schedule on the LDAP Catalog object's schedule page, see "Defining the LDAP Catalog Update Schedule" section in this article.
This page lets you view information that identifies an LDAP Catalog object. As a general rule, you don't want to change the information on this page, with the possible exception of the Security box. If you must change this information, refer to the on-line help.
Clicking the browse button next to the Security box lets you choose an object that you want to make the catalog object security equivalent. That means the catalog will have the same rights to browse the NDS tree or subtree that the selected object has. The catalog must have rights to browse in order to populate the catalog. You must have rights to the object you select.
You can use these pages to change the LDAP Catalog object's filter.
Specifying the Objects the Catalog Will Contain. The LDAP Catalog object's Filter page lets you specify the information you want to retrieve from the NDS database into a catalog. In the LDAP Catalog object's Details pages, click Filter to display the filter page, shown in the next illustration.
Figure 18: LDAP Catalog object's Filter page.
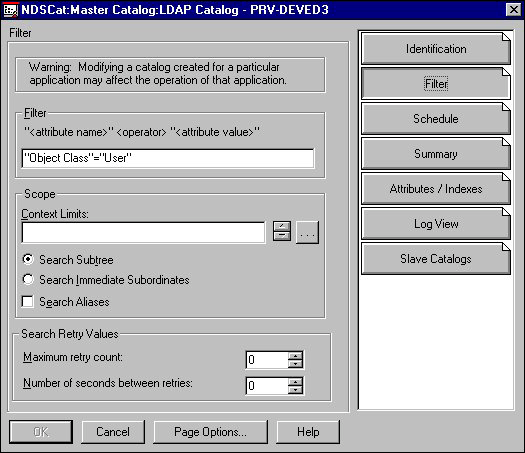
The warning at the top of this page applies particularly to those catalogs created by other applications. You can change this page as you need to for your LDAP Services.
The Filter statement specifies which NDS objects and attributes to contain in the catalog. By default, the LDAP catalog contains User objects and these attributes for them:
CN
Facsimile
Given Name
Internet Email Address
L
O
Object Class
Postal Address
Surname
Telephone Number
You change the catalog to include different NDS objects and attributes or a subset of NDS objects and attributes that you define with the Filter statement. You can specify more than one object by using the logical operators AND and OR. The Attributes / Indexes page helps you select:
The attributes to include for the object
How to index the catalog
The NDS context to search
The "Selecting Attributes to Be Stored in the Catalog" section covers the Attributes / Index page in more detail.
To set the search context:
By default, LDAP services searches the entire NDS tree. Use the LDAP Catalog object's Filter page Scope window to restrict the search to a subtree. You can limit the search to:
One container (OU, O)
Whole tree
Several containers
Pressing the browse button, lets you browse NDS and select the contexts you want to search within. The up and down arrows at the side of the Context Limits box lets you view the list of contexts you have selected.
You can also choose one of these options:
Search Subtree. Selecting this means the LDAP server will search all container and leaf objects in or below the context specified.
Search Immediate Subordinates. Selecting this means the LDAP server will search all container and leaf objects in the specified context or its immediate subordinates.
Search Aliases. Select this if you want the LDAP server to search objects in the context limits that represent other objects outside the context limits and if the search should include information from those other objects in the catalog.
You can use the Configure Search Retry Values and Maximum Retry Count boxes to configure how many times the search will be tried and how many seconds will lapse between the retried searches. Sometimes searches fail and must be retried because of circumstances such as down servers and WAN links.
Selecting Attributes to Be Stored in the Catalog. The LDAP Catalog object's Attributes / Index page helps you:
Choose the object attributes you want to included in the catalog
Specify the attributes the catalog will be indexed by.
Clicking the LDAP Object's Attributes / Indexes button displays the Attributes and Indexes page, shown by Figure 19.
Figure 19: LDAP Catalog object's Attribute / Index page.
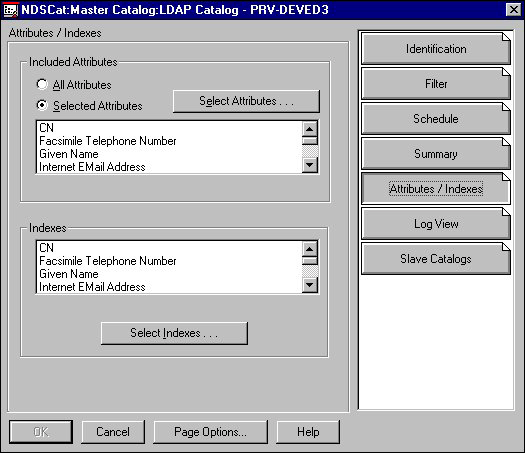
You can change the attributes the catalog contains in the Included Attributes box.
To define the Attributes contained in the catalog, complete the following steps:
Click the LDAP Catalog object's Attribute / Index page.
Select either:
All Attributes. Clicking this means that the catalog will contain all of an object's attributes
Selected Attributes. Clicking this lets you select which attributes of an object the catalog will contain. Clicking the Select Attribute button lets you select attributes from a list of all available attributes.
For example, the LDAP Catalog object's default Filter statement defined on the Filter page is "Object Class"="User". If you select All Attributes on the Attributes / Index page, the catalog will include all the attributes associated with the User object. Or, you can click Select Attributes, to select specific attributes for the User object. The on-line help provides more information on the Filter statement, if you need it.
Indexing the catalog helps you retrieve the information stored in it. You can think of the index attributes as a means of sorting the catalog information. For example, if you include the CN attribute in the Index list, the server can search the catalog sorted by the CN attribute. Indexing the catalog speeds the search for specific attributes. Keep in mind that indexing a catalog consumes disk space. So, you probably only want to index the catalog by attributes the client will frequently search for. Generally, the Indexes list should be only a subset of the Included Attributes list.
The Indexes window contains a list of attributes the catalog is indexed by. You can also select other attributes to index the catalog, but these attributes must be listed in the Selected Attributes window.
The default attributes you can index the catalog by are:
CN
Facsimile
Given Name
Internet Email Address
L
O
Object Class
Postal Address
Surname
Telephone Number
To select the catalog indexes, complete the following steps:
On the LDAP Catalog object's Attribute / Index page, click Select Indexes. A window with the available attribute pops up.
Note: These attributes are the same as those shown in the Selected Attributes Window. Removing an Attribute from the Selected Attribute window also removes it from the Indexes window and makes it unavailable to select as an index.
Select the attributes you want to index the catalog with.
Defining master/slave catalog relationships
Every catalog must have a master catalog. It can also have one or more slave catalogs, if you want. Use the LDAP Catalog object's Slave Catalogs page to define the catalogs' master-slave relationships.
The Slave Catalogs page allows you to:
View a list of catalogs that are slaves to the selected catalog.
Add catalogs to the Slave Catalogs list.
Delete catalogs from the Slave Catalogs list.
Before you can add a slave catalog to a master catalog, you must have first created a Slave Catalog. Clicking the Add button lets you add catalogs to the Slave Catalog list. These are the catalogs that the master catalog will update as soon as it gets updated.
To create a slave catalog, complete the following steps:
In NWAdmn32, right-click the container you want to create the slave Catalog object in.
Select Create.
Double-click the NDSCat:Slave Catalog object icon.
In the Create Catalog dialog, specify the Catalog name, check Define additional attributes, and then click Create.
Note: The slave catalog's name must be different than the master catalog's name.
Fill out the slave catalog's identification page. See the on-line help for more information about this identification page.
To add a slave catalog to a master catalog's Slave Catalog list, complete the following steps:
On the master catalog's LDAP Catalog object's Slave Catalogs page, click Add.
In the Select Object Dialog, go to the context which has the slave catalog.
Double-click the slave catalog's object.
This catalog now appears in the Slave Catalogs list.
To remove a slave catalog from the Slave Catalog list, complete the following steps:
Selecting the slave catalog you want to remove and clicking Remove deletes the slave catalog from the Slave Catalogs list.
You have finished configuring the LDAP Catalog object. Click OK to exit the LDAP Catalog Details. Now, the new configuration must take effect.
Refreshing LDAP Configuration Information
By default, the server polls every 30 seconds and refreshes LDAP services with any changes it finds. However, you probably don't want this polling going on every 30 seconds over a WAN link. So, if the LDAP server NLM and the LDAP server or LDAP catalog objects are across a WAN link, or even not local, you can change the polling date, the time the polling starts, and the refresh interval on the server console's command line. The command syntax is:
ldap refresh `date' `time' `interval'
Enter the interval in minutes. The next table lists some sample commands:
Sample LDAP Refresh Commands
|
ldap refresh immediate |
Configuration changes to LDAP services immediately take effect. |
|
ldap refresh = 00:00:0000 00:00:00 90 |
LDAP polls for configuration changes and puts then into effect every 90 minutes, starting with today's date and at the current time. |
|
ldap refresh = 00:00:0000 00:00:00 .5 |
LDAP polls for configuration changes and puts then into effect every 30 seconds, starting with today's date and at the current time. |
|
ldap refresh = 10:24:1998 12:00:00 1440 |
LDAP services will start polling for changes on October 24, 1998 at midnight and will continue polling every twenty-four hours. Any changes will not take effect until after it starts polling and then every twenty-four hours thereafter. The time is entered as a twenty-four hour clock. For example, enter 1:00 P.M. as 1300. |
|
ldap refresh help |
Displays the help on the server console. |
|
ldap refresh |
Displays the current refresh time and interval. |
Viewing the Catalog Summary and Manually Querying the Catalog
The LDAP catalog object's Summary page lets you view the log summary and manually query the catalog.
To view the log summary, complete the following steps:
Double-click the LDAP Catalog object.
Click Summary to display the Summary page. The Summary page's Catalog Summary window displays information about the catalog, such as:
The date and time it was last updated.
Whether it was successfully updated.
How many objects were searched
How many attributes of those objects were searched.
The LDAP Catalog object's Log View pages give a more detailed history of the most recent catalog searches. This page includes such information as:
Time the catalog was updated
Confirmation that the update was completed,
Any error conditions reported.
The Log View page also lets you configure the maximum log size.
To manually query the catalog, complete the following steps:
Double-click the LDAP Catalog object.
Click Summary.
Click the Query Catalog button to display the Query Catalog dialog. If you need more information about this dialog, see the on-line help.
Be aware that once you start a query, you cannot cancel it. If the query is large, it can consume network bandwidth and take a long time to return to you, and you will not be able to exit it.
Conclusion
This article has included a lot of detail about configuring LDAP services. It has explained how to place the LDAP catalogs on your network and some of the concepts you must understand in order to configure your LDAP server. Once you understand these concepts, configuring LDAP services is really just a matter of defining three objects: the LDAP Group object, the LDAP Server object and the LDAP Catalog object.
* Originally published in Novell AppNotes
Disclaimer
The origin of this information may be internal or external to Novell. While Novell makes all reasonable efforts to verify this information, Novell does not make explicit or implied claims to its validity.