NDS101 with Novell's NWDir Bean
Articles and Tips: article
Senior Research Engineer
Developer Information
01 Oct 1998
The first article and code example in DeveloperNet University's NDS101 category. Using this article as a guide, a Java programmer will be able to use Novell's NWDir bean to build a Java client-side-only application that can read NDS directory information.
- Introduction
- The NDS101 GUI
- NDS Trees
- NDS Object Context
- NDS Attributes
- NWDir Bean NDS Terminology
- Finally, the Source Code Listing
- Conclusion
Introduction
As mentioned earlier in this issue, this is the first code example in DeveloperNet University's NDS101 category. The following table describes what this example intends to accomplish and what you will need in order to build its sample application.
|
Objective
|
Using this example as a guide, a Java programmer will be able to use Novell's NWDir bean to build a Java client-side-only application that can read NDS directory information.
|
|
Prerequisites |
Must have entry level Java programming skills (other DevU examples at this level will have prerequisites unique to their environment). |
|
Required Items |
Java Developers Kit version 1.1, and documentation installed. The JDK install is free from: http://java.sun.com:80/products/jdk/1.1/ Novell Beans Developers Kit and documentation installed. Novell's BDK install is available along with a free DeveloperNet subscription from: http://developer.novell.com/ndk/ |
|
Optional Items |
Novell's NetWare Adminstrator or ConsoleOne NDS Administration tools available along with a free DeveloperNet subscription from: http://developer.novell.com/ndk/ |
|
Required Setup |
The programmer must have authenticated access (be able to log in) to at least one NDS tree. The object to be read will be the programmer's user object in the tree. Attempts to read values from another object may fail because the programmer may not have the read right for the other object. We intend to discuss security issues in later examples. |
The NDS101 GUI
In order to keep the code and explanations simple, we will provide simple GUIs for all DevU examples. We assume you are already familiar with programming the GUI on your platform. Figure 1 shows the GUI provided for NDS101.
Figure 1: The GUI is kept separate from the example code discussed in DevU articles.
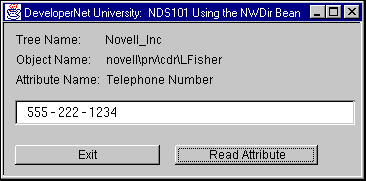
When the user clicks the "Read Attribute" button, the GUI code will execute the example code to read the attribute specified by "Attribute Name" from the object specified by "Object Name" in the tree specified by "Tree Name."
Figure 2: You can modify the example code so that the GUI will call your experiments.
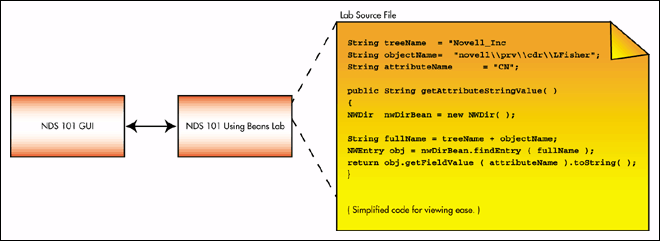
Figure 2 shows a typical code snippet that could be used to perform an NDS read operation. As you can see, there really isn't too much code necessary to read a value from NDS, especially with Novell's NWDir bean. However, you need to understand some things before you can adapt the code to your own purposes. Namely, you need to understand the following basic concepts:
NDS Trees.
NDS object context.
Attribute fields and their syntaxes.
The following three sections discuss these topics. If you are already familiar with NDS, skip to the end of the article for a detailed source code listing and explanations.
NDS Trees
Note: The following discussion uses NDS terms to help familiarize you with standard NDS terminology. These terms may be different from those used in environments other than C, such as the NWDir bean.
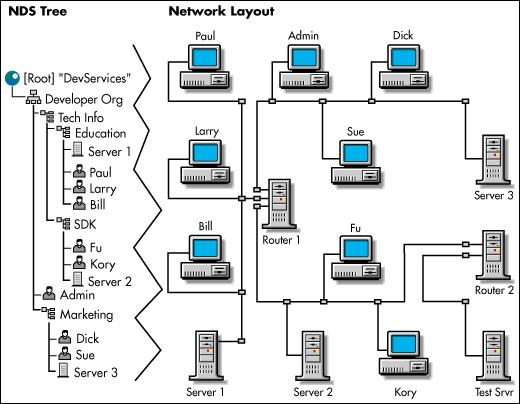
An NDS tree can be looked at like a database containing directory information. The directory's entries are called objects (like database records), which contain information about entities on the network. The NDS tree in Figure 3 shows some different types of NDS objects.
Each tree maintains its own distributed NDS database of objects, usually on more than one server. NDS administrators generally use a network administration application provided by Novell to view and help manage their trees. Novell provides an application called NetWare Administrator that can be run from Windows clients and a Java application called ConsoleOne for the server and other platforms that can be used for NDS administration.
The information in an NDS tree does not describe the physical layout of the network. Instead, an NDS tree view describes arbitrary groups of hardware and software network entities that reflect the organization of the business. The network layout view, on the other hand, usually only depicts the physical connections between the network's hardware entities.
Figure 3: An NDS tree shows how the Administrator wants to look at the entities on the network.
NDS Object Context
The object type an administrator selects when creating an NDS tree object to represent a network entity depends on the purpose of the entity as the administrator understands it. Each object contains the specific information needed for it to perform its role in the network. There are many standard object types provided by Novell and often a programmer may need to add a new object type for special use by an application.
User objects contain information about the persons who operate the client stations on the network. In NetWare Administrator and ConsoleOne, an object can be double-clicked to display its information. This information is read from the object's attributes. NDS attributes are discussed later.
Tree administrators arbitrarily create, edit, and delete objects on a tree as they determine that it is necessary. If you have never used NetWare Adminstrator or ConsoleOne to perform these tasks and have admin rights on a tree, now would be a good time to log in and try them before continuing with this article.
An Organization object like the Developer Org object in Figure 3 are often the highest-level containers in the tree. There can be multiple Organization objects but the administrator for this tree has created only one. Organizational units such as the Tech Info and Education objects in Figure 3 are the mid-level containers in the tree.
Organizations and Organizational Units are called containers. Administrators nest containers to represent the structure within the organization. Organizations and Organizational Units have no physical presence on the network. You can see that there are no entities in the network layout which correspond to the Organization or Organizational unit objects. They are simply conceptual NDS devices designed to help organize directory information.
Administrator's generally create user objects inside of Organizational Unit objects representing the groups that they work in. The path of Organization and Organizational Units leading to an object is actually a part of its name, like a fully qualified pathname in a file system.
An object's fully qualified pathname in NDS is called its NDS name context. Figure 4 shows the different kinds of name contexts that an object can have in an NDS tree.
Figure 4: Objects can be named by the paths leading to their locations in the tree.
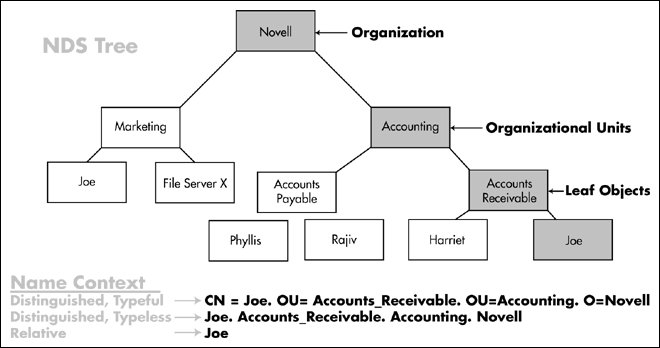
The first two name contexts listed in Figure 4 are referred to as distinguished name contexts because, as complete paths, they can distinguish between the Joe in Accounting and the Joe in Marketing. If the types for each step along the way are specified, the context is also referred to as typeful (CN refers to a leaf object's "Common Name").
A relative name context on the other hand, requires that the accessing station's current context be set so that it can complete a partial reference in order to fully distinguish a target object. For example, in the relative context example in Figure 4, current context would need to be set to "Accounts_Receivable.Accounting.Novell".
NDS Attributes
Objects are composed of attributes. Before an object can be created, the tree must possess knowledge of the attributes that should go into the object's type. These object type descriptions are called classes. Like a recipe, an NDS class describes the composition of the objects created from it. For those of you familiar with object oriented programming, classes in NDS are very analogous to classes in C++ or Java in that you instantiate NDS objects from their NDS class definitions. Figure 5 shows a partial list of the attributes in a User object.
Figure 5: A user object has many more attributes than those shown here.
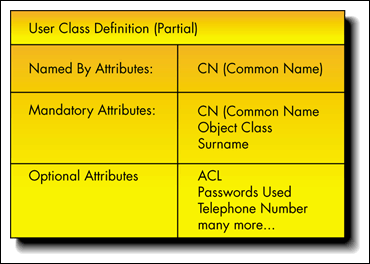
When an object is created, it must be initialized with all of its mandatory attributes and have values for them. However, an object may or may not have any of its optional attributes. Attempting to read an optional attribute value from an object which doesn't have that attribute yet will fail.
Attributes are based upon Syntaxes. Syntaxes are special typedefs created by Novell to be the data types used in attribute definitions. Every attribute definition is built upon a syntax. The syntax specified for an attribute definition defines the data format for values that can be put into that attribute type. You need to know an attribute's syntax in order to anticipate the type of value that you will receive back from an attribute read operation.
NWDir Bean NDS Terminology
The terms used in the NDS descriptions above are standard lingo in the NDS world. However, different environments may use different terms to describe the same things in a directory. Novell beans use terms that are more consistent with the ActiveX/Visual Basic world's directory terminology. Here are some examples:
|
NDS Terminology
|
JaveBean Terminology
|
|
NDS Tree |
Directory |
|
NDS Class |
Layout |
|
NDS Syntax |
Field Type |
|
NDS Object |
Entry |
|
NDS Attribute |
Field |
|
Distinguished Name |
Full Name |
Finally, the Source Code Listing
Below is a source code listing for NDS101 Using Novell's NWDir Java bean. Note that the code and explanations use NWDir terminology. All data types and methods belonging to the NWDir bean are in bold. The large italic, double-underlined numbers refer to explanations after the code listing.
1--------------------------------------------------------------------------------
import com.novell.beans.NWDir.*;
import com.novell.beans.util.NWBeanException;

public class NDS101
{
private static final String DLIMITR = "\\";//first '\' char negates ANSI esc
private final static String NDS_NS      = "NDS:"+DLIMITR+DLIMITR;

2--------------------------------------------------------------------------------
public static final String DIR_NAME     = "Novell_Inc";
public static final String ENTRY_NAME   = "novell\\provo\\devInfo\\LFisher";
public static final String FIELD_NAME = "CN";

   public String getFieldStringValue( )
   {
   String fieldStringValue = null;
   try
3--------------------------------------------------------------------------------
   {   NWDir nwDirBean = new NWDir();
     NWEntry obj = nwDirBean.findEntry(NDS_NS+DIR_NAME+DLIMITR+ENTRY_NAME);
     NWValueCaseIgnoreString fieldValue =
          (NWValueCaseIgnoreString)obj.getFieldValue(FIELD_NAME);
    fieldStringValue = fieldValue.toString();
   }    catch( NWBeanException e )  {    e.printStackTrace();    }
   return ( fieldStringValue );
  }
}
Novell provides a suite of Java Beans for all kinds of purposes. The NWDir bean provides NDS directory (NDS tree) access functionality. You can install Novell beans from http://developer.novell.com/ndk/.
Once you have installed the beans, make sure that your CLASSPATH is set up properly to access them before you attempt to build this sample application.
The DIR_NAME, ENTRY_NAME, and FIELD_NAME variables in the sample source code must be changed to describe the target entry (NDS object), and its location in an NDS directory. This sample recommends that you target your user entry for the read operation, because your company's network administrators have probably already given you the right to read its fields (NDS attributes). You may not have the right to read field values from other entries in your directory.
Obtain your directory (NDS tree) name. You can obtain the directory name from the login window that you use when you log in to the network. Go there now to obtain your directory name and enter it into DIR_NAME in the lab code.
Obtain the distinguished name for your user entry. You can obtain the fully qualified distinguished name for your user entry from the login window that you use when you log in to the network. Go there now to obtain your user name and context and form a typeless distinguished name for your user entry. Enter the distinguished name into ENTRY_NAME in the lab's source code.
To form the distinguished name, concatenate the names of the entries leading to your user entry. Delimit each name with two back-slash characters "\\" like the Java String below:
When the string, "Organization"+ "\\"+"OrgUnit1"+ "\\"+"OrgUnit2"+ "\\"+"YourUserName" is compiled, it will form the string, Organization\OrgUnit1\OrgUnit2\YourUserName
Note: Context names for Novell beans are delimited by the `\' character. Different environments use different delimiter characters. For example, when using C, the NDS context name delimiter will be the `.' character. Different environments may reverse the order of names in a distinguished name. For example in C, names will be in reverse order of the names shown for the NWDir bean.
Select a Field Name. For our sample code, we need to choose a field that we know will always exist in the entry, like a mandatory field. Also, because our GUI interface expects a String, we need a field with a type that can be viewed as a String. Some field types have no human readable String value.
The user entry's "CN" (common name) field is mandatory so it will always exist in every user entry and it uses the "Case Ignore String" field type so it is ideal for our purposes. Enter the common name field's name "CN" as the FIELD_NAME value in the lab source code.
First we create an NWDir bean instance. Then we use it to obtain a reference to an NDS entry in the directory. Note that the String parameter passed to the findEntry( ) method is prefaced with "NDS:\\". The NWDir bean can only deal with the NDS namespace type. Even so, it still requires this prefix so that it can be consistent with other Novell beans, which can deal with multiple namespace types.
Next, we use the NDS entry reference to read the value from the specified field with the NWDir bean method, getFieldValue( ).
Review the NWDir bean's JavaDoc html for information about more classes and methods that you can use in NWDir.
Try rebuilding the sample to read the "Telephone Number" field. It will return a NWValueTelephoneNumber value which can be readily converted to a String with the toString( ) method inherited from Object.
Conclusion
If you have read this article and performed the lab, you have learned about NDS trees (NWDir directories), objects (NWDir entries), contexts, attributes (NWDir fields), and field types (NDS syntaxes). You have also learned how to write a Java application using the NWDir bean that can read field values from an NDS object (as long as the user has been granted the right to do so).
After this brief introduction, we hope that you have discovered that NDS programming really isn't difficult, especially with Novell's NWDir bean.
Note: Later NDS101 examples present other easy ways to develop to NDS, like ActiveX.
For more information about other examples in this series, refer to: http://developer.novell.com/education/.
To download the project corresponding to this article, refer to: http://www.novell.com/coolsolutions/tools/15760.html.
Disclaimer
The origin of this information may be internal or external to Novell. While Novell makes all reasonable efforts to verify this information, Novell does not make explicit or implied claims to its validity.