C3POs Made Easy: A New Tool To Help the Developer
Articles and Tips: article
Senior Software Consultant
GroupWise Division
01 Mar 1998
Introduction
The GroupWise SDK available in Release 15 of the Novell SDK CD contains a new utility that makes the writing of C3PO's much easier: the C3PO. This article gives a brief introduction to C3POs; then it discusses the Wizard in more detail.
A Custom 3rd-Party Object (C3PO) is an OLE COM server object used to extend the GroupWise 5.x environment. The extensions take various forms, ranging from implementing custom record types (objects) in the GroupWise data store to modifying the GroupWise browser or Toolbar functionality. A C3PO can be developed by using C++, Delphi, or VB.
C3POs combine and replace the older and less functional notion of custom messages and custom commands. The 16-bit custom message and custom command drivers of GroupWise 4.x do not run under the 32-bit C3PO implementation. However, a 32-bit C3PO can be written to support 16-bit custom messages and custom commands. C3POs can make the following modifications to the user interface:
Add new items to the menus and new buttons to the Toolbar.
Place user-defined bitmaps on the Toolbar.
Add separator lines to enhance the appearance of menu items.
Provide a Help file with customized information about the C3PO.
Define icons for custom record types.
The ability to modify the user interface allows a C3PO to appear as an integrated feature of GroupWise. One way to run a C3PO is to select the menu item or Toolbar button that was added by the C3PO. In addition, C3POs may be registered to run when an existing menu item or Toolbar button is selected. This allows a C3PO to enhance or replace the normal functionality. C3POs can be also be triggered to run when GroupWise starts, when GroupWise ends, and when a new item arrives in the mailbox.
All objects in the GroupWise data store (mail messages, appointments, and so forth) are theoretically C3POs. By installing a C3PO against the default message class names, customized C3PO behavior can be invoked. For example, arrival of all items in the GroupWise 5.x data store can be monitored by installing a C3PO under the root item message class. Multiple handlers for a given message class are allowed; however, order of execution is dependent on order of handler installation in the Windows registry.
To make the writing of C3POs easier and to help third-party developers get their applications up and going faster we now provide a C3PO Wizard. The C3PO Wizard will take the user through a series of questions and at the end generate the code necessary to create a C3PO in Visual Basic, C++, or Delphi. The Wizard can create a C3PO that will-
Create custom message types and add custom icons.
Provide access to GroupWise events such as "OnReady," "OnShutdown," and "OnDelivery."
Create new menus and menu items on the GroupWise browser.
Add new buttons to the GroupWise button bar.
Take over existing GroupWise functionality for messages, such as open, delete, and forward.
Creating a C3PO Using the Wizard
To demonstrate how to use the Wizard, we'll take you through the steps to create a Visual Basic C3PO that does the following:
Create a new Message Class.
Trap the OnReady and OnShutdown events.
Create a separator new menu with two new menu items in the browser.
Add a new button to the browser button bar.
Add a new menu item to the context menu that appears when a mail message is selected.
Take over the open for the custom message class that was created.
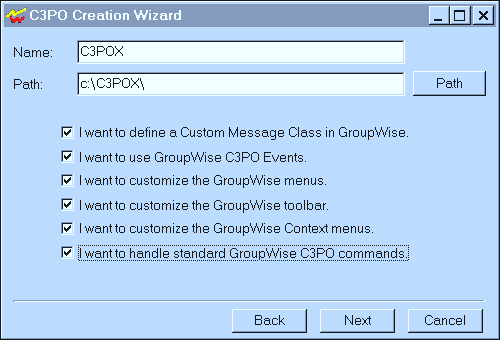
The first dialog that appears is an explanation of the C3PO Wizard. In the next dialog you must specify the name of the C3PO .wiz file that you want to create along with the path to the directory where you want it created. You can use the Path button to browse for the correct directory you want. For instance, if you want to create a C3PO with the name C3POX in c:\C3POX\, this is also the path were the Wizard will create code for the C3PO. There is also a list of check boxes that allow you to select what you would like your C3PO to do for you. For the purposes of our illustration you'll check all of them as shown in the following figure.
Since you decided to define your own custom message class, you'll see the Define Custom Classes dialog box when you click Next. To create a new class, click Add.
You'll see the following dialog. In the combo box, choose the base message class to be GW.MESSAGE.MAIL. Enter the extension that you want which is XXXX. , then click OK to have a custom icon associated with any message that is of your new class. You'll see the previous dialog that now displays your new message class as GW.MESSAGE.MAIL.XXXX.

Click "Next" to go on to the GroupWise C3PO Events dialog and check the appropriate boxes.

Click Next to go to the Create Custom GroupWise Menus dialog. This is a list of all the contexts that you can add menus to. Check the window browser check box.

Click Next for the Custom Menus dialog, which shows menus. With a C3PO you can put menus and menu items in any or all of them. Select File and click Separator to add a separator at the end of the File menu.
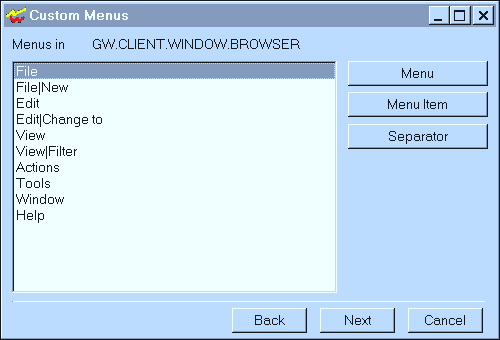
Next, select File and click Menu to display the dialog where you enter the Menu text, the long prompt text and the constant variable that you want to use to identify this menu. When you have finished entering this information, click OK to return to the Custom Menus dialog. The new menu "File|Menu A" is now shown in the list box. To add a menu item to the new menu, select it and click Menu Item.
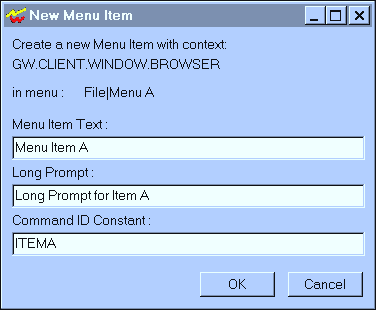
Enter the menu item text, long prompt text and the constant variable name that you want to use to identify this menu item, then click OK to return to the previous dialog. Select the "File|Menu A" menu and click Menu Item again to enter the information for the second menu item for this menu.
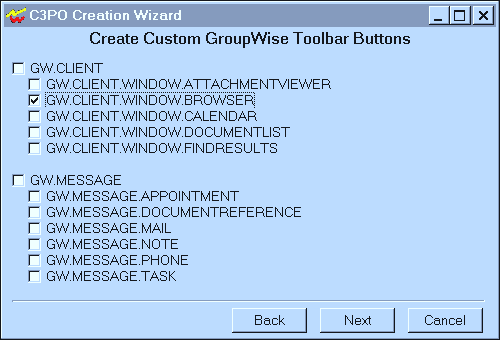
Click Next to go on to the Create Custom GroupWise Toolbar Buttons dialog, which shows a list of all the contexts that you can add a button to. You want to add a button to the browser so check the browser check box. (You can check any or all of the boxes.)
Click Next to go on to the Custom Toolbar buttons dialog, then click New Toolbar Button to create a new button.
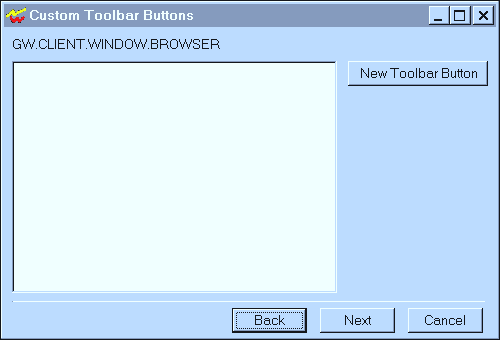
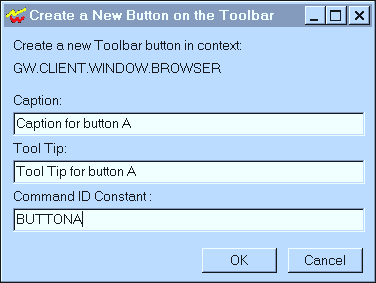
Enter the information for the toolbar button you are creating, including the caption, tool tip and the variable constant to identify this button. Click OK to go back to the previous dialog. Since you don't want any more buttons, click Next to go to the Create Custom GroupWise Context Menus dialog.
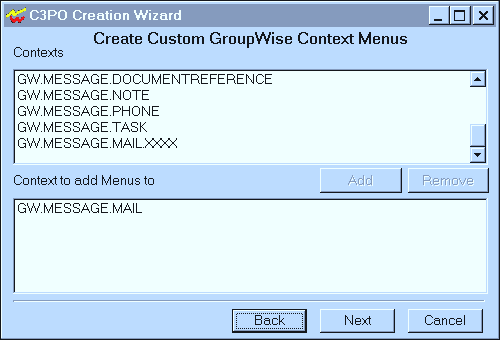
You want to add to the context menu that comes up when a mail message is selected, so you need to select GW.MESSAGE.MAIL and click Add. You don't want to add menus to any other contexts, so click Next to go to the Custom Context Menu Dialog.
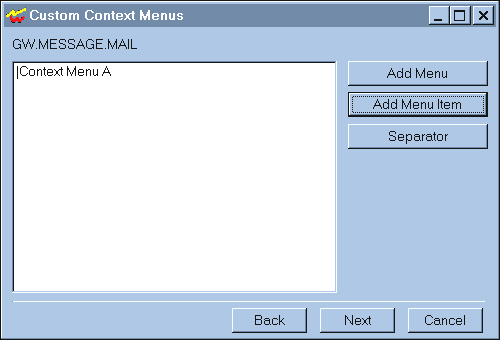
Add a separator and a new menu called Context Menu A. Then select the new context menu and add a new menu item as before with the name Context Menu Item A. Click OK, then click Next to go on to the next dialog.
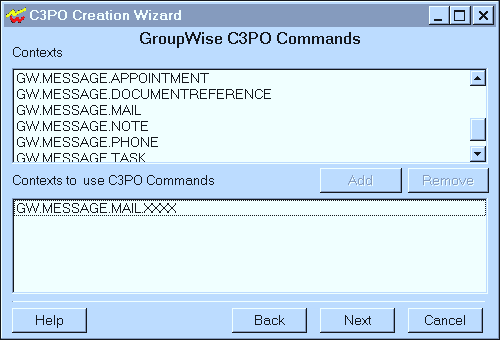
You're now at the GroupWise C3PO Commands dialog, where you want to take over the "Open" command for the new message type that you have created. Select GW.MESSAGE.MAIL.XXXX click Add, then click Next.
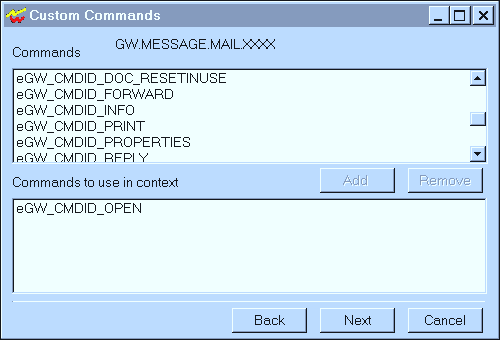
The next dialog displays a list of all the pre-defined commands that you can take over with a C3PO. Select and add the "eGW_CMDID_OPEN" command, then click Next.
You have now finished defining your C3PO. This dialog shows what you have told the Wizard that you want to do. You can look it over to see if it is correct. If it is not, you can go back and change any part. When satisfied, click Next.
A new file is created, named c:\C3POX\C3POX.wiz. This file is an ASCII text file that you can edit and change if you want to. Another utility is available that can take this file and generate code. You want to create code for Visual Basic 5.0, so select that option and click Next.
The last dialog box shows that you have created seven files: five class files, a basic file and a readme. To finish your C3PO, you need to go into Visual Basic 5.0 and create a new ActiveX .exe project called C3POX. You could also make an Active X .dll. Add these files and compile, and you're done.
C3POX Code
This is the code for a custom message type that has a custom icon associated with it. This code is found in IconFact.cls in the GetIcon routine:
Public Sub GetIcons(sGWObjClass As String,

                    psGWIconFile As String,

                    plGWUnOpenIcon As Long,

                    plGWOpenIcon As Long)


If sGWObjClass = "GW.MESSAGE.MAIL.XXXX" Then          ' is the object class         GW.MESSAGE.MAIL.XXXX

                psGWIconFile = "icons.dll"          ' set the icon file name

                plGWUnOpenIcon = 1                    ' set the unopen icon

                plGWOpenIcon = 0                      ' set the open icon

    End If
In the If statement it looks at sGWObjClass to see if the class type is my custom class type. If it is, then it sets the file where GroupWise is to find the icons in. This example uses icons.dll, but it can be any .exe or .dll that has icons in it. It then sets the index for UnOpen and Open icons. Now look at the code generated for GroupWise events. Event code is found in Eventmon.cls in the Notify routine:
Public Sub Notify(sGWContext As String, objGWEvent As Object)

Dim res

    Select Case objGWEvent.PersistentID

        Case eGW_CMDEVTID_ONREADY          'Check for OnReady Event

            'This is were you put OnReady code.

            res = MsgBox(objGWEvent.PersistentID, vbOKOnly, sGWContext)

        Case eGW_CMDEVTID_ONSHUTDOWN          'Check for OnShutdown Event

            'This is were you put OnShutdown code.

            res = MsgBox(objGWEvent.PersistentID, vbOKOnly, sGWContext)

        Case Else

            MsgBox "Unsupported Case"

    End Select


End Sub
In the Notify routine a case statement is set up to look at the objGWEvent.PersistentIDproperty of the EventMonitor object. This contains the value of the event that has just occured. A comment is supplied to show where you want to put code for each event. The code to add menus is in Comamdf.cls in the CustomizeMenu routine:
Public Function CustomizeMenu(sGWContext As String, objGWMenu As Object) As Boolean


    Dim Menu As Object


    If sGWContext = "GW.CLIENT.WINDOW.BROWSER" Then

        Set Menu = objGWMenu

        Set Menu = Menu.MenuItems.Item("File")          ' get menu File

        Call Menu.MenuItems.AddSeparator


        Set Menu = objGWMenu

        Set Menu = Menu.MenuItems.Item("File")          ' get menu File

        Set Menu = Menu.MenuItems.AddMenu("Menu A")          ' add menu item to menu


        Set Menu = objGWMenu

        Set Menu = Menu.MenuItems.Item("File")          ' get menu File

        Set Menu = Menu.MenuItems.Item("Menu A")          ' get menu Menu A

        Dim Cmd02 As New GWCommand

        Let Cmd02.PersistentID = ITEMA          ' create command for Custom menu

        Let Cmd02.LongPrompt = "Long Prompt A"          ' set long prompt for menu item

        Call Menu.MenuItems.Add("Menu Item A", Cmd02)          ' add menu item to menu


        Set Menu = objGWMenu

        Set Menu = Menu.MenuItems.Item("File")          ' get menu File

        Set Menu = Menu.MenuItems.Item("Menu A")          ' get menu Menu A

        Dim Cmd03 As New GWCommand

        Let Cmd03.PersistentID = ITEMB          ' create command for Custom menu


        Let Cmd03.LongPrompt = "Long Prompt B"          ' set long prompt for menu item

        Call Menu.MenuItems.Add("Menu Item B", Cmd03)          ' add menu item to menu


  End If


End Function
The code generated checks sGWContext to see if this routine is being called for the browser. If it is, it gets the main menu from objGWMenu. Then it looks for the File menu from the main menu items, and saves it. Then from the File menu items it adds a separator, then gets the File menu items again and adds the new Menu A. Then it again finds the File menu items and from this finds the new menu Menu A. Now it creates a new GWCommand. The code then gives the constant ID to the GWCommand.PersistentID and sets the long prompt. Using Menu A's items, the code adds a new menu item Menu Item A. Then the code repeats this process to create the second menu item. The code to generate a context menu is found in Commadf.cls in the routine CustomizeContextMenu:
Public Sub CustomizeContextMenu(sGWContext As String, objGWMenu As Object)


    Dim Menu As Object


    If sGWContext = "GW.MESSAGE.MAIL" Then

        Set Menu = objGWMenu

        Call Menu.MenuItems.AddSeparator


        Set Menu = objGWMenu

        Set Menu = Menu.MenuItems.AddMenu("Context Menu A")          ' add menu item to menu


        Set Menu = objGWMenu

        Set Menu = Menu.MenuItems.Item("Context Menu A")          ' get menu Context Menu A

        Dim Cmd02 As New GWCommand

        Let Cmd02.PersistentID = CONTEXTMENUITEMA          ' create command for Custom menu

        Let Cmd02.LongPrompt = "Long Prompt for context menu item A"          ' set long prompt for menu item

        Call Menu.MenuItems.Add("Context Menu Item A", Cmd02)          ' add menu item to menu


    End If


End Sub
The difference between CustomizeMenu and CustomizeContextMenu is that sGWContext is checked to see if the context is "GW.MESSAGE.MAIL." It does not have to look for the File menu, because it uses the context menu that is passed to the routine. The code to create buttons in the Toolbar is also found in Commandf.cls. It is in the CustomizeToolbar routine:
Public Function CustomizeToolbar(sGWContext As String, objGWToolbar As Object) As Boolean

    Dim Button As Object

    Dim FilePath As String


    If sGWContext = "GW.CLIENT.WINDOW.BROWSER" Then

        Dim Cmd00 As New GWCommand

        Let Cmd00.PersistentID = BUTTONA

        Let Cmd00.ToolTip = "Tool Tip for button A"

        Set Button = objGWToolbar.ToolbarItems.Add("Caption for button A", Cmd00)

        FilePath = App.Path & "\icons.dll"

        Call Button.SetBitmap(FilePath, "toolbar")


    End If


    CustomizeToolbar = False


End Function
Once again the context is checked to see if it is the browser. If it is the browser a new GWCommand is created. The persistentID is set to the constant ID that you entered. The Tool Tip is set and the new button is added to the toolbar items. The bitmap for the toolbar is also set. This used icons.dll but any .exe or .dll that has the correct size of bitmaps can be used. The correct sizes are 16x16 and 32x32. Also, the name of the bitmap is set "toolbar." The code for taking over the open for the custom message type is found in Commadf.cls in two routines WantCommand and BuildCommand. WantCommand looks like this:
Public Function WantCommand(sGWContext As String, sGWPersistentID As String) As Boolean


    WantCommand = False


    If sGWContext = COMMANDCONTEXT0 Then

        If sGWPersistentID = eGW_CMDID_OPEN Then

            WantCommand = True

        End If

    End If


End Function
The context is looked at to see if it is the correct one. COMMANDCONTEXT0 was created by the Wizard and is defined in startup.bas. If the persistentID is the open ID, then WantCommand returns TRUE. GroupWise calls WantCommand to see if the C3PO wants to take over this command. The code returns FALSE if it does not want to. Next, the BuildCommand is called. It looks like this:
Public Function BuildCommand(sGWContext As String,

                             sGWPersistentID As String,

                             objGWBaseCommand As Object,

                             objGWParameter As Object) As Object

Dim GWCmd As New GWCommand


    If sGWContext = COMMANDCONTEXT0 Then

        If sGWPersistentID = eGW_CMDID_OPEN Then

            Let GWCmd.PersistentID = GWCOMMAND00          ' create a command object for the open

            Set GWCmd.BaseCmd = objGWBaseCommand

            Set BuildCommand = GWCmd

        End If

    End If


End Function
The same checks are preformed to make sure BuildCommand has been called with the correct context and persistentid. Then a new GWCommand is created. The persistentID is set to GWCOMMAND00, which was define in Startup.bas. The base command is saved and BuildCommand returns the new GWCommand that was created. A number of constants have been defined in Startup.bas:
Public Const COMMANDCONTEXT0 As String = "GW.MESSAGE.MAIL.XXXX"

Public Const GWCOMMAND00 As Integer = 0          ' Constant for eGW_CMDID_OPEN

Public Const ITEMA As Integer = 2          ' Constant for Custom menu item Menu Item A

Public Const ITEMB As Integer = 3          ' Constant for Custom menu item Menu Item B

Public Const BUTTONA As Integer = 4          ' Constant for Toolbar button Caption for button A

Public Const CONTEXTMENUITEMA As Integer = 5        ' Constant for Context menu item Context Menu Item A
The Wizard generated code that created GWCommands for new menu items, a new button and for the pre-defined command open. GWCommand has various properties, including persistentid and basecommand, and methods, including execute and validate. Execute is the only one that you want to look at. The GWCommand object is in GWComman.cls. Execute looks like this:
Public Sub Execute()

Dim res


    On Error GoTo Execute_Err


    Select Case m_sPersistentID

        Case GWCOMMAND00:

            res = MsgBox("GW.MESSAGE.MAIL.XXXX eGW_CMDID_OPEN", vbOKOnly, "Execute")

            ' Put execute command code here for GW.MESSAGE.MAIL.XXXX eGW_CMDID_OPEN


        Case ITEMA:

            res = MsgBox("Menu Item A Custom Menu", vbOKOnly, "Execute")

            ' Put execute command code here for Menu Item A Custom menu.


        Case ITEMB:

            res = MsgBox("Menu Item B Custom Menu", vbOKOnly, "Execute")

            ' Put execute command code here for Menu Item B Custom menu.


        Case BUTTONA:


            res = MsgBox("Caption for button A Toolbar Button", vbOKOnly, "Execute")

            ' Put execute command code here for Caption for button A Custom menu.


        Case CONTEXTMENUITEMA:

            res = MsgBox("Context Menu Item A Context Menu", vbOKOnly, "Execute")

            ' Put execute command code here for Context Menu Item A Context menu.


        Case Else

            MsgBox "Unsupported Case"

    End Select


    Exit Sub


Execute_Err:


    MsgBox "Error Executing GWCommand: " & m_sPersistentID & vbCrLf & vbCrLf &

           "Err Number:  " & Trim(Err.Number) & vbCrLf &

           "Description: " & Err.Description,

           vbCritical


End Sub
A case statement checks the constants that were defined for menus and buttons, and the constants created by the Wizard for the open pre-defined command. When a menu item or button that was created by your C3PO is selected, GroupWise finds the GWCommand that is associated with that item and calls the GWCommand execute method, so the code that you want to perform when your menu item or button is selected, should be put here. Also the code I want to perform for an open of a message of type "GW.MESSAGE.MAIL.XXXX" should be put here.
* Originally published in Novell AppNotes
Disclaimer
The origin of this information may be internal or external to Novell. While Novell makes all reasonable efforts to verify this information, Novell does not make explicit or implied claims to its validity.