Using the DeveloperNet2000 ActiveX Controls
Articles and Tips: article
Developer Support Engineer
Developer Support
01 May 1997
Provides an introduction to the new DeveloperNet 2000 ActiveX controls developers can use to program IntranetWare. Topics include Managing Sessions, Using the Directory, and Managing Servers.
- Introduction
- Prerequisites
- Managing Sessions
- Adding More Tree Connections
- Using the Directory
- Managing Servers
Introduction
This DevNote gives you an introduction to the new DeveloperNet 2000 ActiveX controls you can use to program IntranetWare. For a general overview of these controls, refer to the corresponding article in the Nov. 96 issue of Developer Notes.
This article is based on a set of samples which you can access at http://devsup.novell.com/sample/areas/activexs.htm. A complete design document covering the controls used in this article can be found at http://developer.novell.com/net2000/rad/paper/rdesign.htm.
I'll examine the Session, Directory and Server Admin controls. The Volume Admin, Print Queue Admin and Bindery controls are the subject of another article.
Prerequisites
I feel tempted to say none, which is true as far as the NetWare SDK is concerned. You do not need to know any of the functions documented in the Cross Platform Reference, but of course it will help you appreciate the functionality offered by these controls.
As this article relies on Visual Basic as a demonstration vehicle, some basic knowledge of it or a similar RAD tool is required. Also you should be familiar with concepts of components, such as methods, properties and events.
Managing Sessions
Let's start with a look at the Novell Session Control. You can use it to manage your connections and resources in the network. I will use the XSession sample as the discussion vehicle.
Figure 1: The XSession sample.
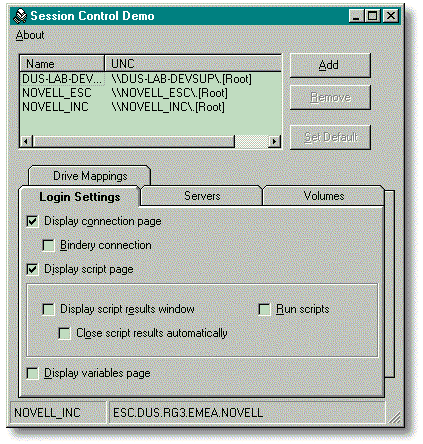
Listing Connected Servers
In Figure 1 you can a list of trees I am currently connected to. The name of the tree is given in the first column. The second holds the UNC name form of the tree root object, which is in the format
\\<tree name<\.<distinguished name<
For trees, the UNC does not make a lot of sense, but you will see it is useful later when we get to talk about servers.
Figure 2 shows the code used to get the list of trees. As you can see, there is nothing difficult to it.
Figure 2: RefreshTreeList.
' get a list of all trees currently connected to

Private Sub RefreshTrees()

    Dim oTree As NWNETOBJ

    Dim itmX As ListItem

    lvTrees.ListItems.Clear

    For Each oTree In session.ConnectedTrees

       Set itmX = lvTrees.ListItems.Add(, , oTree.ShortName)

       itmX.SubItems(1) = oTree.FullName

   Next oTree

End Sub
All I have to do is to declare a reference to a generic network object, NWNETOBJ. I can then use the ConnectedTrees collection of the session control to conveniently display the trees.
The status bar in Figure 1 has the current default tree name and context. You can change it by selecting a tree in the listview and clicking the "SetDefault" button to the right. All I have to do is to store the ShortName property of the selected tree into the DefaultTreeName of our session control, the session control will then automatically retrieve the DefaultContextName for that particular tree.
|
Caution: Changing the default tree and context may adversely affect otherprograms currently running on your machine. |
Adding More Tree Connections
The "Login Settings" Tab in the sample closely resembles the Client32 login settings. Its function is the same, it controls appearance and behavior for the common IntranetWare login dialog. All of the checkboxes shown have their corresponding properties in the session control. Clicking the "Add" button besides the tree list will then bring up the login dialog with whatever you configured. You can specify how much control should be given to the client, and if login scripts should be executed.
I am not going through all of the configuration possibilities here, you can find out for yourself by clicking the boxes. There is only one detail which I did not cover in the sample. You can of course bypass the standard login GUI and just do the login processing for yourself, all you have to do is pass False as the last parameter to the session.Login method.
Figure 3 shows the processing triggered by the "Add" button.
Figure 3: Adding a tree.
' user wants to add a tree

Private Sub cmdAddTree_Click()

   Dim hLogin As Long

   Dim sResource As String, sUser As String

   With session

      ' show connection tab for bindery connections

      ' to let the user choose a server

      .ConnectionTab = optConnectionTab Or optBindery

      .DisplayResults = optScriptResults

      .RunScripts = optRunScripts

      .AutoClose = optAutoClose

      .VariablesTab = optVariables

      .Bindery = optBindery

      hLogin = .Login(sResource, sUser, "", True)

   End With

End Sub
You may ask why there is no processing of the login outcome. To find out if the login operation was successful, one needs to handle the OnLogin event. The session control passes a login handle that can be later used to terminate the connection.
In fact, to be able to log out off a tree, you need this handle. Unfortunately, there is currently no method to get the handles of connections already established. In other words, you can only terminate connections you acquired. This is likely to change in a future revision of the session control.
Terminating Connections
I can tear down a connection I established by clicking the "Remove" button. Upon successful termination, the session control sends an OnLogout event, so the tree list can be cleaned up.
Enumerating Resources
Apart from the connections themselves, the session control also lets you manage the resources allocated, as servers, volumes, and drives.
Connected servers are stored with their server name in the ShortName property and the full NDS name, including the tree, as their FullName. This has several advantages. You can easily relate servers to their respective trees, as the tree is part of the name. Likewise you get the location of the logical NDS object representing the server. If there is a bindery connection to that server, the FullName is the same as the ShortName.
Servers will be covered in more detail below in the discussion of the XServMan sample for server management. As for the volumes, note that connected is not necessarily mapped, it just means we authenticated to the server holding that volume, and consequently we could access files on the volume using normal UNC paths.
Figure 4: A list of current drive mappings.
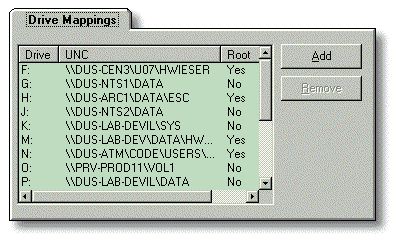
Figure 4 shows a list of drives currently mapped. As you can see in Figure 5, we iterate through the session's DriveMappings collection, retrieving the DriveLetter, FullName and MappedAsRoot properties of each individual drive mapping.
Figure 5: Code to list mapped drives.
Private Sub RefreshDrives()

   Dim oDrive As NWDRIVEMAPPING

   Dim itmX As ListItem

   lvDrives.ListItems.Clear

   For Each oDrive In session.DriveMappings

      With oDrive

         Set itmX = lvDrives.ListItems.Add(, , .DriveLetter)

         itmX.SubItems(1) = .FullName

         it mX.SubItems(2) = IIf(.MappedAsRoot, "Yes", "No")

      End With

   Next oDrive

End Sub
Note that in this case the FullName property holds a Windows style UNC name instead of an NDS name, which allows to use the full name as part of a file name. Adding and removing drives is really simple, you just have to provide a valid name and a free drive letter, which is what the drive form in XSession is for.
For simplicity, there is just a text box, where the user may enter a resource to map to. If we wanted to avoid invalid entries, we could instead provide a read- only combobox holding all connected volumes.
Using the Directory
Generally speaking, the directory control holds two major components for the developer. There is the Entries collection you can use to enumerate objects under a specified context in the directory, and the Layouts collection holding the structure definitions for all objects in the current tree.
Layouts
Let's start by giving the XLayout sample a closer look. Its purpose is to browse the layouts present in the trees currently connected to. Remember that IntranetWare comes with a pre-installed base schema holding all classes necessary for the operation of the network itself. The actual schema in a live tree depends on what products were added to the system. It may consist of a variety of different classes, leading to a variety of possible problems if the schema extensions were not applied with care.
Figure 6: The XLayout sample.
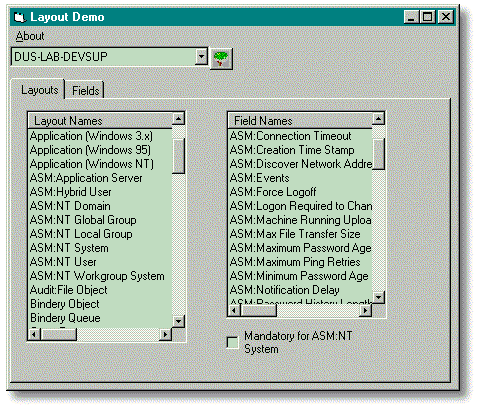
Figure 6 shows the XLayout sample. The combobox in the status bar lets you select one of the connected trees from the session control. The view shows a part of the classes implemented by the NT Administrator and the attributes for an NT System in particular. To find out the layouts defined in the current tree, you can use the NWLayoutDescription collection as in Figure 7.
Figure 7: Getting a list of layouts.
Dim oLayout As NWDIRLib.NWLayoutDescription

   Dim itmX As ListItem


   With lvLayouts.ListItems

      .Clear

      For Each oLayout In directory.Layouts

         Set itmX = .Add(, , oLayout.Name)

      Next oLayout

   End With
Likewise, the fields belonging to a particular layout are easily enumerated using the Fields collection member of a layout object. This is done when handling a user selection in the layout list.
Slightly more complicated is the code to properly set the status of the "Mandatory" checkbox in Figure 8.
Figure 8: Determining if a field is mandatory for a particular layout.
Private Sub lvLayoutFields_ItemClick( _

   ByVal Item As ListItem)

      Dim sCurrentField As String

      Dim sCurrentLayout As String


      sCurrentLayout = lvLayouts.SelectedItem.Text

      sCurrentField = Item.Text

      optMandatory.Value = _

         Iif(directory.Layouts(sCurrentLayout)._

      Fields(sCurrentField).Optional, _

         vbUnchecked, vbChecked)

End Sub
Note that you can use the name of a layout or field as an index into the corresponding collection.
I use the currently selected layout as an index into the Layouts collection and immediately use the resulting object's Fields collection to access the desired field. The Optional flag of the field object does only make sense when used in this context.
Using the OLE Object Browser in Visual Basic or your favorite RAD tool, you may have noticed that there is also a Fields collection property of the NWLayoutDescriptions collection. While the object property will give you all fields used by the current object, the collection property returns all fields known to the directory. There is a small caveat here if you want to use early binding and properly name the field object, as the directory control at the time of this writing does not expose a corresponding object. You could however use a tool like the OLE 2 Object Viewer shipping with Microsoft's Win32 SDK to find out that the correct type is INWFieldDescription. Using the properties of this object, you can browse all relevant field information as in Figure 9.
Figure 9: Browsing field information.
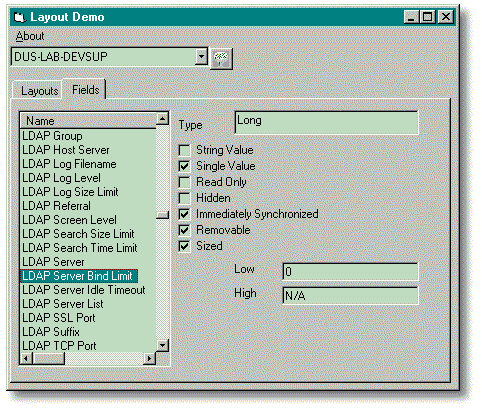
For a detailed documentation of the different flags, you may want to consult the DeveloperNet 2000 RAD Components Design paper at http://developer.novell.com/net2000/rad/paper/rdesign.htm.
Selecting Objects
Next, let's examine the XSelect sample. Actually this might be a useful tool for you even if you are not programming Visual Basic. If you have ever used the NDS Flat Browser in NetWare Administrator, you know what this sample is all about: A generic object filtering and selection tool, implemented as an OLE server. Given a tree name and a context for a start, plus an optional list of layouts to filter for, XSelect lets you navigate through the tree and select objects to perform operations upon, such as adding trustee rights, adding to lists and the like.
Figure 10 shows the selection dialog used from the XCreate sample. In fact, as this is an OLE In-Process server, you will not see much of it unless you use it.
Figure 10: XSelect browsing for containers.
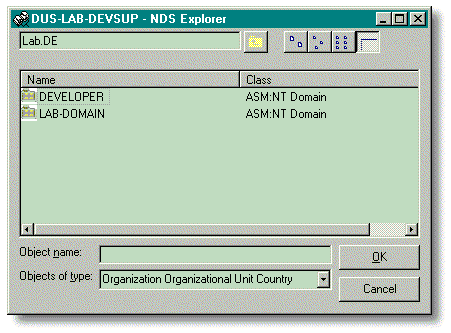
When using the control, you might wonder why it does not have the typical icons for NDS objects you are probably used to. At the time of this writing the Directory control did not support the ImageList method yet, that would allow to display these icons. However, by the time you read this or shortly thereafter, the controls should be fixed so I could add this feature to the sample. Currently, the dialog just uses folder icons for container objects and leaf icons for leaf objects.
Now, how does this all function? The control exposes several properties, including the tree name and the context needed to initialize the dialog box, a list of filters and a list of results, much as in the Flat Browser I referred to above.
As you can see in Figure 11, the main construct again is a loop through a collection exposed by the directory control, this time NWEntries.
Figure 11: Enumerating entries.
Private Sub RefreshList()

   Dim ndsEntry As NWDIRLib.NWEntry

   Dim itmX As ListItem

   Dim ordMousePointer As Long

   Dim bShowAllObjects As Boolean


   ordMousePointer = Screen.MousePointer

   Screen.MousePointer = vbArrowHourglass

   bShowAllObjects = cboObjectType = sAllObjects

   lvObjects.ListItems.Clear


   For Each ndsEntry In directory.Entries

      If Not bShowAllObjects Then

         If Not IncludeObjectType(ndsEntry) Then GoTo DoNotShowEntry

   End If

   With ndsEntry

      Set itmX = lvObjects.ListItems.Add(, , .ShortName)

      itmX.SubItems(1) = .Layout.Name

      itmX.Icon = IIf(.Container, 1, 2)

      itmX.SmallIcon = IIf(.Container, 1, 2)

   End With

DoNotShowEntry:

   Next ndsEntry

   Screen.MousePointer = ordMousePointer

End Sub
As the user may choose to display all objects instead of just the filtered ones, I am checking the status of the corresponding combobox. If filtering is enabled, the IncludeObjectType function checks if the given entry should be displayed. At the moment this is just done by looping through the specified filters. There is a more clever approach though, by making use of the NWFilters collection. This would allow to do filtering on more sophisticated criteria than just the class name.
A good use of this feature would be, for instance, in a Find Tool for NDS that would look much like the standard one on Windows 95. For now, let's move on with the simpler solution. One more thing to mention is the dialog population routine. I have to include containers in the display, be they part of the filter or not. This is due to the fact that they might hold objects satisfying the filter condition. Currently, the information available about layouts does not include the NDS structure rules, such as containment classes. Therefore you cannot tell for sure if a given class may reside in a container or not.
Creating Objects
Another sample using the directory control, the session control and the XSelect sample just mentioned is the XCreate sample. It can be used to create any number of objects belonging to any class and might be useful as a tool to set up test environments.
Figure 12: Creating multiple objects with XCreate.
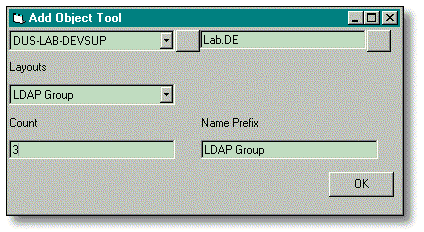
Figure 12 shows the sample creating three new LDAP group objects under the Lab.DE context. The function is rather simple. You can use the two buttons in the toolbar to select the starting tree and context as described in the samples above.
Name prefix and iteration count are used to form a unique name. Figure 13 shows the inner loop in the automatic creation routine. It scans through the fields of the selected layout and determines all mandatory fields. It then attempts to provide some dummy value.
Figure 13: The code to automate creation.
For Each ofield In directory.Layouts(cboLayouts.Text).Fields

   If ofield.Optional Then

   Exit For

   End If


   If ofield.Name << sCommonName And ofield.Name << sObjectClass Then<
      ' fill in some dummy value

      If ofield.String Then

         ' fill in a minimum string

         ' if the field is sized, this must be at least of the minimum length

         Call oEntry.SetFieldValue(ofield.Name, _

         IIf(ofield.Sized, Space$(ofield.LowerLimit), Space$(1)))

      Else

         Select Case ofield.TypeName

            Case "Long"

               Call oEntry.SetFieldValue(ofield.Name, _

               IIf(ofield.Sized, ofield.LowerLimit, 0))

            Case Else

            ' only support simple types at this point

            MsgBox _

               "Cannot fill in " & ofield.Name & " automatically." & _

               vbCritical, _

               ofield.TypeName

            Exit Sub

         End Select

      End If

   End If

Next ofield

Call oEntry.Update
Note that for sized attributes the value can not be less than the lower limit. For strings this limit is a byte count, for integer values a number. If the layout has a mandatory field of a compound type, the sample exits with an error message. You should also not forget to call the NWEntry.Update method as this is the point where changes are actually communicated to the directory.
Managing Servers
Finally, let's look at what you can do using the Server Admin control, using the XServMan sample. To take advantage of the "Parameters" and "NLM/Profiles" tabs, you must have managed rights to the server in question.
Figure 14: Using the XServMan to maintain server configurations.

In Figure 14, we again look at a list of connected servers obtained from the session control. The "Add" button invokes the login dialog, while the "Browse" button attempts to locate a server in the current default tree as displayed in the status bar, using the XSelect tool.
The item of interest here is the tab control below. The fields are filled in by reading out the properties of the selected server. The "Description" is the one you can see and edit in NetWare Administrator. This is really a writeable field, so you could go and modify the sample code to be able to change the description.
The "Parameters" page may be slightly more useful. Please note, that as in Figure 15, you must specify the name of the parameters exactly as they are spelled on the server console. This is a minor inconvenience which will be eliminated with the introduction of a settable parameters collection for this control in an update to the Server Admin control.
Figure 15: Modifying server parameters.
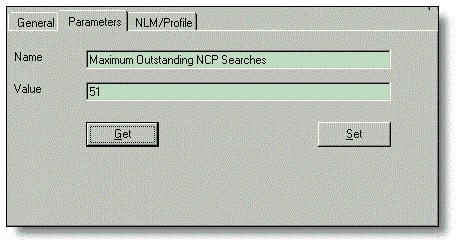
The code for getting and setting the parameters is trivial, you just do variable assignments from and to the server object properties.
Figure 16 illustrates the execution of NetWare Loadable Modules or command files at the server console. This involves the LoadNLM and ExecuteProfile methods, respectively. Both methods have Boolean return values, which will inform you about success or failure of the operation. You should make sure to either specify the full path to the file to be loaded or have it in your server's search path. Alternatively, you could unload an NLM by specifying the module name using the UnloadNLM method.
Figure 16: Loading an NLM with command line parameters.
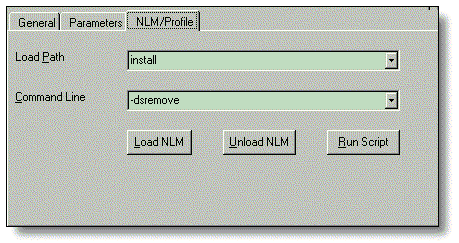
Finally, in Figure 17, note that you should have an error handler in case there is a problem with the connection. All methods assume a connection is in place and you have the necessary rights.
Figure 17: Code used to load an NLM.
' load the NLM with specified command line

Private Sub cmdLoadNLM_Click()

   On Error Resume Next

   If serverManager.LoadNLM( _

      cboLoadFileName.Text, _

      cboCommandLine.Text) Then

      With cboLoadFileName

         .AddItem .Text

      End With

      With cboCommandLine

         .AddItem .Text

      End With

   End If

End Sub
This concludes the first series of samples for the new DeveloperNet 2000 ActiveX controls. As mentioned above, there will be another article covering the controls for volume and print queue administration and accessing the server bindery.
* Originally published in Novell AppNotes
Disclaimer
The origin of this information may be internal or external to Novell. While Novell makes all reasonable efforts to verify this information, Novell does not make explicit or implied claims to its validity.