An Introduction to Visual AppBuilder: Creating Menus for Reuse
Articles and Tips: article
Consultant
Novell Consulting Services
01 May 1994
This article introduces the Visual AppBuilder environment and covers the basic steps in creating Menu frameworks that conform to the Microsoft guidelines for designing a user interface as described in The Windows Interface: An Applications Design Guide. These structures can be reused in other projects by way of the Visual AppBuilder object clipboard.
- Introducing Visual AppBuilder
- Reusable Menus
- Network Applications with Visual AppBuilder
- The Visual AppBuilder Paradigm
- Sample Project
- Window Layout
- Summary
Introducing Visual AppBuilder
This article introduces Visual AppBuilder (VAB)-Novell's visual development environment that is one member of the AppWare family of development tools for building network applications and standalone applications.
Visual AppBuilder (VAB) is more than a "high-level" development tool. Visual AppBuilder, more specifically the AppWare Bus, is a standard for connecting software components know as AppWare Loadable Modules (ALMs).
Visual AppBuilder is currently available on Microsoft Windows 3.1 and Macintosh platforms. Projects that consist of objects that exist on both platforms can be rebuilt nativly on each platform via simple export-import procedures.
This article provides an introduction to the Visual AppBuilder environment and covers the basic steps in creating Menu frameworks that conform to the Microsoft guidelines for designing a user interface as described in The Windows Interface: An Applications Design Guide. These structures can be reused in other projects by way of the VAB object clipboard.
Reusable Menus
Today, most Windows applications offer a set of common menus. This article introduces some basic Visual AppBuilder concepts and in the process illustrates how to create reusable menu sets in the form of VAB Groups and VAB Subjects.
The concepts of reusability illustrated in this article can be applied to other types of object groupings as well, for example, buttons for button bars. Objects combined in reusable frameworks provide the extremely high levels of reusability.
Network Applications with Visual AppBuilder
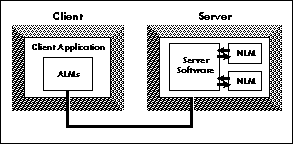
ALMs reside on the client; They exist in two forms: client-specific ALMs, that is, Window and Button objects used for building the interface; and secondly, ALMs that expose back-end services such as NetWare Directory Services (NDS), Message Handing Services (MHS), or relational database management systems, such as OracleWare. On the Microsoft Windows platform, ALMs are dynamic link libraries (DLLs). Client ALMs shelter the developer from complicated issues such as dealing with 3GL client development kits, such as the Microsoft Windows SDK. Server processes exposed at the client shelter the developer from the complexities of network application development. Figure 1 illustrates how an ALM can function as a client-based interface to a server-based service. Developers can focus on the business problems rather that the tedious and mundane technology issues, like network communications, security, and so forth.
Figure 1: ALMs can be client-based interfaces to server-based services.
Reusable software components will have the same impact on network application development as the Industrial Revolution did to manufacturing.
The Visual AppBuilder Paradigm
Visual AppBuilder represents a significant change in how application development is done. The following paragraphs describe some of the new concepts and define some of the terms associated with Visual AppBuilder.
AppWare Loadable Modules (ALMs)
ALMs are software components that can be combined into Projects. Systems can be created analogously to the way stereo-audio systems are put together. By choosing "best of breed" components, industrial strength systems can be built with little understanding of the underlying technology. Development of systems is accomplished 10-100 times faster than with traditional development methodologies.
The Object and Function Palette
ALMs are suites of objects and functions. You can think of objects simply as analogous to nouns, and functions as analogous to verbs. As shown in Figure 2, objects are on the left side of the function palette; functions are on the right side of the palette. Functions are categorized typically by the object upon which they act. The categories for functions are shown in the list box at the far right of the object and function palette. To see the functions in a particular category, simply select the category in the list box.
Figure 2: Visual AppBuilder's Object and Function Pallette.

Objects, Object Properties, and Functions
In object-oriented (OO) terms, Objects are visual representations of class descriptions that are instanced when added to a project from the VAB Object palette. Functions in OO terms are like methods; however, VAB methods are not constrained to operate on a single object; however, good OO design dictates that most functions be categorized by which object they are associated with, unless there is a compelling reason to generalize the function. Some functions such as Quit are general and do not operate on a single object.
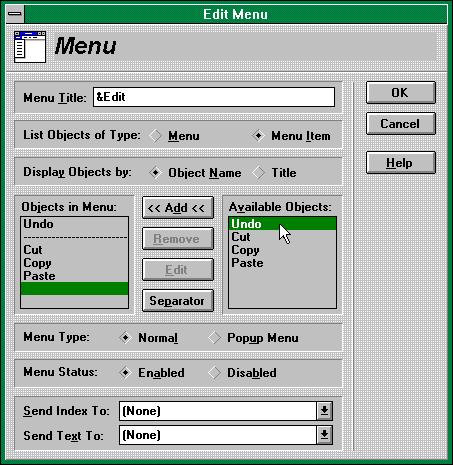
Most objects have attributes that can be edited at design time by double-clicking on the instance of the object in the group. This will bring up the properties dialog associated with the object. Properties are also know as Attributes. Figure 3 shows the properties dialog for a Menu object. Notice that it contains a listing of available objects that can be contained within the Menu object.
Functions associated with an object typically can access or modify object properties at run time.
Figure 3: Properties dialog for a menu object.
Events and Flows
Functions are combined together into function chains or flows. Many objects (and functions) have events associated with them, for example, the Window object has events such as "open", "close", "before closing", "iconified" etc. VAB allows you to create a function chain or flow that is triggered by an event. When you wish to create a flow based on an event, drag a function from the palette to the subject work space and connect the function to the object (or function) for which you intend to extend the flow. Events are selected via a pop-up menu that is on the flow line. Functions are actually event handlers that typically generate other events.
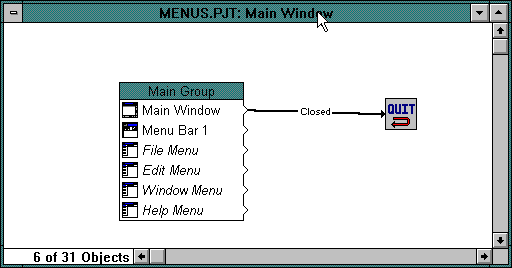
Figure 4 shows a common usage of the Quit function attached to the "closed" event on the Window object.
Figure 4: The Quit function attached to the Window Closed event.

Event-driven environments pose an initial short-lived challenge for the traditional procedural programmer. However, this challenge is short-lived, because development work in VAB is visual. All events are clearly displayed in flow chart form.
Those not experienced in traditional procedural-based methods typically find a visually event driven system to be more intuitive than traditional development methodologies.
AppBuilder Projects
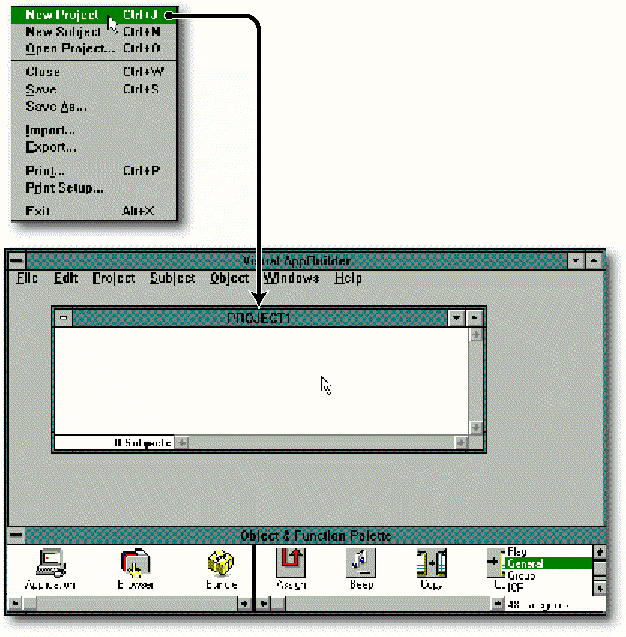
The first step in creating an application with VAB is to open a new project. As shown in Figure 5, you do this by selecting the New Project menu item from VAB's File menu, which opens a new Project window.
Figure 5: Opening a new Project window in Visual AppBuilder.
AppBuilder projects are made up of one of more Subjects.
AppBuilder Subjects
Subjects are important organizational units, given the nature of object-based development. Many objects act as container objects for other objects. For example, The Menu Bar object is a container object that "holds" Menu objects. The Menu object is a container object for Menu Item objects. Window objects are container objects for objects that are displayed within a window.
Objects within the same subject are within the same scope. When you wish to have a Menu hold a Menu Item, The instance of the menu item (or an alias of that instance) needs to be in the same subject. (Aliasing will be discussed later in this article.)
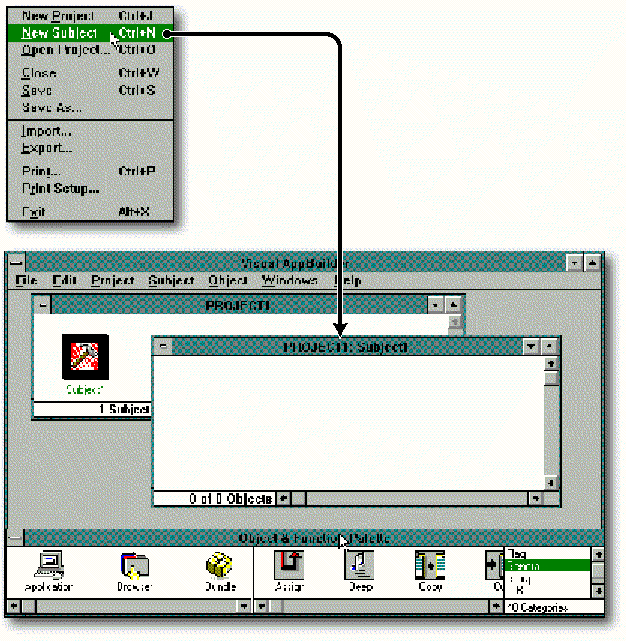
To create a new subject in a project, select the New Subject menu item from the File menu of VAB, as shown in Figure 6.
Figure 6: Creating a new Subject.
Beyond scope and organization, subjects are useful for achieving extremely high levels of reusability, since they can be copied from one project to another. Future versions of AppBuilder will also allow for subjects to exist on other machines when the distributed version of the AppWare Bus is available.
Subjects can be divided into smaller units known as Groups.
AppBuilder Groups
Groups allow for better organization within a subject, while still maintaining the same scope. In other words, if objects exist in separate groups in the same subject, the objects can still be "seen" by each other.
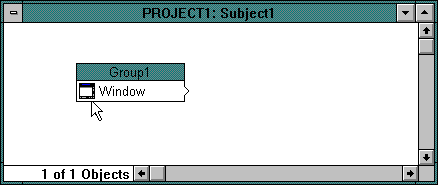
To create a new group, simply add a new object into the subject by dragging the object from the object palette to the subject window (double-clicking on the object will also add an object to a highlighted group.) Figure 7 shows a new group containing a single Window object. Groups can be broken apart or combined together as needed. For more information on working with groups, see the Visual AppBuilder Users Guide.
Figure 7: A new group with a Window object.
Groups also provide high-levels of reusability since they can be copied from one subject to another within the same project or from project to project. To cut or copy a group, draw a box around the group and its flows and use the edit, cut, copy, and paste commands.
A Sample Project
Once you have opened a new project created the first subject, you are ready to create a group. This sample project consists of 5 subjects with one group in each subject. The subjects and groups are titled Main Window, File Menu, Edit Menu, Window Menu, and Help Menu. Each of these subjects will contain a single group with the same title.
The sample illustrates one possible alternative for creating menus that can be reused in other projects.
Creating the Edit Menu Subject and Group
The subject titled Edit Menu contains one Menu object and four Menu Item objects. These objects were added by dragging them from the Object and Function Palette. To change the name of object instances, simply select the object and type in the desired name. Object properties are accessed via a double click on the instance of the object. Figure 8 shows the attribute editor for the Menu Object.
Figure 8: The menu Object attribute editor.
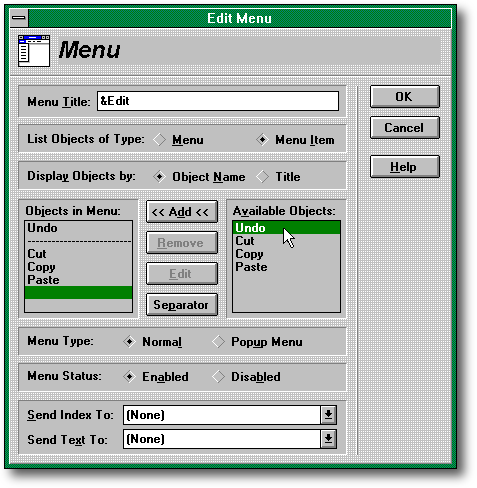
Notice that the Menu item objects are displayed in the Menu Properties dialog as available objects. They can be added to the list of Objects in the Menu by selecting one or more of the menu items and by pressing the add button.
The Menu Item properties dialog appears as shown in Figure 9.
Figure 9: The Menu Item properties dialog.
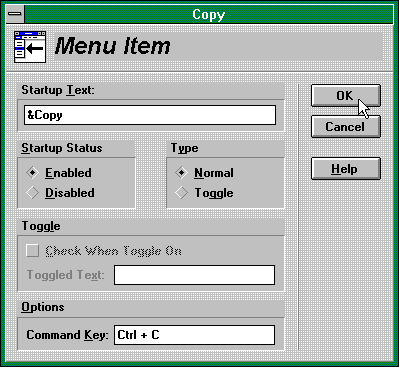
Notice the various options that can be set, such as accelerator and command keys.
Adding functionality to the Edit Menu Group
The next step in creating an Edit Menu group is to add flows to the subject. You can find the Undo, Cut, Copy, and Paste functions in the General category of functions. Simply drag the functions into the subject window and connect them to the appropriate Menu item object. Menu items have a single event called "selected." Therefore, there is no need to select an alternative flow or event.
One final step is necessary to complete the Edit Menu Subject. Since the Edit Menu object must be "visible" in the Main Window subject, you must create an alias.
Aliasing
Aliasing allows you to share objects from one subject to another. This allows for objects to be seen within a subject where they do not exist, since subjects limit the scope of objects.
An alias is a view of on object instance that exists in another subject. This is accomplished by first selecting the real instance of the object and then by selecting the Share Menu Item from VAB's Object Menu. Shared objects are indicated with a bold typeface on the name given to the instance.
Create an alias by opening the subject in which you intend to add the alias and selecting the New Alias item from the Object Menu in VAB. This will bring up the New Alias dialog, shown in Figure 10.
Figure 10: The New Alias dialog.
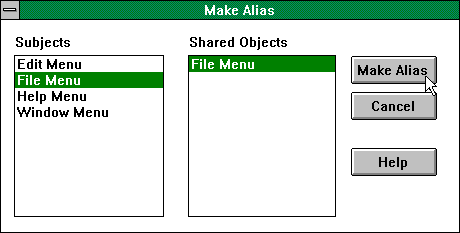
To add an alias to the open subject, select the subject that contains the shared object. This will display all of the shared objects that exist in the selected subject. To add an object alias, simply select the shared object you with to add as the alias and press the Make Alias button.
Creating the File, Window and Help Menu Subjects and Groups
The File, Window and Help subjects and groups are created in the same way as the Edit Menu. The following tables list some appropriate interface design suggestions that conform to defacto industry standards.
File Menu Items
|
StartUp Text |
Command Key |
|
&New |
Ctrl + N |
|
&Open |
Ctrl + O |
|
&Save |
Ctrl + S |
|
Save &As |
|
|
|
Ctrl + P |
|
P&rint Setup |
|
|
E&xit |
Edit Menu Items
|
StartUp Text |
Command Key |
|
&Undo |
Ctrl + Z |
|
&Cut |
Ctrl + X |
|
&Copy |
Ctrl + C |
|
&Paste |
Ctrl + V |
Window Menu Items
|
StartUp Text |
Command Key |
|
Cascade |
|
|
Tile |
|
|
Arrange Icons |
Using these standards in your application provides users with a familiar interface. The application designer must balance creativity with standards. Adherence to standards means that users will be able to use your application without referring to a manual. Some application functionality however, calls for a non-standard interface. A car may work very well with stick steering similar to a tank; however, this will limit its usability for the masses. If you have ever driven a Saab, you may of had trouble finding where to place the ignition key the first time. These issues deserve special attention when designing an interface.
Creating the Main Window Subject and Group
The subject titled Main Window (shown in Figure 11) contains the only instance of a Window object used in this small sample. The other objects in the Main Window subject include a Menu Bar object named "Menu Bar 1", and four other objects-all Menu objects named: File Menu, Edit Menu, Window Menu, and Help Menu.
Figure 11: The Main Window subject.
All of the Menu Objects are aliases of objects that exist in other subjects. These can be added to the Main Window group as described in "Aliasing", earlier in this DevNote.
Once you have created the aliases in the Main Window subject, you need to add them to the Menu Bar Object. You can do this by accessing the Menu Bar properties dialog. Once the aliases exist, the are displayed in the available objects list in the dialog, and can be added by selecting the object aliases and pressing the Add button.
Window Layout
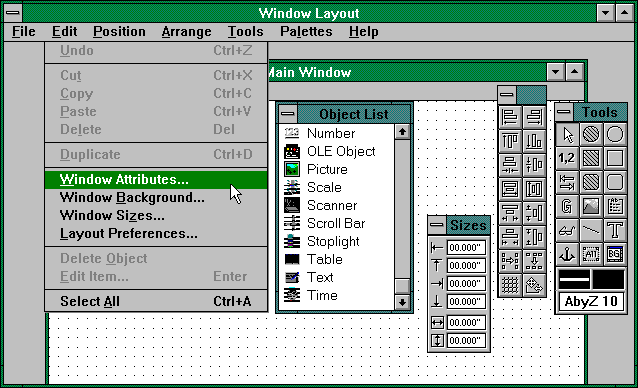
Window layout is a complex subject that we will only mention briefly in this article. You access the Window Layout dialog, like other object-properties dialogs, by double-clicking on the Window object instance within a group. Window Layout is not a standard dialog box; it has its own window with a menu bar and a child window that is the window currently being designed. Since the Window object is very robust, its properties are displayed by selecting the appropriate menu item on the Edit menu on the Window Layout menu bar. You can find the Menu Bar property by selecting the Window Attributes menu item on the Edit menu on the Window Layout menu bar, as shown in Figure 12. Other menu items provide more access to the Window object properties via dialogs.
Figure 12: Selecting the Window Attributes menu item.
The menu-bar pick list lists all Menu Bar object instances (and aliases) contained in the same subject as the window being edited. This article only briefly covers Window Object design-this is a vast subject that deserves careful consideration and is beyond the scope of this article.
Once you have selected the Menu Bar object, the menu structure for this sample is complete. Press the OK button on the Window Attributes dialog, then leave the Window Layout dialog by closing the parent window and saving your changes. You can execute the project from within VAB by selecting Run from the Project menu.
Summary
This article has provided a brief introduction to the Visual AppBuilder development environment. We introduced design concepts including subject organization, group organization, menu structures, and aliasing.
This sample provides one alternative for creating subjects and groups of menus. Other viable alternatives also exist, for example, you could place all of the Menu groups in a single subject named Menus. You can also create subjects of particular groups of menus as needed.
You may want to create a few projects similar to this and keep them around as "clip-art" for developers, providing high-level, reusable frameworks for your applications.
Internal development staffs may want to create corporate "template" projects-subjects and groups with a specific corporate "look and feel." This will provide the user with common interface elements and ease the development burden for developers, benefiting both the user and the developer.
Visual AppBuilder provides the highest level of reusability in the industry; take advantage of the features that will save you months of work.
* Originally published in Novell AppNotes
Disclaimer
The origin of this information may be internal or external to Novell. While Novell makes all reasonable efforts to verify this information, Novell does not make explicit or implied claims to its validity.