Migrating NetWare 4 and NetWare 5 Servers to NetWare 6: Part 1
Articles and Tips: article
01 Jan 2003
From Course 3005: Advanced Novell
Network Management: NetWare 6
Properly preparing your server for migration is the most important thing you can do. The preparation process not only provides guidelines for how much hardware you'll need, but it also provides the correct steps you must take to prepare your file system and Directory for migration.
If you do not prepare your server or network for migration, you risk losing important files in your file system and Directory. You also risk losing all data on your server.
To prepare for a migration, you must do the following:
Prepare the workstation
Prepare the Source (Old) Server
Prepare the Destination (New) Server
Prepare Server Application Files
Prepare the Workstation
Your workstation must be prepared to allow the migration wizard to run.You perform a migration from the workstation running the migration wizard. Make sure your workstation meets the following requirements:
The workstation must run Windows 98 or Windows NT 4/2000 with 50 MB of available disk space.
The Windows 98 workstation must be running Novell Client for Windows 98 version 3.3 or later.
NetWare Migration Wizard 6 does not run on Windows 95 workstations.
The Windows NT 4/2000/XP workstation must be running Novell Client for Windows NT version 4.8 or later.
Install the latest service pack for Windows NT on your Windows NT workstation.
If migrating from NetWare 4, the IPX protocol should be configured on your Novell Client workstation.
For better performance, it is strongly recommended that the source (old) server, destination (new) server, and workstation be running on a common LAN segment.
Prepare the Source (Old) Server
The source server is the old NetWare server that contains the files, volumes, and eDirectory objects to be copied to the NetWare destination server. Valid source servers can be running NetWare 4.11, 4.2, 5.0, 5.1, or 6.
Do the following:
Verify that you have the Supervisor right to the source server's file system and Directory tree.
Make sure the destination (new) server can communicate with the source server:
On the destination (new) server, if it is using IPX, enter
On the destination (new) server, if it is using IP, enter
Display SLP Services
and make sure the source server is listed.
Note: All servers and workstations involved in the migration must have common protocols bound. Also, if using you are using IPX, you must make sure a common frame type is bound.
Apply the NW6NSS1A patch to update the version of NSS. (See TID #2961749, entitled "Post SP1 NSS modules for NetWare 6." Despite what the abstract implies, this patch can be applied before applying Support Pack 1.)
Update the source server with the latest NetWare support pack. Updates are available at http://support.novell.com .
(Conditional) If you are migrating data from NetWare 4, make sure the source server's volumes have long name space support added to all volumes to be copied.
To add long name space support to a NetWare 4.11 or NetWare 4.2 volume, enter the following at the server console:
LOAD LONG
ADD NAME SPACE LONG TO volume name
Load DSREPAIR and run the following options:
Unattended Full Repair
Time Synchronization
Report Synchronization Status
Make sure these finish with no errors. However, in a mixed NetWare 4.x and 5.x environment, it is possible to finish a full unattended repair with errors due to schema mismatches.
You perform these operations to ensure that the Directory is healthy and stable before you migrate the server.
Make 2 full, verified backups of the eDirectory tree and the file system.
Check reference material to verify that you are using the supported hardware.
Display Servers
and make sure the source server is listed.
Prepare the Destination (New) Server
The destination server is the new computer that receives the data from the source server. This server must be installed into a temporary tree.
After data is migrated from source to destination server, the destination server reboots and the migration wizard modifies the destination server's AUTOEXEC.NCF file to include the source server's name and internal IPX number or server ID.
Note: The migration wizard does not support migration to NetWare 4 destination servers.
Review the following information before installing the NetWare operating system on the destination server:
Verify that you have the Supervisor right to the destination server's file system and Directory tree.
Make sure you create a temporary eDirectory tree with a temporary eDirectory tree name.
Note: Do not use the same name as the source server's name or eDirectory tree name; otherwise, the destination server cannot assume the identity of the source server after the migration.
During installation of the destination server, create volumes on the destination server that are the same size as, or larger than, volumes on the source server.
Note: Volume names on the destination server must be the same as the volume names on the source server.
The migration wizard migrates compressed volumes. If you are migrating compressed volumes to uncompressed volumes, the migration wizard decompresses the volumes during migration.
The decompression process is CPU and time intensive, so allow enough time to complete the operation. Also, make sure you have room on the uncompressed volume to accommodate the source volumes after they are decompressed.
If you are migrating from NetWare 4, install and configure IPX. IPX must be bound to the destination server for the migration to work. (You can remove IPX after the migration.)
IP addresses for the source server are not migrated. Instead, you manually change IP addresses during migration.
Install the NetWare operating system on the destination server using the Pre-Migration installation option.
Prevent time synchronization issues by performing the following:
Configure the destination server as a secondary time source by entering the following commands at the console prompt:
SET TIMESYNC TYPE = SECONDARY
SET CONFIGURED SOURCES = ON
SET TIMESYNC TIME SOURCES = SOURCE
		SERVER NAME; or IP ADDRESS;
Note: If your source server is a NetWare 4 server, use the server name.
Turn on the Timesync Debugger screen by entering
SET TIMESYNC DEBUG = 7
Set the Timesync Restart Flag to restart TIMESYNC by entering
SET TIMESYNC RESTART FLAG = ON
Make sure the destination server is the same time or later than the source server by entering
TIME
This prevents critical time synchronization errors during migration.
Prepare Server Application Files
Make sure your server application files are ready to migrate by verifying that both your source server and destination servers are running the same applications. For example, if you are running GroupWise, Oracle, or backup software databases and virus software, make sure that both the destination and source servers are running all of these applications.
Preparing application files is the biggest issue you'll face when preparing for a migration because it is the most time consuming. Remember, always test your migration in a lab environment before performing a migration in your production environment.
How to Perform a Migration
As an alternative to upgrading a server, you can also migrate data from an existing NetWare server to a new NetWare 6 server. You perform a migration when you need to upgrade your hardware.
When you migrate data, the migration wizard copies the file system and eDirectory database from an existing NetWare 4, 5, or 6 server to a newly installed NetWare 6 server. After the original server's file system and eDirectory database are migrated, the original server is brought down and the NetWare 6 server reboots and assumes the name and identity of the original server on your network.
Before you can migrate your data, you must first install a NetWare 6 server in a temporary eDirectory tree. A temporary tree is a tree that contains one server with a basic installation of NetWare and no additional products (other than SMS or any other default products).
To migrate data from NetWare 4, NetWare 5, or NetWare 6 after you have prepared the network and server, do the following:
Run the Migration Wizard
Copy Volumes
Edit Configuration Files
Begin the eDirectory Migration
Finish eDirectory Migration
Run the Migration Wizard
To run the migration wizard, do the following steps:
Install the migration wizard from the NetWare 6 operating system CD.
Run the migration wizard on the workstation by selecting Start > Programs > Novell > Netware Migration Wizard > NetWare Migration Wizard.
Read the Welcome screen; then click OK .
In the Migration Wizard Startup window, select Create a New Project (see Figure 1).
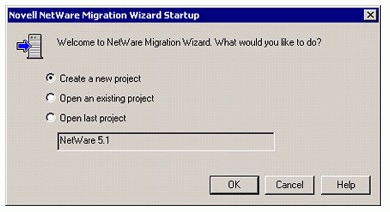
Starting a new project with the Novell NetWare Migration Wizard
Select NetWare 4, 5, or 6; then click OK .
Select View Setup Tasks. Selecting View Setup Tasks launches your default web browser and takes you to the Migration Wizard 6 online documentation.
Select Migrating Data from NetWare 4, 5, or 6 and make sure you have completed the system and software requirements. Then close your browser and click Next .
Name the project and choose a place to save it (see Figure 2); then click Next . By default, the migration wizard saves all projects to C:\PROGRAM FILES\NOVELL\NETWARE MIGRATION WIZARD.
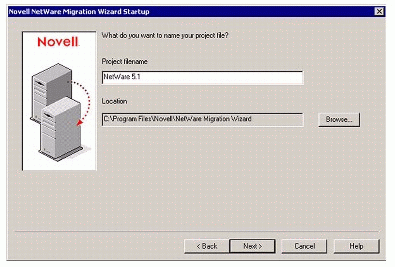
Naming the new project in the Novell NetWare Migration Wizard
In the Select the Source NDS Tree window, select the Directory tree that contains your source server; then select Next.
In the Select the Source Server window, select your source server from the Directory tree.
In the Select the Destination NDS Tree window, select the eDirectory tree that contains your destination server.
In the Select the Destination Server window, select your destination server from the destination eDirectory tree.
Save your project and access the Project Window by selecting Create. The Project Window in Figure 3 appears.
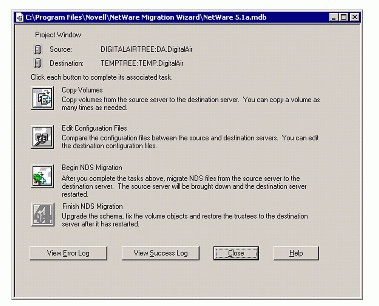
Information in the Project Window
Copy Volumes
Selecting Copy Volumes allows you to copy volumes from the source server to the destination server. You can copy a volume as many times as you need to complete this step.
Before you can copy a volume from the source server to the destination server, you must have a volume with the same volume name created on the destination server. For example, if you want to migrate volume DATA from your source server to your destination server, you must create volume DATA on the destination server and give it enough space to hold all the files from the source server.
In the Migration Wizard utility, copy your volumes by doing the following:
In the Project Window, select Copy Volumes. Before the migration wizard starts copying files, it backs up your directory and file trustees and saves them in files located on the source and destination servers.
After the migration is complete, the migration wizard restores the trustees from the files it stored on the destination server. You do not need to copy all volumes at the same time. You can select volumes to copy now and then copy other volumes later by reopening the project file. Remember that open files are not migrated.
Note: If you copy volumes in phases, at the final volume copy make sure you select all volumes that you previously copied; then select Cancel. Otherwise, the migration wizard restores trustee assignments only to the last volumes that were copied.
Select each volume you want to copy (see Figure 4) and select Yes; then click Next .
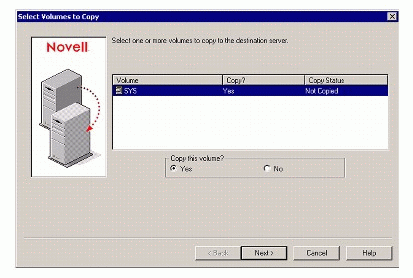
Copying volumes to the new server
Note: If you decide not to copy any volumes, select No for all volumes; then select Next and continue on.
If you selected Yes for one or more volumes, continue with Step 3. Keep the following alternatives for copying volumes in mind:
If you have big volumes or slow LAN connections, or if you want to reconfigure your data by putting existing directories into different folders on the destination server, consider using a backup tape to copy your volumes.
If you use a tape backup, do not restore the source server's standard SYS directories to the destination server if you are upgrading your NetWare operating system to a later version. The standard SYS directories, like SYS:SYSTEM and SYS:PUBLIC, were created for you during NetWare installation.
If you decide to use tape backup, select No for all volumes in the Select Volumes to Copy window and select Next and continue on.
If you are migrating data to new hardware and keeping the same version of NetWare, restore the source server's standard SYS directories to the destination server.
In the Copy SYS Directories window (see Figure 5), decide if you want to copy the source server's SYS directories to the destination server's SYS:SYS.MIG directory; then click Next .
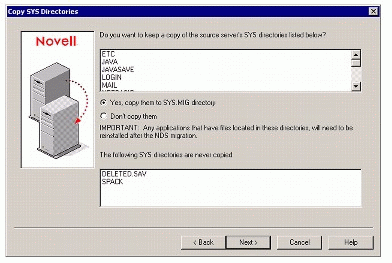
Decisions when copying the SYS directories to the destination server
The migration wizard never overwrites the SYS directories on the destination server. If you migrate the source server's SYS directories, the migration wizard migrates them to SYS:SYS.MIG on the destination server.
If there are files in the source server's SYS directories that you want to use on the destination server, after the migration is completed, copy the files from SYS:SYS.MIG into the appropriate SYS directory on the destination server.
Note: Remember, any applications that have NLM programs in this directory need to be reinstalled after the migration.
In the Duplicate Files window, determine how you want to handle duplicate filenames between the source server and the destination tree by selecting one of the following; then select Next:
Don't copy over existing files
Copy the source file if it is newer
Always copy the source file
In the Disable Login? window, determine how you want to copy your volumes; then select Next. You have the following choices:
Copy volumes with users logged in
Disable login
The migration wizard does not copy open files. If you disable user login, you can be sure that no other users log in and open files during the file copy.
In the Password Verification window, enter the passwords for the source and destination trees.
If prompted, resolve any errors or warnings; then select Next. Noncritical errors are identified by yellow triangles; critical errors are identified by red circles with a white X in the center.
In the Ready to Copy Files window, select Migrate to copy the file system to the destination tree. After you select Migrate, the following happens:
File trustees are backed up
Volume files are migrated to the destination server
When the volume migration completes, the Error Resolution window appears:
View the error and success logs (see Figure 6); then click Done . The error log is very helpful for identifying and fixing errors that occur during migration. The success log is useful for verifying how much of the migration completed.
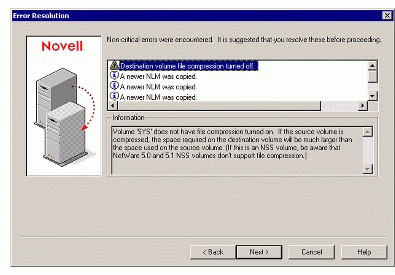
Viewing the error and success logs
Next month, we'll cover editing configuration files, eDirectory migration, and post-migration tasks.
* Originally published in Novell AppNotes
Disclaimer
The origin of this information may be internal or external to Novell. While Novell makes all reasonable efforts to verify this information, Novell does not make explicit or implied claims to its validity.