eDirectory 8.7 Features
Articles and Tips: article
Research Engineer
jfischer@novell.com
01 Oct 2003
Last month we talked about how to install iManager on NetWare, Windows, and Linux. This month we will talk about new features in eDirectory 8.7 and Directory administration through iManager.
With the new iManager tool, most of the functionality of DSRepair, DSMerge, and other console utilities has been integrated into iManager. This means that you don't have to have direct access to the server console in order to perform what have traditionally been server-side only administration tasks, such as replica and partition operations. These operations can now be performed from within a browser.
Partition and Replica Operations
Partitions are logical divisions of the eDirectory database that form a unit of data in the eDirectory tree that Directory administrators use to store and replicate eDirectory information. Each partition consists of a container object, all objects contained in it, and the information about those objects. Partitions do not include any information about the file system or the directories and files contained there. Partitions only contain data about eDirectory.
Instead of storing a copy of the entire eDirectory database on each server, you can make a copy of the eDirectory partition and store it on many servers across the network. Each copy of the partition is known as a replica. You can create any number of replicas for each eDirectory partition and store them on any server. The types of replicas are:
Master
Read/Write
Read Only
Subordinate References
Filtered Read/Write
Filtered Read Only
Master, read/write, and read only replicas contain all objects and attributes for a given partition. A master replica dictates the changes that are made to the Directory and synchronizes these changes with the other replicas. A read/write receives changes from the master replica and is updated. A read only does not update itself.
Subordinate reference replicas are used to connect the tree together. They are basically pointers to objects in the Directory.
Filtered replicas contain a subset of information from the entire partition. Filters are created specifying which classes and attributes of the Directory will be allowed to pass during synchronization. Changes made to the Directory for objects outside the filter are ignored by a filtered replica.
Role of Partition and Replica Management
It is important to understand the types of replicas available when planning your Directory tree. A Directory administrator must use careful planning to optimize the Directory structure and receive good performance and fault tolerance.
In iManager, when you grant someone the role of Partition and Replica Management, they can perform partition operations in the tree such as creating, merging, or moving a partition.
To create or move a partition, follow the steps below.
To create a partition, follow the steps below.
Login to iManager.
Expand Partition and Replica Management.
Click Create or Delete Partition .
Browse to and select the container where you want to create the partition or the child partition you want to merge.
Click OK .
To move a partition, follow the steps below.
Expand Partition and Replica Management.
Click Move Partition .
Browse to and select the partition you want to move.
Browse to and select the new location for the partition.
Click OK .
Once you have reviewed that all the necessary servers that have a replica of the partition are up and running, click Move .
Click OK .
The replica view allows you to see the replicas and partitions in the tree in two views. You can select a server object and view the replicas that the server contains or you can select a partition and view the servers that contain a replica of that partition, also known as the replica ring. Both of these views are helpful when you are troubleshooting partition operations.
From this view, you can also delete a replica from a server, add a replica, view the details of a replica, view and change the type of a replica, and view or modify the filter of a replica.
To open the replica view, follow the steps below.
Expand Partition and Replica Management.
Click Replica View .
Browse to and select the partition or server you want to see.
Click OK
You will now see a screen that shows the servers that hold replicas of the partition. You can delete a replica, change the type of the replica, or add a filter to the replica.
eDirectory Maintenance Utilities
This role is a collection of utilities from ConsoleOne and the server console that have been rolled into iManager. Novell eDirectory is designed to provide fault tolerance for the tree through replication, so that if one server is not available, other servers can provide access. Replication is the primary method for protecting eDirectory.
Replication, however, is not possible in a single-server environment. Also, replication might not provide a complete restore of individual servers in case of a server hardware failure or other damage, or in the event of a disaster such as a fire or flood in which you lose multiple servers. Backing up eDirectory on each server increases the fault tolerance for your network.
eDirectory 8.7 introduces a new backup and restore utility called the eDirectory Backup eMTool to back up the eDirectory database on your individual servers.
This tool, integrated into iManager, has the following benefits.
It can backup multiple platforms
Provide hot, continuous backup so the Directory data can remain open during backup
Supports quick restores
Is accessible through a browser
Performs a complete backup of the Directory database including NICI security files, stream files, and any administrator specified system files such as the autoexec.ncf file.
The Backup eMTool provides hot continuous backup of the eDirectory database on an individual server. You can back up eDirectory on your server without closing the database, and you still get a complete backup that is a snapshot of the moment when the backup began. This feature means that you can create a backup at any time and eDirectory will be accessible throughout the process. Hot continuous backup is the default behavior.
The new backup also lets you turn on roll-forward logging to keep a record of transactions in the database since the last backup, so you can restore a server to the state it was in at the moment before it went down. You must turn on roll-forward logging for servers that participate in a replica ring, so that you can restore a server back to the synchronization state that the other servers expect. If you don't, when you try to restore from your backup files you will get errors and the database will not open. Roll-forward logging is off by default.
To access the backup tool from iManager, perform the following steps.
Expand eDirectory Maintenance Utilities.
Click Backup .
Enter a username, password, and context for the server where you want to perform the backup.
Click Next .
Specify the backup file options, such as full, incremental and name and location of the backup file.
Click Next .
Specify whether to include NICI files in the backup. Novell recommends that you always include NICI files.
Specify any additional files to backup.
Click Start .
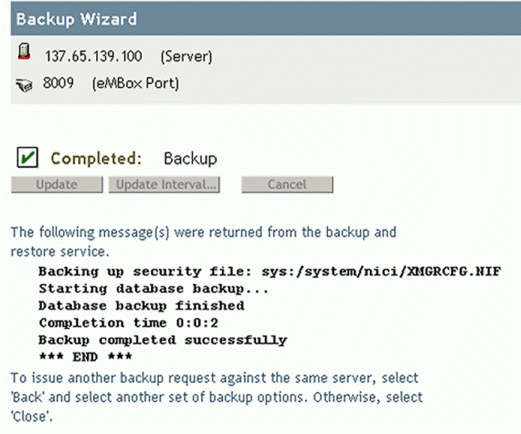
You will see a screen similar to Figure 1's screen shot when the backup completes.
Figure 1: Accessing the Backup Tool in the eDirectory Maintenance Utilities.

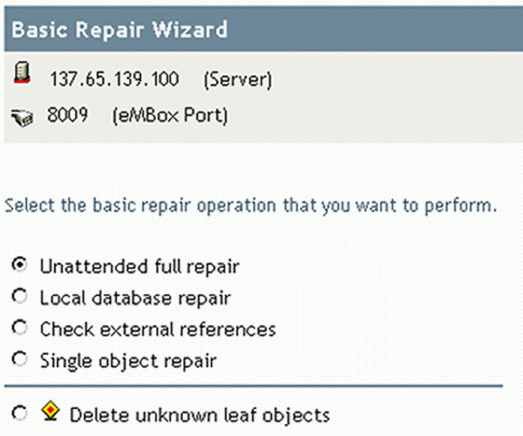
The Basic Repair option in eDirectory Maintenance Utilities offers a few of the Directory repair options available in DSRepair. You can perform:
Unattended full repair
Local Database Repair
Check External References
Single Object Repair
You can make your selection depending on what you need to repair. Figure 2 is a screen shot of the Basic Repair options.
Figure 2: Basic Repair options.

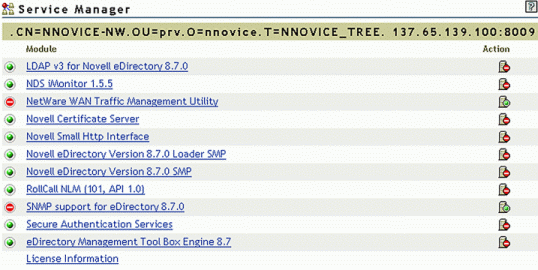
The eDirectory Service Manager provides information about available eDirectory services and their status. You can also use the Service Manager to start and stop these services.
Service Manager only manages eDirectory services. This is done with the help of the dsservcfg.xml configuration file, which lists the services to be managed on various platforms. It also lets you add or remove services from the list.
Figure 3: A screen shot of the eDirectory Service Manager.

The ICE Utility
The Novell Import Conversion Export Utility or ICE lets you import or export data to and from LDIF files into the Directory. You can also migrate data between LDAP servers. An LDIF file is an ordinary text file that lists Directory objects, attributes and values.
For example, if you want to import LDIF data into an LDAP directory, the Novell Import Conversion Export engine uses an LDIF source handler to read an LDIF file and an LDAP destination handler to send the data to the LDAP directory server.
To access the ICE utility, follow the steps below.
Click Import Convert Export Wizard in iManager.
Select whether to import, export, or migrate data.
Specify the file type.
Browse to and select the file to use as the source file.
Click Next .
Specify server, port, and DER file if needed.
Specify any advanced options. I recommend using LBURP if you are using a very large LDIF file and allow forward references.
Click Finish .
Index Manager is an attribute of the Server object that lets you manage database indexes. These indexes are used by eDirectory to significantly improve query performance.
Novell eDirectory ships with a set of indexes that provide basic query functionality. These default indexes are for the following attributes:
|
Attribute
|
Attribute
|
|
CN |
Aliased Object Name |
|
dc |
Obituary |
|
Given Name |
Member |
|
Surname |
Reference |
|
uniqueID |
Equivalent to Me |
|
GUID |
NLS:Common Certificate |
|
cn_ss |
Revision |
|
uniqueID_SS |
extensionInfo |
|
ldapAttributeList |
ldapClassList |
You can also create customized indexes to further improve eDirectory performance in your environment. For example, if your organization has implemented a new LDAP application that looks up an attribute not indexed by default, it might be useful to create an index for that attribute.
While indexes improve search performance, additional indexes also add to directory update time. As a general rule, create new indexes only if you suspect performance issues are related to a particular directory lookup.
There are four types of indexes: User, Auto-Added, Operational, and System. User and Auto-Added can be deleted by an administrator. Operational and System are critical to the operation of eDirectory and cannot be deleted. Auto-Added, System, and Operational indexes are added by the system. An administrator can create a User index type.
When you create an index, you specify one of three rules to which the index will operate. The three rules are value, presence, and substring. If you specify value, the index will match the value you specify exactly or the first part of the value. The example given in the help says that if you specify Jensen as the value of a lastname attribute, the index will match the values Jensen or Jen.
If you specify presence, the index will only look to see if there is a value present for the attribute. If you specify substring, the index will look at the value of the attribute and match an attribute where the specified value is a substring of the attribute value.
To create indexes in iManager, perform the following steps.
Click Index Management .
Select a server where you want to create the index. You will see a list of the indexes on the server.
Click the Create button.
Type in a name for the index.
Select the attribute to index.
Select the rule for the index.
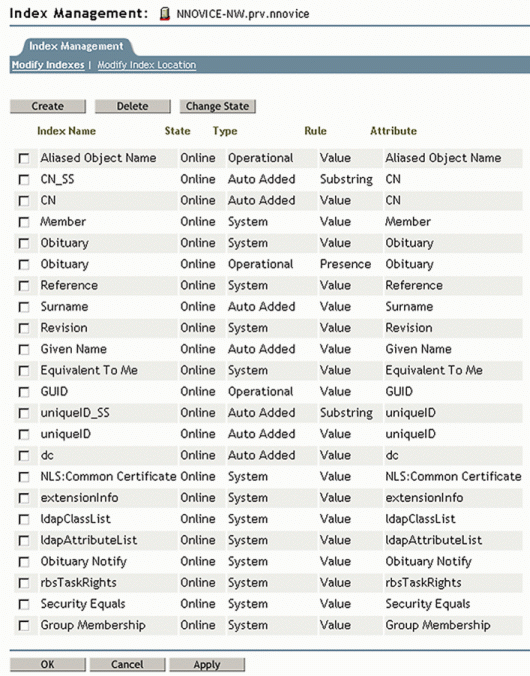
Click OK . You will see the index appear in the list of indexes on the server as shown in the following screen shot (Figure 4).
Figure 4: Creating an index.

Click OK.
Conclusion
This month we have talked about some of the Directory administration options in iManager and some of the new features of the eDirectory. Next month we'll go into detail on how to run the traditional NetWare tools on eDirectory for Windows and Linux.
In the coming months, we'll talk about merging trees, DSTrace commands, eDirectory Health checks and other eDirectory topics. So stay tuned.
* Originally published in Novell AppNotes
Disclaimer
The origin of this information may be internal or external to Novell. While Novell makes all reasonable efforts to verify this information, Novell does not make explicit or implied claims to its validity.