NDS Health Checks: Past and Future
Articles and Tips: article
Senior Research Engineer
Novell AppNotes
kburnett@novell.com
01 Jun 2003
I attended BrainShare last month. Granted that is not so original considering BrainShare's appeal to over 5000 programmers, IS engineers, marketing and sales folks, as well as executives. What was unique was that I had the opportunity to attend several of the 300-plus excellent classes that were offered during the week-long event. In BrainShares past, I have always been too busy teaching an array of classes.
One class that I attended (a very popular one) was centered around NDS Health Check features in the NDS iMonitor utility. I scribbled notes furiously while sitting on the floor in the back of the capacity-filled room. This class was taught by the eDirectory Architects who have been guest authors in this column in past months. Needless to say, their brand of humor, while funny and interjected with Novell technology, will give Leno and Letterman little to worry about! But here's what I gleaned from this class.
eDirectory Health Checks
You can perform two kinds of health checks for your eDirectory tree. The first kind we will call the Basic Health Check. This would logically include the following:
Check NDS Versions for latest releases
Check time synchronization
Check eDirectory replication (synchronization)
Then you have the more inclusive health check that we will call Complete Health Check. This would logically include the following:
All items in the basic health check
Check for External References and Obituaries
Check for Schema anomalies
Check for tunable parameters
Check for Objects with UNKNOWN as their object class
Typically Novell would recommend what is stated in the eDirectory 8.7 documentation, located at http://www.novell.com/documentation/lg/edir87/index.html . At this site, you can select the Administration Guide, then Maintaining Novell eDirectory, then Health Checks, and lastly Keeping eDirectory Healthy. This documentation recommends the following:
For the Basic Health Check:
Run the Treewide Server Information Report with the Health Check option enabled
For the Complete Health Check:
Run the Basic Health Check
Against each server in the Directory Tree:
Run the Obituary Report
Run the Object Statistics Report to check for Unknown objects
Run the Schema Compare
Checking eDirectory's Health: The Procedure
At this point, bring up NDS iMonitor. For review, you need a current Internet Browser. Type the following:
http://<server distinguished name or IP address><port 8009>/nds/
Once you have NDS iMonitor running, click the Reports icon, which will look like Figure 1.
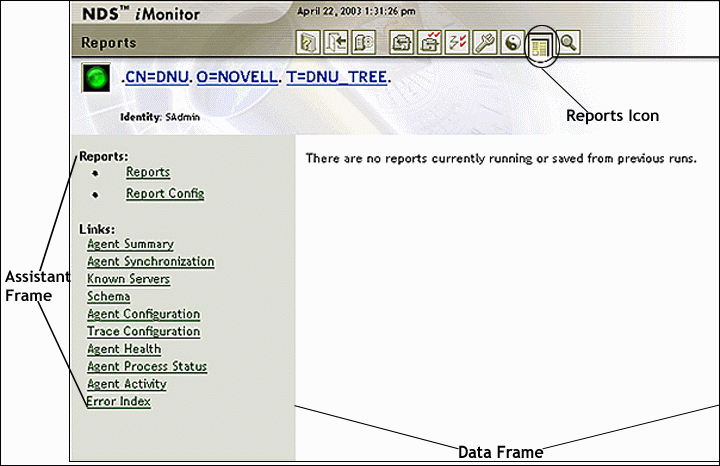
In the Assistant frame, click on the Report Config link. A Runable Report List appears in the Data frame, as shown in Figure 2.
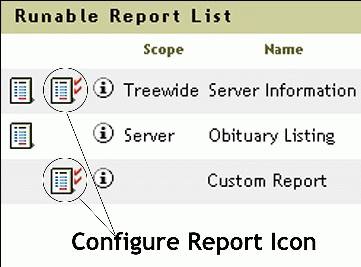
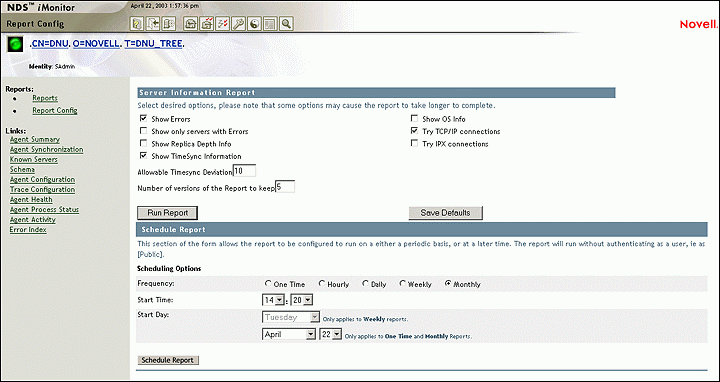
Click on the Configure Report icon for your desired information. In this case, click on the Configure Report icon that is to the left of Treewide Server Information. This will bring up two panes in the Data Frame, Server Information Report and Schedule Report, as shown in Figure 3.
This particular report will walk the entire eDirectory tree, communicating with every NCP-based server it can find. It will report any errors that it finds. You can use this report to diagnose time synchronization and limber problems, or to find out if the server you are running NDS iMonitor on is able to communicate with all other servers from this server's perspective.
In addition to this type of server report, you can create a report to list all of the obituaries on the server or you can create a custom report which will launch any NDS iMonitor page as a report by entering the iMonitor URL in the URL to launch the field. You also have the option of specifying how many versions of the report you wish to keep.
Referring to Figure 3, in the Server Information Report section of the Data Field, you can select from several options, including those in the table below.
|
Option
|
Function
|
|
Show Errors |
Capture and show all server errors in the report |
|
Show only servers with Errors |
List only the servers in your directory tree that have errors |
|
Show Replica Depth Info |
Show the actual depth of your replica information |
|
Show TimeSync Information |
Display server TimeSync information in the report |
|
Allowable Timesync Deviation |
Show the value of acceptable time difference between servers in your Directory tree |
|
Number of versions of the Report to keep |
Show the number of reports that you want to save (each report will be saved with a unique identifier) |
|
Show OS info |
Save each server's OS information (version numbers, etc.) in the report |
|
Try TCP/IP connections |
Test TCP/IP connectivity between all of the servers in your Directory tree |
|
Try IPX connections |
Test IPX connectivity between all of you servers in your Directory tree |
The default selections are shown in Figure 3, so for this column let's stick with these. Click Run Report.
Next the Completion of Running a Report is displayed, as shown in Figure 4.
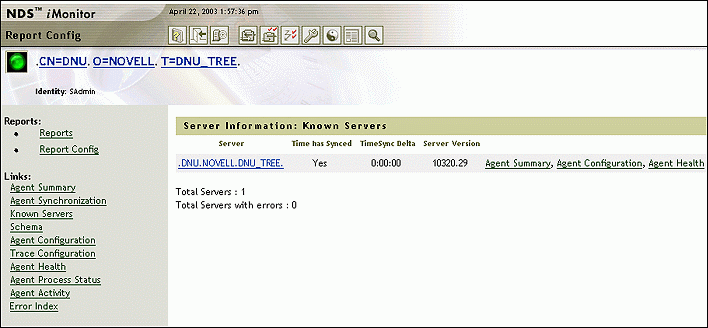
You can see that I only have one server in my Directory tree. You can also see that there are no errors on that server. Under the Reports header in the Assistant Frame, click Reports. The Report List is displayed, as shown in Figure 5.
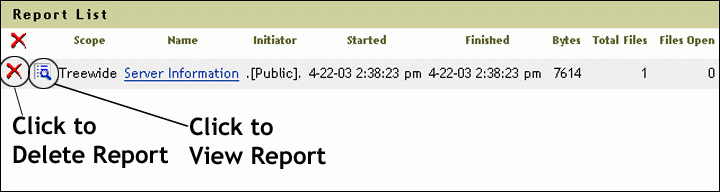
Looking in the Data Frame, note that the report that we just created is listed as the only entry in the Report List. Clicking the red "X" will delete the report. Clicking the icon with the magnifying glass will let you view the report. The information you'll see from this page is listed in the table below.
|
Item
|
Explanation
|
|
Scope |
"Treewide" indicates that the entire Directory tree was scanned |
|
Name |
Contains a link to the server(s) information including DN, version, etc. |
|
Initiator |
In this case, the report was run as [Public] so it could run without you having to log in as Admin or equivalent |
|
Started |
The time the report was started |
|
Finished |
The time the report completed |
|
Bytes |
The size of the report in bytes |
|
Total Files |
The number of files in the report |
|
Files Open |
The number of files open on each server |
Now let's click on the icon with the magnifying glass, as seen in Figure 5. The screen shown in Figure 6 is displayed.
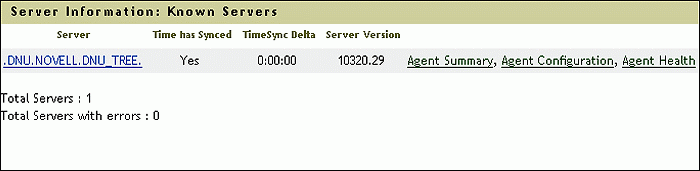
This is the actual report that we ran previously. Note the components of the report. The distinguished server name is a link to a page containing a wealth of information about the server. The "Yes" under the "Time has Synched" entry indicates that time synchronization is good on the server. But since this is the only server in the Directory tree, this will always be the case.The TimeSync Delta is 0:00:00; there again, this is due to the fact that there only one server in this Directory tree.
Clicking on the Agent Summary link will allow you to view the health of your NDS servers, including synchronization information, agent process status, and the total number of servers known to your database. Clicking on the Agent Configuration link will allow you to control and configure the DS Agent.The functionality available on the Agent Configuration page depends on the rights of the current identity and the version of NDS that you are looking at. Clicking on the Agent Health link allows you to view health information about the specified NDS Agent and the partitions and replica rings it participates in. Additional links are provided that give several layers of more detailed information.
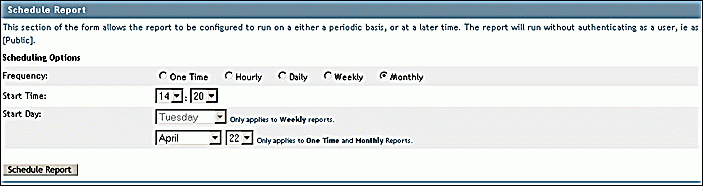
So now you know how to create a health check report for your Directory tree using NDS iMonitor. But there is one more thing to cover before ending this article. Refer to Figure 3 again. Looking at the lower portion of the Data Frame, under the section called Schedule Report, you see the option to run reports automatically.
This section of the form allows your report of choice to be configured to run on either a periodic basis, or at a later time. In this case, the report will run without authenticating as a user but will run as [Public]. Note the scheduling options in Figure 7, that allow you to set the parameters listed in the table below.
|
Scheduling Option
|
Value
|
|
Frequency |
One time, Hourly, Daily, Weekly, or Monthly |
|
Start Time |
The time of the day you want the report to start |
|
Start Day |
The Day option only applies to Weekly Reports, and the Month and Date option only applies to One Time and Monthly reports |
Summary
This month we have learned that NDS iMonitor has a very strong reporting tool to help diagnose the health of your Directory Tree. We have learned that there are several types of reports you can run. This column also showed you how to perform a health check against all of the servers in your Directory tree.
Getting back to my experience at BrainShare, I must note that the information presented in the "Automated eDirectory Health Checks and Troubleshooting" class indicated that with upcoming versions of NDS iMonitor there will be a more robust selection of reports that you can run. But that can wait for another column. Until then, happy Directory-ing!
* Originally published in Novell AppNotes
Disclaimer
The origin of this information may be internal or external to Novell. While Novell makes all reasonable efforts to verify this information, Novell does not make explicit or implied claims to its validity.