iFolder 2.0
Articles and Tips: article
Research Engineer
jfischer@novell.com
01 Oct 2003
Last month we concluded a very detailed discussion about iManager 1.5. Now we begin talking about basic network services that are an important part of a business. We will talk about Novell's cross-platform services that run on NetWare, Windows, and Linux. This month we begin our discussion about network services with an article on iFolder storage.
Storage, an Important Service
Storage space is one of the most vital services on a corporate network. Users must have secure and reliable storage space in order to store their work. With all of the software available today, the total number of storage space necessary for large corporations to conduct business amounts to hundreds of Gigabytes of disk space.
Users must be able to easily and quickly access storage space to save their files. If you were to poll most corporations, I would bet that most users store the majority of their data on their local hard drives. While this is not uncommon nor necessarily bad, it does introduce several problems that must be overcome for businesses.
First of all, businesses must provide a way for users to store their important data on network drives that are reliable and secure. The data must be accessible to those who need to access it, and inaccessible to everyone else. Second, the network drives should be backed up so that the data can be recovered in case of a hardware or software failure on the users' workstation.
I'm sure many of us have experienced a time when suddenly our laptop or desktop computer did not start up and all the data on the machine was lost. Although with today's hardware, such hardware failures occur less frequently, the chance of it happening is still high enough that it must be considered.
Third, the data must be accessible from anywhere and at anytime. This comes increasingly more difficult for a network staff to provide access to data from anywhere in the world at anytime and still maintain a high level of security.
What is iFolder?
iFolder is a file storage and management solution that lets you access your files from anywhere and at any time. It no longer matters where you are, whether you are inside the corporate network or outside the firewall. iFolder lets you open and use any local files that you've placed in your iFolder directory.
iFolder Features
iFolder provides the following features:
File storage
Access from anywhere
Synchronization of files
Security
Data encryption
HTTP-based
Conflict bin
Cluster aware
iFolder stores files and directories. You can organize your files with folders just like you would organize them on your local file system. This makes it easy for mobile employees to access important data and take advantage of other iFolder features.
With storage solutions like iFolder, we no longer have a need for what the industry has coined the term as "sneaker-net." You can eliminate the need to carry files back and forth on a floppy disk, or even other media such as a CD. All you need is an Internet connection to store data in your iFolder directory.
Most of us save our work on our local workstation. Now we can do that because iFolder will help solve the problems associated with that. iFolder manages the versions of files for you. It will always provide for you the latest version of the file and it synchronizes the changes with the iFolder server.
You can even open files and make changes while you are not connected to the network. Then the next time you connect to the network, the changes are synchronized. Even if your computer crashes with a hardware failure and you cannot power on your computer, you can still access your iFolder files that were most recently synchronized.
iFolder manages the security for you. It ensures that users only have access to their own directories. Administrators can setup encryption so that files are exchanged to the iFolder Server encrypted. This allows for valuable protection against packet sniffing and spoofers that are trying to capture sensitive data from the Internet.
The iFolder service is integrated with a web server so that all traffic is based on the HTTP protocol. This eliminates the need for VPN services and other special firewall configurations, since HTTP uses port 80.
iFolder has the capability to deal with document "collisions" via a built-in Conflict Bin. For example, suppose you work on a document while you are disconnected from the network but don't synchronize it to the iFolder server because you don't have an Internet connection. Later, you connect to the network from a different computer, work on the same document, and that version is automatically updated to the iFolder server. When you return to the original client computer and connect to the network, it will try to send its own update version of the document to the iFolder server, but it won't be able to because that document version will have an earlier time stamp. Instead, iFolder sends the document to the Conflict Bin, where you can retrieve it and restore it at any time.
iFolder is cluster-aware and supports the use of SANs or Storage Area Networks. You can install iFolder on an NCS cluster to provide extra fault tolerance and load balancing for a more robust storage solution for your network.
Components of iFolder
iFolder consists of four main components, which are:
iFolder Server
iFolder Client
eDirectory
Browser
The iFolder Server is integrated into the Apache web server on NetWare and IIS web server for Windows servers. An iFolder Linux and Solaris port integrated with Apache is also available.
The iFolder Server provides LDAP authentication, Web page delivery, and secure HTTP communication. A single iFolder server can service thousands of users and supports any standard type of disk storage solution. It also has a web based management console.
The iFolder client facilitates the storage of user data in a local iFolder directory and watches for any changes to user files. The iFolder client currently supports Windows-based clients, with a Linux based client in development.
iFolder integrates with eDirectory. eDirectory stores information about the iFolder system, user authentication, and access control. System and server information is stored in a Global Setting LDAP Directory, which contains information for the iFolder service objects, server objects, and LDAP server objects. User authentication and access control information is stored in a User LDAP Directory.
A web browser interface can be used to access the contents of an iFolder service as well. The iFolder Server provides a web interface if you are accessing iFolder from a computer where the iFolder client is not installed. You can access iFolder from any device that has a browser, including PDAs. Through the web browser interface, users can login to an iFolder server and perform all file operations just as if they were accessing iFolder on their local machine. These operations include downloads, uploads, deletions, renames, and the creation of new folders. Users can download the files, make any changes and then upload the file to the iFolder Server.
iFolder Server Installation
In order to install iFolder, you should be sure you meet the following requirements:
eDirectory 8.6 or higher
10 MB of free space on volume SYS
ROOTCERT.der file for secure transmissions
Server IP address or DNS name
NetWare 5.1 with SP4 or NetWare 6 with SP1 or higher
Adequate disk space for the iFolder user data
While it seems logical to have an IP address for the iFolder server, you must make sure the IP address does not have other web services or LDAP services bound to that IP address. Because iFolder uses LDAP and Apache, which run on ports 389, 443, 80, 636, the IP address must be free of those services as to not create a port conflict.
It is common and typical to use a secondary IP address for your iFolder server. To add a secondary IP address to your NetWare server, at the server console prompt, type
add secondary ipaddress 123.45.67.89
You will most likely want to put this command in the autoexec.ncf file so that the IP address for iFolder will be added on server reboot.
Here are the steps to install iFolder Server on a NetWare server.
From a Windows client, map a drive to volume SYS of the NetWare server that will be the iFolder Server.
From the Windows client, run ApacheiFolderServer.exe.
Click Next .
Click Yes to accept the license agreement.
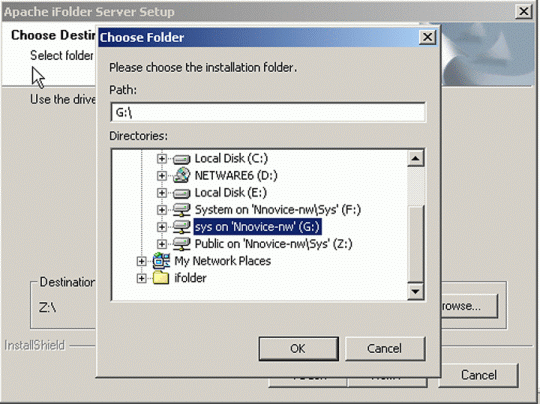
Click Browse to select the drive mapped earlier to volume SYS as shown in Figure 1.
Figure 1: Selecting Volume SYS:.
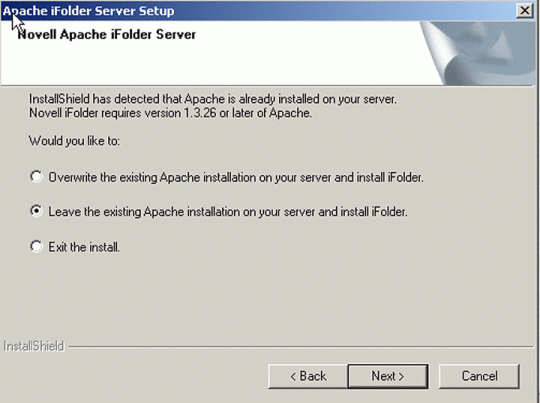
Select to leave the existing installation of Apache and install iFolder as shown in Figure 2.
Figure 2: Installing iFolder.
Allow the copy to occur.
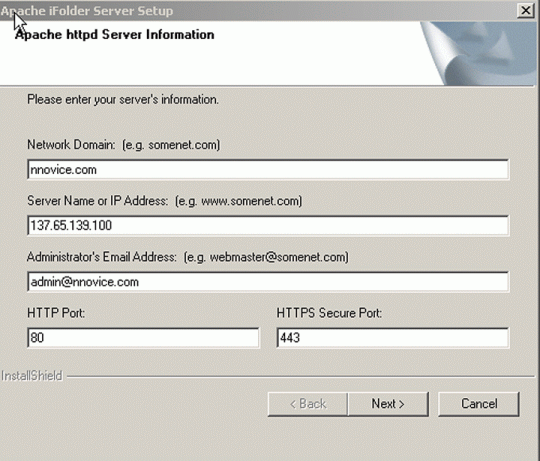
Fill in the network domain, IP address, admin's email, and port number fields as shown in Figure 3.
Figure 3: Filling in the other important information.
Click Next .
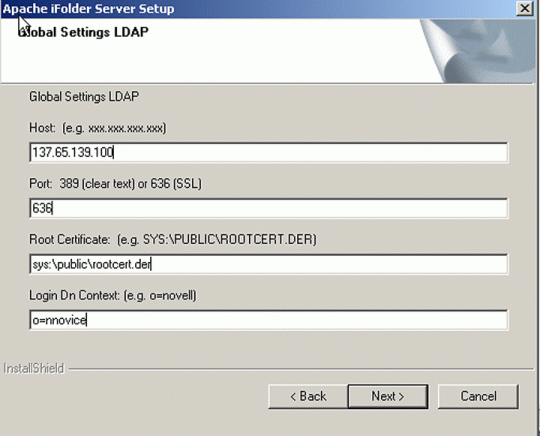
Fill in the IP address of the iFolder Server, the LDAP port, security certificate if using secure transmissions, and the context where the users reside as shown in Figure 4.
Figure 4: Filling in the IP address and LDAP port information.
Click Next .
Enter the location where the users' data will reside.
Enter the administrators for iFolder, separated by semi-colons.
Click Next .
Click Finish .
Restart your iFolder Server.
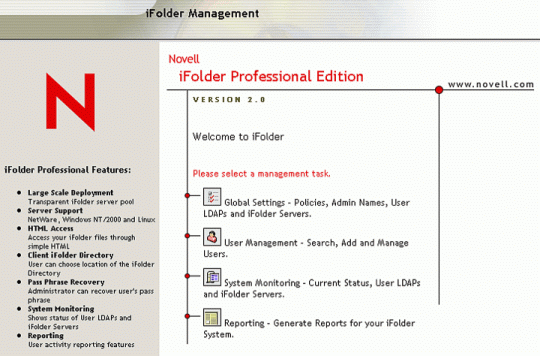
iFolder is now installed. Once iFolder is installed, you can access the Administrator web-based management Console by opening a browser and typing in the address bar as shown in Figure 5:
https://ip_address/iFolderServer/Admin
When you enter this URL, you will see the following screen:
Figure 5: Accessing the Administrator web-based management Console
Install iFolder Client
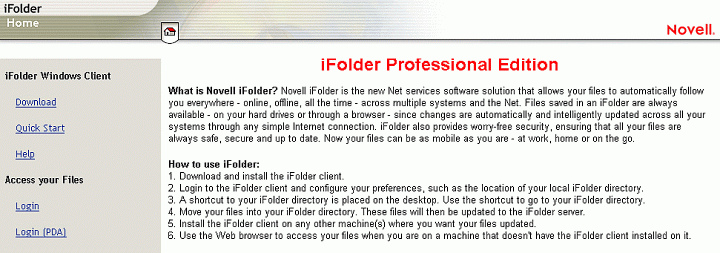
The iFolder client is a Windows application that monitors files for changes and synchronizes them with the iFolder server. To install the iFolder client, go to the URL of the server where iFolder is installed by using the IP address you assigned to the iFolder server, such as:
http://ip_address
You will see a screen like the one in Figure 6.
Figure 6: The iFolder client screen.
Follow these steps to install the iFolder client.
Click on the link to download the iFolder client and save it to your hard disk.
Run the iFolderClient.exe program.
Click Next .
Select the language to install and click Next .
Close the browser window with the license agreement.
Select Yes to accept the license.
Click Next to accept the default installation path.
Click Finish .
Select Yes to restart your computer and click Finish .
After the reboot, an iFolder login screen should appear. Login with your username and password.
The screen will prompt you for a pass phrase, which is used to encrypt the files as they are sent to the server.
Specify the path where you want to place your iFolder home directory.
You can now place any files in the folder and they will be synchronized with the iFolder server.
Post iFolder Installation Considerations
First, you must enable iFolder for each user account that will need to access iFolder. This must be completed before users attempt to login. This process is simple and is described below.
Access the iFolder Management Console by typing:
http://ip_address/iFolderServer/Admin
Click the link for user management.
Login with an admin user if prompted.
Click the Advanced Search link on the left navigation bar.
You can specify a criteria here to search for users or just search for all users in the tree and click Search as shown in Figure 7.
Figure 7: Searching for users.
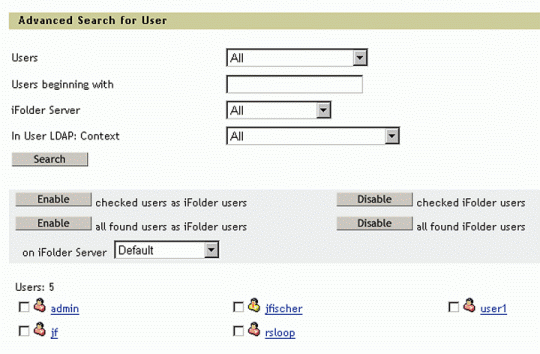
From this screen, you can check the users that you want to use iFolder, or check to enable all user accounts.
iFolder Browser Client
To access your files from a computer that does not have the iFolder client, perform the following.
Open a browser and type the URL that specifies the iFolder server, such as: http://ip_address
Click Login on the left navigation bar.
Type your username, password, and pass phrase.
Grant permission to the Java certificates if prompted.
You will see a Windows Explorer-type window inside the browser that lets you access your iFolder files as shown in Figure 8.
Figure 8: The window inside the browser lets you access your iFolder files.

Conclusion
In this month's article we talked about the iFolder storage solution. We covered the components of iFolder, features, and how to install the iFolder server and client. Next month, we'll detail the features of iFolder and administrative considerations.
* Originally published in Novell AppNotes
Disclaimer
The origin of this information may be internal or external to Novell. While Novell makes all reasonable efforts to verify this information, Novell does not make explicit or implied claims to its validity.