iManager Roles Defined: Part 4
Articles and Tips: article
Research Engineer
Novell AppNotes
jfischer@novell.com
01 Sep 2003
Last month we talked about several of the predefined roles included with iManager. This month we'll conclude the discussion of iManager by finishing with the remaining roles. After today's discussion, you should feel like you canadminister effectively your network using iManager more effectively and efficiently.
Dynamic Group Management
A dynamic group is a specialized eDirectory group object. It is a group whose members are added and removed dynamically by eDirectory. You can specify the criteria that will determine who will be made a member of the group. eDirectory will dynamically add or remove the object based on the criteria you specify.
For example, if you specify an attribute of a user object such as department to be the criteria, eDirectory will search and find all user objects that match the criteria and make them a member of the dynamic group. All members of the Marketing department could be members of a dynamic group called MarketingDynGroup.
This can be extremely useful in managing a position where there is a high employee turnover ratio such as the help desk. If you specify the search criteria to be the value help desk, all objects with the help desk value on their job title attribute will be made members of the dynamic group.
Dynamic Groups have an advantage over regular eDirectory group objects in that memberships for group objects must be explicitly set. This provides extra administrative overhead. With dynamic groups, the membership is done automatically for you, as long as the property value specified in the search criteria is updated.
To create a dynamic group object, perform the following steps:
Login to iManager.
Expand the Dynamic Group Management role.
Click Create Dynamic Group.
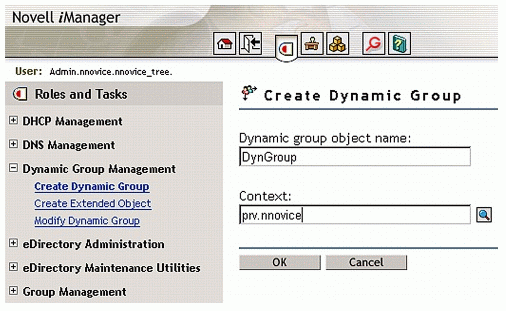
Enter a name for the group and the context where the group object will be created as shown in Figure 1.
Figure 1: Creating a dynamic group.
Click OK.
Click OK.
Fill out the information to complete the properties for the dynamic group object as shown in Figure 2.
Figure 2: Completing the properties for a dynamic group object.
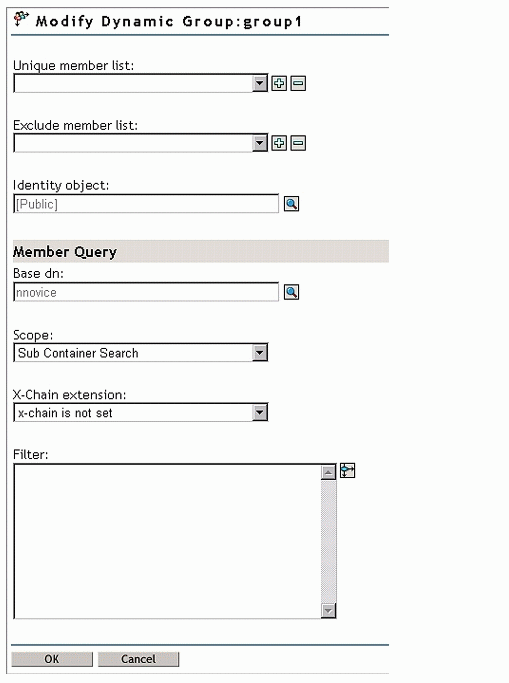
Figure 3: Entering a filter name in the filter field.

In the inclusion field, you can enter users that will always be a member of the group, no matter the criteria you enter.
In the exclusion field, you can enter users that will never be a member of the group, no matter the criteria you enter.
Enter in a base DN where eDirectory will begin to search for users to be a member of the dynamic group.
Enter in the scope where eDirectory will search.
Click the button next to the filter field.
Enter a filter as shown in Figure 3.
Click OK.
eDirectory Maintenance Utilities and iPrint
Due to space and time restrictions on this column, I will address the eDirectory Maintenance Utilities in the very near future in the Directory Primer column. The topic could merit at least one entire month by itself. I will also address iPrint in the very near future in this column.
NMAS Management
Novell Modular Authentication Services (NMAS) provides a flexible authentication scheme for your network. Each authentication method offers a range of security, features, and configurations that are necessary to configure on your server. You can set up applications and users to use certain login methods and different methods for other applications or users. You choose the method that is right for your environment that is based on the needs you have.
I won't provide a detailed explanation of each login method in this column. NMAS allows you to choose which method is right for your environment. You can configure your servers to provide the best authentication scheme, and it can be managed from iManager.
Here are the basics of managing NMAS from iManager.
To view the authentication methods supported by eDirectory and their properties, do the following:
Log in to iManager.
Expand NMAS Management.
Click NMAS Login Methods. This displays the methods that are available to your network. You will the screen shown in Figure 4.
Figure 4: NMAS login methods.
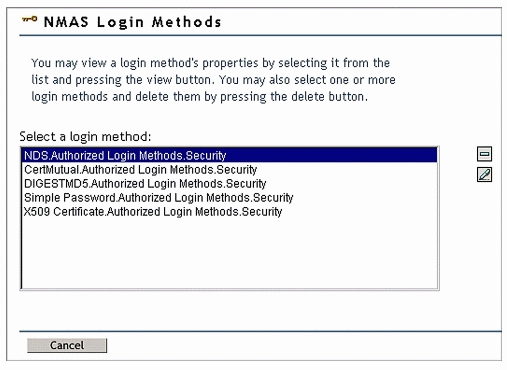
You can click the minus button to delete a login method from NMAS.
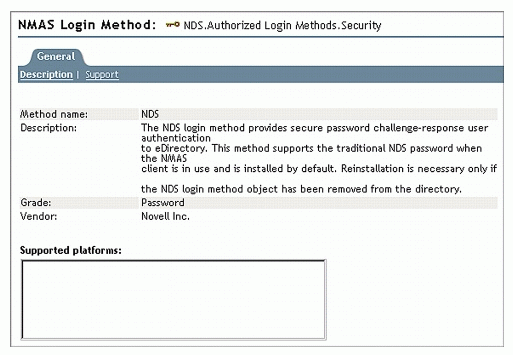
Click the pencil button to view the properties of a login method. The screen shown in Figure 5 shows the properties of the NDS Login method.
Figure 5: Properties of the NDS Login method.
Click Cancel to return to the home screen.
NMAS Enterprise edition, which is available as a separate product, contains more features and configurations for NMAS login methods. For a more comprehensive feature list of NMAS, see the Novell documentation Web site at http://www.novell.com/documentation.
Novell Certificate Server Management
Novell Certificate Server is another product that could merit an entire article in order to explain its features. I won't attempt to do that here. I only intend to introduce the management capabilities that are available from iManager. For comprehensive coverage of Novell Certificate Server, visit the Novell documentation Web site and search for Novell certificate server.
Novell Certificate Server provides public key cryptography services integrated with eDirectory and allows you to create, issue, and manage the digital certificates for your organization that secure data transmissions. You can create digital certificates for users and for servers on your network to allow for the secure transmission of data.
An Organizational Certificate Authority object contains all of the security information for the Directory tree. It is created at the installation of eDirectory. You can also create it manually using iManager. When you plan and configure the security information for the Directory, it is the properties of this object and objects contained within this object that you will modify. This object contains its own set of properties and holds objects such as certificates, keys, and other objects.
Here are three basic tasks involved in managing Novell Certificate Server on your network. To create an Organization Certificate Authority object, perform the following steps.
Log in to iManager.
Expand Novell Certificate Server Management.
Click Create Certificate Authority.
If a Certificate Authority object does not exist in the tree, one will be created.
Partition and Replica Management
Efficient partition and replica management is one of the most important aspects of managing your eDirectory tree properly. Misplaced replicas or partitions can cause bad performance for eDirectory and bog down your network completely. For more information about how to design your eDirectory tree, see the eDirectory documentation at http://www.novell.com/documentation.
Partitioning eDirectory is similar to what you do when you partition a hard disk; you break up the Directory into sections. This is mostly done to improve performance of the Directory.
By replicating the Directory, you place a copy of a partition onto another server. If a server has a copy of a partition where the services it needs reside, then the Directory will not have to search as much to provide the service to the user. This is a basic illustration, but it is the idea behind replicas.
By default when an eDirectory tree is created, there is only one partition created, which is called the Root partition. The first three servers to be installed into the tree each automatically receive a replica of the Root partition. After that, you will have to manually place replicas on additional servers.
It is a good idea to create additional partitions as your eDirectory tree expands. The strategy is to add replicas to servers to provide efficient access to network services for users, without bogging down the network with too much traffic. Each replica needs to synchronize itself to be sure it has the latest information about the Directory. In many cases, this can be a delicate balance.
To create a partition, follow the steps below.
Log in to iManager.
Expand Partition and Replica Management.
Click Create Partition.
Browse to and select the container where you want to create the partition.
Click OK.
To delete a partition, you merge it in with its parent partition. Follow the steps below to merge a partition.
Expand Partition and Replica Management.
Click Merge Partition.
Browse to and select the child partition you want to merge.
Click OK.
You can move a replica of a partition to another container in case that the container does not need the partition any longer. To move a partition, follow the steps below.
Expand Partition and Replica Management.
Click Move Partition.
Browse to and select the partition you want to move.
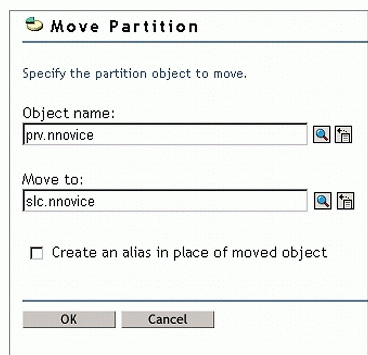
Browse to and select the new location for the partition, as shown in Figure 6.
Figure 6: Moving partitions.
Click OK.
Once you have reviewed that all the necessary servers that have a replica of the partition are up and running, click Move.
Click OK.
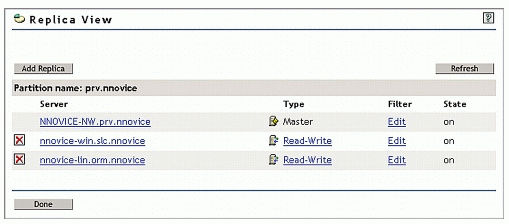
The replica view allows you to see the replicas and partitions in the tree in two views. You can select a server object and view the replicas that the server contains or you can select a partition and view the servers that contain a replica of that partition, also known as the replica ring. Both of these views are helpful when you are troubleshooting partition operations.
From this view, you can also delete a replica from a server, add a replica, view the details of a replica, view and change the type of a replica, and view or modify the filter of a replica.
For more detailed information about partitions and replicas, see the documentation Web site or the AppNotes Directory Primer column also.
To open the replica view, follow the steps below.
Expand Partition and Replica Management.
Click Replica View.
Browse to and select the partition or server you want to see.
Click OK. You will see a screen similar to the one shown in Figure 7.
Figure 7: Viewing replicas.
Click Done.
The Replica Wizard allows you to create a Filtered Replica. A Filtered Replica is a replica that does not synchronize all of its data with the other replicas in the replica ring. It minimizes network traffic by only synchronizing what is specified in the filter criteria.
Filtered Replicas are a great way to reduce network traffic, but should not be used exclusively. The two central benefits for using replicas is performance enhancement and Directory redundancy for fault tolerance. Filtered Replicas can be used in areas where network traffic is heavy, and Non-Filtered replicas add too much synchronization traffic.
Creating Filtered Replicas is very much environment specific. For example, if you have an application that only accesses information about user objects, you could place a filtered replica on that server and only filter the user class and its attributes. That way, the network will not contain synchronization traffic from all of eDirectory. Filtered replicas also work well with DirXML solutions to help filter out what DirXML has to process.
Filtered Replicas can be created from the Replica View link, or the Replica Wizard link. To create a Filtered Replica, follow the steps below.
Expand Partition and Replica Management.
Click Replica Wizard.
Browse to and select the server where you want to configure the Filtered Replica.
Click Next.
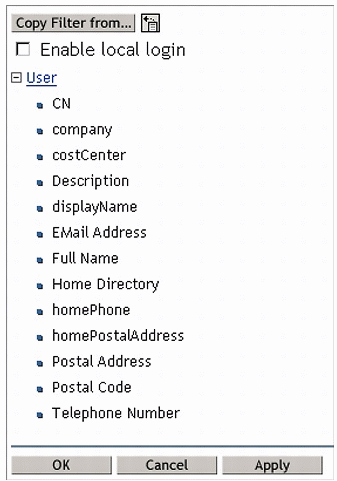
Now you must define which classes and attributes you want filtered from the replica. Click Define Filter Set.
Click The Filter Set is Empty link to specify the filter.
On the left side, check the classes you want to be part of the filter.
On the right side, check the attributes you want to be part of the filter. Figure 8 shows the filter I set up.
Click Define the partition scope to select where the filter will reside.
Click Next.
Click Finish.
Schema Management
Just as with ConsoleOne, iManager allows you to add classes and attributes to the schema. You can add additional attributes to a class or create your own custom attributes and add them to a class.
Follow these steps to create a custom attribute and add it to the user class.
Expand Schema Management.
Click Create Attribute.
Type in a name for the attribute.
You do not need to use the ASN1 ID number unless the attribute is registered with Novell.
Click Next.
Select the Syntax for the attribute. For example, if the attribute will have possible values of true and false, select the boolean flag.
Click Next.
Set any attribute flags necessary and click Next.
Click Finish.
To add the newly created attribute to the user class definition, do the following steps.
Click Add Attribute.
Scroll down the list and select User class.
Scroll down the Available Attributes list and find the attribute you just created and double click it.
Click OK.
Figure 8: Defining the attributes to be a part of the filtered replica.
Conclusion
For the past several months, we have talked about the capabilities of iManager 1.5. We have discussed how to install it on NetWare, Linux, and Windows, as well as how to customize it and use it to manage your network using role based administration.
In the coming months, this column will discuss how to set up and run services such as iFolder, iPrint, Apache, Tomcat, MySQL, NetDrive, NetStorage,and others.
* Originally published in Novell AppNotes
Disclaimer
The origin of this information may be internal or external to Novell. While Novell makes all reasonable efforts to verify this information, Novell does not make explicit or implied claims to its validity.