iManager 1.5 Roles Defined: Part 3
Articles and Tips: article
Research Engineer
Novell AppNotes
jfischer@novell.com
01 Aug 2003
Last month we discussed DHCP Management, DNS Management, and eDirectory Administration roles. This month we continue to define the roles in the Novell iManager 1.5 utility.
Group Management
Group Management role allows you to create logical groups in the eDirectory tree. The concept of a group is fundamental to what a Directory can provide for your network. Groups can be useful to help you manage administrative resources as well as user resources.
We have previously talked about using groups to manage your administrative users. For example, you can create a group called administrators and assign to the group the rights or roles necessary to administrator a network resource, such as rights to folders and files on a server.
It's also a good idea to use groups to manage network resources. For example, you could create a group called DevUsers. This group object would have rights to a certain network resources, such as printers or folders, etc. Members of this group would have access to this common set of resources without having to assign the resources to each user object. This greatly simplifies administration.
To create a group object, follow the steps below:
Login to iManager with a user assigned to the Group Management role.
Expand Group Management.
Click Create Role.
Enter in a name for the group and context as shown in Figure 1.
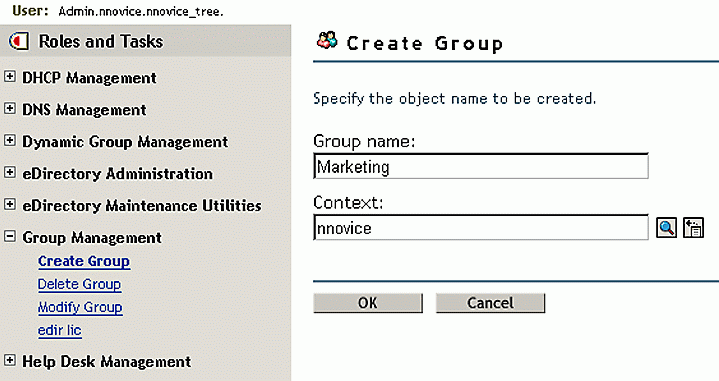
Creating a group for group management purposes
Click OK to create the group.
Click OK to return to the home menu.
To delete a group, follow the steps below:
Expand Group Management.
Click Delete Group.
Type in the full distinguished name of the object or use the object browser to browse to the object. Notice that you can select multiple objects as well.
Click OK to delete the object.
Click OK to return to the home menu.
To modify the properties of a group, follow the steps below:
Expand Group Management.
Click Modify Group.
Type in the full DN of the object or use the object browser to browse to the object. Notice that you can select multiple objects as well.
Edit the properties as needed, as shown in Figure 2.
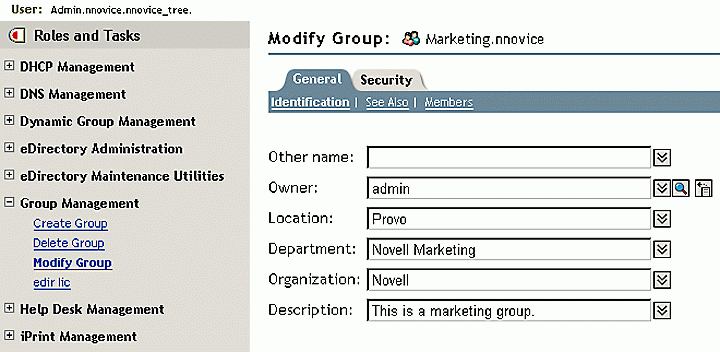
Modifying an already created group in Group Management.
Click OK to modify the group.
Help Desk Management
The Help Desk Management role takes a few of the common tasks that could be asked of Help desk personnel and groups them into a role. Users assigned to this role can create users in the tree, set passwords, and clear an account lockout for a user object.
To create a user, follow the steps below:
Login to iManager as a user assigned to the Help Desk Management role.
Expand Help Desk Management.
Click Create User.
Fill in the properties you need for the user. Note that the username, lastname, and context are required fields.
Click OK to create the user.
Click OK to return to the home menu.
To set a password for a user, follow the steps below:
Expand Help Desk Management.
Click Set Password.
Type in the full DN of the object you want to set a password for or use the object browser to browse to the object.
Enter in a password for the user.
Confirm the password in the second field.
Click OK to set the password.
Click OK to return to the home menu.
An account can become locked if an intruder attempts to login with a username and then tries to guess the password. If intruder detection is enabled, the account can become locked after a certain number of bad attempts to login with the username/password.
More commonly, an account can become locked after a user changes his/her password and does not remember it. The user may repeatedly try to login using several passwords hoping to remember which one they used until their account becomes locked. The user would then need to call the help desk to unlock their account.
To unlock an account, follow the steps below:
Expand Help Desk Management.
Click Clear Lockout.
Type in the full DN of the user or use the object browser to browse to the object.
Click OK to clear the lockout.
Click OK to return to the home menu.
LDAP Management
LDAP Management is a role that helps you administer eDirectory LDAP Services. A complete tutorial of all the LDAP services eDirectory provides is way beyond what I could detail in this column. However, I will cover the three tasks that pertain to this role. If you would like more information specifically about eDirectory and LDAP, visit the eDirectory 8.7 documentation at http://www.novell.com/documentation.
Simply put, LDAP is a communication protocol used to access a Directory. The two objects responsible for providing LDAP services are the LDAP Group Object and the LDAP Server object. The LDAP Group object manages the LDAP properties for an LDAP server. The LDAP Server object manages the way LDAP software clients connect to the server.
The LDAP objects are created during eDirectory installation, but you can use the LDAP Management role to change the LDAP properties from their defaults. You can also create them if there is a case where you would need to.
To create an LDAP Server object, follow the steps below:
Login to iManager with a user that is assigned to the LDAP Management role.
Expand LDAP management.
Click Create LDAP object.
Specify whether the object is an LDAP Server or Group object.
Enter a name for the object and specify its context as shown in Figure 3.
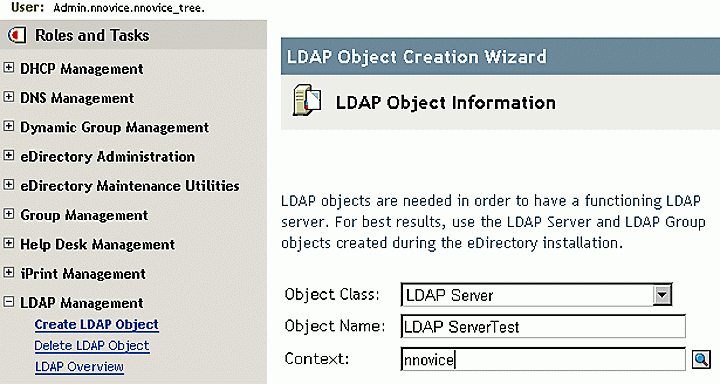
Creating an LDAP server object.
Click Next.
Specify the server that will host the LDAP services.
Click Start.
To delete an LDAP object, follow the steps below:
Expand LDAP Management.
Click Delete LDAP object.
Select the objects to delete.
Click Delete.
The LDAP Overview tasks lets you see the settings for the LDAP objects. Here you can change things such as using a secure LDAP connection, LDAP mappings, connections, and searches.
To view the LDAP Overview, follow the steps below.
Expand LDAP Management.
Click LDAP Overview.
Notice that you can select to see LDAP Groups or Servers.
Click View LDAP Servers.
Click the link to view the LDAP properties for a server as shown in Figure 4.

Viewing the LDAP properties
Click OK when you are finished viewing or editing the properties you desire to see.
License Management
eDirectory allows you to store and manage the licenses you need to run eDirectory. The License Management role allows you to install, delete, and manage the properties of a license installed into your eDirectory tree.
To install a license into the tree, follow the steps outlined below:
Login to iManager with a user assigned to the License Management role.
Expand License Management.
Click Install License.
Click the browse button and browse to a license file.
You can view the properties of the license file by clicking the View button.
Click Next.
Mark the checkbox next to the license in order to install it and click Next.
Enter the context into which you will install the license. This can be the context of the server object.
Click Install.
To delete a license from the eDirectory tree, perform the following steps.
Expand License Management.
Click Delete License.
Use the browse button and browse to the license file you wish to delete.
Click OK.
To move a license to a new location in the tree, follow the steps below:
Expand License Management.
Click Move License.
Click the browse button to browse to and select a license.
Click Next.
Browse to and select a new location for the license and click OK.
The License Management role also lets you manage the properties for a license. Follow the steps below to manage the properties for a license:
Expand License Management.
Click Manage License Properties.
Click the browse button to browse for and select a license object. You can select a License Container, Certificate, or Service Provider and view the properties of that object.
To view the properties of a license, select a License Certificate object in the browser and click OK.
View all the properties of the object and click OK when you are finished.
Rights Management
Managing rights assignments in the tree can be a daily task. Since I have already discussed in detail how to manage rights on a network using ConsoleOne, I'll only show how to perform the tasks in iManager.
To modify an IRF in iManager, perform the following steps:
Login to iManager with a user assigned to the Rights Management role.
Expand Rights Management.
Click Modify Inherited Rights Filter.
Using the browse button, select an object from the tree where you want to apply or modify the IRF.
Click OK.
Click Add Property to add a property you want to filter from locations below this object of the eDirectory tree.
Unmark the rights you want to block as shown in Figure 5.

Blocking and unblocking rights in the IRF.
Click OK.
To modify trustee assignments, follow the steps below:
Expand Rights Management.
Click Modify Trustees.
Using the browse button, browse to the object to which you want to assign the trustee, such as a container object if you are going to assign a trustee rights to a container.
Click OK.
Click Add Trustee.
Browse to and select the object you will use as a trustee.
Click the assigned rights link for the new assignment.
You can also add a new property by clicking the Add Property button.
Mark the rights you want the trustee to have.
Click Done.
Click OK twice to return to the home menu.
To view and modify the rights an object has to other objects in the tree, follow the steps below:
Expand Rights Management.
Click Rights to Other Objects.
Browse to and select the object you want to view, such as a user object.
Select the context from which to search. To view the top most rights that an object has, select to search from [Root].
Select to include subcontainers.
Click OK.
To add additional rights, select the Add Property button.
Choose the rights you want to assign and mark these rights.
Click Done.
Click OK twice to return to the home menu.
To view the effective rights a trustee has on an object, perform the following steps:
Expand Rights Management.
Click View Effective Rights.
Using the object browser, select the trustee you want to view.
Click OK.
Highlight the properties in the Property Name field and view the effective rights for this trustee in the Effective Rights field.
Click Done.
Server Management
The Server Management role lets you open the NetWare Remote Manager for a server. The Remote Manager is a browser-based utility that lets you manage the server itself. You can access the console screens, change SET parameters, as well as monitor server performance.
To launch the Remote Manager, follow the steps below:
Login to iManager with a user assigned to the Server Management role.
Expand Server Management.
Click Launch NetWare Remote Manager.
Using the object browser, browse to and select the NetWare server you want to administer.
Click OK and you will be logged in to the Remote Manager utility.
User Management
User management is an important daily network task. iManager allows you to create, delete, move and modify users. Since we have already created users, I will only show the steps to enable and disable users through the iManager utility.
To disable an account for a user, perform the following:
Expand User Management.
Click Disable Account.
Using the object browser, browse to the user you want to disable and click OK.
The user has been disabled and will no longer have access to the network.
To re-enable the account, click Enable Account.
Using the object browser, browse to the user you want to enable and click OK.
The user account has been re-enabled.
Conclusion
This concludes this month's article on the iManager roles. In this article, we documented the steps to perform the tasks within the Group Management, Help Desk Management, LDAP Management, License Management, Rights Management, Server Management, and User Management roles. Next month we will conclude the discussion about iManager roles by detailing the remaining roles.
* Originally published in Novell AppNotes
Disclaimer
The origin of this information may be internal or external to Novell. While Novell makes all reasonable efforts to verify this information, Novell does not make explicit or implied claims to its validity.