iManager 1.5 Roles Defined: Part 2
Articles and Tips: article
Research Engineer
Novell AppNotes
jfischer@novell.com
01 Jul 2003
Last month we discussed the predefined roles in the iManager utility's Configure section. We explained how to use property books, User Self Management, and the Collection Configuration section. In this month's article, we'll discuss the roles in the Roles and Tasks section of iManager.
iManager 1.5 includes roles with assigned tasks necessary to perform nearly all network function on your network. From iManager, you can manage DNS Services, DHCP Services, eDirectory objects, LDAP objects, iPrint Services, SNMP Services, WAN Traffic Services, Novell Licensing Services, and Novell Certificate Services. This is beneficial to administrators because most of the network management and administration can be performed from the same tool.
In the previous sections, we discussed how to customize your administrative roles to allow for a more decentralized approach to administration. Now that you know how to set up and configure roles, let's talk about the roles that iManager sets up for you and how you can use them to perform your daily network administration tasks. For the rest of the article, I will list the role as it appears in iManager and include a brief description of the role and the tasks associated with that role.
DHCP Management
Dynamic Host Configuration Protocol, or DHCP as we call it, is the service that manages IP addresses on your network. If DHCP is set up and configured on your network, users can plug their computers into a network jack in their offices and they are ready to access the corporate network or Internet. Without DHCP, an administrator would have to visit each workstation and assign an IP address before the users could connect to the network or Internet. Without DHCP, connecting employees to the network cannot be automated.
DHCP servers have been built for almost any platform now. eDirectory allows you to store the DHCP information as objects in the Directory. This gives you the benefit of being able to control access to the objects as well as a central repository to manage the objects.
iManager allows you to manage the objects and change their property values. The process for setting up a DHCP server is basically the same as was done in NetWare 5.x with the DNS/DHCP management console. Now though, the tasks are available through iManager.
To setup DHCP Services from iManager, perform the following steps.
You should first be sure that the schema has been extended for DNS/DHCP. This is done at the initial server installation, or by typing DNIPINST <Enter> at the server console prompt.
Login to the iManager utility and expand DHCP Management.
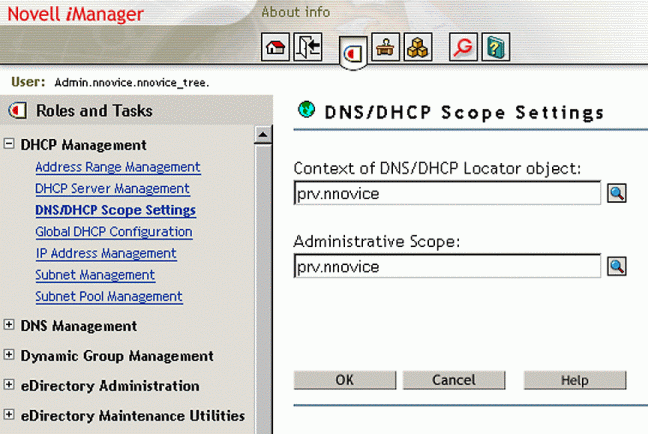
Select DNS/DHCP Scope Settings .
Browse to and select the scope where the locator object resides. This would be wherever you specified as the location for the objects in the DHCP installation.

Browse to and select the administrative scope, which would probably be in the same location as the DHCP objects.
Click OK twice.
The next task is to create a DHCP server object in eDirectory.
Click DHCP Server Management .
Select Create Server from the drop down menu.
Browse to and select the server that will host DHCP Services.
Click Create .
Next, you will need to create a subnet and an address range. The subnet is the name and IP address of the network the computers will use to communicate. The address range is the range of IP addresses that your DHCP server will service to clients who request an IP address.

Click Subnet Management .
Select Create Subnet and click OK .
Type in a name for the subnet. This will be the name of the eDirectory object. You probably will want to give it a name that will describe the location and address range of the subnet such as BuildingA_Range1.
Browse to and select the context where the subnet object will be stored in eDirectory.
Enter the address of the subnet, which ends with a 0. For example, the subnet address can be 168.49.112.0 and the subnet mask will be 255.255.255.0.
Select the name of the DHCP server that you have created and select Create .
Click Address Range Management .
Select Create Address Range and click OK .
Select the subnet you created above from the drop down menu.
Enter a name for the address range. The name should be descriptive of the range of addresses.
Enter the start and end IP addresses for the range and click Create .
You can now start the server by clicking DHCP Server Management and selecting the option to start/stop the DHCP server.
Select your DHCP server from the drop-down list and click OK .
You should be aware of two additional functions to manage your DHCP server from iManager. First, you may need to configure an IP address exclusion. An exclusion is an IP address that will not be handed out by the DHCP server; it is excluded from the range. This IP address could be reserved for a server on the network. For example, you could configure the DHCP server to also give clients the IP address of the DNS server, a host name, the network time server, default router, and a host of other options.
Select IP Address Management .
Select Create IP Address .
Select the Subnet from the drop-down box to which this IP address belongs.
Enter the IP address to be excluded.
Select Exclusion and click Create .
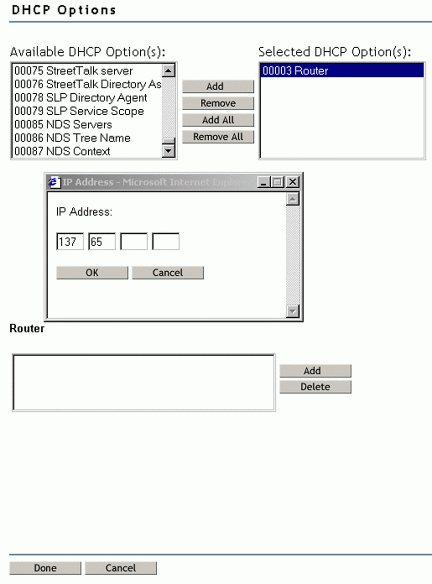
Second, you may need to configure other options to pass down to clients who request an IP address from the DHCP server.
Expand DHCP management.
Select Global DHCP Configuration .
Select View/Set Global Preferences and click OK .
Click Modify .
In the table on the left, select the parameters you want to include and the values of the parameters at the bottom of the screen.
Click Done after you have added all the parameters and values you need for your network.
DNS Management
DNS Services allow users to type in friendly URLs, such as http://www.novell.com , without having to remember the IP address of the Web server that hosts the novell.com domain. For instance, when a URL is typed into a browser, the browser contacts a DNS server and asks for the IP address that resolves to the URL the user has typed. When the DNS server finds the IP address, the browser displays to the user the requested Web page.
Configuring DNS Services using iManager is basically the same as using the DNS Management utility that is included with NetWare 5.x.
The schema must be extended to include DNS functionality. This is performed at the server installation or by typing DNIPINST <Enter> at the server console prompt.
Log in to the iManager utility and expand DNS management.
Select DNS Scope Settings and set a context for the locator object and administrative context. just as you did with DHCP and click OK .
Select DNS Server Management .
Click Create Server and click OK .
Browse to and select the server object.
Enter a host name for the server. The host name could be the same name as the server object, such as FS1.
Enter the domain for the DNS server. The domain could be something like provo.novell.com.
Click Create .
Once the server is created, you next need to create a zone and a record that will specify the IP address to which the zone will resolve.
Select Zone Management .
Select Create Zone and click Create .
Select OK to create a new Zone.
Specify the context in eDirectory where the object will reside. This would probably be the same context as the locator object.
Specify a zone domain name, such as novell.com.
Select Primary server if this server will be the first or the only name server for this zone. Otherwise, click secondary and enter the IP address for the primary DNS server for this zone.
Either select a DNS server from the drop down list, or enter a host name or IP address in the next field to where this zone will point. Select Create .
You will now need to create a resource that will resolve a URL to an IP address.
Select Resource Record Management .
Select Create a Resource Record and click OK .
Select the Domain you created above or enter a host name or IP address if the Domain is not on your network. Click Create .
Specify a host name for the domain, such as services.novell.com.
Specify a "Type A" record.
Enter the IP address of your web server or the address of the server to which the URL should resolve.
Click Create .
eDirectory Administration
This role allows you to create any object in the Directory. You can set property values for objects, as well as copy an object, delete an object, and rename an object. Members of this role can create any object in the Directory and modify its properties, delete it, or rename it.
There are two things worth noting about this role. First, iManager does not provide you with the ability to just browse the tree. You must select an object to modify or view its properties. This is different from ConsoleOne, where you can look at the entire tree from one screen if you want.
Second, when you create an object, you only specify the minimum fields that are necessary to create the object, such as a context and name for the object. In order to assign other property values to the object, you must first create the object, then select to modify the object where you can modify the values you need.
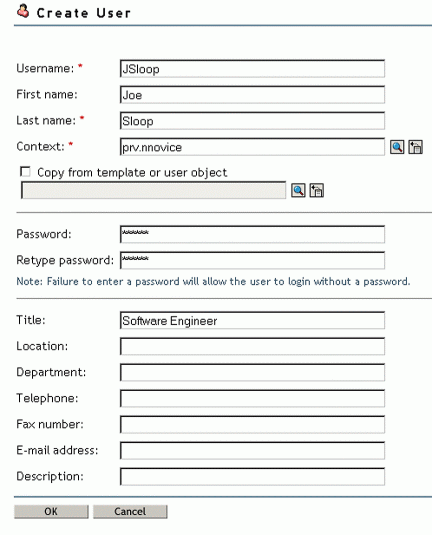
First, create a user object by performing the following:
Expand eDirectory Administration.
Select Create an Object .
Select user from the text area and click OK .
Type in a username such as JSloop.
Type in "Joe" for his first name.
Type in "Sloop" for his last name.
Type in the context where the User object will reside.
Type in a password for the user.
Type in "Software Engineer" for JSloop's title.
Click OK twice to create the user.
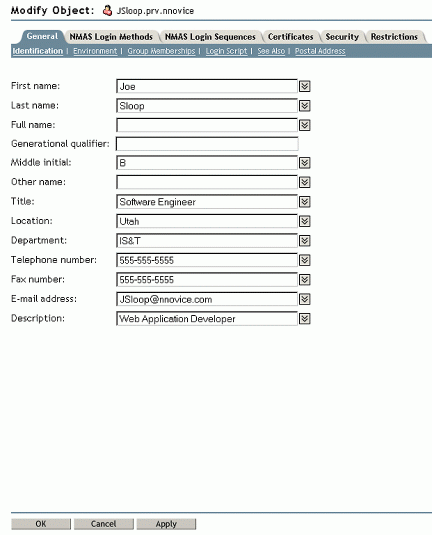
Next, let's modify JSloop's User object.
Select Modify Object .

Create User.
Click Select a Single Object and browse for JSloop's user object. Notice the links that allow you to select a single object, multiple objects, or advanced selection that allows you to select objects based on a filter criteria.
After you select JSloop's User object, click OK .
Notice the tabs at the top of the page. You can edit properties for this user.
Enter in a telephone number for JSloop.
Click OK to modify the object.
Now, let's move JSloop's User object.
Select Move Object . Notice that you can select multiple users if you need to.
Browse to the User object you want to move, such as JSloop in this case.
Browse to and select a location where you want to move JSloop's User object. Click OK twice.
You can also create a copy of JSloop's User object. This could be useful to create a user that is an exact copy of another user.
Select Copy Object .
Browse to and select a user to copy from. For this example, use JSloop.
Select Create a New Object and Copy Values and enter in a new name and context for the new user.
Notice that you can select to copy JSloop's ACL property if you want, so you don't have to re-create his ACL list. Click OK twice.
Now let's rename JSloop's User object:
Select Rename Object .
Browse to and select the object you want to rename. Use JSloop in this example.
Enter a new name without the context, such as HSloop.
Click OK twice.
Click Delete Object .
Browse to and select the object to delete and click OK .

Modify Object.
This month, we have talked about a few of the pre-defined roles in iManager. Next month, we'll continue our discussion about the predefined roles and how to use them.
* Originally published in Novell AppNotes
Disclaimer
The origin of this information may be internal or external to Novell. While Novell makes all reasonable efforts to verify this information, Novell does not make explicit or implied claims to its validity.