Managing User Accounts in ConsoleOne
Articles and Tips: article
Senior Research Engineer
Novell AppNotes
kburnett@novell.com
01 Oct 2002
In previous months, we have discussed the administration basics of the ConsoleOne management utility. This month we will start a discussion on how to manage user accounts with ConsoleOne.
Creating a Novell eDirectory user account involves creating a User object and setting properties to control the user's login and network environment. You have the flexibility of using a Template object to make completion of these tasks easier.
You can create login scripts to allow users to be connected automatically to the files, printers, and other network resources they need when they log in. If several users use the same resources, you can put the login script commands in container and profile login scripts.
Creating User Accounts
A user account is a User object in the eDirectory tree. A User object specifies a user's login name and supplies other information used by eDirectory and the NetWare operating system to control the user's access to network resources. You can define user properties ahead of time in a template, before actually creating the User object.
Creating a User Object
Perform the following steps to create a User object in an eDirectory container:
Right-click the container in which you want to create the User object. Select New and then User.
Under Class, select User.
Fill in the New User dialog box (see Figure 1). You have the option here of clicking Help for details.
To apply a template during creation of the user object, select Use Template.
To set additional user properties during creation of the user's object, check Define Additional Properties.
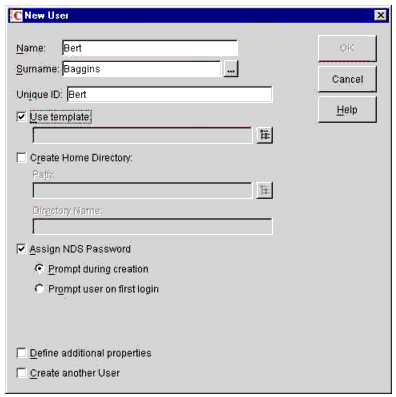
Creating a User object
Click OK.
If the Set Password dialog box appears, set the user's login password and click OK.
Note: If you cancel the Set Dialog box when it appears, an eDirectory password (object-key pair) won't be created for the user account and the user will not be able to log in unless you set up some other means of authentication, such as an NMAS password.
Note: You can set an eDirectory password later on using the Password Restrictions property page of the User object. If you leave the password blank and click OK, the User object is created with a blank (null) password and the user can login in without entering a password.
Creating a User Template
User templates can be very useful when creating a large numbers of User objects. For example, an IS professional at a college or university would want to consider using templates. Perform the following steps to create a template:
Right-click the container that you want to create the Template object in. Select New and then Object.
Under Class, select Template. Click OK.
Fill in the New Template dialog box. You can click Help for details.
To clone and existing Template or User object, select User Template or User.
To set template properties immediately after creating the Template object, select Define Additional Properties.
Click OK. After clicking OK, you will see property pages that look similar to those of a User object (see Figure 2). Help is available on all the property pages.
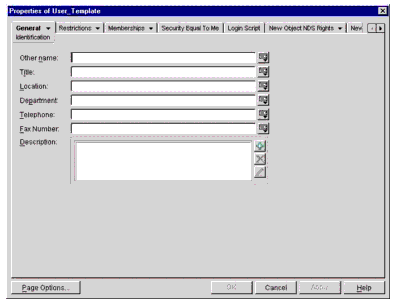
Properties of a User Template
Setting Up Optional Account Features
After creating a User object, you can optionally set up the user's network computing environment, implement extra login security features, and set up an accounting of the user's NetWare server usage.
Setting Up a User's Network Computing Environment.
Complete the following steps to set up a User's computing environment:
Right-click the User or Template object for which you want to set up the network computing environment. Click Properties.
Use a Template object if you haven't created the User object yet.
On the General tab, select the Environment page (see Figure 3).
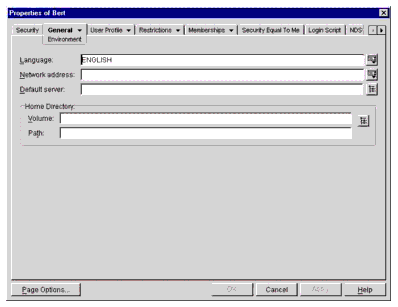
Environment Properties Page
Fill in the property page. You can click the Help tab for help.
Click OK.
Setting Up Extra Security for a User.
Perform the following steps to set up extra security for a user:
Right-click the User or Template object for which you want to set up login security. Click Properties.
On the Restrictions tab, fill in the property pages you want. You can click Help for details on any page.
Note: The page Password Restrictions is used to set up a login password, while the page Address Restrictions is used to restrict the locations from which the user can login.
Note: The Time Restrictions page is used to restrict the times when the user can be logged in. The Login Restrictions pages is used to limit the number of concurrent login sessions and to set a login expiration and lockout date.
Click OK.
To set up intruder detection for all of the User objects in a container, complete the following steps.
Right-click the applicable container, then click Properties.
On the General tab, select the Intruder Detection page.
Fill in the Property page. Remember, you can click Help for assistance.
Click OK.
Setting Up an Accounting of a User's NetWare Server Usage.
To track the time a user spends on a NetWare server, perform the following steps:
Right-click the User or Template object for which you want to set up the accounting. Click the Properties tab.
On the Restrictions tab, select the Account Balance page (see Figure 4).
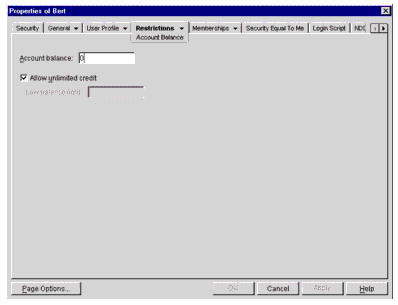
Account Balance Page
Fill in the Property page. The Account Balance specifies the amount of "credit" this object has to "buy" network services. As the object uses network services, the account balance is decremented by the system. To set an account balance, enter a number from -99,999,999 to 999,999,999. The number is relative to the particular services being charged for, the rates being charged, and the number of NetWare servers that are charging. You can click the Help button for context-specific help.
Click OK.
Setting Up Login Scripts
A login script is a list of commands that executes when a user logs in. It is typically used to connect the user to network resources like drive mappings and printers. Login scripts execute on the user's workstation in the following order:
Container login script
Profile login script
User login script
During login, if the login process doesn't find a container login script, it skips to the next script on the list (profile, then user). If none of these login scripts is found, the system executes a default script that maps a search drive to the SYS:PUBLIC folder on the user's default server. The default server is set on the Environment property page of the User object.
Creating a Login Script
Follow these steps to create a login script:
Right-click the object for which you want to create the login script. Click the Properties tab.
To Have the Login Script Apply ToCreate It OnOne user only
The User object
One or more users that haven't been created yet
A Template object
All the users in a container
The Container object
A set of users in one or more containers
A Profile object
On the Login Script page, enter the login script commands you want. (Due to the sheer number of commands, we won't cover these here but may do so in a future column.)
Click OK.
If you have created the login script on a Profile object, assign the profile to the users you want, as explained next.
Assigning a Profile to a User
Complete the following steps to assign a profile to a user:
Right-click the User or Template object to which you want to assign the profile. Then click Properties.
Use a Template object if you haven't created the User object yet.
On the Login Script page, click the browse button next to the Profile field. Select the profile object then click OK.
Click OK.
Ensure that the user effectively has the Browse right to the Profile object and the Read right to the Login Script property of the profile object.
Login Time Restrictions for Remote Users
On the Time Restrictions property page of a User object (see Figure 5), you can restrict the times when the user can be logged in to eDirectory. (By default, there are no login time restrictions.) If you set a login time restriction and the user is logged in when the restricted time arrives, the system issues a warning to that user to log out within five minutes. If the user is still logged in after five minutes, the user is logged out automatically and loses any unsaved work.

User Time Restrictions Property Page
If a user logs in remotely from a different time zone than the server that is processing the login request, any login time restrictions that have been set for the user are adjusted for the time difference. For example, if you restrict a user from logging in Mondays from 1:00 am to 6:00 am, and the user logs in remotely from a time zone that is one hour later than the time zone set on the server, the restriction effectively becomes 2:00 am to 7:00 am for that user.
* Originally published in Novell AppNotes
Disclaimer
The origin of this information may be internal or external to Novell. While Novell makes all reasonable efforts to verify this information, Novell does not make explicit or implied claims to its validity.