ConsoleOne: Organizing Objects into Containers
Articles and Tips: article
Senior Research Engineer
Novell AppNotes Magazine
01 Aug 2002
Continuing with our discussion about how to use ConsoleOne, this month we will look at how to effectively organize objects into containers. Once you have an eDirectory tree, you can make it more organized by creating various types of containers and placing objects inside them.
Note: Objects in a container are automatically security equivalent to the container, so make sure you manage the container's rights accordingly.
ConsoleOne gives you the flexibility to access a single object from multiple containers. This is referred to as "aliasing" the object. The remainder of this column provides examples on how to create common container types and aliases.
Creating an Organization Object
The steps to create an Organization (O) object are as follows:
Right-click the tree, county, locality, or domain object that you want to create the organization object in. In my case, I selected DNU_TREE. Click New, followed by the Object Class you want to create. The New Object window is now displayed, as shown in Figure 1.
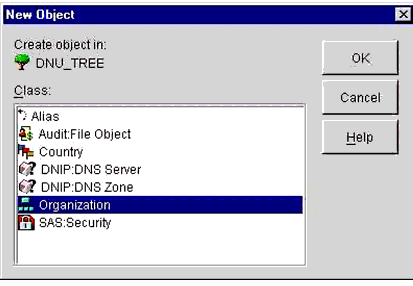
ConsoleOne's New Object Window
In the Class window, select Organization. Then click OK.
In the New Organization window, enter a name up to 64 characters long in the Name entry box. For my example, the Organization name is ACME_CORP (see Figure 2).
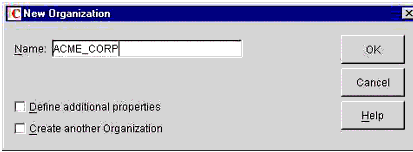
New Organization window
Note: Make sure you follow the proper naming conventions for eDirectory. For more information, see your eDirectory documentation or see the online version at http://documentation.novell.com .
If you want to assign additional property values as part of the creation process for the container, select Define Additional Properties as seen in Figure 2. For example, you might want to create a login script or set up intruder detection for the container. The option Create another Organizational Unit allows you to create another Organizational Unit in the same context without starting this creation process all over again.
Click OK to create the container.
Creating an Organizational Unit Object
Organizational Unit (OU) objects are typically used for departments in a company, whereas the Organization object generally denotes the name of the company itself. To create an Organizational Unit:
Right-click the Organization, Organizational Unit, Locality, or Domain object in which you want to create the new Organizational Unit object. (In my case, I have selected the ACME_CORP Organization container that I just created.) Click New and then Object, followed by the Organizational Unit entry that is found in the Class window (see Figure 3).
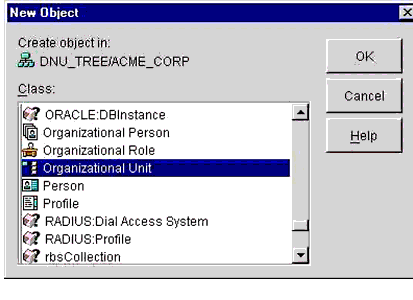
The Class Type Selection Window
In the Name entry of the New Organizational Unit window, enter a name up to 64 characters long. In my case, I used Engineering.
Note: Again, be sure to follow the proper naming conventions for eDirectory.
If you want to assign additional property values as part of the creation process for the container, select the Define Additional Properties box. For example, you might want to create a login script or set up intruder detection for the container. Clicking the Create Another Organizational Unit box allows you to create another Organizational Unit in the same context without starting this process all over again.
Click OK to create the container.
Creating a Locality Object
The Locality container usually denotes the location of a specific company division. For example, for ACME_CORP's Engineering department, there may be a site in Georgia and one in California. To create a Locality container:
Right-click on the Country, Locality, Domain, Organization, or Organizational Unit object in which you want to create the Locality object. In my example, I clicked on the Engineering Organizational Unit. Click New followed by Object.
In the Class screen, select Locality. Then click OK.
Once selected, fill in the Name and the Named By fields that you see in the New Locality window (see Figure 4). The Name field can be up to 128 characters long. It will become part of the Distinguished Name of all objects that you place in the container.
The Named By field specifies whether the name corresponds to a general locality or to a specific state or province. If you select Locality, the object must be referred to by L=name in typeful name specifications. If you select State or Province, the object must be referred to by S=name in the typeful name specifications. Otherwise, you selection makes no difference.
There are two optional checkboxes that you may want to consider:
The Define Additional Properties checkbox allows you to assign additional property values as part of the creation process for this locality. For example, you might want to provide a more descriptive name for the locality.
The Create Another Locality box allows you to create another locality in this immediate container as soon as you are done creating this one. (In my case, I choose Georgia as one state for ACME_CORP's Engineering group. I also selected State or Province, since Georgia is a state.)
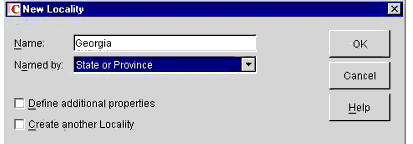
Creating the New Locality
Click OK to create the container.
Creating a Country Object
Follow these steps to create a Country object:
Right-click a Tree or Domain object. Click New followed by Object.
Under the Class screen in the New Object window, select Country. Click OK.
You will see the New Country dialog box, as shown in Figure 5. In the Name entry, enter an ISO country code. (Click the Help button to see a built-in list of country codes.) In my case, I selected US as the country.
The country code will become a part of the distinguished name of all of the objects that you place in the new container.
Check the Define Additional Properties box to assign additional property values as part of the creation process for this object. For example, you might want a to provide a more descriptive name for this country. Check the Create Another Country box if you want to make another country object as soon as you are finished creating this one.
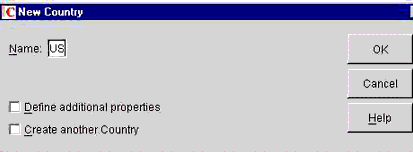
Selecting a New Country
Click OK to create the object.
Creating an Alias to an Object
You can create an Alias object that points to another object in the eDirectory tree. Alias objects are most commonly used to give users a local name for an object that lies outside their normal working container.
When you rename a container, you have the option of creating an alias in the former container's place that points to the new name. By doing this, workstations and login script commands that reference objects in the container can still access the objects without having the container name updated.
An Alias object represents another object, which can be a Container object, a User object, or any other object in the tree. An Alias object does not carry trustee rights of its own. Any trustee authority you grant to the Alias object applies to the object it represents. The Alias can be a target of a trustee assignment, though.
Create an Alias object to make name resolution easier. Since object naming is simplest for objects in the current context, you should create Alias objects there that point to any resources outside the current context. Follow these steps to create an Alias object:
Right-click the container in which you want to create the Alias object. In my case, I selected the ACME_CORP container. Click New followed by Object.
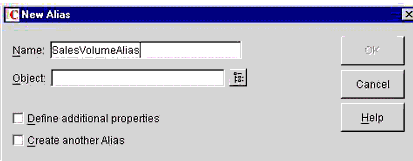
Under Class screen in the New Object window, select Alias. Then click OK. This brings up the New Alias window (see Figure 6).
The New Alias window
Enter a name in the Name field for the new Alias object. For example, I used SalesVolumeAlias. The name can be up to 64 characters long and should follow eDirectory object naming conventions.
The Object field specifies the object that this Alias represents. Enter a distinguished name, or click the browse button next to the field to navigate to the object you want the Alias to represent. (In my case I have selected Horace in VerySmall- Company) See Figure 7. The object name is stored in the Aliased Object Name property of the new alias.
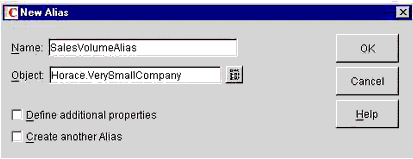
Selecting an object to alias
Check the Define Additional Properties box if you want to assign additional property values as part of the creation process for this alias. For example, you might want to assign trustees of the alias. Check the Create Another Alias box if you want to create another alias in this container as soon as you are finished creating this one.
Click OK to create the Alias. Users can use the Alias as though it were the actual object that it represents.
Conclusion
This month we have discussed how to create and manage container objects in ConsoleOne. ConsoleOne makes these type of operations simple and straight- forward. Next month, we'll continue our discussion of ConsoleOne.
* Originally published in Novell AppNotes
Disclaimer
The origin of this information may be internal or external to Novell. While Novell makes all reasonable efforts to verify this information, Novell does not make explicit or implied claims to its validity.