Creating and Manipulating Objects in ConsoleOne
Articles and Tips: article
Senior Research Engineer
Novell AppNotes
01 Jun 2002
Continuing with our discussion from last month about the ConsoleOne utility, let's focus on the creation and manipulation of objects. With its graphical interface, ConsoleOne makes it easy to locate the network resources (objects) you want to manage. You can change their behavior by modifying their properties. You can also delete, move, and rename objects or create new ones as needed.
The rest of this column details how to perform many of the available object manipulation operations provided by ConsoleOne. The following table explains some of the terms used:
|
Term
|
Definition
|
|
Shift+click |
While pressing the Shift key, click the left mouse button. |
|
Ctrl+click |
While pressing the Ctrl key, click the left mouse button. |
|
Right-click |
Click the right mouse button. |
Creating an Object
Right-click on the container that you want to create an object in. Click New and then Object (see Figure 1).
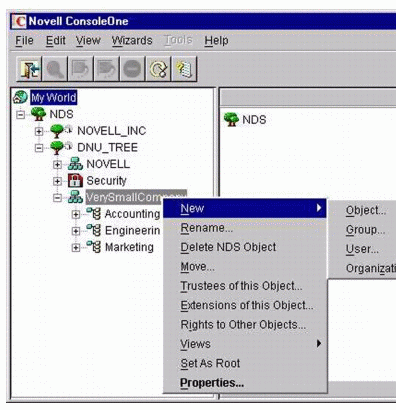
Creating a new object in ConsoleOne
Note: There are restrictions as to the types of objects you can create in different container types. The ConsoleOne utility documentation, located at http://www.novell.com/documentation/ provides you with this information. Since this information is beyond the scope of this column, the Web site will be your best source for such information.
In the Class scroll-down list in the New Object window, shown in Figure 2, select the type of object you would like to create. For this example we will create a user. Then click OK.
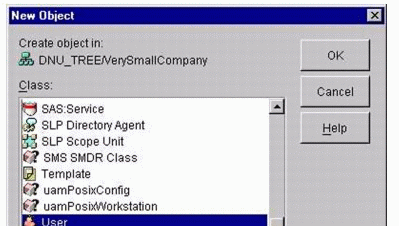
Selecting the Class type
Note: If you get a warning that there is no snap-in available to create the object, complete the appropriate action from the table below (depending on your level of understanding of the object you are creating).
Understanding LevelActionThorough -- you understand this object and how its properties are used.
Click Yes in the warning box. You will be allowed to set the object's mandatory properties using generic editors. After creating the object, you can set other properties using the generic other property page.
Minimal -- you understand what the object is but not how its properties are used in any detail.
Click No in the warning box and then quit this procedure. You will need to install a product that provides a ConsoleOne snap-in to create and manage this object type.
You are presented with the New User screen (Figure 3). Enter a name for the user object.
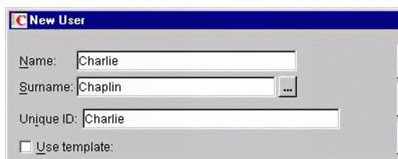
The New User creation screen
If the Assign NDS Password box is checked (the default), you will be prompted to enter a password (Figure 4).

The Enter NDS password screen
Once you have typed and retyped your password click Set Password. You will then be able to see your new user created in the container you selected. The new user will be identified by its Unique ID.
Note: You can specify any other information that is optional for creating a new user. Options such as using a template or creating a home directory can also be enabled. You can define additional properties for this user, or you can directly create another user.
Modifying an Object's Properties
ConsoleOne is very flexible in allowing you to modify an object's attributes. Follow these steps to modify an objects attributes:
Right-click the object and choose Properties.
Edit the Property pages you want.
Note: Click Help for details on any specific properties you wish to fill out.
In our example, we see that the Properties page is entitled "Properties of Charlie." There are several tabs that represent the attributes of the object Charlie that you can modify.
Click the General tab and select Identification (the default). This brings up a screen similar to Figure 5.
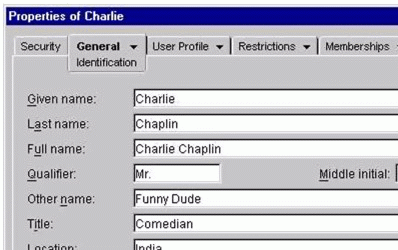
The Properties of Charlie page
You can then fill in any or all of the options that are presented here.
Click Apply and then OK to save the changes to NDS.
Modifying Multiple Objects Simultaneously
ConsoleOne allows you to modify multiple objects at the same time. Follow these steps to modify multiple objects:
Select the objects by using one of the following methods:
In the right pane, Shift+click or Ctrl+click one or multiple objects of the same kind . (You cannot modify dissimilar objects at the same time.)
Click a group or template object to modify its members.
Click a container to modify the objects it contains.
Click File and then select the Properties of Multiple objects option.
If you selected a container in Step 1, while in the dialog box, double-click the object type you want to modify. Otherwise, skip this step.
On the Objects to Modify page, make sure you list only the objects that you want to modify. Here you can add and/or delete objects as needed.
On the other property pages, specify the property values you wish to set for all the selected objects.
Note: You can click Help for details on specific properties.
Click OK.
For example, suppose I have selected Charlie and Frank by holding down the Ctrl key and clicking on the two usernames. My steps would be:
Click File and then Properties of Multiple Objects. Select the General tab and the default Identification option (Figure 6).
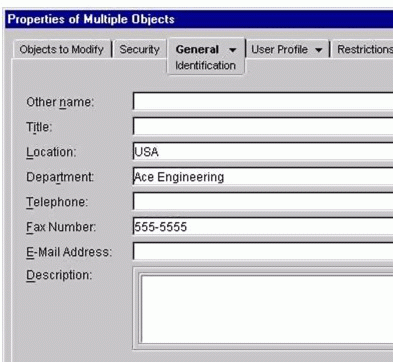
Changing multiple objects' information
Modify one or more of the Multiple Objects Information.
Click OK.
Now if you go back and click on either Charlie or Frank (or your own example users), you will see that they both have the modified information as a part of their General/Identification screen.
Renaming an Object
ConsoleOne makes it very easy to rename an object. Follow these steps to rename an object in ConsoleOne:
Right-click the object and then click the Rename entry (Figure 7).
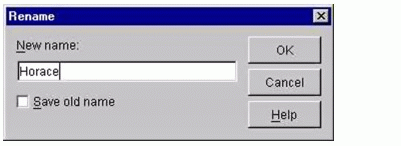
Renaming an object in ConsoleOne
In the Rename window, enter the new name. (In my instance I am changing Charlie's name to Horace.)
You can click Save Old Name if you want to save the old name of the object. The old name is stored in the Other Name field of the object's General Identification property page.
Click OK. The object's new name will be written out to NDS. You will also see the change in the right pane of ConsoleOne.
Note: Do not use this procedure to rename a NetWare server object. To rename a NetWare server, follow all of the steps outlined in Technical Information Document (TID) #10063497 on the Web at http://support.novell.com/cgi-bin/search/searchtid.cgi?/10063497.htm .
Moving Objects
ConsoleOne allows you to move objects to different locations in your eDirectory tree. Follow these steps to move an object in ConsoleOne:
In the right ConsoleOne pane, Shift+click or Ctrl+click the objects you wish to select to move.
Note: You can't move a container object unless it's a partition root. Since the discussion of a partition root is beyond the scope of this column, you can find more information at: http://www.novell.com/documentation/ .
Right-click your selection. Then, click Move. The Move window is displayed as shown in Figure 8.
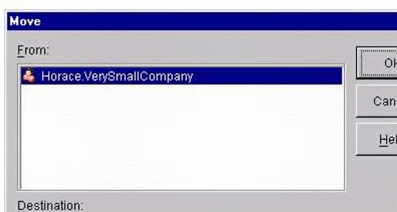
Moving an object in ConsoleOne
Click the browse button to the right of the Destination field. Select the container to which you wish to move the object or objects.
If you want to create an alias in the old location for each object being moved, select the "Create an alias for all objects being moved" check box at the bottom of the Move window.
Note: Selecting the "Create an alias for all objects being moved" check box allows any operations that are dependant on the old location to continue uninterrupted until you can update those operations to reflect the new location.
Click OK to write the changes to NDS.
Deleting Objects
Deleting objects is a simple task in ConsoleOne. Follow these steps to delete an object:
Shift+click or Ctrl+click the object(s) to select them.
Note: You can't delete a container unless you first delete all of its contents.
Right-click your selection, then click the Delete NDS Object option (Figure 9).
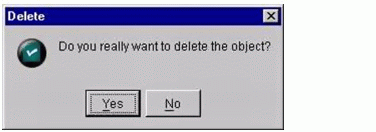
Deleting an Object in ConsoleOne
If you are really sure you want to delete the object, then in the Delete confirmation box, click Yes.
In conclusion, this month we discussed how to create and manipulate objects in ConsoleOne. As you can tell, ConsoleOne is quite diverse in its ability to deal with eDirectory objects. Next month we'll continue our exploration of the ConsoleOne utility.
* Originally published in Novell AppNotes
Disclaimer
The origin of this information may be internal or external to Novell. While Novell makes all reasonable efforts to verify this information, Novell does not make explicit or implied claims to its validity.