Cluster-Enabling DHCP, DNS, and SLP Services in NetWare 6
Articles and Tips: article
01 Oct 2003
Dr. Frieder Schmidt
Technical Specialist
Novell Consulting
FSchmidt@novell.com
Hylton Leigh
Senior Technical Consultant
Novell Consulting
HLeigh@novell.com
Thanks to Thomas Lubanski and Joe Azzopardi of Novell Consulting, Germany, and Ken Lenihan and Stuart Thompson of Novell Consulting, U.K., for their invaluable assistance with this AppNote.
This AppNote describes a high-availability implementation of DHCP, DNS, and SLP Directory Agent services on a NetWare 6 cluster.
|
Topics |
Novell Cluster Services, DHCP, DNS, SLP, Directory Agent, high-availability |
|
Products |
Novell Cluster Services 1.6.2 and later |
|
Audiences |
network administrators and consultants |
|
Levels |
advanced |
|
Prerequisite Skills |
familiarity with Novell Cluster Services, DHCP, DNS, SLP |
|
Tools |
DNS/DHCP Management Console, ConsoleOne, DSBrowse |
|
Sample Codes |
no |
Introduction
Name resolution--the process of determining a network resource's IP address given its name via DNS or SLP--is crucial to any pure IP environment. Equally vital is the ability to dynamically configure clients with valid IP parameters DHCP. Hence, a highly-available and fault-tolerant implementation of the following services would clearly be beneficial:
DHCP (Dynamic Host Configuration Protocol)
DNS (Domain Name Services)
SLP (Service Location Protocol) Directory Agent
With the release of Novell Cluster Services (NCS), Novell provided a template for cluster-enabling a DHCP Server. However, a DHCP Server that is cluster-enabled by using this template will always advertise itself using the primary IP address of the node the resource is running on. If the DHCP Server should fail-over to another node and a client should subsequently do a renew request, the DHCP Server would be unreachable for that client.
While the arguments for clustering DNS may be academic, we consider having a highly-available Primary DNS Server a benefit. NCS does not provide a template for cluster-enabling a DNS Server.
For fault tolerance, Novell Consulting normally recommends setting up two SLP Directory Agents (DAs) for any SLP Scope. However, this approach has the drawback of collision objects in eDirectory that occur when the same SLP entries are being created by the two DAs at the same instance. A cluster-enabled SLP DA would avoid this name collision problem. Again, NCS does not provide a template for cluster-enabling the SLP DA.
In this AppNote, we will demonstrate how to cluster-enable DHCP, DNS, and a SLP DA. As an example configuration, we'll use a four-node cluster named CL1 consisting of nodes CLU01, CLU02, CLU03, and CLU04. The various IP services will be assigned to the four nodes as outlined in Table 1.
Table 1: Assignment of name resolution services to the cluster nodes.
|
|
Host Server |
|
|
|
|
Service |
CLU01 |
CLU02 |
CLU03 |
CLU04 |
|
DHCP |
- |
- |
|
|
|
DNS |
|
|
- |
- |
|
SLP DA |
|
- |
- |
|
The procedures described were tested on NetWare 6 with Support Pack 2 applied. The DHCPSRVR.NLM must be v3.12.02, dated November 25, 2002, or newer.
Use of Virtual Servers
One of the facilities of Novell Cluster Services that makes the configuration of these services possible is the ability to create "virtual" NCP servers. By creating these objects, the configuration of the service can be "virtualised" from the actual physical nodes that the service is run on.
The key to successfully clustering these IP services is to identify how the service "discovers" its configuration when it is loaded on the server console. The default operating mode is to examine the server environment, determine the server name and eDirectory Context, and then examine the server object in eDirectory to determine the configuration as required for the service. By configuring the service on a Virtual Server, all of the required service configuration information will be written to the Virtual Server object rather than the actual physical cluster node.
All that then remains to be done is to tell the service when it loads to look at the Virtual Server rather than the NCP Server object of the node it is running on. The DHCP Service supports the ability to specify which NCP Server to read for its configuration. However, the DNS and SLP DA Services do not provide this level of support. Therefore, as a workaround, you will have to manually modify the physical cluster nodes to have the same attributes that the Virtual Servers have.
So, you may ask, what is the advantage of using a virtual server? The main advantage is that the configuration of the service is held in one place, in a single eDirectory object. Using a Virtual Server object for the configuration of the DNS and SLP DA Services gives you a single point of configuration. That way, you avoid the hassles of maintaining multiple configurations.
Creating the Virtual Server
To create a virtual NCP Server to hold the IP services configuration information, we created a small NSS (NetWare Storage System) Pool and NSS Volume. We then converted this volume into a cluster-enabled volume.
In the process of creating a Cluster-Enabled Volume object, a Virtual NCP Server is created; it is this virtual server that we will use when configuring the various services.
Note: In this Appnote, the same virtual server is used for the configuration of all three services. However, you can choose any virtual server in the cluster as the host server.
Cluster-Enabling a DHCP Server
There are four basic steps to be completed to cluster a DHCP Server:
Create the DHCP Server on a Virtual Server in eDirectory
Create the DHCP Cluster Resource
Modify the DHCP Cluster Resource load and unload scripts
Test the clustered DHCP service
Creating the DHCP Server
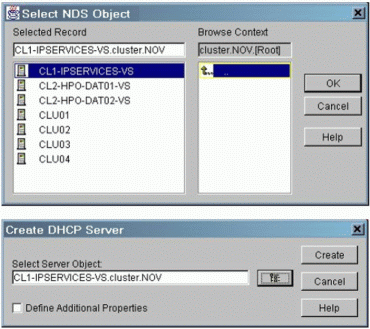
The first step is to create a new DHCP Server object in eDirectory. You can do this by using the Java-based Novell DNS/DHCP Management Console that comes with NetWare 6. The host server for the DHCP Service will be the virtual server that was set up earlier.
The NSS pool/volume that is hosted on the virtual server is not needed to cluster-enable the DHCP Server. However, you could export your DNS/DHCP configuration to this volume as an additional backup.
In this example, we used a pool named IPSERVICES containing the volume DNSDHCP. The virtual server for this resource is named CL1-IPSERVICES- VS. This server is used as the host server for the DHCP Server. The DHCP Server object will be named DHCP_CL1-IPSERVICES-VS and will be automatically placed in the container where the cluster object resides.
Figure 1 shows the process of creating the DNCP Server object from within the DNS/DHCP Management Console.
Figure 1: Creating a new DHCP Server object.
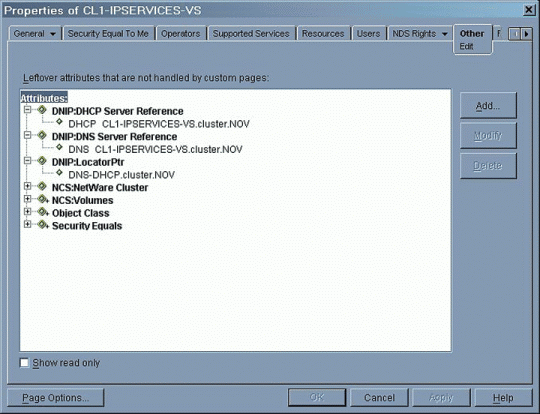
Once the DHCP Server has been created, inspection of the attributes of CL1-IPSERVICES-VS on the other tab will reveal that two new attributes have been added when the server was selected as the host server for the DHCP Server. These attributes are "DNIP: LocatorPtr" and "DNIP:DHCP Server Reference" (see Figure 2).
Figure 2: New attributes created on the DHCP host server.

For the DHCP Server to operate properly, these two attributes must be added to the NCP Server object of any cluster node that is intended to host the DHCP Service resource. The attributes contain the values that are required for the DHCP Service to determine the appropriate configuration parameters. This will be done automatically by means of the "CLUSTER DHCP" command the first time the resource is set to the Online status on a particular node.
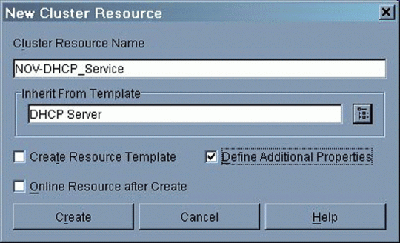
Creating the DHCP Service Cluster Resource
The next step is to create a cluster resource for the new DHCP Server using the DHCP Server template of NCS. Figure 3 shows how to do this.
Figure 3: Creating a Cluster Resource for the DHCP Service.
Modifying the DHCP Cluster Resource Scripts
At this point, you need to modify the load and unload scripts for the DHCP Service resource to match the required configuration.
Add a secondary IP address to the load script and add the "--servaddr=sec.IP" parameter to the DHCPSRVR command line. These configuration changes will force the DHCP Service to respond to any DHCP request with a particular IP address, and read its configuration from the virtual server.
Note: There are two hyphens in front of "servaddr' and no spaces around the " = ". This parameter is only available with DHCPSRVR.NLM v 3.12.02 and newer.
Figure 4 shows a sample load script modified with the secondary IP address and "--servaddr" parameter.
Figure 4: Modified load script for the DHCP Service.
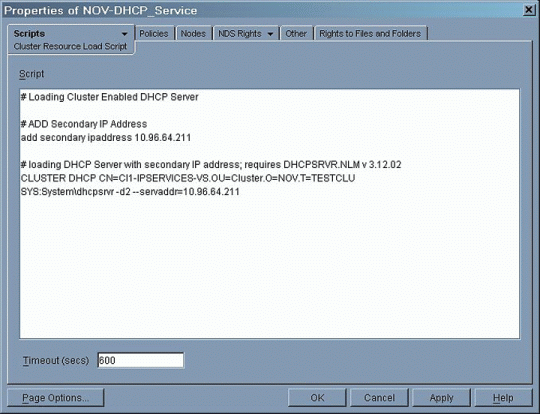
Note: The "-d" options seen in this and other sample scripts in this AppNote are included for testing and debugging purposes. Once it has been determined that the services are working as desired, these options can be removed.
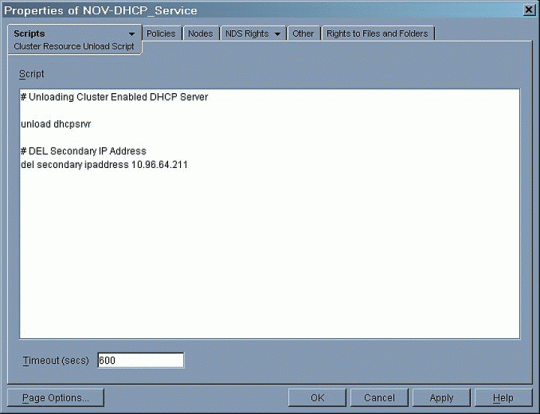
In the unload script, add the command to unbind the secondary IP address after unloading DHCPSRVR, as shown in Figure 5.
Figure 5: Modified unload script for the DHCP Service.
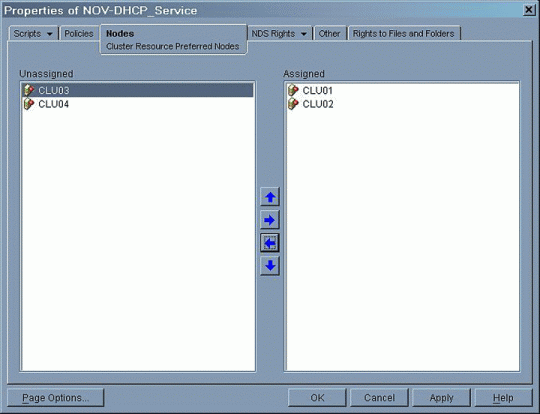
As the final step, configure the nodes of the cluster on which this resource is intended to run. Figure 6 shows nodes CLU01 and CLU02 being assigned to host the DHCP Service, following our resource assignment plan detailed earlier in Table 1.
Figure 6: Node assignments for the DHCP Service.
The cluster resource can now be brought online. Configuration of the DHCP Service can take place at this time, creating the ranges, subnet, and DHCP options as normal.
Testing the DHCP Service Resource
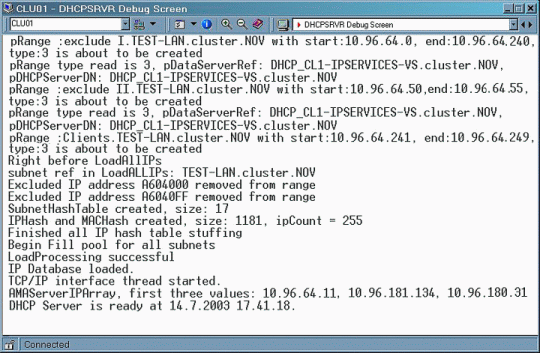
When you bring up the DHCP resource on any of the nodes assigned to it, check the information displayed on the DHCP Server Debug screen to confirm that the DHCP configuration is being read from the virtual server. Figure 7 shows an example of the debug information that will be displayed for a correct configuration.
Figure 7: The DHCP Server debug screen.
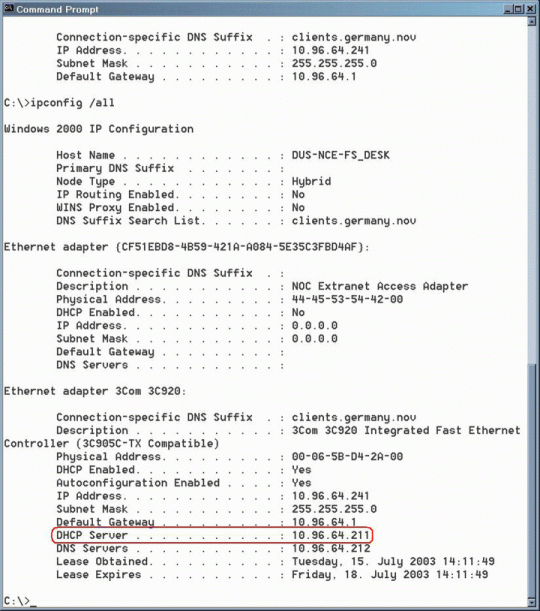
The DHCP Server will respond using the IP address specified in the "--servaddr" parameter. It will always be available for client requests as long as the resource is online on any node. You can easily verify this by running the "ipconfig /all" command from a client workstation. Figure 8 shows that the DHCP Server is being advertised with its secondary IP address.
Figure 8: DHCP Server being advertised with its secondary IP address.
Cluster-Enabling a DNS Server
The overall process for cluster-enabling DNS is similar to clustering the DHCP Service. However, while the DHCP Service directly supports the definition of a secondary IP address and the virtual server when launched, DNS requires a bit of a workaround to ensure that the service reads the correct configuration when it is loaded. The main steps are as follows:
Create the DNS Server object
Modify the NCP Server object of the physical servers
Create the DNS Server Cluster Resource
Creating the DNS Server
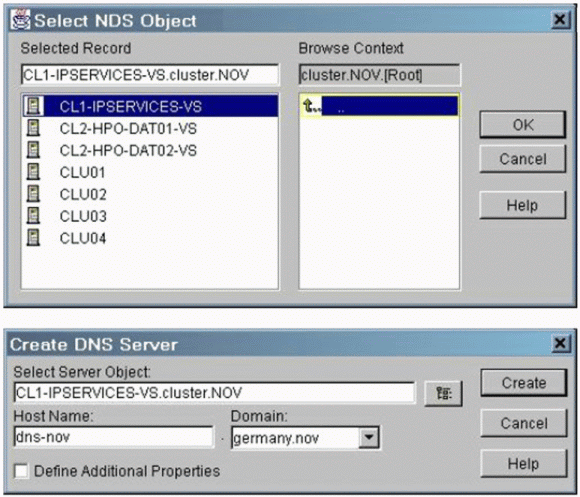
Using the Novell DNS/DHCP Management Console, create a new DNS Server object, selecting any virtual server in the cluster as the host server. In this example, we again chose the virtual server for the IPSERVICES resource in the cluster CL1 (see Figure 9). The DNS Server object will be named DNS_CL1- IPSERVICES-VS and will automatically be placed in the container where the cluster object resides.
Figure 9: Creating a new DNS Server object.
Modifying the NCP Server Object of the Physical Servers
If you now inspect the attributes of the virtual server chosen as the host for the DNS Server (using ConsoleOne or DSBrowse), you will discover that in addition to "DNIP: LocatorPtr" and "DNIP:DHCP Server Reference" attributes that were created during the DHCP configuration, there is the new attribute named "DNIP:DNS Server Reference" (see Figure 10).
Figure 10: Attributes created for the virtual server CL1-IPSERVICES-VS.
This attribute is used to determine which eDirectory DNS Server object the DNS Service will read for its configuration.
According to our plan, we will use CLU03 and CLU04 as host servers for the DNS Server resource. As there is no "CLUSTER DNS" command that would automatically add the "DNIP:LocatorPtr" and the "DNIP:DNS Server Reference" attributes to the NCP Server object for these two nodes, you need to add both attributes manually.
Figure 11 shows the "DNIP:DNS Server Reference" and "DNIP:LocatorPtr" attributes being added to physical server CLU03.
Figure 11: DNS attributes being added to physical server CLU03.
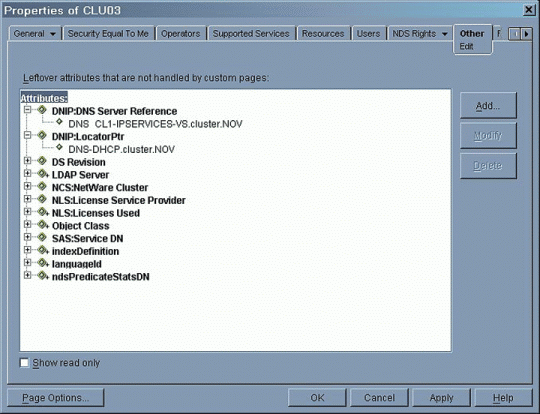
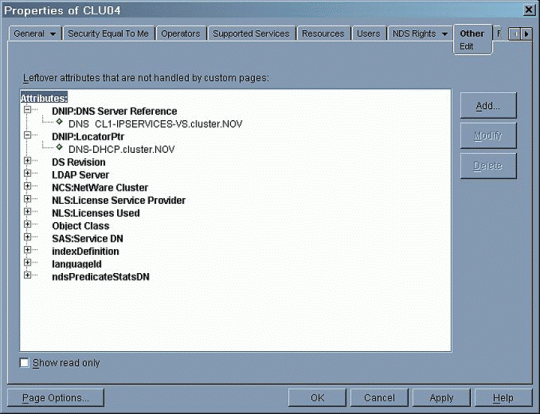
These attributes must point to exactly the same objects as the corresponding attributes of the virtual server. Make sure you point to the DNS Server object and not to the NCP Server object of the virtual server hosting the DNS Service.
Figure 12 shows the attributes being added to physical server CLU04.
Figure 12: DNS attributes being added to physical server CLU04.
If you should choose to use the same node for the DHCP Service and the DNS Service, you are only required to add "DNIP:DNS Server Reference" attribute.
"DNIP:LocatorPtr" will have been automatically added to the NCP Server object of the physical servers the first time the DHCP resource was launched on a node.
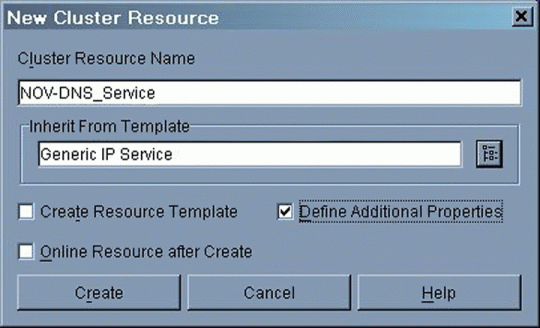
Creating the DNS Server Cluster Resource
The next step is to create a cluster resource for the new DNS Server using the "Generic IP Service" template of NCS (see Figure 13).
Figure 13: Creating a resource for the DNS Server.
Configuration of the DNS Server Resource
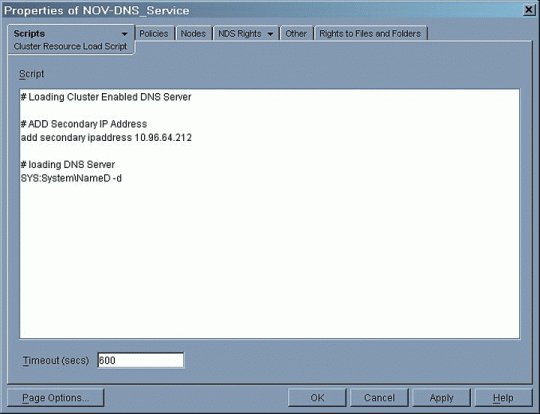
Next, simply add the secondary IP address and the command to load NameD.NLM to the load script of the newly-created resource (see Figure 14).
Figure 14: Modified load script for the DNS resource.
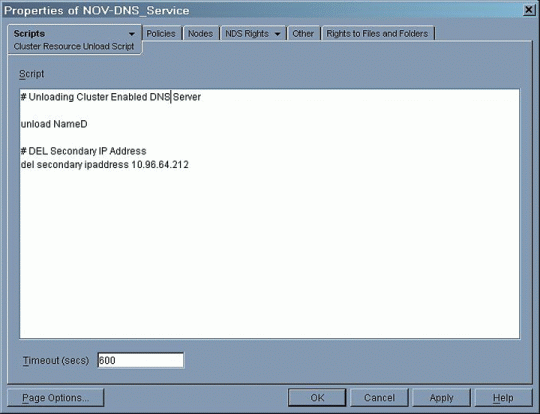
The unload script simply contains the commands to unload NameD.NLM and to remove the secondary IP address (see Figure 15).
Figure 15: Modified unload script for the DNS resource.
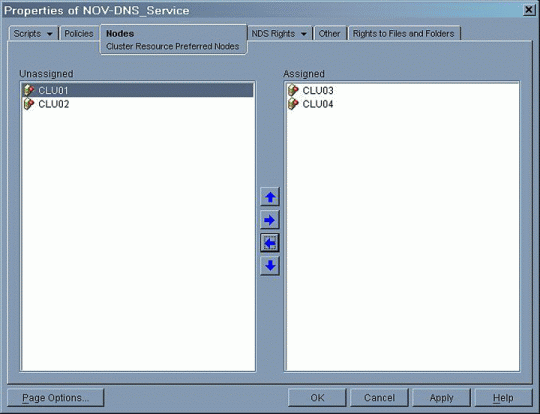
The last configuration step is to assigning the nodes of choice to your newly-created DNS resource, as shown in Figure 16.
Figure 16: Node assignment for the DHCP Service.
Testing the DNS Service
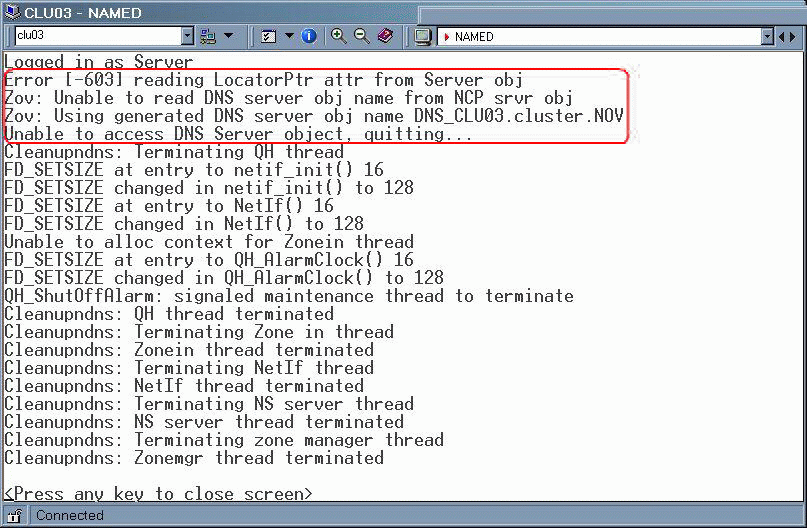
If the NCP Server object for the nodes you selected as host for the DNS Service has not been properly modified with the required attributes, NameD.NLM will not be able to load because it is lacking any reference to the DNS configuration information in eDirectory. Figure 17 shows the -328 errors that will be displayed on the system console screen if this is the case.
Figure 17: System console screen showing -328 errors while attempting to load NameD.NLM.
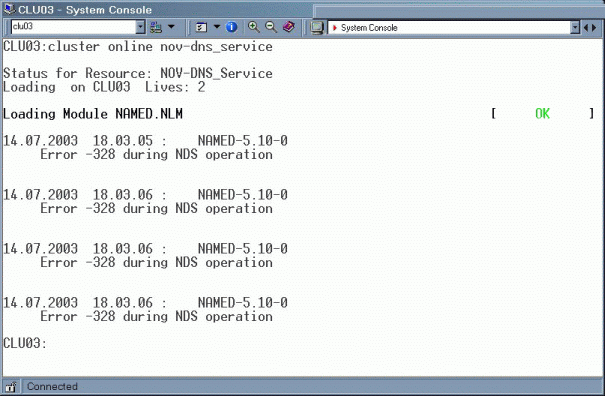
Figure 18 shows the error messsages that will be displayed on the NameD.NLM screen in the case of an incorrect configuration.
Figure 18: Error messages displayed on the NameD screen.
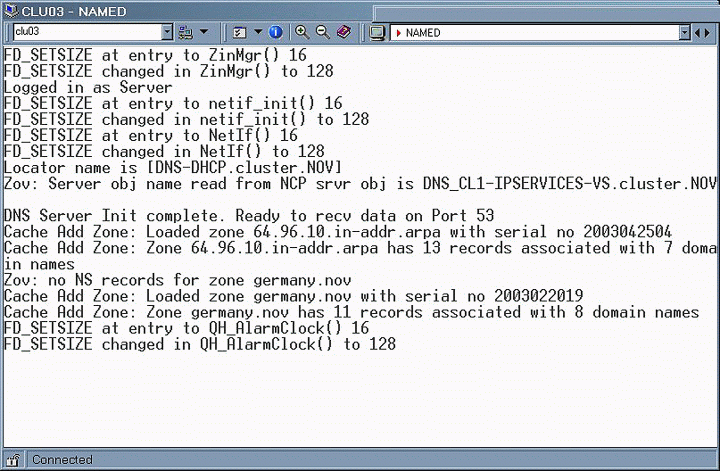
With the "DNIP:DNS Server Reference" and the "DNIP:LocatorPrt" attributes added to the NCP Server object of each physical server, NameD will load without errors as it is able to follow the attribute pointers that reference the DNS Server object configured for the virtual server, as shown in Figure 19.
Figure 19: NameD loaded successfully by reading its configuration information from the virtual server.
Cluster-Enabling a SLP Directory Agent
The clustering of the SLP DA is similar to that of DNS. It also requires modification of the cluster node NCP Servers, as there is no mechanism to force the SLP DA to read its configuration from a specific NCP Server.
The workaround is to configure the cluster node NCP Server object with the appropriate attributes to reference the SLP DA object. Once this is in place, the SLP DA loading on the nodes has a mechanism to determine the SLP DA object that it is to function as.
The steps for cluster-enabling a SLP DA are:
Create the SLP NDS objects
Modify the NDS Server object of the physical servers
Create the SLP DA cluster resource
Creating the SLP NDS Objects
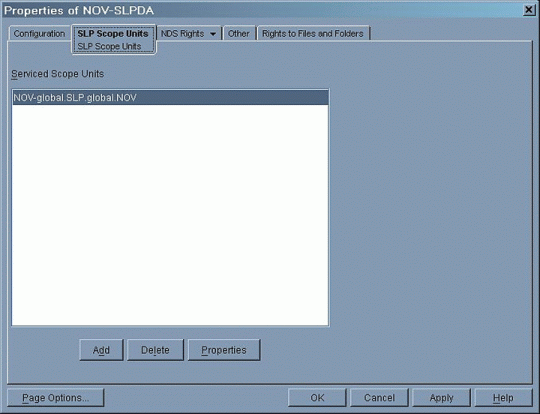
First, create the SLP Scope Unit objects as required for the SLP design to be implemented in a separate container. Then you can create the required SLP DA objects in the same container, selecting a different virtual server in the cluster as host server for each DA (one DA per scope).
In this example, we use a single scope (NOV-global) serviced by NOV-SLPDA. We selected the same host server as for the DHCP Service and the DNS Service. Figure 20 shows the creation of NOV-SLPDA.
Creating an SLP Directory Agent object.
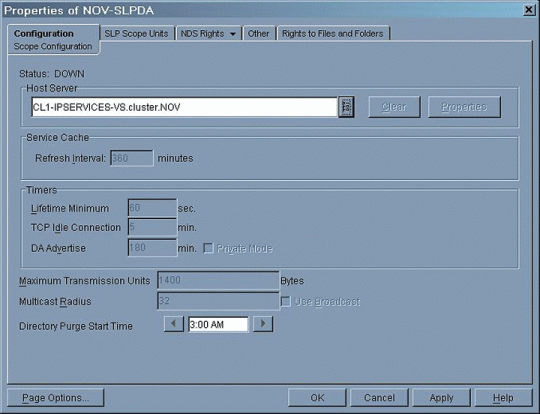
Figure 21 shows the assignment of the NOV-global scope to this object.
Creating an SLP Directory Agent object.
Modifying the NCP Server Object of the Physical Servers
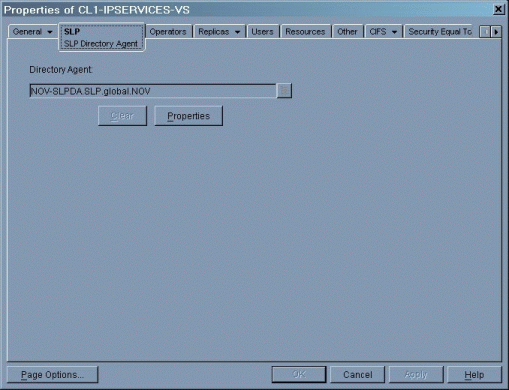
If you inspect the SLP tab on the Properties page of the virtual server CL1-IPSERVICES-VS using ConsoleOne, you will notice that it is pointing to the Directory Agent NOV-SLPDA (see Figure 22).
Note: Make sure you have the latest SLP snap-ins properly installed!
Figure 22: SLP Directory Agent DN attribute of the virtual server CL1-IPSERVICES-VS.
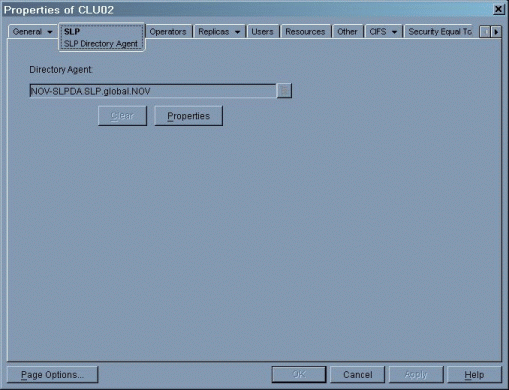
Again, in order for the SLP DA to work, you need to add this attribute to the NCP Server object of the physical node servers that the SLP DA will be run on. Figure 23 shows the attribute being added to physical server CLU02.
Figure 23: SLP Directory Agent DN attribute added to physical server CLU02.
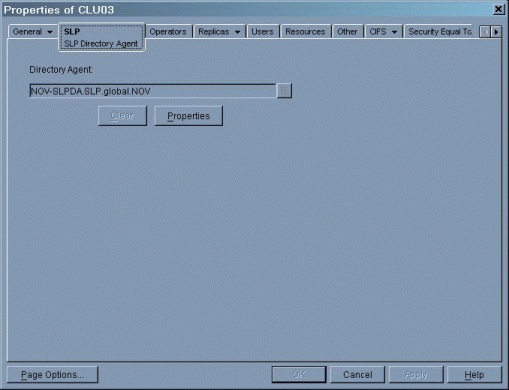
The same operation needs to be applied to physical server CLU03 (see Figure 24).
Figure 24: SLP Directory Agent DN attribute added to physical server CLU03.
Note: Do not modify the Host Server attribute of the SLP DA object. This would break the link between the virtual server and the SLP DA!
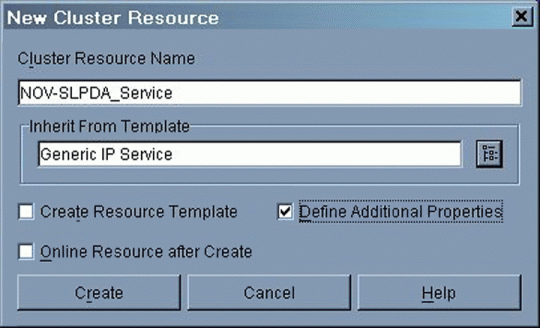
Creating the SLP DA Cluster Resource
With the SLP DA configuration in place, the next step is to create a new cluster resource using the Generic IP Service template (see Figure 25).
Figure 25: Creating a resource for the SLP Directory Agent.
Configuration of the SLP DA Resource
With this configuration, the SLP DA will run on all modified nodes. However, it will still reply with the primary IP address of the host server, even if queried on the secondary IP address.
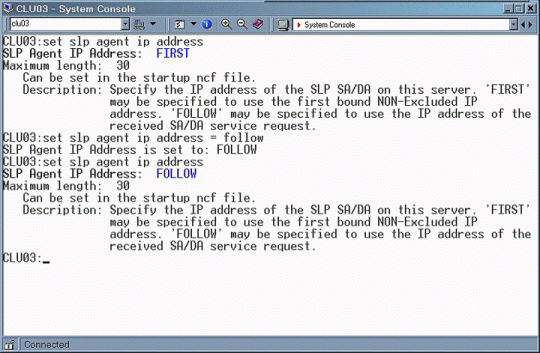
For this to change, you need to set the following parameter before you load the SLP DA:
SLP Agent IP Address = FOLLOW
This will force the SLP DA to respond to SLP registrations or queries using the destination IP address in the query or request.
Figure 26 shows the help screen information for the SLP Agent IP Address parameter.
Figure 26: Help screen for the SLP Agent IP Address parameter.
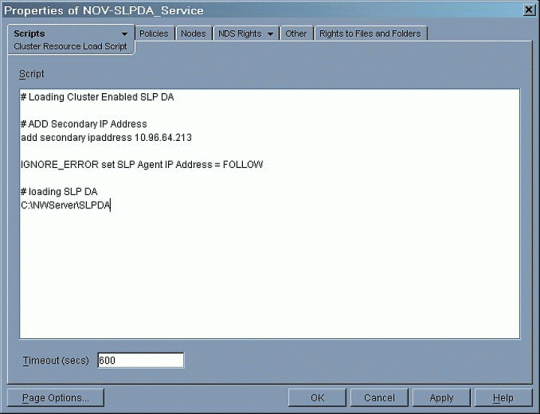
It is recommended that you add this setting to the resource load script after the secondary IP address has been added. However, if this parameter is already set to FOLLOW, the resource would become comatose. To avoid this, use the IGNORE_ERROR prefix, as shown in Figure 27. Loading the SLP DA should be the last command in the load script.
Figure 27: Load script for the SLP DA resource.
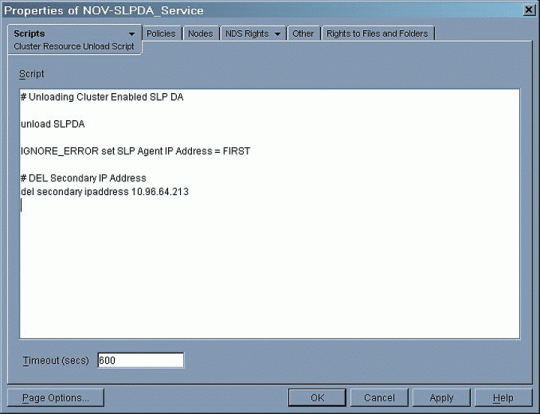
The unload script is simply the reverse of the load script (see Figure 28).
Figure 28: Unload script for the SLP DA resource.
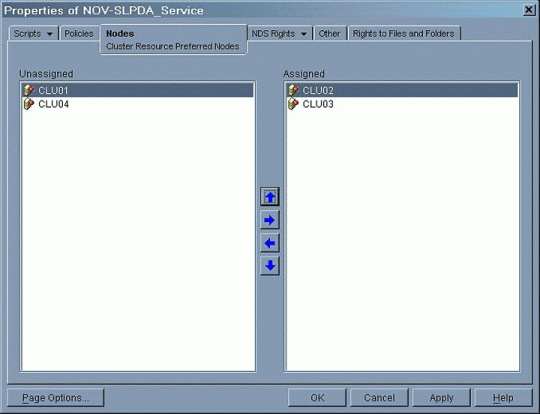
The node's configuration constitutes the final step of the creation of the SLP DA resource (see Figure 29).
Figure 29: Node assignment for the SLP DA Service.
SLP Configuration with a Cluster-Enabled SLP DA
All the servers (including the servers hosting the SLP DA) that are registering their services with the cluster-enabled SLP DA will use the same SLP.CFG containing only the secondary IP address of the cluster-enabled DA.
The SLP scope and the SLP DA should be configured on the client. This is best achieved by using DHCP options 78 and 79, respectively. Detailed information about the SLP configuration of the NetWare Client is given in TID #10014466, "Configuring SLP for the NetWare Client," available at http://support.novell.com.
Testing the SLP Service
If the "SLP Directory Agent DN" attribute has not been added to the NCP Server object of the physical servers, the SLP DA will not be able to read its configuration from eDirectory and query whether to set up the default configuration, as shown in Figure 30.
Figure 30: Query for setup of default configuration if SLP Directory Agent DN attribute has not been added to physical server.
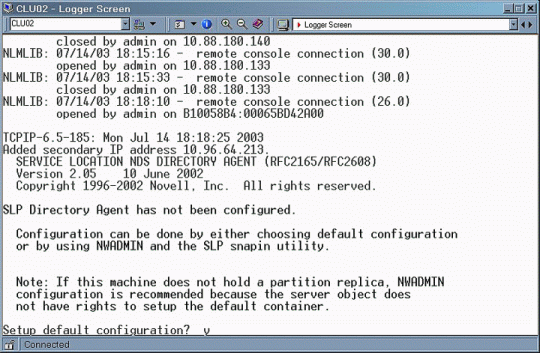
By answering "N," you instruct SLPDA.NLM to exit.
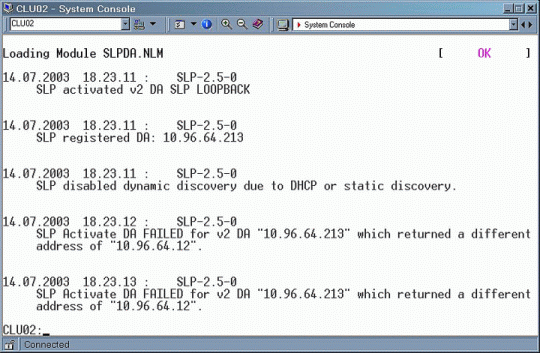
If you do not set the SLP Agent IP Address parameter to FOLLOW, you will get the error message shown in Figure 31.
Figure 31: The SLP DA fails to load because SLP Agent IP Address is not set to FOLLOW.
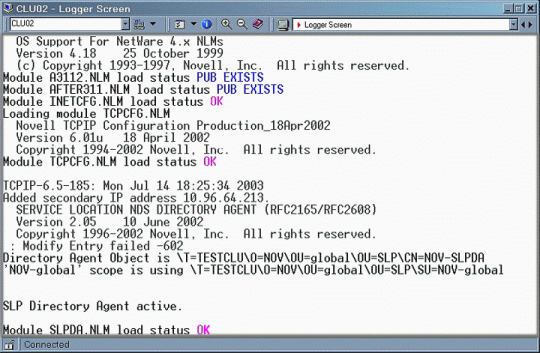
With the SLP Directory Agent DN attribute added to the NCP Server object of the physical server and the SLP Agent IP Address set to FOLLOW, the SLP DA will load using the proper SLP DA and SLP Scope Unit objects. Figure 32 shows the information that is displayed on the Logger Screen for a successful configuration.
Figure 32: The SLP DA loads successfully after the SLP Directory Agent DN attribute has been added to the physical server objects.
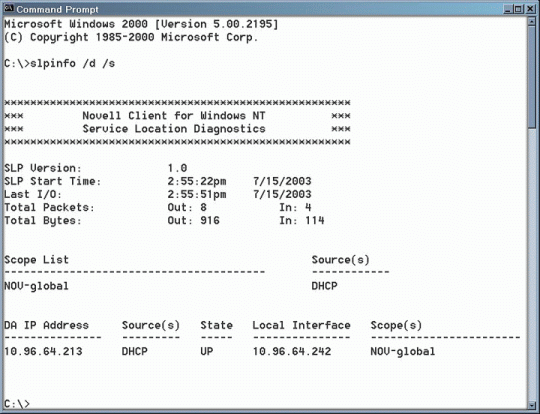
By running the SLPINFO command on a Windows workstation, you can easily verify that the client is obtaining SLP information from the cluster-enabled SLP DA via the secondary IP address of the cluster resource. (SLPInfo.EXE is installed along with the Novell Client software.) Figure 33 shows the correct SLP information for our example configuration.
Figure 33: SLP DA running on secondary IP address.
eDirectory Design Considerations
When cluster-enabling name resolution, it is strongly recommended that you incorporate the following eDirectory design considerations:
A separate container for the DHCP information
A separate container for the DNS information
A separate container for the SLP information
Each of these containers must be partitioned, and every server providing any of these services must hold a replica of the corresponding container.
As always, master replicas should not be stored on a cluster. The use of a dedicated "NDS master" server is highly recommended instead.
Should you elect to use a multi-scope approach, proper DA-to-DA communication requires that all SLP DA objects be placed into the same container.
Conclusion
This AppNote has demonstrated how to properly configure the DHCP, DNS, and SLP DA services in NetWare 6 for a cluster-enabled implementation. By following the outlined procedure, you can ensure that these vital services are always available to your network clients.
For more information about Novell Cluster Services, see:
http://www.novell.com/products/clusters/ncs/
* Originally published in Novell AppNotes
Disclaimer
The origin of this information may be internal or external to Novell. While Novell makes all reasonable efforts to verify this information, Novell does not make explicit or implied claims to its validity.