Running Novell BorderManager on Novell Cluster Services
Articles and Tips: article
Senior Software Engineer
Novell, Inc.
mkanti@novell.com
Sachhin AS
Senior Software Engineer
Novell, Inc.
ssachhin@novell.com
Craig Johnson
Author of Novell BorderManager: A Beginner's Guide to Configuring
Filter Exceptions and A Beginner's Guide to Configuring Novell
BorderManager 3.x
craigsj@ix.netcom.com
01 Sep 2003
Novell BorderManager Proxy and Firewall services can be run on Novell Cluster Services (NCS). The main advantages of doing so are increased availability of network services and the ability to share resources across nodes. It also lowers the cost of operation by minimizing manual intervention, as elements of the system can be reconfigured dynamically. This AppNote providesa "quick start" guide to installing and configuring these BorderManager services in an NCS environment
|
Topics |
proxy services, firewall services, clustering, fault tolerance, resource sharing |
|
Products |
Novell BorderManager 3.7 & 3.8, Novell Cluster Services 1.6 |
|
Audience |
network administrators, consultants, integrators |
|
Level |
intermediate |
|
Prerequisite Skills |
familiarity with Novell BorderManager configuration |
|
Operating System |
NetWare |
|
Tools |
none |
|
Sample Code |
no |
Introduction
Novell Cluster Services (NCS) 1.6 is a reliable and cost-effective storage area network (SAN) solution that provides you with virtually uninterrupted access to your critical storage resources. This multinode server clustering product for NetWare ensures high availability and manageability of critical network resources including data (volumes), applications, server licenses, and services. It is enabled for eDirectory and supports failover, failback, and migration (load balancing) of individually managed cluster resources.
This AppNote discusses the use of Novell BorderManager Proxy and Firewall services in an NCS environment. After describing the advantages of running BorderManager on NCS, it shows an example clustering setup and lists the steps for installing and configuring these BorderManager services in that environment. It also discusses the configuration of access control and authentication, and provides some practical tips on clustering BorderManager servers.
Advantages of Running BorderManager in a Clustering Environment
This section describes the advantages of running Novell BorderManager Proxy and Firewall services in an NCS environment.
BorderManager Proxy Services and NCS.Novell BorderManager Proxy services can be configured on a NetWare cluster to make the services highly available and to share resources. The benefits of configuring the HTTP/FTP proxy on NCS are:
High service availability. The HTTP/FTP Proxy service remains available to the users even if the currently active node of a cluster goes down. Any one of the existing nodes of the cluster can take over as the active node, load the proxy component, and continue to provide the service to the users. This transparency is achieved by making the proxy service listen on a secondary IP address on the private side of the network.
Configuration availability. For administrators, another big advantage is that users are able to use the same settings, configuration, and authentication mechanisms that were available on the active node when it went down.
The benefit of configuring the SMTP proxy on NCS is:
High service availability. The SMTP proxy listens for incoming mail and sends outgoing mail from the cluster. If the active node of the cluster goes down, another node from the cluster can take over and act as an SMTP proxy for all incoming and outgoing mail.
BorderManager Firewall Services and NCS.Novell BorderManager Firewall services can also be configured on a NetWare cluster to make the services highly available and to share resources. The benefit of configuring Firewall services on NCS is high service availability. When Firewall services are hosted on NCS, if the active node of a cluster goes down the Firewall services continue to be available. Any one of the existing nodes of the cluster can take over as the active node, load the firewall component, and secure the private network.
BorderManager Terminology
Here are some terms to understand when dealing with Cluster Services.
Cluster Container Object. This is an eDirectory container object that represents a group of nodes in the cluster and holds the resource objects in it. It is created when NCS is installed.
Cluster Resource Object. This is aneDirectory object which can represent a data volume, an application, or aservice that runs on a cluster node. These objects can be created using either of these: the NCS installation program, ConsoleOne snap-ins, or the NetWare Remote Manager (NRM) utility. Cluster Resource objects contain the load and unload scripts used to load and unload the resources on the nodes in a cluster. Load/unload scripts of these objects ensure the availability of services.
Load Script. This is a set of commands associated with a particular Cluster Resource object which are executed on a node when the resource is brought online. Because the commands are executed sequentially, the ordering of thecommands is extremely important.
Unload Script. This is a set of commands associated with a particular Cluster Resource object which are executed on a node when the resource is taken offline. Because the commands are executed sequentially, the ordering of the commands is extremely important. Normally the unload script will execute commands in reverse order to those in the load script.
Cluster Volume. This is the shared volume that usually used in a cluster environment as the file system.
Active Node. A clustering system consists of a set of nodes. At any point of time, only one of the nodes acts as the active node. If the active node goes down, another node from the cluster takes over and becomes the new active node. BorderManager services run on the active node in the cluster.
Failover. This is the term used to describe the process of another node taking over as the active node if the current active node in a cluster goes down.
ConsoleOne. This is the Novellutility used to administer the cluster server and its corresponding nodes. It can be found on a NetWare server at sys:\public\mgmt\consoleone\1.2\bin\consoleone.exe
NWAdmin. This is the Novell utility used to administer the BorderManager proxy modules. This utility can be found on a NetWare server at sys:\public\win32\nwadmn32.exe.
Secondary IP Address. Secondary IP addresses are used to configure a NetWare server as a multihomed host. The client will see each secondary IP address as a logical host. Secondary IP addresses can also be used to launch different services on different IPaddresses. In a cluster environment, services (such as Proxy) listen onsecondary IP addresses. To add a secondary IP address, go to the server prompt and type "ADD SECONDARY IPADDRESS <IP_address>". To delete a secondary IP address, go to the server prompt and type "DELETE SECONDARY IPADDRESS <IP_address>". To display secondary IP addresses, go to the server prompt and type "DISPLAY SECONDARY IPADDRESS".
Example Cluster Setup
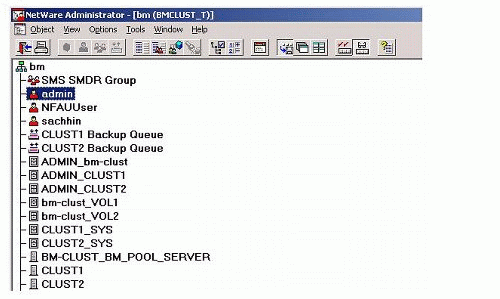
This section presents an example cluster setup. In this example, the cluster has two nodes named CLUST1 and CLUST2. Both of them have Novell BorderManager installed and configured on them (see Figure 1).
Figure 1: Cluster nodes as viewed from NWAdmin.
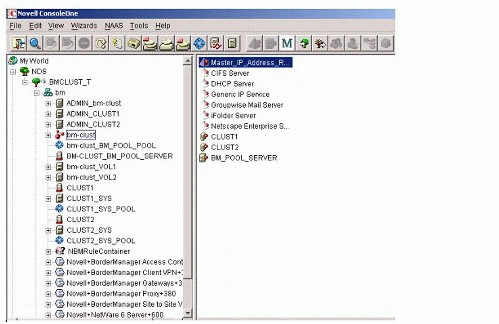
In the ConsoleOne view of this example setup (see Figure 2), "bm-clust" is a Cluster container object. The eDirectory objects seen in the right panel are the Cluster Resource objects.
Figure 2: Cluster container and Cluster Resource objects.
Viewing and Editing the Load/Unload Scripts
You can view and edit the load and unload scripts of a Cluster Resource object by using ConsoleOne. To do this, select the Cluster container object on the left panel. The Cluster Resource objects inside the container are displayed in the right panel. Click a resource object, then select the Scripts tab to view or edit the scripts.
Figure 3 shows an example of a load script.
Figure 3: Example load script.

Figure 4 shows an example of an unload script.
Figure 4: Example unload script.
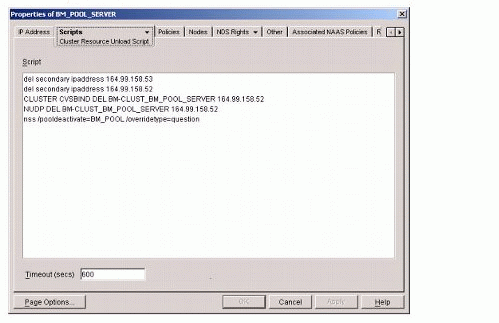
Note that the commands in the unload script are mostly opposite to the commands in the load script and are in the reverse order.
Novell BorderManager Pre-Install Procedures
This section lists the software requirements and steps to be taken before installing Novell BorderManager on the cluster nodes.
Software Requirements
To run Novell BorderManager services on NCS, you need the following software:
Novell NetWare 6 or NetWare 5.1
Novell Cluster Services 1.6 (NetWare 6 ships withaCluster Services license for two servers; licenses for additional nodes can be purchased separately.)
Novell BorderManager 3.7 SP2 or Novell BorderManager 3.8 (BorderManager 3.8 is currently scheduled for release in October 2003)
One important point to note up-front is that all nodes of the cluster must be available in the same eDirectory tree.
Pre-Installation Steps
Before you install Novell BorderManager on the cluster nodes, complete these steps.
Install NetWare 6 on all the nodes in a cluster. Remember that all cluster nodes must be in the same eDirectory tree. It is recommended that each node of a cluster should have two interfaces: a public interface and a private interface.
Install the Novell Cluster Services software. At the end of this install, allocate an IP address to the shared volume.
In ConsoleOne, select the cluster resource object for shared volume (BM_POOL_SERVER from example above) and then select "Load and Unload Scripts" under Properties.
In the load script of the Cluster Resource object, add the following line:
add secondary IP address <an unused IP address for the private network>
The proxy services will listen on this IP address.
In the unload script of the Cluster Resource object, add the following line:
del secondary IP address <same IP address as specified in the load script>
For the change to take effect, either bring the Cluster Resource object offline and then online, or restart all of the cluster nodes.
Install Novell BorderManager on all the nodes of the server. The next section in this AppNote describes special steps to be aware of. For details on the overall BorderManager installation process, refer to the Novell BorderManager documentation at http://www.novell.com/documentation.
Installing Novell BorderManager on Cluster Nodes
This section describes the special steps to take while installing Novell BorderManager on cluster nodes.
While configuring the Proxy, a dialog will appear requesting that you select the private and public interfaces. All the server's interfaces should be listed, including the ones that have been added for the server's pool (shared volume). Select the secondary IP address of the private network that you added in the load/unload scripts.
Skip license installation during NBM installation.
Select the services (for example, HTTP proxy, FTP proxy, and so on) at the time of install. Comment out STARTBRD in AUTOEXEC.NCF before rebooting the server. If you have already completed the installation without selecting any of the proxy services, STARTBRD would not be added. If you do not select the services at the time of install, you can do so from NWAdmin when the product is running.
Repeat Steps 1, 2 and 3 as you install BorderManager on all the cluster nodes.
Install MLA licenses at the root container in eDirectory. All NBM servers will read this license while coming up. You need to install license only once.
Add the following line at the end of the load script for the Cluster Resource object:
load brdsrv
The object could be the shared volume resource object (BM_POOL_SERVER) or the Proxy's Cluster Resource object (BM-Proxy in the example setup shown in Figure 2).
Add the following lines at the beginning of the unload script of the same resource object:
unload proxy
unload proxycfg
unload aclcheck
unload brdmon
unload nbmalert
unload brdsrv
This configuration ensures that the proxy services are available even if the node on which they are running goes down. With this setup in place, proxy services will come up automatically on another cluster node if the active cluster node goes down.
Licensing Issue and Workaround
Licensing delays on bootup can happen when multiple BorderManager servers are placed in the same OU. By default, when BorderManager services start, the licenses are read from the Master replica holding the licenses. After a long delay (several minutes), licenses will be read from a Read/Write replica.
The implications should be clear. If you have multiple BorderManager servers in an OU and one is the Master, the other server needs to read licensing information from that server when BorderManager services load. (This is a particular issue with site-to-site VPN members, and is a reason that each VPN member should hold the Master of the replica holding its own licenses.) Iftheserver holding the Master replica is down, BorderManager servers needing a license will be very slow in coming online.
This licensing issue can be overcome with a simple eDirectory design rule: Create a new OU for each BorderManager server, partition and replicate that OU, and assign the BorderManager server within it to hold the Master replica. Each server will then be able to quickly read its own license at bootup.
Configuring the Novell BorderManager Nodes
This section describes how to configure the Novell BorderManager cluster nodes.
Load/Unload Scripts
The load and unload scripts can be configured at two locations. You can configure the scripts from any one place. We shall call them Option 1 (cluster-enabled volume resource) and Option 2 (Proxy Cluster Resource object).
Option 1.Here are some sample load and unload scripts for the cluster-enabled volume resource option.
Load Script:
nss /poolactivate=BM_POOL
mount VOL2 VOLID=253
mount VOL1 VOLID=254
CLUSTER CVSBIND ADD BM-CLUST_BM_POOL_SERVER 164.99.158.52
NUDP ADD BM-CLUST_BM_POOL_SERVER 164.99.158.52
add secondary ipaddress 164.99.158.52
add secondary ipaddress 55.60.60.3
load brdsrv
Unload Script:
unload proxy
unload proxycfg
unload aclcheck
unload brdmon
unload nbmalert
unload brdsrv
del secondary ipaddress 55.60.60.3
del secondary ipaddress 164.99.158.52
CLUSTER CVSBIND DEL BM-CLUST_BM_POOL_SERVER 164.99.158.52
NUDP DEL BM-CLUST_BM_POOL_SERVER 164.99.158.52
nss /pooldeactivate=BM_POOL /overridetype=question
Option 2.This procedure should be adopted in cases when a separate Proxy Cluster Resource object is required. It is divided into two parts: creating a new Cluster Resource object, and setting the priority of this new object lower than that of the shared Cluster Volumeobject.
Creating a New Cluster Resource Object
In ConsoleOne, select the Cluster container object ("bm-clust" in the example setup). Select File, New, Cluster, and then Cluster Resource. Enter a name for the resource object (see Figure 5).
Figure 5: Creating a new Cluster Resource object using ConsoleOne.

After creating the new Cluster Resource object, ensure that the resource is online. To check this, select the Cluster container object (bm-clust) in ConsoleOne, select View (top menu), Cluster State view, and then click on the Cluster Resource object (see Figure 6).
Figure 6: ConsoleOne view of a Cluster Resource object's state.
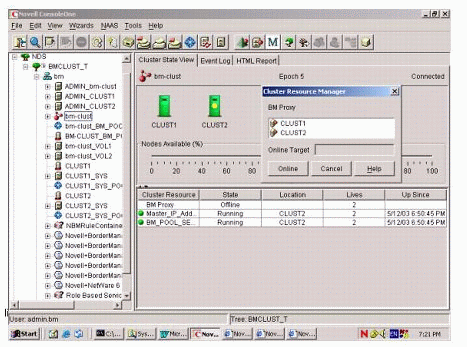
Click the Online button to automatically activate the resource on the active node.
Note: Do not try to bring a Cluster Resource object online on a node that is not active. This would not work and the Proxy would not come up.
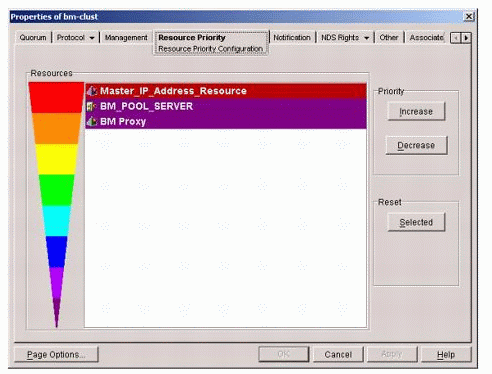
Setting the Priority of the Resource Object
The resource priority of the new Cluster Resource object ("BM-Proxy" in this example) should be less than that of the shared volume resource object. To do this, follow these steps:
In ConsoleOne, right-click on the Cluster container object ("bm-clust" in this example) and choose Properties.
Select Resource Priority.
Ensure that the priority of the proxy resource object (BM-Proxy) is less than that of the shared pool resource object (BM_POOL_SERVER), as shown in Figure 7.
Figure 7: Prioritization of Cluster Resource objects.
Load/Unload Scripts
The resource object's (BM-Proxy) load and unload scripts would look like this:
Load Script:

add secondary ipaddress 55.60.60.3
load brdsrv
Unload Script:

unload proxyunload proxycfg
unload aclcheck
unload brdmon
unload nbmalert
unload brdsrv
del secondary ipaddress 55.60.60.3
Configuring Proxy Services on NCS
This section explains how to configure HTTP/FTP and SMTP proxies on NCS.
Configuring an HTTP/FTP Proxy.If an HTTP/FTP proxy is configured in the cluster server environment, it must be configured on all the existing nodes of the clusters. Configure HTTP proxy services on one node at a time.
Before you begin to configure a cluster node to host HTTP/FTP proxy services, ensure that BRDSRV is loaded on that particular node. Also make sure BRDSRV and corresponding proxy NLMs are not running on any other node other than the node that is being configured. If they are, unload the NLMs on the other nodes.
To configure an HTTP/FTP proxy, map a drive to the IP address of the active node.
Start NWAdmin and enable the proxies you want to use. Configure the same ones for all nodes on the cluster.
Ensure that the cache volumes are traditional NetWare volumes.
Ensure that all authentication and logging mechanisms configured on one node are configured on all. If necessary, replicate the configuration manually on all nodes, one node at a time.
If the configuration has added "STARTBRD" in the AUTOEXEC.NCF file of the node, comment out this line.
After you finish configuring, run "CLUSTER LEAVE" on the system console of the active node. This will force the active node to leave the cluster, and another node in the cluster will become active. Repeat the configuration on the currently active node.
Repeat Step 6 until all nodes are configured.
Run "CLUSTER JOIN" on all the nodes.
Don'ts of HTTP/FTP Configuration.Here are some things that you should not do when configuring an HTTP/FTP Proxy on NCS.
Don't try to configure proxies by loading commands manually; this might lead to abends. Create or alter the configuration of the proxies only on the active node.
If you do not find SSL certificates (for example, SSL Certificates for IP or DNS), create them manually using ConsoleOne.
Don't uncomment STARTBRD in AUTOEXEC.NCF, as this couldcause abends to occur on the cluster node.
Don't use NSS volumes. As the shared volume is NSS, we recommend that it not be used for HTTP/FTP cache.
Known Issues with the HTTP/FTP Proxy on NCS.The failover takes time, especially if the data accumulated in the cache is in gigabytes. The reason is that the proxy reads the cached pages from the cache directory. This takes some time, which accounts for the delay in loading the proxy.
Configuring an SMTP Proxy.Here are the steps to configure an SMTP Proxy on NCS.
Allocate two unused secondary addresses: one as part of the private network, and the other as part of the public network.
Using NWAdmin, select these secondary IP addresses so that the SMTP proxy listens on them.
Configure the SMTP proxy on the active node. Give the domain name and the Web server's domain name or its IP address.
In NWAdmin, the default spool directory points to sys:etc\proxy\spool.
The Mail Exchanger on the DNS server should point to the SMTP proxy.
If you need to use the SMTP proxy for incoming mail, add the following line to the sys:etc\proxy\proxy.cfg file:
[BM Mail Proxy]
BM_Domain=<domain name>
BM_Proxy_Domain=<Proxy domain name>
These flags are primarily meant for incoming mail. If these flags are not used, the SMTP proxy would forward mails to the outside world but would not be able to accept or spool any incoming mail.
If you already have a proxy.nlm running on the server, only unload and load PROXY.NLM after adding the flags mentioned above.
Repeat these steps for all nodes. Ensure that proxy is loaded on the specific node on which the configuration is done; this should be the active node.
Configuring Other Proxy Services.Other proxy services such as DNS and Real Audio proxies can be configured to run on the cluster services. The concept of configuring these proxies is similar to that of HTTP proxy--they need to be enabled on all nodes in the cluster. High availability of these services is the primary advantage of configuring these services on NCS.
Configuring Firewall Services on NCS
When configuring BorderManager Firewall services on NCS, you need to configure each node of the cluster with packet filters. To do so, enable filter support in INETCFG.NLM for each of the machines in the cluster. The packet filters would normally be applied on the public interface of each node. Similar packet filters should be configured on all machines in the cluster.
You can use any of the following methods to configure BorderManager Firewall services:
Secure the public interface during Novell BorderManager install.
Run BRDCFG after install.
Run FILTCFG on the servers.
Use the iManager Web-based framework.
One of the easiest ways to configure firewall services on cluster is to run BRDCFG on each of the cluster nodes. BRDCFG will secure the public interfaces of the cluster nodes and add exceptions for BorderManager services.
While adding filters through FILTCFG or iManager, you should configure similar filters/exceptions on all the nodes in the cluster.
Overcoming Filtering Issues
In order to successfully use Novell BorderManager in a two-node cluster as a proxy firewall, it has been found that filtering represents the biggest single problem, due to two issues:
Filtering of cluster node-to-node communications
Problems with Novell BorderManager 3.7 and above sharing one NBMRuleContainer
Filtering of Cluster Node-to-Node "Keep Alive" Communications.To maintain communication between cluster nodes, NCS uses "keep alive" broadcast packets sent on the network address of the cluster. For example, if the cluster nodes have IP addresses 192.168.10.1 and 192.168.10.2 with a mask of 255.255.255.0, the network address is 192.168.10.0. The broadcast address of the 192.168.10.0 network is 192.168.10.255, but the cluster nodes do not use that address. Oddly enough, cluster nodes communicate to each other with packets addressed to 192.168.10.0 in this example.
Filtering of cluster node-to-node communications will usually occur as soon as you enable filtering on either cluster node. The problem is that, by default, NetWare filtering blocks packets addressed to the network address, and will therefore filter the "keep alive" packets. You cannot enter a filter exception to allow the network-addressed packets through the filtering. However, you can use a simple SET command to turn off this filtering behavior:
SET FILTER SUBNET BROADCAST PACKETS=OFF
This SET command will disable broadcast filtering, and your cluster nodes will then be able to maintain communications with filtering enabled.
There is another way to achieve the same end without disabling filtering of subnet broadcast packets--that is to readdress the cluster nodes. To see how this method works, it is necessary to understand how NetWare's filtering understands subnetting.
When NetWare tries to filter subnet broadcast packets, it does not understand what the network address really is, but simply filters packets with addresses that end in ".0". Since most internal LAN networks have such addresses, filtering subnet broadcasts will typically block node-to-node communications in clusters within these networks. However, if the cluster nodes themselves are using a network address that does not end in ".0", their node-to-node communications will not be filtered.
As an example, say you have a two-node cluster with the following network addresses assigned:
Cluster node 1 - 192.168.10.1, mask 255.255.255.0
Network address=192.168.10.0

Cluster node 2 - 192.168.10.2, mask 255.255.255.0
Network address=192.168.10.0
Filtering will block the node-to-node communications between these cluster nodesby default. But using this second method, you can change the cluster node addresses as follows:
Cluster node 1 - 192.168.10.6, mask 255.255.255.252
Network address=192.168.10.5

Cluster node 2 - 192.168.10.7, mask 255.255.255.252
Network address=192.168.10.5
Now node-to-node "keep alive" packets use subnet address 192.168.10.5 to communicate, and filtering will not block that traffic.
While the above discussion may explain why some cluster nodes in some networks have no problems, it doesn't help much if your servers happen to have typical network addresses and masks. However, there is another trick that can be used here--that is to dual-home the servers, and set the cluster communications to use a subnet that will not be filtered.
Dual-homing occurs when you have two different IP addresses on a server. In this case, the second IP address assigned must not be a secondary IP address, but instead must be a new binding on a different network. For example, the address assignments might look like this:
Cluster node 1 - primary binding 192.168.10.1, mask 255.255.255.0
Network address=192.168.10.0

Cluster node 1 - secondary binding 192.168.100.6, mask 255.255.255.252
Network address=192.168.100.5

Cluster node 2 - primary binding 192.168.10.2 mask 255.255.255.0
Network address=192.168.10.0

Cluster node 2 - secondary binding 192.168.100.7, mask 255.255.255.252
Network address=192.168.100.5
Simply use INETCFG to add a new binding to the private interface, along with the existing 192.168.10.x address. In this example, you must use ConsoleOne to change each cluster IP address to the 192.168.100.x alternative, instead of allowing the servers to use the 192.168.10.x. The cluster broadcast communications will then occur using the 192.168.100.5 network address and will not be filtered.
Sharing an NBMRuleContainer.BorderManager 3.7 and 3.8 store filters and filter exceptions as eDirectory objects in a container in the same OU as the server object. The container is named NBMRuleContainer and cannot berenamed.
There may be some problems to get filtering to work properly when two BorderManager 3.7 servers share the same OU, because they both have to use the same NBMRuleContainer. While filtering can be made to work in this environment, it is much simpler to dedicate an OU to each BorderManager server.
As mentioned earlier, you can overcome filtering issues with a simple NDS design rule: Create a new OU for each BorderManager server, partition and replicate that OU, and assign the BorderManager server within it to hold the Master replica. There will then be a dedicated NBMRuleContainer object for each BorderManager 3.7 or 3.8 server, without the possibility of filtering problems related to sharing an NBMRuleContainer container.
Configuring Access Control and Authentication
This section describes how to configure access control and authentication on a cluster.
Access Control Rules
Access control is the process by which an administrator can regulate and monitor user access to intranet or Internet services. Rules can be configured at the following eDirectory object levels:
Country(C)
Organization (O)
Organizational Unit (OU)
Server
The effective rules are all access rules, in order of execution, from the object up to the root of the eDirectory tree. Rules are listed in the order in which they are applied to subjects attempting to access a resource through a BorderManager server in this container. You can view the effective rules from the Server object in NWAdmin.
Configuring Access Control Rules
In a cluster, configure rules at the container object level. (Right-click on the container object, click Details, and then select the BorderManager Access Rules tab.) You can thus enter the rules once at the servers container, and you do not need to configure identical rules on all the servers in the cluster.
However, third-party URL filtering rules (such as SurfControl, N2H2, and Connectotel AdWall, FileWall, or LinkWall) should always be set on the eDirectory Server object. So in a cluster setup, you would replicate only the third-party URL filtering rules on each Server object.
Access Control Rules on the Example Setup.Figure 8 shows the effective rules that have been set on the BorderManager server CLUST2 in our example setup.
Figure 8: Effective access control rules on CLUST2.
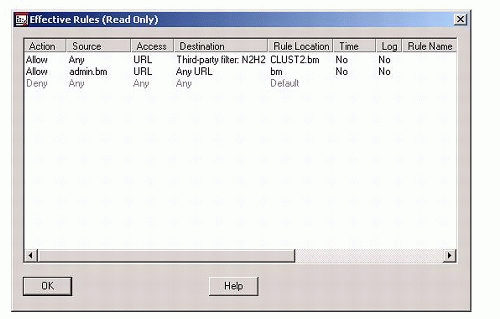
The first rule is an example of a third-party rule (N2H2 in this case) which allows all users access to sites that fall under categories such as free mail, search engines, news, sports, and so on. This rule is configured individually on each BorderManager server in the cluster (CLUST1 and CLUST2).
The second rule allows the Admin user to access any site. This rule is configured on the "bm" container object. The Rule Location field shows where a rule is configured.
Configuring Authentication
Novell BorderManager provides two methods of authenticating proxy connections from browsers:
Secure Sockets Layer (SSL)-based authentication. With SSL you make a decision to use either a Java applet or an HTML form (default) to be presented to the user.
Single Sign-On (SSO)-based authentication. SSO requires the clients to run a background process (CLNTRUST.EXE), which is usually invoked from the login script. Authentication can be configured to occur for all users (default), or when the Access Control (ACLCHECK) facility denies a request. FTP proxy can be configured to use SSO or a clear-text form of authentication. The Transparent Telnet Proxy can be configured to use a clear-text form of authentication.
You can also use terminal server authentication in environments that need it.
SSL Authentication.SSL Authentication is a secure mechanism for users to authenticate to a proxy usingtheir eDirectory username and password. When using SSL authentication on a Novell BorderManager Proxy cluster, a user who has logged in through SSL to a proxy will need to re-authenticate after the active node (on which the proxy was running) goes down and another node takes over. The reason is that proxy maintains the authentication status in server memory. Therefore, this information is lost when the proxy server goes down.
To configure SSL authentication on the cluster nodes, invoke NWAdmin on the active node and go to the BorderManager Setup tab. Click on Authentication Context. You should see a dialog as shown in Figure 9.
Figure 9: Configuring SSL authentication.
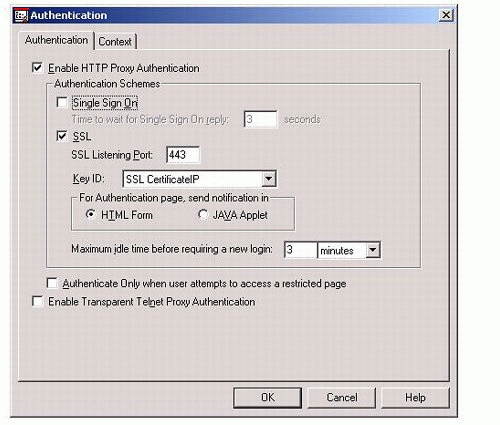
Check SSL, and enter other parameters as desired. Repeat this process for all nodes on the cluster.
Single Sign-On Authentication.SSO-based authentication to a proxy occurs when a browser makes a request to theproxy that is configured for SSO. SSO-based authentication is attempted before SSL authentication. With SSO, the proxy does not actually authenticate the user. It verifies that the user already had an authenticated connection through the Novell Client. Therefore, SSO is not really an authentication method, but a way to avoid redundant authentication.
With Single Sign-On, the user logs in to the tree containing the BorderManager servers and runs CLNTRUST.EXE. When the BorderManager server receives a request from a browser and determines that SSO authentication is required, it contacts the CLNTRUST module running on the workstation. If the client is not authenticated to the tree, SSO fails. If the client is authenticated to the tree but not connected to the BorderManager server, the Novell Client locates the server and makes an "open service connection" request to it through NCP. If the workstation already has an NCP connection to the BorderManager server or is able to create one, it sends an NCP service request extension request code 37, which contains a 4-byte identification number. BorderManager verifies that the client sending the NCP extension is the same one that it sent the SSO request to, and SSO succeeds.
When using SSO on a BorderManager Proxy cluster, the user is usually already authenticated to the tree containing the BorderManager servers. In thiscase, failover happens transparently. The user will not be aware of the fact that one node in the cluster has gone down and another has taken over. This is because the user is always authenticated to the tree containing the BorderManager servers. When one server goes down, the Novell Client locates another server and makes the "open service connection" request via NCP, as explained above.
Services may be unavailable or slow to respond during the short time it takes for one node in the cluster to go down and another to come up.
Configuring Single Sign-On Authentication.To configure SSOn authentication on the nodes, start NWAdmin on the active node and go the BorderManager Setup tab. Click on Authentication Context. You should see a dialog as shown in Figure 10.
Figure 10: Configuring SSO authentication.

Check "Single Sign On", and enter other parameters as desired. Repeat this procedure for all nodes on the cluster.
Terminal Server Authentication. This feature helps you authenticate to a BorderManager Proxy using a terminal in a Citrix Metaframe on Windows 2000 environment, or from a workstation behind NAT (Network Address Translation) using Windows 2000 or Windows XP.
When using terminal server authentication in a BorderManager Proxy cluster, the behavior of terminal server authentication is similar to SSL authentication. That is, a user who has authenticated to the proxy via terminal server authentication will need to re-authenticate after the active node goes down and another node takes over.
Configuring Terminal Server Authentication.To configure terminal server authentication on the nodes, follow these steps.
Add the following lines to the PROXY.CFG file of each node:
[Extra Configuration]
EnableTerminalServerAuthentication=1
[Authentication Addresses]
PrivateAddr1= <IP address of the Terminal Server>
Make sure SSL is enabled on all nodes.
Unload and re-load proxy at least once for the configuration to take effect. Ensure that you unload and then load the proxy on the active node.
After you finish configuring, run "CLUSTER LEAVE" on the system console of the active node. This will force this node leave the cluster, and another node in the cluster will become active.
Repeat the configuration on the newly-activated node.
Repeat Steps 4 and 5 until all nodes are configured.
Run "CLUSTER JOIN" on all the nodes.
Tips for Clustering BorderManager Servers
Here are some practical tips that might help you when clustering Novell BorderManager servers.
Modify Proxy Server Settings on All Servers
Clustering two BorderManager servers essentially means maintaining two parallel systems. If you change the filters on one server, you need to immediately duplicate the change on the other server(s) in the cluster. If you add a new static NAT mapping on one server, you need to immediately add the mapping to the other server. If you change a proxy setting, you will have to change that setting on the other server, but you will also have to start the proxy services on the other cluster node(s) in order to make the change.
You cannot modify the proxy settings unless the BorderManager services are started, although you can modify them with PROXY.NLM unloaded. If you manually load PROXY.NLM (on a secondary node), it will attempt to automatically bring up its configured IP addresses as secondary IP addresses, even if you have no ADD SECONDARY IPADDRESS statements for these addresses in use in AUTOEXEC.NCF or a cluster load script. Normally this does not create a problem, because if the IP addresses are already in use on the primary node, they will not be loaded again on the secondary node, nor will they be unloaded on the primary. (You will see a bind error message in the proxy console menu option 17 screen for the secondary node). But you must be careful that the active node does not fail-over with the secondary node having PROXY.NLM already loaded.
If the proxy is up on the secondary, but without the proxy IP addresses active, when the primary node fails the proxy addresses on the secondary will not be added automatically. Proxy communications will therefore fail. You may have to unload and reload PROXY.NLM to get those IP addresses to bind on the new primary node. If you want to adjust proxy settings on non-active nodes, either fail- over the proxy services to the node you want to adjust, or be sure to stop BorderManager services on the secondary node after you adjust proxy settings.
If you want proxy services to start quickly on a node when the node is made active, the proxy cache should be empty. The easiest way to clear the cache data from a non-active proxy is to manually delete the cache directories on the cachevolume(s). When BorderManager proxy loads on a server, the cache directories will be recreated automatically and the proxy will load quickly.
Client-Site VPN Issues
You cannot fail-over a VPN server within a BorderManager 3.x clustered environment. However, you can maintain two parallel client-site VPNs, as long as each cluster node is a master VPN server. When one node fails and another node becomes active, the default route will move to the new node. Client-site VPN in a BorderManager 3.7 or earlier environment will then work on the new node, as long as the remote host connects to the new node's public IP address. VPN users must be told that if one public IP address does not respond, they should try a backup address (of a secondary cluster node).
Maintenance Checklist
Because there are so many things to consider in maintaining a clustered BorderManager server environment, we suggest you create a checklist for making changes. This checklist should include the following:
Filters modified on all nodes
Static NAT modified on all nodes
Load scripts modified on all nodes
Unload scripts modified on all nodes
Proxy settings modified on all nodes
Access rules modified on all nodes (except the rules at the container level)
Alerts modified on all nodes
Cache volumes deleted on all non-active nodes
Fail-over test performed on all nodes (optional)
Conclusion
This AppNote has provided information about running Novell BorderManager in a Novell Cluster Services environment. This scenario provides a number of benefits, the most prominent being high service availability and sharing of hardware resources.
The results depicted in this AppNote are derived strictly from test scenarios. In real user scenarios, you may experience deviations from these results. Novell does not recommend deploying untested configuration changes directly in a production network. You should always verify configuration changes on a simulated test network before you deploy anything in a production environment.
* Originally published in Novell AppNotes
Disclaimer
The origin of this information may be internal or external to Novell. While Novell makes all reasonable efforts to verify this information, Novell does not make explicit or implied claims to its validity.