Taking Things Out of Context: Using LDAP Contextless Login in Your Network
Articles and Tips: article
Consultant
Novell, Inc.
Nancy Cadjan
Technical Writer
Novell, Inc.
Special thanks to Suzan Jensen of Novell for her help with this AppNote.
01 Sep 2003
One of the new features of the Novell Client for Windows NT/2000/XP version 4.9 is the ability for users to log in to the network without having to enter any eDirectory tree or context information. This AppNote explains how to install, configure, and maintain LDAP Contextless Login on your network.
|
Topics |
LDAP Contextless Login, LDAP Services for Novell eDirectory, Novell Client features, Novell eDirectory, LDAP |
|
Products |
Novell Client for Windows NT/2000/XP version 4.9 or later, Novell eDirectory version 8.5 or later |
|
Audience |
network designers, administrators, consultants, integrators |
|
Level |
intermediate |
|
Prerequisite Skills |
familiarity with Novell eDirectory, LDAP, and installing the Novell Client |
|
NetWare |
NetWare 6.5 |
|
Tools |
none |
|
Sample Code |
none |
Introduction
The LDAP Contextless Login feature introduced with the Novell Client for Windows NT/2000/XP version 4.9 makes it easier for users to log in to the network because they no longer have to remember their context or tree name (depending on how you set it up). With LDAP Contextless Login, users simply enter their username and password in the Novell Login window--the Novell Client and LDAP Services for Novell eDirectory do the work of figuring out where the users are located and in which eDirectory tree. Administrators are free to move User objects around or change the organization's name, and the users will still be able to log in without any extra assistance. This saves you the costs associated with supporting users who have trouble remembering their tree/context information or who don't know how to change this information at login after modifications have been made in the tree structure.
Several large Novell customers have used LDAP Contextless Login to facilitate the merging of several trees into one global tree. Because users no longer needed to enter their tree or context in order to successfully authenticate after the merge, these customers could make changes within the directory as often as necessary without incurring the costs associated with supporting user login problems.
This AppNote explains how to install and configure LDAP Contextless Login on your network. It shows what users will experience during the login process once this feature is implemented and provides information on how to customize the Novell Login dialog box. It also includes some troubleshooting information. This AppNote is not meant to replace or supersede the Novell documentation for the Novell Client or LDAP Services for Novell eDirectory. References to the appropriate documentation are made throughout this discussion
Before reading this AppNote, you should be familiar with LDAP (Lightweight Directory Access Protocol) and how it operates in your network. A good reference to review is the section entitled "Understanding How LDAP Works with eDirectory" in the Novell eDirectory 8.6 Administration Guide at http://www.novell.com/documentation/lg/ndsedir86/index.html?page=/documentation/lg/ndsedir86/taoenu/data/h0000007.html.
Overview of LDAP Contextless Login
To take advantage of LDAP Contextless Login, you'll need the following software:
Novell Client for Windows NT/2000/XP version 4.9 or later. The latest version of the Novell Client software is available for download at http://www.novell.com/download.
LDAP Services for Novell eDirectory. This is a server application that lets LDAP clients access information stored in eDirectory. It is automatically installed along with Novell eDirectory.
LDAP Services for Novell eDirectory. This is a server application that lets LDAP clients access information stored in eDirectory. It is automatically installed along with Novell eDirectory
Once you have LDAP Contextless Login set up, users who are logging in to the network from Windows NT/2000/XP workstations running the Novell Client can log in without having to enter their context in the Novell Login screen. Optionally, you can also have users log in to the network without having to know the eDirectory tree name.
User objects can be located in the tree by username, e-mail address, surname, or many other attributes. You can also enable wildcard searches. If a wildcard search brings up multiple usernames, the user is prompted to select his or her username.
Generally, when a user connects to the network using LDAP, the connection is made through an LDAP client. The new Novell Client Login acts as an LDAP client and connects to the network. All LDAP clients bind (connect) to eDirectory as one of the following types of users:
[Public] User (Anonymous Bind)
Proxy User (Proxy User Anonymous Bind)
NDS/eDirectory User (NDS User Bind)
Note: The NDS User Bind is not used by LDAP Contextless Login.
The type of bind and the rights assigned to the corresponding User object determine the content that the LDAP client can access. LDAP clients access a directory by building a request and sending it to the directory. When an LDAP client sends a request through LDAP Services for eDirectory, eDirectory completes the request for only those attributes that the LDAP client has the appropriate rights to. There are additional restrictions that can be set to further secure connections.
In order to make the magic of LDAP Contextless Login work, you need to:
Set up rights to view the User object attributes in the eDirectory tree
Install and configure the Novell Client
These steps are discussed in the next two sections of this AppNote.
Setting Up Rights to View User Object Attributes
The LDAP server provides LDAP clients access to eDirectory services and provides access to eDirectory objects and their attributes, while enforcing eDirectory's robust security. A server running LDAP Services for Novell eDirectory allows LDAP Contextless Login to utilize the speed of LDAP searching and allows the resolution of a user name to a context
After installing LDAP on an eDirectory server, additional steps are required to allow the LDAP Contextless Login client software to properly search user attributes. LDAP Contextless Login works by searching user attributes in the eDirectory tree using LDAP. By default, insufficient rights exist to allow this search. Read rights to the attributes are required for proper searching. There are two ways you can enable the proper rights for LDAP Contextless Login:
Grant adequate search rights to [Public]
Create a Proxy (anonymous bind) user that has adequate rights
While LDAP Contextless Login does not necessarily need access to all users, a minimum set of Read rights must be assigned to the User object associated with the Proxy username in the LDAP Group object. The Read right allows LDAP Contextless Login to browse the necessary user attributes needed for a search. You can specify the Read rights for only the specific attributes you want searched during a contextless login process depending on the attributes that Novell Client is configured to search for during a contextless login. These attributes include CN, mail, full name, phone number, and so on.
Setting Up [Public] for LDAP Contextless Login
The LDAP Group object allows you to specify a User object as the Proxy username. If you do not specify a particular object, the rights of [Public] are assumed by default. However, when LDAP is installed on an eDirectory server, by default [Public] has insufficient rights to browse the user attributes necessary to resolve a search for LDAP Contextless Login. In other words, the necessary attributes that Contextless Login needs to search are hidden from [Public].
You can assign the correct rights in the Novell iManager or ConsoleOne utilities by making [Public] a trustee of the Root of the tree or container, and then assigning Read rights to the user attributes required for searching by LDAP Contextless Login. To give [Public] access to object attributes, you must do the following in iManager or ConsoleOne:
Make [Public] a trustee of the appropriate container or containers.
Grant the Read right to [Public]. Without the Read right, [Public] will not be able to search containers for the User object information. Be sure to check the Inheritable check box if you want to allow LDAP to search for users further down in the tree.
Figure 1 shows an example of granting rights to [Public] via the "Modify Trustees" option in the iManager utility
Figure 1: Granting rights to [Public] in iManager.
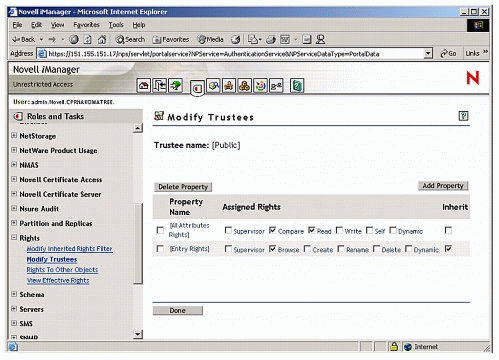
You can grant the Read right to the specific attributes that LDAP Contextless Login will search within User objects, or you can grant rights to all attributes. For example, you can grant rights only to the e-mail address or telephone number. Then when LDAP Contextless Login searches the tree as [Public], it can search only these attributes.
Setting Up a Proxy User for LDAP Contextless Login
Setting up a proxy user allows you to specify a User object whose rights will be assumed by an anonymous user during an LDAP session. A Proxy User Anonymous Bind is an anonymous connection linked to an eDirectory username. If an LDAP client binds to LDAP for eDirectory anonymously, and the LDAP group is configured to use a Proxy User, the user is authenticated to eDirectory as the Proxy User. Specifying a User object as a proxy allows more flexibility and better security since anyone logging in anonymously is subject to the selected User object's restrictions and rights to browse the directory.
Instead of using an existing User object, you will probably want to create a User object with the necessary rights to search the attributes and then assign this User object to the proxy username in the LDAP Group object (see Figure 2).
Figure 2: Assigning a User object to the proxy username in the LDAP Group object.
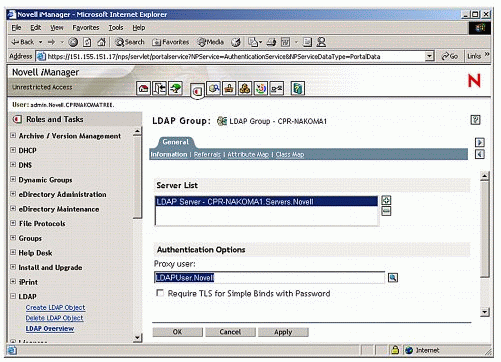
You can assign the proxy user rights to the Root of the tree so that the LDAP client can view attributes of User objects throughout the tree. Or, you might want to restrict access by assigning Read rights only to individual Organizational Units that you want LDAP to search for users. Figure 3 shows an example of assigning the proxy user "LDAPUser" attribute-specific rights.
Figure 3: Assigning specific attribute rights to the proxy user.
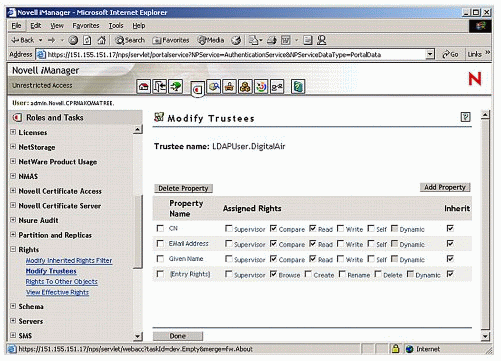
Note that the "Inheritable" checkbox is checked. This allows the User object "LDAPUser" to see attributes of all objects from the [Root] on down.
For more specific instructions about how to set the rights for the proxy user, see "Understanding How LDAP Works with eDirectory" in the eDirectory documentation (http://www.novell.com/documentation/lg/ndsedir86/index.html?page=/documentation/lg/ndsedir86/taoenu/data/h0000007.html).
Configuring the Novell Client to Use LDAP Contextless Login
Once you set up the Proxy user with the correct rights to the attributes that will be searched by LDAP Contextless Login, you must also install and configure the Novell Client for Windows NT/XP/2000 version 4.9 or later for LDAP Contextless Login, as explained in this section.
If you are installing the Novell Client software on just a few workstations, install the software and then configure the Novell Client property pages so that the LDAP port number and SSL settings in the client properties match the settings on your LDAP server. For more information on these steps, see "Setting Up LDAP Contextless Login on One Workstation" in the Novell Client for Windows documentation at http://www.novell.com/documentation/lg/noclienu/index.html?page=/documentation/lg/noclienu/noclienu/data/ahpxzr7.html.
If you are installing the Novell Client software on multiple workstations, preconfigure the LDAP Contextless Login property pages prior using NCIMAN so that the LDAP port number and SSL settings in the Client properties match the settings on your LDAP server. Then install the Novell Client software. For more information on these steps, see "Setting Up LDAP Contextless Login on Multiple Workstations" in the Novell Client for Windows documentation at http://www.novell.com/documentation/lg/noclienu/index.html?page=/documentation/lg/noclienu/noclienu/data/ahpxzr7.html#ahqa58z.
LDAP Contextless Login no longer requires the context because LDAP searches the tree for other attributes that define a user. Previously, users were located during login by their username and context. Now, you can specify any number of attributes that LDAP will use to identify a specific user, such as e-mail address, full name, given name, surname, telephone number, or the unique ID attribute.
LDAP takes the data entered in the username field and searches the user attributes from the context you specify as the administrator. If multiple users are found with the same username and specified attributes, the user is prompted to select his or her account from the list.
Enabling LDAP Contextless Login
To enable only LDAP Contextless Login, go to the Novell Client Configuration window and check the "Enable LDAP Contextless Login" checkbox, as shown in Figure 4. In the Servers field, specify the IP address or DNS name of the server running LDAP services and then click Add. If you have more than one server running LDAP, you can specify additional servers. Order is important for speed and efficiency; servers will be queried in the given order for their tree until one is found that matches the tree specified by the user in the Tree field.
Figure 4: Enabling LDAP Contextless Login in the Novell Client.
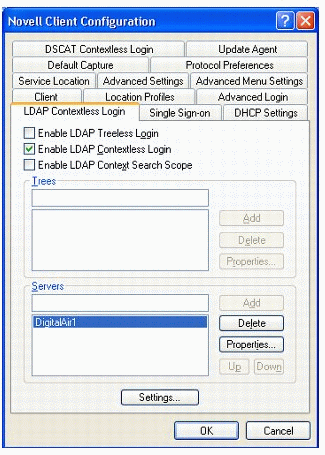
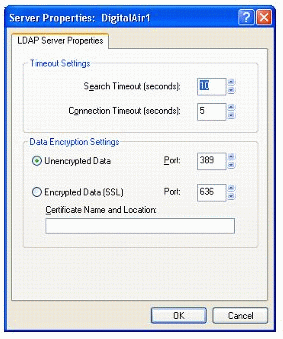
You can also modify the server's property page to make sure that the timeout settings and data encryption settings are correct (see Figure 5). If you are using Secure Socket Layer (SSL) to establish a secure connection, you must specify the path and name of the certificate on the workstation. You should also check to make sure that the correct port number is specified.
Figure 5: Setting the LDAP Server Properties.
Limiting the Scope to Trees and Contexts
Optionally, in the Novell Client Configuration window you can limit your search for users to a certain context by checking the "Enable Context Search Scope" checkbox (see Figure 6).
Figure 6
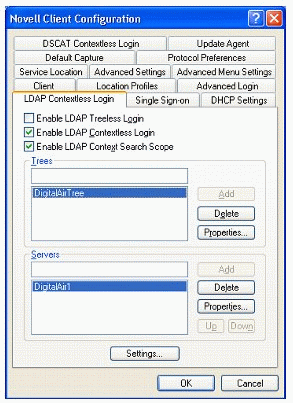
Once you have checked this box, the Trees listbox and the Tree Properties button become active and you can enter tree information and set the context to be searched. In the Trees field, specify the name of an eDirectory tree running LDAP services and then click Add. You can add more than one tree to the list. The trees will be searched in the order that they appear in the list. The tree information entered by the user must match the information you enter to limit the scope for the LDAP search to work.
If you also want to limit the scope of the search on that tree, select the tree from the Trees list and then click Properties. You can enable a search in the specified contexts and any containers in that context by clicking on the "Search Context and Subtree" radio button. Or, you can enable a search in the specified context only by selecting Search Context Only. In both cases, you must type the distinguished context delimited by commas (standard LDAP format)--for example: ou=tokyo,o=digitalairline, as shown in Figure 7. Then click Add.
Figure 7: Setting the Search Context and Subtree in the Tree Properties.
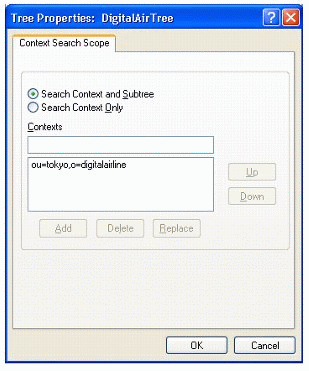
You can add multiple contexts to be searched. The servers and contexts are searched in the order you specify. You can change the order by selecting a server or context, then clicking the Up or Down buttons to move its position in the search list.
Make sure you enter the contexts correctly, because the LDAP property page does not check to see if the contexts are valid. If users have problems logging in, double-check to verify that you have entered the correct context information.
Specifying the Attributes to Search
You must specify the attributes that LDAP Contextless Login can search. For example, you can specify any one of the following attributes:
E-mail address
Full name
Given name
Surname
Telephone number
Unique ID
To specify what attributes will be searched, click the Settings button and set the desired attributes to "On". The attributes are shown in the Parameters list as "Search on E-mail Address", "Search on Full Name", and so on (see Figure 8).
Figure 8: Setting the LDAP Contextless Login parameters.
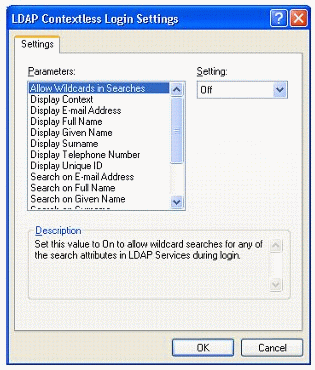
In this window, you can also choose to display various attributes in the login box. If users need to enter information so that it can be searched on, make sure that you enable that piece of information to be displayed in the login window.
Because users do not need to enter their context, you might want to disable the "Display Context" parameter so that the context will not be displayed during login. However, if multiple users with the same username might exist in the same tree or branch, the user will be prompted to select the correct user account from a list depending on other attributes (such as context, e-mail address, or full name) that have been set by the administrator.
Going Treeless
If you really want to get wild, you can also go treeless by enabling LDAP Treeless Login. If you select "Enable LDAP Treeless Login", LDAP Contextless Login is also enabled by default. LDAP Contextless Login authenticates users against the first tree that the user belongs to that is associated with the server list specified on the LDAP Contextless Login Property Page. In this case, the order of servers is important because LDAP Contextless Login takes the first match it finds. While users no longer need to know their tree name or context, if you have set up Context Search Scope, the user must still enter the correct tree name because you have limited the scope of the LDAP search to a specific context.
In order for LDAP Treeless Login to work, you need to set all the same information that you set for LDAP Contextless Login.
What Users Will Experience with LDAP Contextless Login
When users log in to the network using LDAP Contextless Login, they see the familiar Novell Login dialog box as shown in Figure 9. The users simply enter their username and other specified attributes based on the options you specified in the LDAP Contextless Login Settings page, such as the password.
Figure 9: Novell Login dialog box with LDAP Contextless Login enabled.
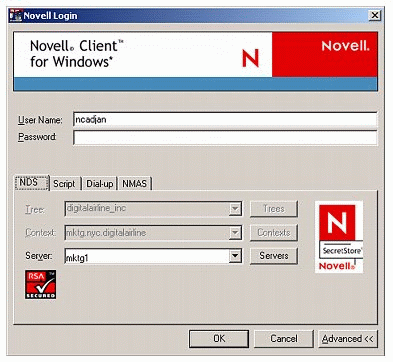
If LDAP Treeless Login has not been set up, users will have to enter their tree name. The context information is added automatically to the Novell Login window when the username is found.
If you selected to allow wildcard searches, users can perform a wildcard search and the LDAP database will list all possible users that meet the search criteria. However, it is important to understand that LDAP Contextless Login doesn't necessarily search for the user every time the user goes through the login process. In fact, under normal circumstances, an LDAP search rarely occurs. There are two events which cause LDAP Contextless Login to search a user's context and/or tree: (1) a change in the username field; and (2) in the case of Contextless Login, a change in the tree name field.
Once a successful login has occurred, the successful login parameters, including username and tree name, are stored to be brought up as the defaults for the next login attempt. So if nothing is changed during the next login, no LDAP search will occur.
Customizing the Novell Login Dialog Box
You can customize the Novell Login dialog box to show the features that you want users to have access to. Customizing gives you control over what fields and buttons the users see during login. So, for example, if users don't need to enter their context, you can eliminate this field and button from the screen.
You can customize the Novell Login dialog box to show the features that you want users to have access to. Customizing gives you control over what fields and buttons the users see during login. So, for example, if users don't need to enter their context, you can eliminate this field and button from the screen.
You can customize the following:
Tree field. If the Novell Login dialog box is being used to log in to a specific tree, disable the Tree field to prevent users from changing the tree.
Tree button. If the Novell Login dialog box is being used to log in to a specific tree, disable the Tree button to prevent the user from changing the tree.
Context field. If the Novell Login dialog box is being used to log in to a specific tree, disable the Context field is disabled to prevent users from changing the context.
Context button. If the Novell Login dialog box is being used to log in to a specific tree, disable the Context button to prevent users from changing the context.
To show or hide any Login dialog box options, right-click the N icon in the system tray. Then click Novell Client Properties and select the Advanced Login tab. In the "Show On Login" section of the Advanced Login property page, you can check the checkboxes for the items that you want users to access and uncheck those that you want to be greyed out (see Figure 10).
Figure 10: Selecting which items to show in the Novell Login dialog box.
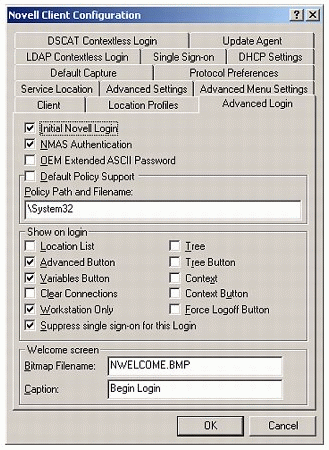
The login box will only contain the information that the users need to input. For more information, see "Customizing the Novell Login Dialog Box" in the Novell Client documentation at http://www.novell.com/documentation/lg/noclienu/index.html?page=/documentation/lg/noclienu/noclienu/data/hqyfl7t5.html.
Troubleshooting the Most Common Problem
The most common problem in getting LDAP Contextless Login to work is insufficient rights for the LDAP Proxy user. By default, the proxy user used by LDAP services does not have sufficient rights to browse a User object's individual attributes such as e-mail name, phone number, or even the common name. Problems with the access rights given to the proxy user are usually indicated by an error message similar to the one shown in Figure 11.
Figure 11: This error message usually indicates insufficient rights for the proxy user.

This message indicates that a connection with the server was made but no user was found in the tree to which that server belongs that matched the search criteria specified by the user. What it really means is that the LDAP client did not have enough access rights to the user's attributes to search for the given attribute so it could resolve to the user's context.
If you are experiencing this error or other problems with LDAP Contextless Login, check the Server and Group object configurations.
Troubleshooting with DOS Command Line Utilities
You can see the same attributes that LDAP Contextless Login sees (or doesn't see) by using openly-available LDAP utilities. For example, by using the DOS command line utility LDAPSEARCH (available as part of the Novell LDAP SDK at http://developer.novell.com/ndk), you can search for attributes and thereby verify that the necessary attributes can be read.
For example, Figure 12 uses LDAP syntax to display the dn (distinguished name), givenname, sn (surname), and mail (email address) attributes for all User (inetOrgPerson) objects at a given OU and below. Note that not all objects have all of the requested attributes defined so sometimes nothing is displayed for that attribute. Also, since no login user and password was specified, we login as and assume the rights of the user "anonymous".
Figure 12: Viewing object attributes with the LDAPSEARCH utility.
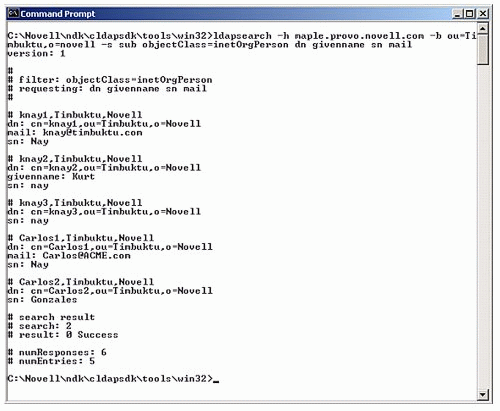
In this example, the values of the email, givenname, and surname (sn) attributes are visible and therefore can be read by LDAP Contextless Login.
Troubleshooting with an LDAP Browser
A more graphical way to display the object attributes that LDAP Contextless Login can see is by using an LDAP browser. Several LDAP browsers are available on the Internet. One example is the Softerra LDAP Browser that can be found at http://www.softerra.com/products/ldapbrowser.php. By using such a browser and binding to the LDAP server anonymously, you can verify that the necessary attributes can be seen.
In the LDAP browser, browse to the user and verify that you can read the inetOrgPerson property and other properties you are searching for, such as common name and email. If these attributes cannot be seen through the LDAP browser by logging in anonymously, LDAP Contextless Login likewise cannot perform the proper searches to resolve the User object's context in the tree.
Conclusion
The LDAP Contextless Login feature included in the Novell Client for Windows NT/XP/2000 version 4.9 or later allows you to leverage the power of LDAP Services for Novell eDirectory. With this feature enabled and configured as shown in this AppNote, users with Windows NT/2000/XP workstations can log in to the network without having to enter their context or tree in the Novell Login screen. This feature is useful for managing the costs of supporting client login.
* Originally published in Novell AppNotes
Disclaimer
The origin of this information may be internal or external to Novell. While Novell makes all reasonable efforts to verify this information, Novell does not make explicit or implied claims to its validity.