Novell Server Consolidation Utility, Migration Wizard, or Volume Split/Move: Which Should I Use?
Articles and Tips: article
Software Engineer
Novell, Inc.
bcutler@novell.com
01 Aug 2003
This AppNote provides an overview of two updated utilities that have been released along with NetWare 6.5: the Migration Wizard 6.5 and the Server Consolidation Utility 2.5. It covers the new features of each and explains when you would use one over the other. It also introduces the NSS Volume Split/Move feature in NetWare 6.5.
|
Topics |
NetWare server upgrades, server migration, server consolidation, NSS volumes |
|
Products |
NetWare 6.5, Migration Wizard 6.5, Server Consolidation Utility 2.5 |
|
Audience |
network administrators, installers |
|
Level |
beginning |
|
Prerequisite Skills |
familiarity with NetWare servers |
|
Operating System |
NetWare 6.5 |
|
Tools |
none |
|
Sample Code |
none |
Introduction
With the release of NetWare 6.5, Novell has released two updated utilities: the Migration Wizard version 6.5 and the Server Consolidation Utility version 2.5. There is also a third related capability called NSS Volume Split/Move.
The purpose of this AppNote is to clarify what these utilities do and when you would use one over the other. It will also cover some of the new features of the Migration Wizard and the Server Consolidation Utility.
For the remainder of this article, whenever I refer to eDirectory, it also applies to NDS. eDirectory is simply a newer version (8.x) of NDS.
Overview of the Utilities
This section provides a brief overview of the utilities and the primary uses for each one.
Migration Wizard 6.5
The Migration Wizard 6.5 utility is designed to help you transfer the identity of one server to another server. This is what is referred to as a server hardware upgrade. (If you are going to add a new server with a new name into the tree, you wouldn't use the Migration Wizard.) By transferring the identity from one physical server to another, you won't need to update any client applications that may be doing drive mappings or running applications based on the server name. All file system data, including meta-data such as file trustees, ownerships and attributes, is copied from the old machine to the new one (see Figure 1).
Server hardware upgrade with the Migration Wizard 6.5. The eDirectory files are also transferred from the old server to the new one without any additional work on your part. After the migration, the eDirectory partitions that existed on the old server will exist on the new server. This is because the Migration Wizard backs up the entire eDirectory database on the source server and restores it on the destination server.
Once the migration is complete, the old (source) server will be brought down and the new (destination) server will be rebooted. When it comes back up, it will have the source server's name. Most of the process is automated, but you will have to manually change the IP address of the destination server to match that of the source server. Products and services are not migrated. Once the migration is complete, you will need to re-install all applications and reconfigure them, if necessary.
Server Consolidation Utility 2.5
The Server Consolidation Utility copies file system data and meta-data from one location to another within the same eDirectory tree or between trees. It also moves printer agents from one print manager to another within the same tree. If you are moving data between trees, it allows you to match up file trustees. If the file trustees are User objects or Group objects, you can create new users and groups in the destination tree based on the users and groups in the source tree (see Figure 2).
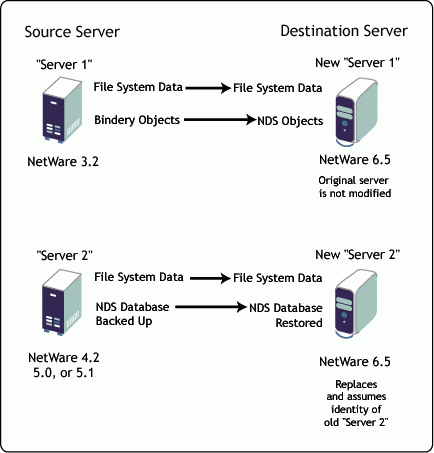
Figure 2: Combining multiple servers into one with the Server Consolidation Utility 2.5.
NSS Volume Split/Move
Another feature in NetWare 6.5 is NSS Volume Split/Move, which is accessed via the Novell Storage Services (NSS) utilities. This feature allows you to take an existing volume and split it across two different physical locations. It keeps the same physical volume name but it is logically split between multiple locations (see Figure 3).
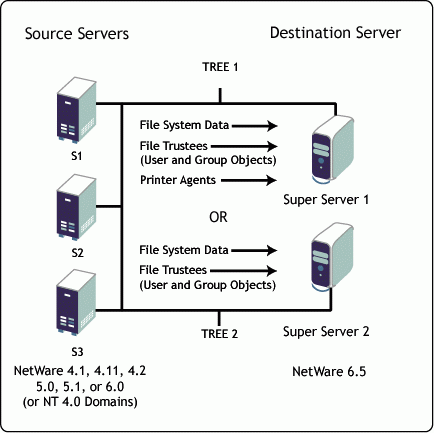
Figure 3: Extending a NetWare 6.5 volume with the NSS Volume Split/Move feature.
You can use the Volume Split/Move capability if you have a volume that needs more space on one server and you have extra space available on another server. Because the volume is made larger while keeping the same logical volume name, no clients will have to be modified.
Migration Wizard 6.5 Features
This section provides additional details on the features of the Migration Wizard 6.5.
Source and Destination Server Versions
The Migration Wizard allows you to do a hardware upgrade from and to servers running the following versions of NetWare:
|
Old Server Version
|
New Server Version
|
|
3.12, 4.11, 4.2, 5.0, 5.1 |
5.1, 6.0, 6.5 |
|
6.0 |
6.0 |
|
6.5 |
6.5 |
The first question you are probably asking is, why can't I migrate from NetWare 6.0 to 6.5? There are two parts to the answer.
First, with the introduction of NetWare 6.0, a large number of services were added to the operating system. When you upgrade a server, these applications need to be upgraded at the same time. This means that, not only would you have to change the server hardware and upgrade the operating system (OS), but you would also be upgrading multiple applications. It has been our experience that the more changes you make at one time, the more risk there is of something going wrong. Conversely, the more you can control the changes, the easier it is to find and fix any problems that may occur. Upgrading the hardware, OS, and applications all at the same time created what we deemed an unacceptably large risk. Therefore, we eliminated the direct approach of upgrading the hardware, OS, and applications all at once.
Second, in NetWare 6.5 a new Remote Upgrade option has been introduced which will allow you to remotely upgrade a running server from your workstation. Previously, you had to go to the server to do the upgrade. Now you can do this from the comfort of your office, through the Remote Upgrade option in either iManager 2.0 or the NetWare Deployment Manager.
In light of these changes, you now have two choices to move from NetWare 6.0 to 6.5:
You can do an in-place upgrade from NetWare 6.0 to 6.5 on the old hardware, if your hardware meets the NetWare 6.5 requirements.
You can install NetWare 6.0 on a new destination server, migrate the source server to it using the Migration Wizard, make sure it functions correctly, and then use the Remote Upgrade option on the destination server to upgrade it to NetWare 6.5.
Based on the rationale presented above, in the future the Migration Wizard will only be used to perform hardware upgrades (same NetWare OS on both source and destination).
New Features
Rather than detail all of the features that have been brought forward from previous releases of the Migration Wizard, this section will simply address the significant new features in the Migration Wizard 6.5. For information about the features available in previous releases, see "Upgrading or Migrating to NetWare 6" in the October 2001 issue of Novell AppNotes, available online at http://support.novell.com/techcenter/articles/ana20011002.html.
File Copy
The file copy operation no longer requires you to have exactly the same volumes on the source and destination servers. Now you can model the project by dragging and dropping folders from the source server to the destination server. Once you have completed the model, you select to begin the migration.
When the project is created, you drop the standard SYS folders from the source into the SYS:SYS.MIG directory of the destination. The standard SYS folders are defined as any folders that exist on the destination folder's SYS volume when you create the project. You can back them out, if desired, prior to doing the migration. You can also drop other folders from the source to the destination. You can select a container, click the right-mouse button, and select "Show Dropped Directories" to see all the dropped folders, including the ones you've dropped and the ones the system dropped for you.
When you've completed the file modeling phase, select the Project/Migrate menu option or click the Migrate button. You will then see the familiar four-step migration process from the previous version of the Migration Wizard, as shown in Figure 4.
The four-step migration process in the Migration Wizard.
In Step 1, the files are copied according to what you have dragged and dropped in the project model.
Step 2 is Edit Configuration Files.
Step 3 is Begin eDirectory/NDS Migration.
Step 4 is Continue eDirectory/NDS Migration.
Steps 1, 2, and 4 have not substantially changed. Step 3 still goes through the same process as the previous version, but it stops after each sub-step to allow you to verify that the step completed correctly.
The first sub-step modifies the configuration files on the destination server.
The second sub-step backs up the eDirectory /NDS database on the source server and copies it to the destination.
The third sub-step downs the source server.
The fourth sub-step removes eDirectory from the destination server and renames the destination server.
The fifth sub-step restores and upgrades eDirectory/NDS to the destination server.
The final sub-step of the process reboots the destination server with the source server's name.
Since each step adds complexity to restoring, you need to make sure that each step completes correctly. If any of these steps fail, you are given a procedure to bring the old server back online without any loss of data. This is done by following the dialog box instructions. You can abort the migration at any step except for the final sub-step, and relatively easily back out of the migration. Once the destination server reboots and starts advertising as the source server, it is more difficult to get the old server back to its pre-migration state. That's why the Migration Wizard asks you to make sure all the previous steps have completed successfully before performing the final step.
New Features in the Server Consolidation Utility 2.5
A number of new features have been added to the Server Consolidation Utility since version 1.0 was released.
The 1.0 release only allowed you to copy files between servers within the same tree. You can now move data between trees, maintaining all trustees and ownerships.
The NT-to-NetWare migration capability has been moved from the Migration Wizard to the Server Consolidation Utility.
The following sections highlight some additional new features.
File Synchronization
In addition to being able to refresh the destination server with newer files from the source server, you can also select to delete files and folders from the destination that don't exist on the source. This way you can copy a set of files and, at a later point in time, refresh the files, which will copy all newer files and delete any files from the destination that were deleted from the source since the last update.
File Comparison
If you want to be assured that all of the file system data copied correctly, you can select to have the Server Consolidation utility check for you. If this option is selected, the utility will compare the file and directory names, dates (Last Accessed, Last Modified, Created), size, attributes (Read-only, Hidden, System, and so on), trustees, and ownerships. You can also select to have it compare the actual file contents. Of course, this final option could be rather time consuming; however, the client does all of the processing for the comparison routines so as not to burden the servers unnecessarily.
Date Selection
You can select to copy files based on dates. For example, you might not want to copy any files that haven't been accessed for a long time. The three date selections are: Last Accessed, Last Modified, and Created. There is an "On or Before" and an "On or After" date for each type (see Figure 5).
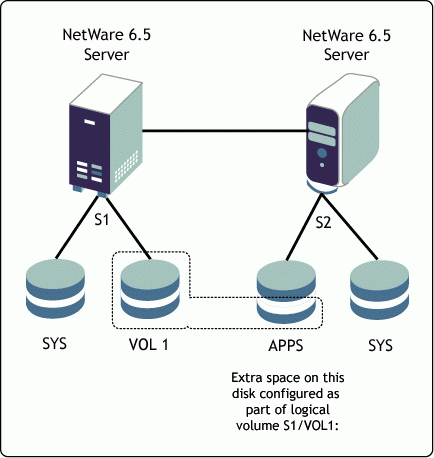
Figure 5: Filtering files based on dates.
Wildcard Selection
You can select to exclude certain files from being copied based on file extension. For example, if you don't want to copy MP3 files that your users have stored on the network, you can select to exclude them from the copy process by entering "*.mp3". You can also select individual files that you don't want copied as well. This is done by entering the full name of the file, such as "Sam's file.doc" (see Figure 6).
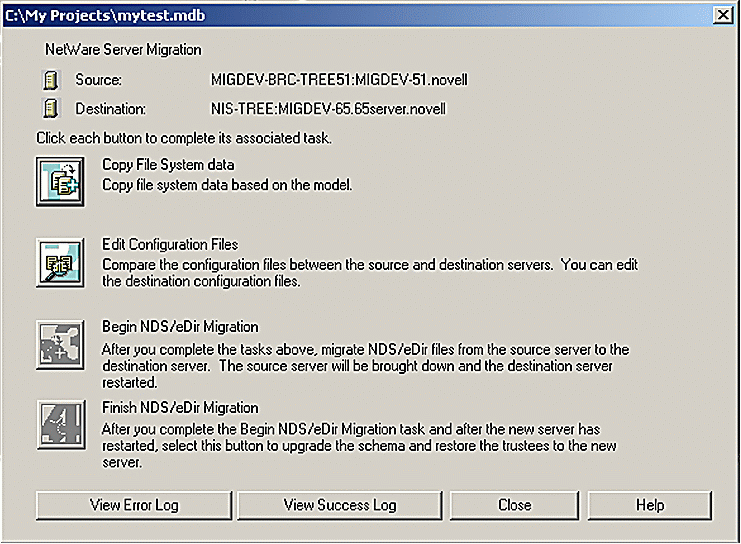
Figure 6: Excluding files through wildcard selection.
Space Check
You can have the utility check to make sure there is enough room on the destination volume to copy the files. It adds up the space for all dropped directories for each volume and reports the estimated size requirements. Obviously, if you have already copied some or all of the files and are just refreshing the copy, it would appear that you don't have enough space. This would be an erroneous message because you might actually have enough space. We've all seen this before, especially when reinstalling applications.
Disable Login
If you want to be absolutely sure that all files copy, you can have the utility disable the login on the source server while copying files from it. Of course, you will have to initially get everyone off the server. The utility doesn't delete connections prior to disabling the login.
Server-to-Server Copy
This is not a new feature, but it is worth noting. The Server Consolidation Utility copies the files directly from server to server, without them passing through the workstation. Once the copy begins, the workstation is only used to monitor the copy process.
Conclusion
With the release of NetWare 6.5, the Migration Utility and the Server Consolidation Utility have been greatly enhanced for your benefit. These enhanced utilities, along with the new NSS Volume Split/Move feature, are designed to help you get the most out of your investment in NetWare.
If there are features that you would like to see in future releases of these utilities, we'd like to hear about them. We'd also be interested in your success stories. Novell has grand plans for these utilities, especially the Server Consolidation Utility, as they move to the Linux platform. Send your feedback to bcutler@novell.com
.
* Originally published in Novell AppNotes
Disclaimer
The origin of this information may be internal or external to Novell. While Novell makes all reasonable efforts to verify this information, Novell does not make explicit or implied claims to its validity.