Sending Secure and Encrypted Messages with GroupWise 6.5
Articles and Tips: article
Primary Support Engineer
Novell, Inc.
tkratzer@novell.com
01 May 2003
This AppNote explains how to send secure and encrypted e-mail messages, which can only be received and read by the stated recipient. It details the preparatory steps that must be taken by the GroupWise administrator, and then presents a User's Guide for instructing users how to proceed.
Note: The User's Guide portion of this AppNote is available as a separate Adobe Acrobat (PDF) file that you can download and print out for your users. To download the file, go to http://www.novell.com/coolsolutions/feature/9721.html.
- Introduction
- System Requirements
- Administrator Actions
- Overview of End-User Actions
- Sending Secure/Encrypted Messages with GroupWise 6.5: User's Guide
- Conclusion
|
Topics |
GroupWise, e-mail, security, encryption, digital certificates |
|
Products |
GroupWise 6.5, NetWare 5.1 and 6, Novell Certificate Server 2.0, Novell eDirectory 8.6 or later |
|
Audience |
network administrators |
|
Level |
intermediate |
|
Prerequisite Skills |
familiarity with GroupWise, NetWare, and eDirectory |
|
Operating System |
NetWare 5.1, NetWare 6 |
|
Tools |
none |
|
Sample Code |
no |
Introduction
Some e-mail users are required to send secure and encrypted messages. A "secure" message is one that only the stated recipient can receive. An "encrypted" message is one that can only be read by the stated recipient. Examples of messages that you may want to send secure and encrypted include:
Contract information
Trade secrets
Purchase requisitions
SEC-restricted information
HIPAA-restricted information
When you send a secure and encrypted message, the entire message body and the attachments are encrypted. The recipient addresses and the subject of the message are not encrypted.
This AppNote explains how you can capitalize on the value already built into the Novell NetWare environment by leveraging eDirectory and Novell Certificate Server. Novell Certificate Server is used to create X.509 certificates, which are a key component of the S/MIME standard. Novell Certificate Server is compatible with NetWare 5.1/6 and eDirectory.
The information and procedures outlined herein are based on an actual customer engagement in which the author was a participant. The software versions used when creating this documentation and procedure were eDirectory 8.6.2 on NetWare 6 Support Pack 2, with the Novell Certificate Server software installed from the NetWare 6 installation CD.
System Requirements
S/MIME (Secure Multipurpose Internet Mail Extensions) is a protocol for exchanging digitally signed and/or encrypted e-mail. Originally developed by RSA Data Security, Inc., S/MIME is now a widely-adopted industry standard based on the PKCS #7 data format for messages, and the X.509 v3 format for certificates. It relies on the multipart/signed MIME type described in RFC 1847 for moving signed messages over the Internet. If you would like to learn more about S/MIME, the Internet Mail Consortium Web site (http://www.imc.org) is a good starting point.
The information in this AppNote is centered around the S/MIME standard, because NetWare and the Novell Certificate Server, along with GroupWise 6.5, provide all the elements needed to support S/MIME out of the box.
S/MIME System Configuration Requirements
The system requirements for the NetWare server, administrator's workstation, and user's workstation are outlined below.
NetWare Server Software. Here are the software requirements for the NetWare server:
NetWare 5.1 or NetWare 6 with the latest Support Pack applied
Novell eDirectory 8.6.2 or later on the Organizational Certificate Authority (CA) server
Novell Certificate Server 2.0 or later on the Organizational CA server
To determine which server is the Organizational Certificate Authority (CA) for your eDirectory tree, and to verify the NetWare, eDirectory, and Certificate Server versions, follow these steps:
Start the Novell ConsoleOne utility and go to the root of your eDirectory tree. Highlight the Security container in the eDirectory browser view in the left-hand pane.
In the eDirectory object view (right-hand pane), highlight the object with the name of "<Tree_Name> Organizational CA". For example, for a tree named ACME_TREE, the name of the object you would be looking for is "ACMETREE Organizational CA".
Edit the Organizational CA object and go to the General tab and the Identification property page. Identify the server in the "Host server:" field. This is the Organizational CA's Host Server.
At the console prompt of the NetWare server you have determined is the Organizational CA's Host Server, type the following command:
VERSION
This command reports the NetWare version, including the Support Pack.
To find the version of the Novell Certificate Server running on this server, type the following command:
MODULES PKI
Verify that the Certificate Server version is 2.0 or above. For example, on a server runing NetWare 6 Support Pack 2, the Certificate Server version is 2.23.01.
If you have not yet installed the Novell Certificate Server, do so now. If you have a NetWare 6 SP2 overlay CD, install it from that CD rather than downloading the Certificate Server from http://download.novell.com. When you install eDirectory 8.6.2 or later, the Certificate Server is typically installed automatically.
To find the eDirectory (DS.NLM) version on the Organizational CA's Host Server, type the following command at the console prompt:
MODULES DS
The screen should display something like "Novell eDirectory Version 8.6.2 SMP". Confirm that the eDirectory version is 8.6.2 or later.
Administrator's Workstation Software Requirements. The software required at the administrator's workstation includes:
Novell International Cryptographic Infrastructure (NICI) version 2.4.2 or later
Novell Certificate Server ConsoleOne Snap-ins version 2.21 or later
When you perform the steps mentioned throughout this AppNote, you must be at the workstation where you have installed NICI support and the Certificate Server ConsoleOne Snap-ins. Here are the steps for obtaining this software:
Go to http://download.novell.com.
Start with the NICI software, which will be installed directly on the machine on which you are going to run the ConsoleOne utility. To obtain the latest NICI software for Windows, select to search by "Product" and choose "Novell International Cryptographic Infrastructure" from the pull-down list. Select the appropriate platform (such as "Windows 2000"), date posted (leave it set to "<All Dates>"), and language (such as "English"), and then click on "submit search". At the time this AppNote was written, the latest software was named "2.4.2 on Windows 95/98/NT/2000", dated 11 Nov 2002. Click on "download"-if you haven't already done so, you'll need to create a user profile to proceed. Save the .EXE file in a directory where you can easily find it.
Locate the .EXE file that you downloaded, double-click on it, and follow the installation wizard to install the NICI software.
To obtain the latest Certificate Server Snap-ins for ConsoleOne, select to search by "Product" and choose "Certificate Server" from the pull-down list. Select the appropriate platform (such as "Windows 2000"), date posted (leave it set to "<All Dates>"), and language (such as "English"), and then click on "submit search". At the time this AppNote was written, the latest software was named "2.21 Snap-in on Windows 95/98/NT/2000", dated 07 Sep 2001. Click on "download" and save the zipped file into a directory where you can easily find it.
The Snap-in software does not have an install routine or a readme file; you'll need an archive utility such as WinZip (available at http://www.winzip.com). Run the utility to expand the zipped file.
When prompted for a path in which to expand the software, indicate the full path to the ConsoleOne directory, such as C:\NOVELL\CONSOLEONE\1.2 (this may be "1.2" or "1.3" or something similar, depending on your ConsoleOne version). Figure 1 shows an example of specifying the correct extract path.
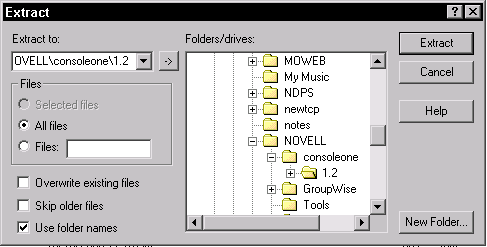
Figure 1: Specifying the ConsoleOne path to extract the Certificate Server Snap-ins.
Proceed with the ZIP file extraction to copy the snap-in files into the ConsoleOne directory.
User Workstation Software Requirements. In order for users to be able to send secure and encrypted messages, the following software must be made available to the users:
GroupWise 6.5 Windows client
Novell Certificate Console 2.0
The Novell Certificate Console Setup program is typically located in the SYS:PUBLIC\MGMT\CERTCONSOLE directory and is usually installed at the same time as the Novell Certificate Server software. However, I have seen occasions when the Certificate Server was installed but the Certificate Console software was not. If this is the case for you, do the following:
Go to http://download.novell.com and in the "choose a product" field select "Certificate Server". Keep all other defaults. Click on "submit search".
When the search is completed, you should see a download link labelled something like "2.0 on NetWare" (this was the latest version at the time this AppNote was written). Click "download" and save the self-extracting CERTSERV.EXE file to a directory where you can easily find it.
After the download has completed, locate and run CERTSERV.EXE, which is a self-extracting zipped file.
Locate the ...\FILES\PKIPUBLICFILES\CERTCONSOLE directory that was created during the extraction of CERTSERV.EXE. There should be a SETUP.EXE file is this directory.
Rather than having each user run the SETUP.EXE program to install this utility locally, run SETUP.EXE and install the Certificate Console utility to a network location where users have access to run the utility.
Test the Certificate Console utility, for which the executable is named CERTCNSL.EXE located in the \CERTCONSOLE\BIN directory under the directory where you installed the Certificate Console.
Note: In rare cases with specific hardware, the Certificate Console utility will not run. Fortunately, the workaround is simple. All you have to do is go to the . . . \CERTCONSOLE\BIN directory and rename the SYMCJIT.DLL file to SYMCJIT.OLD. This DLL is not needed by the Certificate Console.
Remember that the GroupWise 6.5 Client must be installed on the users' workstations in order for them to be able to follow the directions in the User's Guide portion of this AppNote.
Administrator Actions
This sections outlines the remaining actions the administrator must take to prepare the system for sending secure and encrypted e-mail.
Validate the Certificate Authority's Public Key Certificate
Follow these steps to validate the CA's public key certificate:
In ConsoleOne, go to the root of the tree and highlight the Security container on the eDirectory browser view in the left-hand pane.
In the eDirectory object view (on the right-hand) highlight the object with the name of <The TREE Name><Organizational CA>. For example if my tree was called ACME_TREE the name of the object I would be looking for is "ACMETREE Organizational CA".
Edit the Organizational CA object and go to the "Certificates" tab and the "Public Key Certificate" property page. Click the Validate button, and make sure the certificate comes back as valid.
Note: When you go to this page again, the Validate button will always be available.
Generate User Certificates in eDirectory
Follow these steps to generate certificates in eDirectory for your users:
In ConsoleOne's browser view, highlight a full eDirectory User object (one for which the icon has a red shirt).
Note: You must highlight the User object in the eDirectory browser view, not the GroupWise view.
Edit the properties of the user.
Click on the Security tab to see the Certificates property page, as shown in Figure 2.
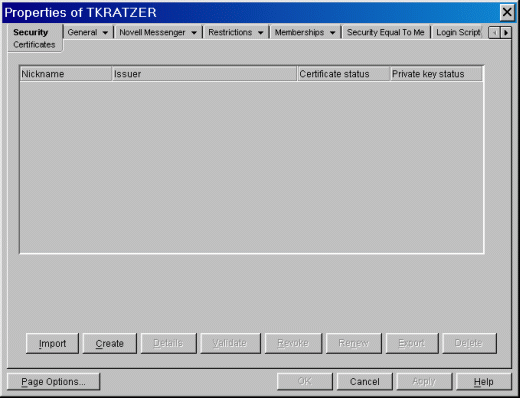
Figure 2: The Security > Certificates property page for a User object.
Click the Create button to access the "Create User Certificate" dialog.
In the drop-down field next to "Server:", specify the Organizational CA's Host Server (or another server that you know has the same Certificate Server and eDirectory versions as the Organizational CA's Host Server).
Fill in the "Certificate nickname" field. This user and other users will see the nickname you assign here, so you should make it something intelligible; for example, the user's full name. There is no need for you to keep a record of the nicknames you assign.
Keep the "Standard" setting for the certificate creation method. You can choose Custom if you want to configure either of these two settings:
Specify a certificate validity period other than the default of two years.
Specify an e-mail address other than the one stored in eDirectory (if any) for the user. E-mail programs require the sender's e-mail address in any certificate that is to be used for securing e-mail.
If you are prompted for an e-mail address, fill in the user's Internet E-mail address as it would appear in the mailbox of an individual who received an e-mail from this user. Click OK to save the e-mail address.
Click Finish to create the user's certificate.
Click the Validate button to ensure that the certificate is valid. It may take a couple of minutes until you receive a message stating that the certificate is valid.
Overview of End-User Actions
The following is an overview of the steps that must be performed by GroupWise users who intend to send secure and encrypted e-mail messages to one another:
Each user must run the Certificate Console utility and export their Private Secure/Encryption Key.
Each user must then import his or her Private Secure/Encryption Key into GroupWise.
Each user must send each other a digitally-signed message, in order to exchange their Private Secure/Encryption Keys.
Users should then test sending secure/encrypted messages back and forth to ensure functionality.
Important Notes
Here are some final notes to be aware of:
Users must be logged in to an eDirectory tree in order for the Certificate Console utility to launch.
If you are logged into two or more eDirectory trees and you run Certficate Console, the interface may look garbled, in that the "Subject Name", "Effective Date", and "Expiration Date" fields do not appear.
As mentioned above, in certain hardware configurations the Certificate Console utility will not load at all. The workaround is to rename the SYMCJIT.DLL file in the . . . \CERTCONSOLE\BIN directory to SYMCJIT.OLD. This DLL is not needed by the Certificate Console.
You may delete a user's certificate with no problem; however, if you re-create the certificate, the user will need to re-import the certificate and distribute it again.
Neither encrypted messages nor the attachments contained in those messages can be scanned by virus scanning software. For virus protection, you are completely dependent upon virus scanning happening at the sender's or recipient's workstation.
For simplicity's sake, the User's Guide portion of this AppNote instructs users not to choose "Set strong private key protection". However, you may allow them to choose this higher level of protection if you so desire.
Encrypted messages can only be viewed in the GroupWise 32-bit Windows client; the GroupWise WebAccess client cannot read encrypted messages.
If a user is running Microsoft Outlook Express as a POP3 or IMAP client on the same machine where the private keys are imported for the sender and recipient, then the Outlook Express client can read the encrypted messages. This has been tested with Outlook Express v6.
Although this AppNote focuses on GroupWise, it is quite likely you will have the need to communicate securely with non-GroupWise systems across the Internet. In my testing with Microsoft Outlook Express, I found that the processes of exchanging certificates and sending encrypted messages in Outlook Express are almost identical to those in GroupWise. The particular advantage that Novell customers have is that they can mint X.509 certificates for free, whereas non-Novell customers must purchase X.509 certificates for their users.
Sending Secure/Encrypted Messages with GroupWise 6.5: User's Guide
The following are step-by-step instructions for sending secure and encrypted messages that will comply with the security and encryption standards your organization has adopted.
When you send messages normally within GroupWise, they are encrypted. However, the recipient can forward your messages to other people with ease. Also, when you send messages across the Internet, they are often not secure or encrypted. The procedures outlined in this AppNote are designed to fill in these gaps in information security.
By sending secure and encrypted e-mails, you can ensure that only the stated recipient is able to read the messages you send. Examples of e-mails that you'd want to send secure and encrypted are messages that contain:
Contract information
Trade secrets
Purchase requisitions
SEC-restricted information
HIPAA-restricted information
While the process described here may seem foreign and arcane, you will need to perform most of these steps only once. You must execute the technical steps personally, because that is the only way to assure recipients that messages you compose and send encrypted are done with your authorization.
Step 1: Export Your Encryption Key/Certificate
You only need to perform this procedure once.
Start up the Novell Certificate Console utility. Your network administrator will tell you where this utility is located.
You will see a screen similar to the one shown in Figure 3; however, the username and other information displayed will be specific to you.
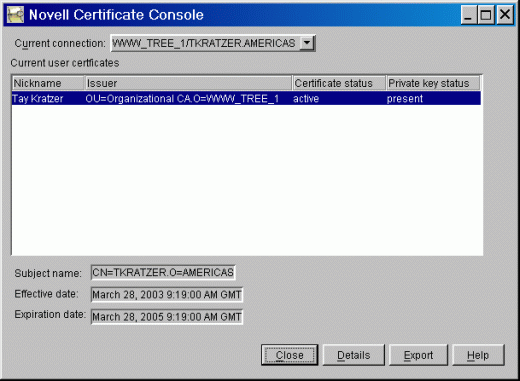
Figure 3: Initial screen of the Novell Certificate Console utility.
Click the Export button.
In the next dialog (see Figure 4), you are asked if you want to export the private (encryption) key with the certificate. Answer "Yes" to this prompt and then click the Next button.
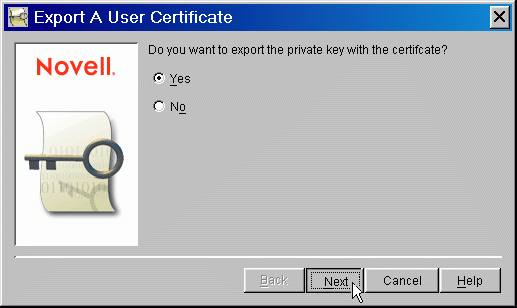
Figure 4: The "Export A User Certificate" prompt.
In the next screen (shown in Figure 5), do the following:
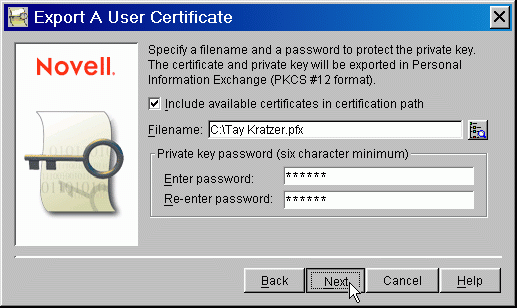
Figure 5: The "Export A User Certificate" dialog.
Make sure the checkbox for "Include available certificates in certification path" is checked.
Keep the default filename and path specified. Note the name of the *.PFX file that is being created.
Enter and re-enter a password of 6 characters or longer. This does not have to be the same as your login password. In fact, you won't have to remember this password beyond the initial setup period explained in this AppNote. You will need to provide this password later on in these procedures, but that's it-you will not need it beyond that.
When you are ready, click Next to continue.
The last screen (see Figure 6) shows a summary of your selections.
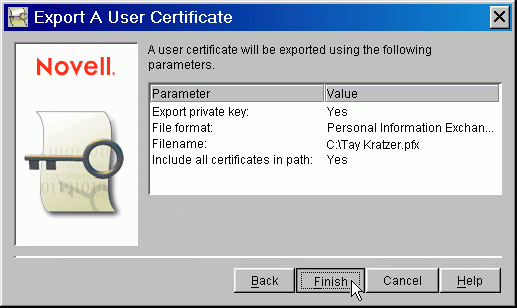
Figure 6: The "Export A User Certificate" summary screen.
Review the information and then click the Finish button. You will not see a screen confirming the success of the operation, but it's generally safe to assume the export went just fine. You can now close the Novell Certificate Console utility.
Step 2: Import the Encryption Key/Certificate into GroupWise
You will only need to perform this procedure once.
From the GroupWise 6.5 32-bit Windows client (not the GroupWise WebAccess browser-based client), access your GroupWise Mailbox.
Select Tools > Options > Certificates. You will see the screen shown in Figure 7.
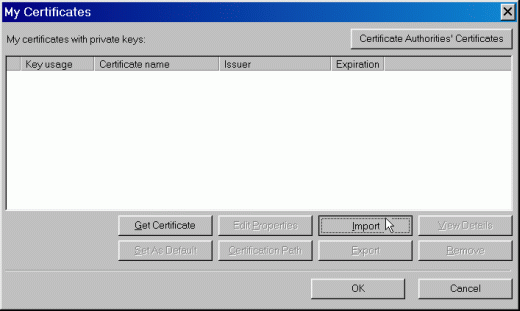
Figure 7: The "My Certificates" screen in GroupWise 6.5.
Click on the Import button. Follow the instructions below while referring to Figure 8.
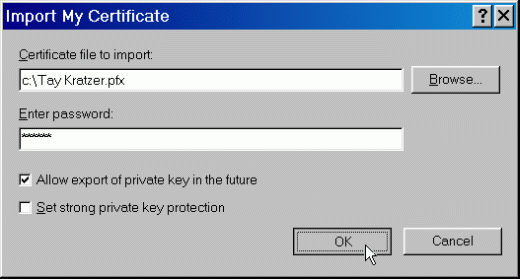
Figure 8: The "Import My Certificate" dialog.
To fill in the "Certificate file to import" field, click the Browse button and navigate to the *.PFX file you exported in the previous procedure.
Type the password that you were prompted to enter earlier when exporting your certificate and private key.
Make sure the checkbox for "Allow export of private key in the future" is checked.
Do not check the checkbox for "Set strong private key protection" (unless your network administrator tells you otherwise).
Click the OK button to continue.
Note: If you are prompted to add the "Root Store Certificate," answer "Yes".
Highlight the certificate you just created and click the Set As Default button. You should then see a green checkmark next to the certificate, as shown in Figure 9.
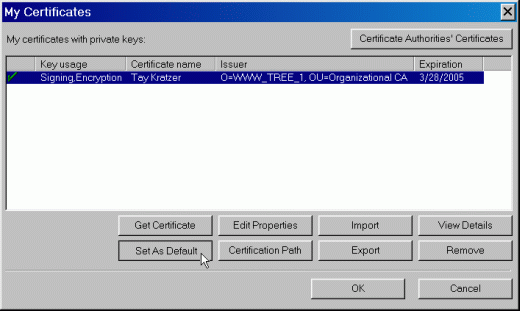
Figure 9: The imported certificate set as default.
Click OK and then Close to return to the GroupWise 6.5 mailbox.
You have now configured GroupWise 6.5 so that, when you choose to do so, you can send secure and encrypted e-mail. However, you must first exchange your encryption key/certificate with those users who you intend to communicate with in a secure and encrypted manner. The following are step-by-step instructions that both you and another user must follow in order to send and receive your encryption keys.
Step 3: Exchange Encryption Keys
Sending the Encryption Key.��Both users must complete the following steps to exchange their encryption keys:
From the GroupWise Windows client (not a browser), select File > New > Mail.
Address the e-mail to the desired recipient.
Click the Send Options tab, and then click on the Security icon in the left-hand side of the window.
Under "Secure item options," place a check in the checkbox for "Sign digitally", as shown in Figure 10.

Figure 10: Selecting the option to "Sign digitally".
Send the message to the recipient.
Receiving the Encryption Keys.��Both users must perform these steps to accept and import the sender's certificate/ private key that was just sent.
In the GroupWise Windows client, open the e-mail message that was signed digitally.
When the "Security Warning" dialog appears, select the Signing/Encryption Certificate tab.
Click on the Modify Trust button and select the choice "I trust this certificate." A message box should appear confirming the successful import, as shown in Figure 11.
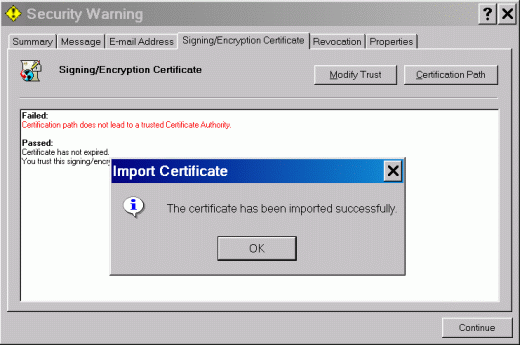
Figure 11: Message indicating successful import of the certificate.
Click on OK and then Continue.
Step 4: Test Sending an Encrypted Message
Once the above procedures have been successfully completed, you are ready to test the sending of an encrypted message.
Note: Both users must have performed all of the steps outlined above before proceeding with the test.
From the GroupWise Windows client (not a browser), select File > New > Mail.
Click the Send Options tab, and then click on the Security icon at the left-hand side of the window.
Place a check in the checkbox next to "Encrypt for recipients", as shown in Figure 12.
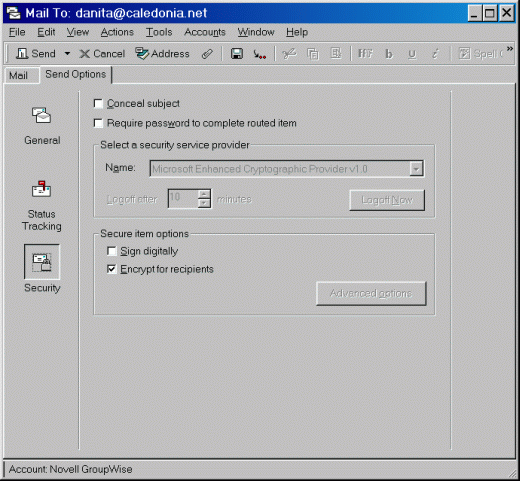
Figure 12: Selecting the option to "Encrypt for recipients".
Compose a test message and send it to the recipient with whom you previously exchanged encryption keys.
Verify that the intended recipient, who has received your encryption key, is the only one able to read the encrypted message. You may want to send the e-mail to other recipients to verify that they cannot read the message.
From this time forward, you will be able to send secure/encrypted messages to the user with whom you exchanged encryption keys.
Conclusion
This AppNote has shown how to send secure and encrypted e-mail message in GroupWise 6.5. For more information about Novell GroupWise 6.5, visit the product Web page at http://www.novell.com/products/groupwise.
* Originally published in Novell AppNotes
Disclaimer
The origin of this information may be internal or external to Novell. While Novell makes all reasonable efforts to verify this information, Novell does not make explicit or implied claims to its validity.