Accessing Network Files with the Novell Native File Access Pack (NFAP)
Articles and Tips: article
Chief Evangelist
Logilent, Inc.
DClarke@iACME.com
01 Apr 2003
This AppNote discusses the Novell Native File Access Pack (NFAP), a server- based solution that enables Windows, Macintosh, or Linux/Unix clients to securely access NetWare storage natively. It also allows these users to be managed through the central eDirectory tree.
This AppNote is excerpted from the new book entitled Novell's CNE Update to NetWare 6 Study Guide (Novell Press, ISBN 0-7897-2979-2). To order this and other Novell Press books, visit http://www.novellpress.com.
- Introduction
- Accessing the Network from Native Clients
- Novell Native File Access Pack Fundamentals
- Novell Native File Access Pack Configuration
- Conclusion
|
Topics |
Novell Native File Access Pack (NFAP), network file access |
|
Products |
NetWare 6 NFAP |
|
Audience |
network administrators |
|
Level |
beginning |
|
Prerequisite Skills |
familiarity with basic NetWare concepts |
|
Operating System |
NetWare 6 |
|
Tools |
none |
|
Sample Code |
no |
Introduction
It's time to get connected! Welcome to the new AAA for the information superhighway-Anytime, Anywhere Access. As a NetWare 6 network administrator, you must appreciate the delicate balance of life on the network. To be a Certified Novell Engineer (CNE) means that you appreciate your users and their resources. It means that you like the smell of laser printer toner, the feel of eDirectory objects between your toes, and the sound of disgruntled users breathing down the back of your neck.
In this AppNote, we're going to arm you with a very powerful AAA technology -Native File Access Pack (NFAP). NFAP unshackles users from the Novell Client and makes it possible for Macintosh, Windows, and Linux/Unix clients to access the network using their own native environments. This server-based solution enables cross-platform clients to securely access NetWare storage using their own native client software, and enables those users to be managed through eDirectory. All of this magic is made possible using these native protocols: CIFS (for Windows), AFP (for Macintosh), and NFS (for Unix). I can feel the freedom already.
Now let's learn how to be a twenty-first century web guru by building one of these cool new ubiquitous networks ourselves-starting with Native Clients.
Accessing the Network from Native Clients
By definition, a network is a collection of computers that share three important features: the ability to communicate with each other, the ability to share resources, and the ability to access remote hosts on other networks. NetWare 6 enhances this cross-platform connectivity with the introduction of the NFAP.
NFAP is a server-based solution that enables Windows, Macintosh, and Linux/ Unix clients to securely access NetWare storage using their own integrated client software. In addition, NFAP enables you to manage non-NetWare clients through eDirectory.
In previous versions of NetWare, Windows, Macintosh, and Linux/Unix clients were required to use special versions of the Novell Client. This was always very messy and sometimes quite awkward. Now, with NFAP, these clients can access centralized NetWare storage using their own integrated operating system. For example, Macintosh clients can now access NetWare files using their native AppleTalk Filing Protocol (AFP).
In this AppNote, we will begin with the fundamentals of NFAP, and then we will dive into the installation and configuration section with more detail about how to activate this exciting new AAA platform. Let's get started with the fundamentals of NFAP.
Novell Native File Access Pack Fundamentals
NFAP is a chameleon. NFAP behaves slightly differently in each of the five operating system environments it supports. The cool thing is it "morphs" automatically to use the native protocol of the client it is communicating with. For example, NFAP communicates with Macintosh clients using the AFP protocol, and it transforms the NetWare server into a virtual AppleShare server.
Following is a list of the five different platforms supported by the NetWare 6 NFAP chameleon:
NetWare Clients communicate with NetWare servers without any modification.
Windows Clients communicate with NetWare servers using their native Common Internet File System (CIFS) protocol.
Macintosh Clients communicate with NetWare servers using their native AppleTalk Filing Protocol (AFP).
Linux/Unix Clients communicate with NetWare servers using their native Network Filing System (NFS).
Browsers communicate with NetWare servers using the standard HyperText Transfer Protocol (HTTP).
In this section, we will learn how the NFAP chameleon performs its magic for the three most popular native clients-Windows, Macintosh, and Linux/Unix. Just a hint-it's all smoke and mirrors.
Windows NFAP
Windows NFAP enables native Windows clients to access NetWare servers by using the Common File Internet System (CIFS) protocol. CIFS is a standard, cross-platform file-sharing protocol that allows users to share files on the Internet without installing any additional client software. Windows 95/98/NT/2000/ME clients are CIFS-enabled by default.
NetWare 6 Windows NFAP provides the following features and benefits. Windows NFAP:
Requires no Novell Client software. However, the Microsoft Client is required.
Benefits from the following advanced NetWare 6 features: mature protocol stacks, high-performance file systems (traditional and NSS), Novell Modular Authentication Service (NMAS), and eDirectory-managed file access.
Enables users to be managed through eDirectory or Network Information Systems (NIS).
Enables NetWare servers to appear as Windows servers within My Network Places (Windows 2000/NT/ME) or Network Neighborhood (Windows 95/98).
Ensures security using Microsoft's native authentication protocols, NMAS, and eDirectory together.
Supports offline files and folders.
Is cluster-enabled for superior fault tolerance.
Once Windows NFAP is installed on the NetWare 6 server, native CIFS client access is a breeze. As I mentioned earlier, NFAP enables NetWare servers to appear as Windows servers on the client desktop. In the Windows 2000/NT/ME world, the NFAP server can be found by choosing Computers Near Me in the My Network Places desktop icon. In the Windows 95/98 world, the Windows NFAP server appears in Network Neighborhood. Remember that the host workgroup or domain for your NFAP chameleon is established during NFAP software installation.
Note: Windows NFAP requires the Microsoft Client, which is installed by default during Windows 2000/NT installation. If your clients are using Windows 95/98, you must install the Microsoft Client manually before NFAP servers will appear. In addition, you should be aware that the NFAP server name is not the same as the NetWare server that hosts it. This means you can be creative and descriptive when defining NFAP server names.
Macintosh NFAP
Macintosh NFAP enables native Macintosh Clients to access NetWare servers by using the AppleTalk Filing Protocol (AFP). With Macintosh NFAP installed, the NetWare server appears to Macintosh Clients as an AppleShare IP server in the Chooser (MacOS 8/9) or Network Browser (MacOS X).
Macintosh NFAP provides the following features and benefits. Macintosh NFAP:
Sends AFP requests and responses. In addition, it supports LocalTalk, EtherTalk, and TokenTalk.
Supports IP administration by using DNS and SLPv2.
Enables user management through eDirectory.
Is TCP/IP-enabled.
Provides security by using the Macintosh Native Authentication Protocols, NMAS, and eDirectory.
Supports network access through the Chooser (MacOS 8/9) or Network Browser (MacOS X). Remember that in order for NFAP to work, your clients must be using MacOS 8.1 or above.
To access NetWare files from a client running MacOS 8/9, you must select Chooser from the Apple menu. Then choose AppleTalk and Server IP Address. Once you get there, simply enter the NFAP IP address or DNS name and authenticate. Finally, click Connect to make the NFAP server available.
To access NetWare files from a client using MacOS X, you must use the Network Browser. This new IP-based facility can be found by selecting Go from the Apple menu and choosing Connect to Server. Similarly, you must enter the IP address or DNS name of the NFAP server and choose Connect to authenticate.
The Macintosh NFAP connection process described above can be automated by creating a NetWare server Alias on the Macintosh desktop. This Alias is retained after rebooting and allows the native MacOS to auto-authenticate to the NFAP server using Keychain. To do so, simply select the NetWare server icon from the Macintosh desktop and choose File > Make Alias.
Note: If your Macintosh users want to access files on a NetWare 5 server, you must specify the server IP address or DNS name. This is because Macintosh NFAP relies on SLPv2 for server discovery and this advanced version of the Service Location Protocol (SLP) is only available in NetWare 6.
Linux/Unix NFAP
Linux and Unix use the Network File System (NFS) protocol to access files over the network. After Novell NFAP is installed on a NetWare server, Linux and Unix users can mount exported network storage and use it as their own file system via a virtual NFS server.
Before Unix users can access a NetWare file system, it must be made available to NFS clients. This process is called "exporting the file system." During the exporting process, you can define various levels of server access control and configure how the information is accessed. For example, you can restrict NetWare file access to specific Unix workstations and/or export the directory as Read-Only.
Exporting and mounting a NetWare file system to a Unix workstation consists of the following two tasks:
Creating a Mount Point. A mount point is an empty directory that becomes the access point for the NetWare file system. It is best to create an empty directory of your own as the mount point because the existing contents of that directory become unavailable until you unmount the remote file system.
Mounting the NetWare Directory. Most Unix systems use the MOUNT command to mount a remote file system. After you have mounted the NetWare directory, Unix users can access the NetWare file system by pointing to the local mount point.
Note: Linux/Unix NFAP supports the native Network Information System (NIS) so Unix users can be administered through the eDirectory tree.
NetWare, Linux and Unix servers use different methods for controlling access to files. Although both have similar directory and file security, NetWare security is more elaborate. At their most basic levels, both systems assign access controls to similar user types. However, each server uses slightly different methodologies. Fortunately, NFAP maps these differences so that setting access controls from one system has similar meaning and effect on the other.
In fact, you have five different choices for how you want Linux/Unix NFAP to handle server access control. The choice is yours. As network administrator, you have the responsibility of choosing the type of access control that suits your network setup. The five "access control modes" supported by NFAP are:
NetWare Mode
NetWare-NFS Mode
NFS-NetWare Mode
NFS Mode
Independent Mode
Unfortunately, new NetWare 6 NSS volumes only support Independent Mode. In Independent Mode, no rights/permissions mapping is performed. Therefore, NFS rules apply for NFS clients and NetWare rules apply for NetWare clients. This is okay because Independent Mode is strongly recommended for most NetWare 6 volumes. Otherwise performance can suffer because of the creation of excessive numbers of trustees.
Real World. With Linux/Unix NFAP, NFS clients can extend file sharing over a wide area network (WAN) by using an integrated product called "Web NFS". Web NFS enables direct web access to data on NFS servers by directing HTTP traffic through a new URL. Using this URL, browsers with Web NFS support can access data from any server without going through the port mapper or mount protocols. Web NFS enables you to access files through firewall-friendly ports and improves performance over a wide area network by reducing the number of turnarounds. Unfortunately, each NFS server can only support one exported path.
That completes our fundamental lesson in NetWare 6 NFAP. Now let's learn how to put this great new capability to work by installing and configuring it on a NetWare 6 server.
Novell Native File Access Pack Configuration
Now it's time for action. Enabling Novell NFAP is a relatively straightforward process. First, you must make sure that the host server and distributed workstations meet the minimum system requirements. Then you can install NFAP by using the NetWare 6 installation GUI. This involves selecting the Macintosh, Windows, and/or Linux/Unix components to install and configuring certain protocol parameters.
After Novell NFAP installation is complete, you must select or create User objects and assign them simple passwords before they can access the network natively. This is all part of NFAP configuration. When users access a network resource by using their native protocols, they enter their NetWare username and simple password which is verified by NetWare. This is all part of the high- security methodology maintained by NetWare 6.
Now let's take a closer look at Novell NFAP configuration-starting with the minimum system requirements.
NFAP System Requirements
As we learned earlier, Novell NFAP is installed on the NetWare 6 server. Furthermore, it requires a Windows administrative workstation for specific configuration duties. Finally, to access NetWare servers running NFAP, your distributed workstations must be connected to the network and must support specific levels of their native operating systems-including Windows, Macintosh, and/or Linux/Unix.
To support Novell NFAP, the host NetWare server must meet the following minimum system requirements:
The host NFAP server must be running the NetWare 6 operating system.
The host NFAP server must be running NMAS version 2.0 or above. Fortunately NMAS 2.0 is installed or upgraded during NFAP installation. If Macintosh will be accessing the host NFAP server, you must make sure that the Macintosh Namespace is loaded on each traditional volume before installing NFAP. To add the Macintosh Namespace to a volume, enter the following commands at the server console:
LOAD MAC.NAM ADD NAMESPACE MACINTOSH TO VOLUME {volume name}
If Macintosh users are going to access the host NFAP server, you must unload the AppleTalk NLMs from server console:
UNLOAD AFP.NLM UNLOAD APPLETLK.NLM
If BorderManager Enterprise Edition 3.5 (or above) is running in the same tree as the host NFAP server, you must create the Login Policy Object (LPO).
Note: When NMAS is automatically installed or upgraded, NFAP makes sure to match your existing edition. For example, NMAS Starter Pack 1.0 is upgraded to NMAS Starter Pack 2.0 and NMAS Enterprise Edition 1.0 is upgraded to NMAS Enterprise Edition 2.0.
To install, configure, and manage NFAP, you must have at least one Windows administration workstation that meets these system requirements:
Windows 95/98 running Novell Client for Windows 95/98 3.21.0 (or above)
Windows NT/2000 running Novell Client for Windows NT/2000 4.80 (or above)
Novell International Cryptographic Infrastructure (NICI) for Windows Strong Encryption 1.5.7 (or above). NICI is required to use ConsoleOne. You can install the NICI software from the Novell Client CD-ROM.
After you have installed the server and administrative workstation components, it's time to focus on users. To access a NetWare server running any version of NFAP, your distributed workstations must be connected to the network and support one of the following native operating systems:
MacOS 8.1 (or above) or MacOS X
Windows 95/98/ME, Windows NT 4.0 or Windows 2000. Remember that Windows workstations must be running the Client for Microsoft Networks.
Any Linux/Unix workstation which that supports NFSv2 or NFSv3.
After your Novell NFAP server and workstations have passed the muster, it's time to install the software. Ready, set, go!
Installing NFAP
To install Novell NFAP to your host NetWare 6 server, follow these simple steps:
Mount the NetWare 6 Operating System CD-ROM. Then switch to the server's graphic console and select Install from the Novell menu.
The Installed Products screen will appear. Select Add and navigate to the root volume of the NetWare 6 Operating System CD-ROM.
Select PRODUCT.INI and choose OK twice to open the product installation utility.
Accept the License Agreement. Then select the Novell NFAP components you wish to install-from the list of Macintosh, Windows, or Unix. Then select Next to continue.
If you install Windows CIFS, you must perform some preliminary configuration tasks as described below:
Log in as a user with Supervisor privileges using a full distinguished name.
Enter the server name and server comment that will appear in Network Neighborhood. Remember that the CIFS server name must be 11 or fewer characters and must be different from the NetWare server name. The server comment is optional.
Select which user authentication method you would like Windows NFAP to use. Your choices are Local (in which users will authenticate by using eDirectory) or Domain (in which users will authenticate by using a Windows domain). When you have chosen your preferred authentication method, select Next to continue.
Note: Windows NFAP supports two types of user authentication: local and domain. Local authentication requires a simple password to log into a NetWare 6 server, while domain authentication does not. Furthermore, you cannot change the simple password or the NetWare 6 password by using the Windows native Change Password feature when the system is configured for domain authentication. In this case, you must use the Windows Domain Management utilities.
Specify the IP address to be attached to the Windows CIFS protocol.
Then specify additional NetWare volumes or folders that you may want to appear as share points in Network Neighborhood. Remember that share points must be configured with an ending backslash (\).
Provide the eDirectory context for all Windows users who need access to the server.
Finally, select Next to leave the CIFS NFAP preconfiguration and to return to Novell NFAP installation.
Read the Summary window and select Finish to complete the Novell NFAP installation.
Restart the server so that your changes take effect.
Note: The list of eDirectory users supported by Windows NFAP is maintained in a context list called CIFSCTXS.CFG. This file is created during NFAP installation and can be updated later with new user contexts.
After you have completed Novell NFAP installation, you must select or create user objects and assign them simple passwords before they can access the host server. This task is accomplished during NFAP configuration.
Configuring NFAP
Novell NFAP incorporates the security of NetWare by using simple passwords. The simple password is required because it provides access to NetWare servers from workstations not running Novell Client software. Just like any NetWare password, the simple password is stored in eDirectory and each user must have one before they can access NetWare resources using native protocols.
When users access a network resource by using their native protocol, they enter their NetWare username and simple password that is verified by NetWare. Then the user object reads eDirectory and controls the network resources the user can access.
To create User objects and assign simple passwords for NFAP access, perform these steps:
From the administrative workstation, log in as a user with administrative privileges. Then run the ConsoleOne utility by using CONSOLEONE.EXE, which is found in the \PUBLIC\MGMT\CONSOLEONE directory.
Create a new user object for NFAP access by right-clicking the appropriate host container and selecting New > User. You can also configure an existing user for NFAP access by double-clicking it.
You must assign a simple password to your new or existing user object. To do so, simply right-click the user object and select Properties. Then choose Simple Password from the Login Methods tab. You should see a configuration screen similar to Figure 1. Finally, mark the Set Password radio button and enter the user's simple password in the fields provided.
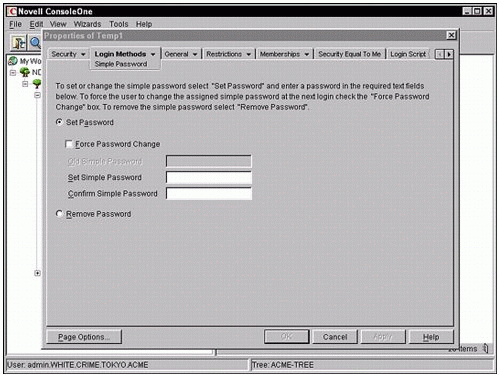
Configuring simple passwords for NFAP user access.
Note: If the simple password you configure is different from the user's NetWare password, the user must enter the simple password when accessing the network native protocols. However, users must also remember that their NetWare password is required when logging in from Novell Client-equipped workstations.
You can create simple passwords for users one at a time by using ConsoleOne or you can automate the process for many users with the help of NORM (Novell Remote Manager).
To create simple passwords for many users, select Manage eDirectory from the left frame of NetWare Remote Manager., and Tthen click on the NFAP Security link. Next the NFAP Simple Password Management screen should appear (as shown in Figure 2).

Figure 2: Configuring simple passwords in NORM.
This web-based form includes these configuration fields:
NDS Context. Enables you to create a simple password for each User object found in the specified context.
Traverse Context Tree for User Objects. Enables you to search the tree for User objects and to create passwords for each one that is found. This is very similar to the "inheritance" flow of eDirectory rights.
User Supplied Password. This field defines the simple password that you will be passing to all users in the context described above.
Generate Script File. Enables you to create a text file that contains the scripting commands necessary to create simple passwords based on the NFAP security preferences you selected.
Process Script File. Enter the script name in this field if you want the system to automate the process of assigning simple passwords to User objects scattered through the eDirectory tree.
Finally, select Start to begin the automatic simple password assignment process.
Conclusion
All finished! And if you have learned anything in this AppNote, I hope that it is that NFAP is your friend. This powerful NetWare 6 chameleon enables you to open the doors of NetWare filing to users of many different workstations, operating systems, and protocols. This is network diversification at its finest.
* Originally published in Novell AppNotes
Disclaimer
The origin of this information may be internal or external to Novell. While Novell makes all reasonable efforts to verify this information, Novell does not make explicit or implied claims to its validity.