Blocking Browser Ads with Novell BorderManager
Articles and Tips: article
Senior Systems Analyst
City of Tampa
martin.zinaich@netscape.net
01 Jan 2003
This AppNote discusses how to configure Novell BorderManager to block browser ads for all users within an enterprise. The design uses redirection of browsers from ad servers to a Web server on your network. The implementation demonstrated uses Microsoft Internet Information Server (IIS) as the Web server running on an existing Novell iFolder server.
|
Topics |
BorderManager Hosts file, IIS multiple site configuration on iFolder, BorderManager log file statistics |
|
Products |
Novell BorderManager (any version) running on NetWare (any version) |
|
Audience |
network administrators, support technicians |
|
Level |
intermediate |
|
Prerequisite Skills |
familiarity with BorderManager and IIS configuration |
|
Operating System |
NetWare 5.x and 6.x |
|
Tools |
none |
|
Sample Code |
yes |
Introduction
Before talking about how to actually use BorderManager to block ads, I feel compelled to mention that many Web services are free to us because of advertising. So while they are annoying, they also serve a purpose. The other side of the argument goes beyond the annoyance of ads. Ads can consume a great deal of your Internet connection bandwidth. If you have ever looked at your bandwidth usage, you'll notice right away some sites at the top of the list that look very strange. You may notice some have "ad" in their name. Most of these strange servers are ad servers and all of the bandwidth they consume is going to advertising. In my experience it has been one of the largest portions of bandwidth usage.
What if, instead of downloading these highly colorful and sizeable pictures, you replaced them with the little word "adblocking"? What follows is a way to construct just such a scenario using Novell BorderManager.
Why Use BorderManager?
Actually, you could pull off this feat by using a local hosts file on each and every PC in your enterprise. You could deliver this file to every PC using Novell's ZENworks for Desktops and exclude the internal Web server from the proxy settings. Then every time you wanted to make a change, you would have to go through the same process again. Doesn't sound like much fun, does it?
If you use BorderManager, all you have to do is modify BorderManager's hosts file to point somewhere different. Once you make this change, you'll be redirecting everyone's ads to your own message.
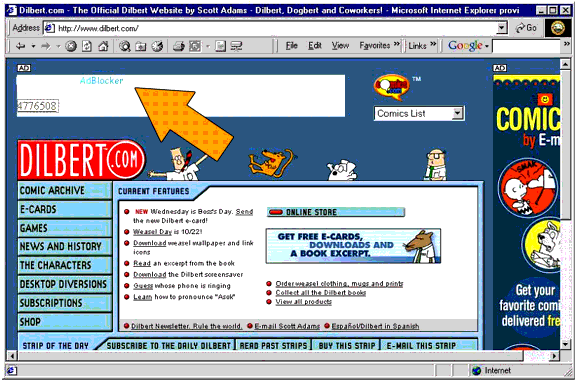
Figure 1 shows what it might look like when BorderManager has blocked a browser ad.

Figure 1: Example of a browser ad being block by BorderManager.
Note the number 4776508 that is also displayed in the empty ad box. This number indicates how many ads have been blocked to date for this particular installation.
The rest of this AppNote will show you how to implement such a configuration using BorderManager running on NetWare. Because of the design of this implementation, a Web server is required, but it does not need to be dedicated nor does it have to be a particular Web server. In this AppNote, Windows 2000 Internet Information Server (IIS) is used as the Web server for the redirection.
To eliminate the need to purchase new server hardware, you can use a server you already have installed for the Web server platform. For example, on my network I already had a Novell iFolder server installed, which I figured was a good candidate for loading IIS. It was a simple matter of adding another Web site to it. This AppNote details the complete setup and configuration for this scenario.
BorderManager Configuration
The BorderManager configuration is very easy. Just use EDIT.NLM at the BorderManager console and edit the hosts file. To do this, type "edit sys:\etc\hosts <Enter>". Next, add a section to the file similar to the one shown below:
# Ad Blockers
198.191.211.88 ad.doubleclick.net
198.191.211.88 ads.msn.com
198.191.211.88 us.i1.yimg.com
198.191.211.88 us.a1.yimg.com
198.191.211.88 ads.web.aol.com
Note that the address you specify here is the address to which you want the ads to be redirected; it should be the address of the Web server you configure on IIS. This address can be inside or outside of your firewall, just as long as BorderManager can get the requests.
For those who aren't familiar with hosts files, what you are doing here is redirecting requests for the domains on the right to the IP addresses on the left. How do you know what domains to include? The best method is to look at your log files and make note of the top usage domains either by bandwidth or number of requests. Once you have a list of these domains, research each domain to determine which ones are ad servers.
There are Ad Blocking lists available on the Internet that you can use, but some of these lists are huge. I have no idea what loading a large list into BorderManager's hosts file will do; you will more than likely block some needed sites. My suggestion is to start out small, using your log files to identify the top offending domains and referring to the Ad Blocking lists to help you research what you see in your log files.
After you have added your list of domains to block, save the hosts file and exit EDIT.NLM. There is no need to restart the server; you will see BorderManager read the file in about a minute. If you make a mistake or block something that needs to be open, just re-edit the hosts file and save it again.
Web Server Configuration
The first thing you need to do here is create a new Web site, preferably on one of your current Web servers since this server isn't going to be doing much. I suggest you bind a new IP address to your Web server just for the ad blocking function.
Binding a Second IP Address to Your Web Server
First, bind a second IP address to your Web server by following these steps (you may have to adapt these steps for non-Windows 2000 servers).
On a Windows 2000 server, right-click My Network Places and select Properties.
Right-click the server's desired network card and select Properties again.
Select the TCPIP protocol stack and then select Properties again.
Click Advanced.
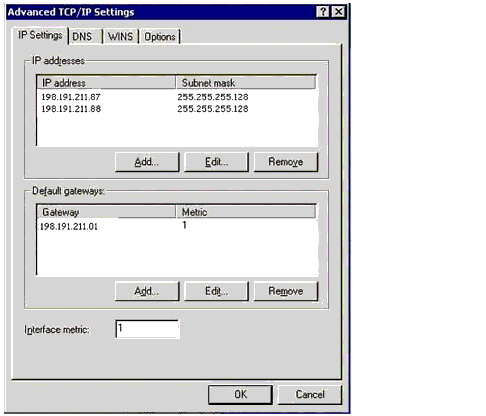
Add your second IP address (in this example, it's 198.191.211.88).
Note: The second IP address you use must fit into your current subnetting range.
Figure 2 shows what the Advanced TCP/IP settings should look like.

Figure 2: The Advanced TCP/IP Settings screen.
Adding a New Web Site
Next, using the IIS Internet Services Manager, add a new Web Site called AdBlock.
Right-click the server (in this case *if).
Select New Site.
Name it "AdBlock" (see Figure 3).

Figure 3: Adding a new site using the Internet Services Manager.
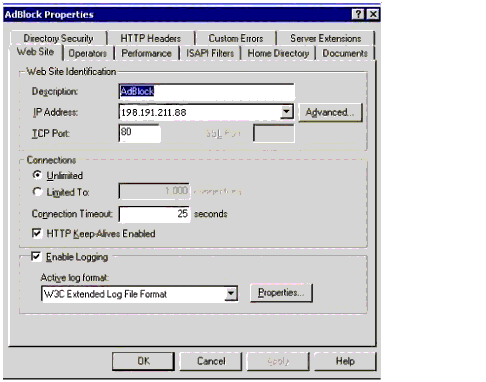
Now right-click the site and select the IP address you just added as the site's IP address, as shown in Figure 4. (Note that the IP address here is the same one you put in the hosts file on BorderManager.)

Figure 4: Editing the Properties of the AdBlock site.
As an additional security item, I suggest you limit access to this site for only the BorderManager IP address (see the Directory Security tab). The address you put for Directory Security is either the public or private card's IP address for BorderManager, not the AdBlocking IP address. Use the private address if BorderManager will be contacting this Web site on your private network; use the public address if BorderManager will be contacting this Web site on your public network (DMZ).
Changing the 404 Error Message
Now comes the part that makes all of this work. You need to change the Web site's error message for the "File Not Found error 404". Because every redirect will be looking for a page you do not have on your Web site, this is where you can send back a message of your choice.
Click the Custom Errors tab and edit the 404 message. You can use whatever you want for this, but if you would like to use the code from this AppNote, enter "/adblock.asp" as the URL, as shown in Figure 5.
Note: You must change the message type to URL for the counter to work.

Entering a custom message for error 404.
Creating the AdBlock ASP Script
In the Web site's home directory, put the following ASP file called "adblock.asp" (substitute your new adblock Web site's IP address in the href= section):
<html>
<head>
<meta http-equiv="Content-Type" content="text/html; charset=windows-1252">
<meta name="GENERATOR" content="Microsoft FrontPage 4.0">
<meta name="ProgId" content="FrontPage.Editor.Document">
<title>YourName AdBlocker</title>
</head>
<body>
<p align="left" style="line-height: 100%"><font face="Comic Sans MS"
size="2"><font color="#00CC99">Your</font>
<font color="#00FF99"> of</font> <font color="#00FFCC"> Name</font>
<font color="#99FFCC">
</font><font color="#00FFCC">Ad</font><font color="#00CCFF">Blocker
</font></font></p>
<p><a href="http://ipaddess.ofyour.adblock.website" target="_blank">
<%
Set myPageCounter=Server.CreateObject("MSWC.PageCounter")
myPageCounter.PageHit
Response.Write(myPageCounter.Hits)
%>
</a></p>
</body>
</html>
Setting Up the Page Counter
If you want to use the page counter section in the above ASP script, you need to set up and configure the page counter on your IIS server. The counter in this example uses the IIS counter.dll control, which is installed by default on Windows 2000 servers running IIS. If your server does not have this file (located in the C:\WINNT\SYSTEM32 directory), you can obtain it from the IIS Resource Kit. Simply copy the file to C:\WINNT\SYSTEM32 and then run the following command at the command prompt:
regsvr32 C:\WINNT\system32\counters.dll
Creating the Default Home Page Script
The last step is to make a default home page for the new site. It should explain what the site is and have a link to support pages in case you are blocking something that is needed. I also like to list the sites being blocked on this page.
Make a file called default.asp that looks something like this:
<html>
<head>
<meta http-equiv="Content-Language" content="en-us">
<meta http-equiv="Content-Type" content="text/html; charset=windows-1252">
<meta name="GENERATOR" content="Microsoft FrontPage 4.0">
<meta name="ProgId" content="FrontPage.Editor.Document">
<title>AdBlocker</title>
<%Set myPageCounter=Server.CreateObject("MSWC.PageCounter") %>
</head>
<body>
<h1 align="center"><b><font color="#0000FF">Your Name</font></b></h1>
<h2 align="center"><font color="#FF00FF" face="Comic Sans MS">AdBlocking Site</font></h2>
<p align="center"><img border="0" src="BD21318_.GIF" width="623" height="7"></p>
<p align="center"> </p>
<p align="center"><font face="Comic Sans MS" size="4">This is the official site
for the Your Name AdBlocking project.</font></p>
<p align="center"><font face="Comic Sans MS" size="4">If you are seeing this
page and did not intend to visit us, you may have clicked on a link to a web
advertising service that we are blocking. If you are being directed to
this site when trying to reach a site needed for business, please contact the
<a href="http://yoursupportsite.com">ServiceDesk</a>.</font></p>
<p align="center"> </p>
<p align="center"><img border="0" src="BD21318_.GIF" width="623" height="7"></p>
<p align="center"> </p>
<p align="center"><font face="Lucida Console" size="4" color="#FF00FF">Sites
currently being blocked:</font></p>
<table border="1" width="100%">
<tr>
<td width="33%"><font face="Lucida Console"
size="4">ad.doubleclick.net</font></td>
<td width="33%"><font face="Lucida Console"
size="4">ads.msn.com</font></td>
<td width="34%"><font face="Lucida Console"
size="4">us.i1.yimg.com</font></td>
</tr>
<tr>
<td width="33%"><font face="Lucida Console"
size="4">us.a1.yimg.com</font></td>
<td width="33%"><font face="Lucida Console"
size="4">ads.web.aol.com</font></td>
<td width="34%"><font face="Lucida Console"
size="4">a799.ms.akamai.net</font></td>
</tr>
<tr>
<td width="33%"> </td>
<td width="33%"> </td>
<td width="34%"> </td>
</tr>
</table>
<p align="center"><font face="Lucida Console" size="4">
</font></p>
<p align="center"><font face="Lucida Console" size="4" color="#0000FF">Total
number of blocks since 05/14/02:</font><font color="#FF0000"><b><font face="Lucida Console" size="4">
<%Response.Write(myPageCounter.Hits("/adblock.asp")) %>
</font></b></font><font face="Lucida Console" size="4" color="#0000FF">
</font></p>
<p align="center"> </p>
</body>
</html>
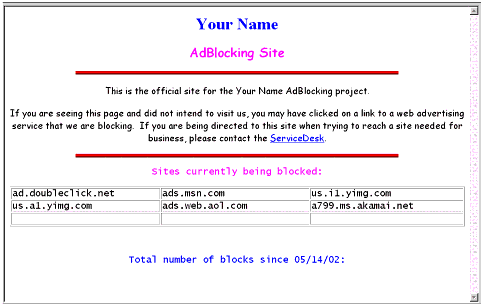
Now, if users click on the AdBlock counter link, they see the default page shown in Figure 6.

Figure 6: Example of a default home page for your Ad Blocking Site.
Final Thoughts
As elegant as this solution is, unfortunately some Web site designers have recognized the possibility of being blocked in this manner. In an effort to stay one step ahead of people like us, they have put their menus on the ad servers. That way if you block the ad site, you will also block the menus for a site you really need to access. As with everything else on your network, you'll need to test your new configuration before putting it into production.
Remember to periodically check your Internet access logs for sites that are consuming large portions of your network bandwidth. If they are ad sites, add them to your list of sites to block.
Conclusion
This AppNote has shown how to configure BorderManager to block browser ads for your users enterprise-wide. Happy blocking!
* Originally published in Novell AppNotes
Disclaimer
The origin of this information may be internal or external to Novell. While Novell makes all reasonable efforts to verify this information, Novell does not make explicit or implied claims to its validity.