What's New in Novell iFolder Professional Edition 2.0
Articles and Tips: article
Senior Research Engineer
Novell, Inc.
kburnett@novell.com
01 Dec 2002
This AppNote introduces the new features available in Novell iFolder Professional Edition 2.0, a new release of the popular file storage and synchronization solution available from Novell. It also provides "quick start" information on installing the iFolder server and client software, and gives a brief description of how to use iFolder 2.0.
- Introduction
- Overview of Novell iFolder
- New Features in iFolder Professional Edition 2.0
- Pre-Installation Considerations
- Installing the iFolder 2.0 Server Software
- Installing the iFolder 2.0 Client
- Using iFolder 2.0
- Conclusion
|
Topics |
iFolder, Net services, NetWare features |
|
Products |
Novell iFolder Professional Edition 2.0 |
|
Audience |
network administrators, installers, designers |
|
Level |
beginning |
|
Prerequisite Skills |
familiarity with NetWare |
|
Operating System |
NetWare 5.1 and 6.x, Windows 2000/NT 4, Linux, Solaris |
|
Tools |
none |
|
Sample Code |
no |
Introduction
Novell iFolder is a simple, secure storage solution that can increase user productivity by enabling you to access, organize, and manage your personal files from anywhere, at any time. Once you have installed iFolder, you simply save your files locally, as you have always done, and iFolder automatically updates the files on a network server and delivers them to the other computers you use. For example, you can save a file at the office and iFolder automatically transfers the file to your home computer through an Internet connection. With iFolder you no longer need to e-mail files to yourself or save them on removable disks; your files are kept up-to-date on all the machines that you use.
To maintain data integrity and ensure you have the latest version of your files, iFolder seamlessly synchronizes the contents of all of your iFolders, no matter which of your computers you may currently be using. This is possible because your computers communicate regularly with the server, ensuring that the most current information is distributed to all of your computers that use iFolder. If you make a change to any of your personal files, iFolder locates the changes you made and communicates only the changed data to the server and your other computers..
Novell iFolder is currently available in two versions:
iFolder Standard Edition 1.01 (included with NetWare 6)
iFolder Professional Edition 2.0 (the latest version, available separately)
This AppNote discusses the features available in iFolder Professional Edition 2.0; a subset of these features is available in iFolder Standard Edition 1.01. The AppNote begins with a brief overview of how the iFolder system works and how it can benefit network administrators and users. It then describes the new iFolder features and gives a "quick start" guide to installing the iFolder server and client software.
Overview of Novell iFolder
Novell iFolder works by using a Web browser to access an iFolder server. From that server, users can download the iFolder client software to their workstations. After completion of the iFolder client software installation, they have a personal iFolder on their computer's hard drive. Any files they place in this folder will automatically be synchronized to a corresponding folder on the iFolder server.
This personal iFolder looks like any other folder on your computer's hard drive. You can access it just as you would any other folder: by saving files to it, dragging-and-dropping files into it, or copying files to it.
The iFolder client software monitors your personal iFolder and notifies the iFolder server if you make changes to the contents of your personal iFolder. In addition, the iFolder server notifies the client software when its copy of your personal iFolder changes. By loading the iFolder client on multiple computers, you can use Novell iFolder to publish your data across as many computers s you want.
Both the iFolder server and iFolder client work together to keep your files synchronized. Effectively, the iFolder server provides a reliable backup for the files in your iFolder client directory. Once the files are updated to the iFolder server, they become available to be included in your organization's regular network backup operations.
Figure 1 illustrates a typical iFolder system that allows users to access their files from different Windows workstations and various locations.
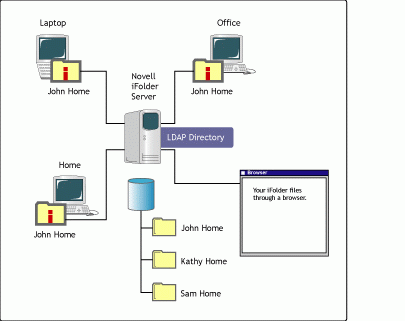
Novell iFolder allows users to access their files from their office or home computer, from a laptop, or through a Web browser.
Benefits of Novell iFolder
As a network user, iFolder provides you with many significant benefits. First and foremost, it greatly simplifies access to your files by allowing the data to follow you wherever you go. Novell iFolder stores and synchronizes your work in such a way that your files are always available, no matter what computer you are using or what location you log in from. With iFolder, you are only as far away from information you need as the nearest Internet-connected device.
Another big benefit is that your iFolder files are transparently synchronized across all of the computers you use-including workstations, desktops, laptops, and your company's iFolder server-so you always have the most current version of your files. You no longer have to keep track of different versions of the same file on different computers and try to remember which is the most recent version. And iFolder is smart enough to send only the changed portions of your files over the wire, thus making more efficient use of network bandwidth.
iFolder provides enhanced security options for users. By encrypting your personal files as they are delivered to the network and while they reside on the server, Novell iFolder protects sensitive files from unauthorized access. This eliminates the need to deploy a virtual private network (VPN) in order for remote users to access their information. .
iFolder also provides reliable protection against data loss due to system failure or disaster. For example, if the computer you have been using at home crashes beyond repair, your files are still accessible via iFolder. They remain safe and secure on the other computers you use and on the company's network-all of which are accessible through a standard Web browser.
Novell iFolder has the capability to deal with document "collisions" via a built-in Conflict Bin. For example, suppose you work on a document while you are disconnected from the network but don't synchronize it to the iFolder server because you don't have access to a network connection at the time. Later, you connect to the network from a different computer, work on the same document, and that document version is automatically updated to the iFolder server. When you return to the original client computer and connect to the network, it will try to send its own updated version of the document to the iFolder server, but it won't be able to because that document version will have an earlier time stamp. Instead, iFolder sends the document to the Conflict Bin where you can retrieve it and restore it at any time.
With its convenient storage capabilities and tight security features, iFolder provides an easy way to make sure your work is always synchronized, backed up, and accessible. What's more, iFolder liberates you from being tied to any specific piece of hardware. If you're constantly on the go, you no longer need to copy data from one machine to another when you travel. With iFolder, your electronic bags are always packed.
There are many more benefits that iFolder has to offer, but we don't have room to describe them all here. If you're interested in finding out more about what iFolder can do for you and your users, an iFolder 2.0 White Paper is available at http://www.novell.com/info/collateral/docs/4621279.01/4621279.html.
Components of the Novell iFolder System
The four main components of the Novell iFolder system are described in more detail below.
The Novell iFolder server runs as an extremely lightweight Apache Web server module on NetWare, Linux, and Solaris servers, and as an ISAPI filter on Internet Information Server (IIS) Web servers for Windows 2000 and NT platforms. The iFolder server provides LDAP authentication, Web page delivery, and secure HTTP communication over port 80. A single iFolder server can service approximately 10,000 users and can have any standard type of disk storage attached to it for storing users' synchronized data in an encrypted format.
The Novell iFolder client facilitates the storage of user data in a local iFolder directory and watches for any changes to user files. It runs as a filter driver and plugs right into the file system to be able to watch for modifications being made to files in the iFolder directory. (On Windows 9x computers, the iFolder client runs as a .VXD file.)
Novell eDirectory ships with iFolder Professional Edition 2.0 and is used to store information about the iFolder system, user authentication, and access control. System and server information is stored in a Global Setting LDAP Directory, which contains information for the iFolder service objects, server objects, and LDAP server objects. User authentication and access control information is stored in a User LDAP Directory.
A Web Browser interface can be used to access the contents of an iFolder from a computing device that does not have the Novell iFolder client installed. These devices include PDAs, Web kiosks, and clients in terminal server farms. Through the Web browser interface, users can log in to an iFolder server by supplying their username, password, and encryption pass phrase. They can then perform file operations such as downloads, uploads, deletions, renames, and new folder creation. If users need to make changes to files, they must download them, make the changes locally, and then upload the changed file back to the iFolder server.
Figure 2 is a technical architecture diagram of the Novell iFolder 2.0 system.
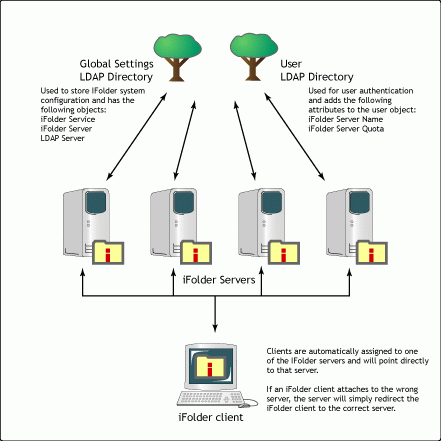
Technical architecture of Novell iFolder Professional Edition 2.0.
New Features in iFolder Professional Edition 2.0
To better handle large-scale deployments of iFolder, Novell has modified and enhanced the underlying architecture of iFolder to support the following new features:
Scalability to support millions of users by having multiple iFolder servers act as a single system
Works with Storage Area Network (SAN) and clustering solutions
Cross-platform capability-iFolder server runs on additional network operating systems besides NetWare
Increased LDAP integration
Ability to choose the location of the iFolder directory on local hard drives
Ability for the administrator to recover a user's pass phrase
Improved iFolder system management and monitoring
Reporting features for management and billing
Thin-client support for Citrix, Terminal Server, and Novell OnDemand Services
Pocket PC and Palm PDA access to files via a Web browser
Scalability
After the release of iFolder 1.x, the product development team had one major goal in mind for the next version: to enable iFolder 2.0 to scale from small businesses with tens or hundreds of users to large corporate networks with thousands of users to huge ISPs with millions of users. With iFolder 2.0, you can have a single-server system for smaller companies, or a multiple-server system for large corporate networks. You can also span multiple directory trees seamlessly. This not only provides load balancing for synchronization traffic, but also enables you to deploy iFolder servers closer to their users to minimize the flow of synchronization traffic across expensive or slow WAN links.
To make things easier on users, iFolder 2.0 enables all users to log in to a single iFolder server (the default server), regardless of the number of iFolder servers in your iFolder system. Administration is greatly simplified as well, as the new iFolder architecture enables you to manage multiple iFolder servers as a single iFolder system.
Novell estimates that you can include at least 100 servers in a Novell iFolder 2.0 system. If each of these 100 servers supports 10,000 users, the system would support 1,000,000 users. Granted, the majority of corporate customers will not need this type of support, but it does offer serious potential for large multinational corporations and especially ISPs.
Increasing the capacity of your iFolder 2.0 system is an easy process. You simply access the Web-based iFolder Management Console, select Global Settings from the main Web page, select iFolder Servers from the Global Settings menu, and click the Add button. (For more detailed instructions, refer to the iFolder online documentation at http://www.novell.com/documentation/lg/ifolder20.)
SANs and Clustering
Novell iFolder 2.0 can be configured to use a Storage Area Network (SAN). The advantage of using a SAN is that it separates the physical data storage device from the servers that access that storage. Depending on the amount of usable storage space available in a particular SAN, an iFolder server can typically support more and larger personal iFolders by using a SAN than it can using the server's internal storage.
If you choose to configure an iFolder server to use a SAN, you can easily increase the amount of storage available to that server by increasing the size of the iFolder volume on the SAN. As an example, Novell has an internal iFolder server connected to a SAN for employee use. Origianlly the system was configured with a 175 GB volume for iFolder use. As more and more employees started using the system, Novell realized the iFolder volume on the SAN needed to be enlarged. It was first increased to 250 GB and then recently to 325 GB. Using the SAN made it extremely easy to increase the available iFolder volume space.
Of course, if an iFolder server fails, users will lose access to any personal iFolder contents that are stored on that server. To provide the ultimate in reliability and availability, Novell recommends that iFolder be deployed in a clustered environment with SAN storage. This will provide the necessary redundancy to maintain the iFolder service in case of server failure.
Cross-Platform Capability
To better support companies with varying Web infrastructures and server platforms, Novell designed iFolder 2.0 to run on multiple operating systems. Currently, the iFolder 2.0 server software runs on the following operating system platforms:
NetWare 6.x with Apache 1.3.20+
NetWare 5.1 with Support Pack 3 and above and Apache 1.3.20 +
Windows 2000 SP2 with IIS v4 or greater
Windows NT 4 SP6a and IIS v4 or greater
Linux (Red Hat 7.1 and 7.2) with Apache 2 +
Solaris 8.0 with Apache 2 +
The iFolder Client software runs on the following client operating system platforms:
Windows XP
Windows 2000/NT 4
Windows ME/98/95
Macintosh (coming soon)
LDAP Integration
To connect individual servers into a single iFolder system, iFolder 2.0 uses one or more LDAP-based directories. iFolder 2.0 currently supports eDirectory 8.6 and above, and Novell plans to support other leading LDAP v3-compliant directories in the future. iFolder 2.0 uses a Global Settings LDAP Directory to store global iFolder server configuration settings. For example, the Global Settings LDAP directory stores the identity of the default iFolder server.
iFolder 2.0 uses LDAP directories to authenticate users and to store information that associates individual users with the iFolder servers where the users' personal iFolders are stored. In the cases where a user's personal iFolder does not reside on the default iFolder server, this server uses the information stored in the User LDAP Directories to redirect the user's requests to the iFolder server where that user's personal iFolder resides. This is a big improvement over previous versions of iFolder (1.0 and 1.01) in which users had to log in to the individual iFolder server where their personal iFolders exist. It also reduces a lot of extra work for system administrator, since each iFolder server must be managed separately.
Flexible Placement of Local iFolder Directories
Novell iFolder 2.0 allows users to place their personal iFolder anywhere they want to on their local hard drive. Previous versions of iFolder did not allow this convenience. The iFolder 2.0 client installation program prompts users to specify where they want to store the local copy of their personal iFolder. You can select the default, which is: C:\My Documents\iFolder\<username>\Home, or browse to select another location.
However, system administrators have the option to change the default directory path that iFolder creates on users' workstations. Of they can set a policy that prevents users from changing the location for their personal iFolders (some organizations have this policy). The default setting is to allow users the freedom to place their iFolders wherever they would like. If you want to enforce a specific location for iFolder directories, you can do so via the iFolder Management Console. The option is found by selecting Global Settings, Global Policies, displaying client policies, and specifying a Novell iFolder location in the iFolder Location field. Be sure to click the checkbox to enforce this policy.
Ability to Recover User Pass Phrases
Like its predecessor, iFolder 2.0 includes the option to enable encryption using 128-bit Blowfish encryption keys. The users' data is encrypted on the iFolder server by default. When you enable the Encryption option, users can encrypt their data as it crosses the Internet. If users choose to encrypt data, the iFolder 2.0 client prompts them to provide a pass phrase which is used to generate the 128-bit encryption key. After choosing a pass phrase, they are asked if they want the pass phrase remembered. If so, the pass phrase is stored in encrypted format on the workstation's hard drive. After that, each time the user authenticates to iFolder, the pass phrase is passed to the iFolder client automatically without the user having to type it in.
A new and significant plus in iFolder 2.0 is the ability to recover pass phrases. By enabling and enforcing the Recover Pass Phrase option, you can ensure that the administrator has access to the data stored in users' personal iFolders in case a user forgets his or her pass phrase or leaves the company without disclosing it. If you choose not to enable this option and a user forgets the pass phrase, there is a very good chance that none of that user's iFolder data will be usable.
Management and Monitoring
The Web-based Management Console for iFolder 2.0 has been updated with several new features to help you better manage large-scale deployments of iFolder. For example, through the Global Settings interface you can easily add, modify, or delete iFolder server and LDAP directories in multiple-server systems. Through the User Management interface, you can enable, disable, and manage users' iFolder accounts. You can also set how much space is allotted to each iFolder client, and how much time must elapse before an inactive session times out.
The iFolder 2.0 Management Console runs on Internet Explorer v5 and above, and NetScape v4.7 and above. You access the iFolder Management Console by pointing your Web browser to the following URL:
https://<ifolder_server_IP _address>/iFolderServer/Admin
Real-Time Reporting
Also included in the iFolder Management Console are new reporting features that give system administrators the ability to track various usage statistics. These advanced reporting tools are accessed from the Management Console by clicking on the report icon (see Figure 3).
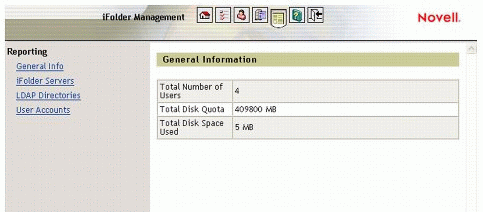
Novell iFolder reporting options.
As you can see, there are four reporting options to choose from:
General Information
iFolder Servers
LDAP Directories
User Accounts
General information includes total number of users, total disk quota, and total disk space used. You can also view iFolder server statistics such as server uptime, host OS, iFolder version, total user accounts, and so on (see Figure 4). LDAP statistics include IP or DNS name, status, number of LDAP users, and number of iFolder users. The User Accounts option will show you individual users' session start and stop times, latest synchronizations, amount of data uploaded and downloaded, and so on.
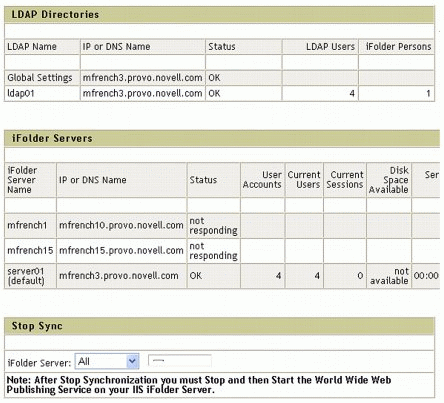
The iFolder Management Console displays helpful usage information.
In addition to displaying these statistics on your computer screen, you can export the statistics as comma-delimited files for import into a spreadsheet or database. This could be useful for trending purposes and possibly for billing purposes as well, for scenarios such as academic computer labs or ISPs that want to charge users for the disk space used.
Thin Client Compatibility
If your company relies on a thin-client environment, deploying iFolder can present some challenges. Typically, iFolder will normally create personal iFolders on the hard drives of users' local computers. As a result, these personal iFolders will consume valuable space on thin-client servers. To make matters worse, thin-client configurations can introduce synchronization delays between personal iFolders on thin-client servers and personal iFolders on Novell iFolder servers. This delay is caused because all user data must be synchronized to the local drives of the thin-client servers.
Novell NetDrive, which is included with iFolder 2.0, allows you to access NetWare 6 servers using standard Internet protocols such as FTP. It also supports Novell's Internet Folder Protocol (IFP), the filing protocol that iFolder uses. Basically, NetDrive allows you to map a drive directly to your iFolder on the iFolder server. This improves synchronization speed and eliminates the need to have a copy of your files on your local hard drive.
NetDrive supports the following thin-client environments:
Terminal Services Client
Citrix MetaFrame
Novell OnDemand Services
Setting up iFolder 2.0 for thin-client users is an easy proposition. You first install NetDrive on your hin-client servers. The servers will then display a Novell NetDrive icon on the users' virtual desktops. Click on the icon to map a drive from the thin-client server to the iFolder server. This is a slick solution because it allows multiple thin-client networks to access the same, or multiple, iFolder 2.0 servers.
Pocket PC or PDA Access via the Web
One unique feature of iFolder is the ability to access your data from any Internet-connected device, even if the device is not running the iFolder 2.0 software! You can do this from any device that has a Web Browser and Internet connection, such as a Pocket PC computer, PDA or Palm OS-based handheld, or Web kiosk.
Pre-Installation Considerations
Before you install your iFolder system, there are a few design considerations you need to make. First off, iFolder Professional Edition 2.0 requires the following for the iFolder Server hardware platform:
256 MB of RAM minimum (the more the better!)
10 MB of space on the SYS volume (when running on a NetWare server)
Adequate space for iFolder data: 1 MB to 4 TB per user (when using NetWare as the server, data will need to be on a volume other than SYS)
A Storage Area Network is optional but recommended for deployments in which disk space usage is likely to grow rapidly. A clustering solution is another option you might consider to protect against server failure.
As explained earlier, iFolder also requires a directory service to function properly. The following table lists the directory-related items and other design issues you need to be consider in planning your iFolder 2.0 deployment.
|
Design Issue
|
Choices
|
|
Tree selection |
- iFolder in its own tree (standalone) iFolder in an existing tree |
|
LDAP Directory selection (supports up to eight LDAP directories) |
- iFolder and LDAP on the same server iFolder and LDAP on separate servers |
|
LDAP Port selection |
- Port 389 for clear text - Port 636 for LDAP SSL |
|
Context searching |
- List contexts to be used List contexts that will use subcontainer search |
|
iFolder Servers |
- Number of iFolder servers needed User allocation/distribution among the#160; iFolder servers |
|
Firewall issues: |
|
|
iFolder server placement |
- Inside firewall (no access from the outside) Outside firewall (everybody can access) |
|
iFolder ports required |
- HTTP = port 80 HTTPS = port 443 LDAP = port 389 or 636 |
|
Access methods |
- Firewall pinholes Level 4 (L4) switch |
As an example of a successful iFolder system design, here is a description of the production iFolder system that Novell's IS&T team has implemented to handle all Novell employees worldwide.
Five iFolder servers (Compaq and Solaris 1U machines, each with 1 GB of RAM and a Compaq StorageWorks SAN)
Three servers in Provo (NetWare 6, Windows 2000, and Solaris)
One server in Asia/Pacific region (NetWare 6)
One server in Europe/Middle East/Africa region (NetWare 6)
Novell eDirectory 8.6.2 (global settings and users in the same tree)
LDAP authentication to at least three servers via Port 636
Firewall options: access from everywhere, Firewall and L4 Switch using a source NAT
More iFolder servers will be added when the need arises.
Installing the iFolder 2.0 Server Software
As explained earlier, the iFolder server does the following tasks:
Provides the infrastructure for iFolder clients to synchronize files
Stores encrypted files
Uses LDAP for user authentication
Has a server management utility that allows you to monitor the server from a Web browser
After you install the iFolder server software , you can access the Server Management Console and the default iFolder Web site. From the Server Management Console, you can perform administrative tasks for all your iFolder user accounts. The iFolder Web site is the place from which users can download the iFolder client software. It is also where they can access the Java applet to view their iFolder files from a Web browser. You can customize the iFolder Web site to fit your company's "look and feel" and business needs.
For this discussion, we'll divide the iFolder server installation into four stages:
Stage 1: Install the first iFolder server and make the Global Settings LDAP Directory settings.
Stage 2: Configure global settings, default policies, LDAP authentication sources, and iFolder servers.
Stage 3: Provision iFolder users (enable them to use the system).
Stage 4: Install additional iFolder servers as needed.
Server Installation Stage 1
Install the first iFolder server software on a physical server by running the setup program and following the onscreen prompts. You will first see the welcome screen shown in Figure 5.
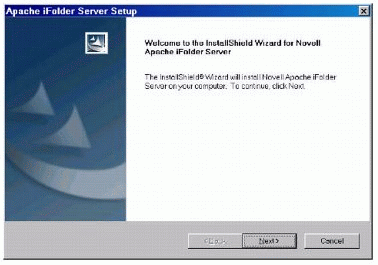
Initial screen for iFolder 2.0 server software installation.
Next, make the Global Settings LDAP Directory settings, as shown in Figure 6.
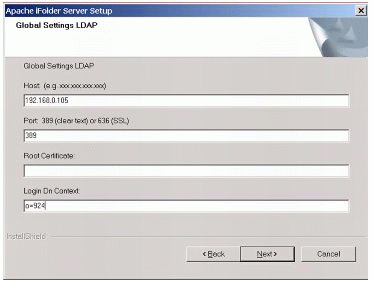
Global Settings LDAP screen.
Choose the LDAP port you want to use (389 for clear text or 636 for SSL). You'll need to enter the path for the Root Certificate (ROOTCERT.DER file) in order for SSL encryption to work properly. Finally, select the context for the Admin user. You can have other users besides the actual Admin be iFolder administrators. Click Next to continue.
The eDirectory schema is automatically extended to support iFolder during the installation of the first iFolder server.
Server Installation Stage 2
Once you have installed iFolder on the first server, access the iFolder administration browser page by pointing a client Web browser to "https://servername/iFolderServer/Admin".
To go the Global Settings page, click the icon with the checklist on it. It is the second icon from the left in the row of icons at the top of the screen. You will see the screen shown in Figure 7.
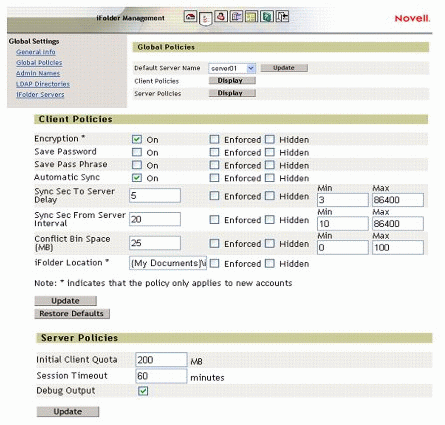
iFolder Management Console screen.
Setting Global Policies. Select the link to the Global Policies page. Select the server that you want to serve as the default server from the available list. Click the Display button for the Client Policies and select from the following available options:
Encryption: On, Enforced, or Hidden
Save Password: On, Enforced, or Hidden
Save Pass Phrase: On, Enforced, or Hidden
Automatic Sync: On, Enforced, or Hidden
Sync Sec To Server Delay: Value, Enforced or Hidden
Sync Sec From Server Interval: Value, Enforced or Hidden
Conflict Bin Space (MB): Amount, Enforced or Hidden
iFolder Location: Path, Enforced or Hidden
After making changes, be sure to click the Update button to save the changes.
Setting Server Policies. Click the Display button for the Server Policies and select from the following available options:
Initial Client Quota (MB)
Session Timeout (minutes)
Debug Output (on/off)
After making changes, be sure to click the Update button to save the changes.
Selecting the iFolder Administrators. In the Global Settings box, click the link to Admin Names and select the users you want to be iFolder administrators.
Adding and Configuring LDAP Directories. In the Global Settings box, click the link to LDAP Directories. You will see the screen shown in Figure 8.
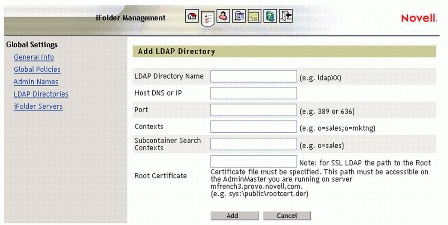
The Add LDAP Directory screen.
Fill in the following information:
LDAP Direcrtory Name
Host DNS or IP
Port (389 or 636)
Contexts
Subcontainer Search Contexts
Root Certificate
Click the Add button to save your choices.
Making Settings for iFolder Servers. In the Global Settings box, click the link to iFolder Servers. Fill in the following information for your iFolder server:
Server Name
Host DNS or IP
Port (typically 80)
Secure Port (typically 443 for SSL)
Click the Add button to save your choices.
Server Installation Stage 3
To provision iFolder users (enable them to use the system), click the icon with the user on it to take you to the User Management page. This page allows you to set up the way you search for users. There are links for basic Search and Advanced Search parameters that you can use. Figure 9 shows the Advanced Search parameters screen.
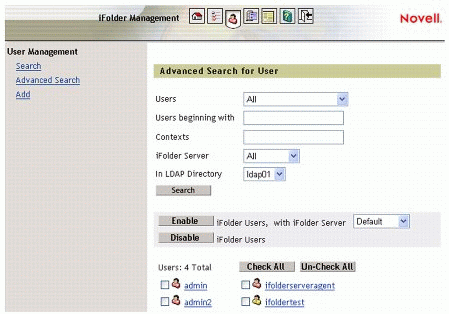
User Management screen.
In addition, you can enable or disable iFolder users on this page.
Server Installation Stage 4
You can now proceed to install other iFolder servers as needed. The process is similar to that described above for the first iFolder server. However, you may need to adjust the global settings and user provisions to meet the needs of your particular iFolder implementation.
Installing the iFolder 2.0 Client
Installing and configuring the iFolder 2.0 Client is easy. You can download and install the client from an iFolder server by following these steps:
From a Web browser, bring up the iFolder default home page. (You selected the URL when you installed the iFolder server; in Novell's case, it is http://ifolder.novell.com/).
Select the link to download the iFolder Client. The file is roughly 2 MB in size, so download time should be quick, even on a 56 Kbps modem line.
Execute the iFolderClient20.exe file that you just downloaded to start the Setup Wizard.
The first screen asks you to choose the language that you want to install the client in. Make your selection and click the Next button.
The software license agreement appears in a Web browser screen. After you have read the agreement, close the browser. Select "Yes" to accept the license terms.
The next screen allows you to select the location where Setup will install the iFolder client software (see Figure 10).
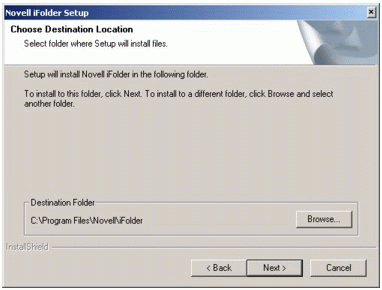
Novell iFolder Setup "Choose Destination Location" screen.
Either leave the path as is to use the default location or browse to another location. Click Next to continue.
Once the iFolder client has been successfully installed, you will see the screen shown in Figure 11.
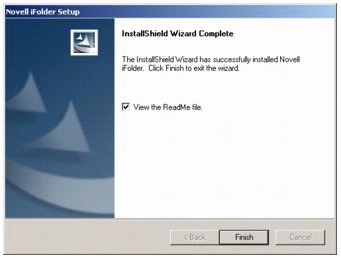
Novell iFolder Setup Wizard complete screen.
Leave the checkbox checked if you want to view the Readme.txt file for any last minute issues. Click the Finish button. At the next screen, click Finish to restart your computer and finalize the installation.
After the workstation restarts, you will see the welcome screen shown in Figure 12.
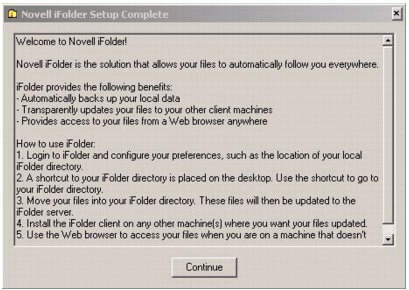
Novell iFolder Setup Complete screen.
Read the usage information and click Continue.
Using iFolder 2.0
To use iFolder, you first need to log in by right-clicking on the iFolder icon in the Windows System Tray. You will see the Novell iFolder Login screen shown in Figure 13.
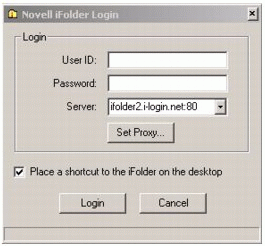
Novell iFolder Login screen.
Enter your network User ID and password. If you have more than one iFolder server, you can select one. If you need to set proxy information, click the Set Proxy button. Check the box if you want an iFolder shortcut to be created on your desktop. Then click the Login button.
The first time you log in to iFolder, you will see the screen shown in Figure 14.
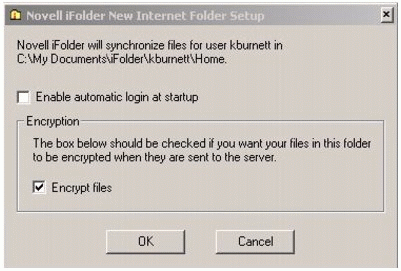
Novell iFolder New Internet Folder Setup screen.
Click the first box if you want to automatically log in to iFolder whenever you start your computer. Leave the "Encrypt files" box checked if you want your iFolder files to be encrypted when they are sent to the iFolder server. Click OK to continue.
If you chose to encrypt your files, the next screen asks you to enter a pass phrase (see Figure 15).
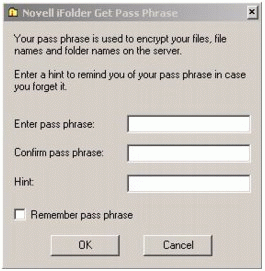
Novell iFolder Get Pass Phrase screen.
Enter a pass phrase and then retype it in the "Confirm pass phrase" entry box. In the "Hint" box, type a hint that will remind you what the pass phrase is in case you forget it. Click the checkbox to save the pass phrase on the computer you are currently using. Click OK to continue.
A shortcut to your iFolder directory is placed on the desktop by default. You can use this shortcut to go to your iFolder directory. When you open your iFolder, you see what looks like a standard Windows directory, as shown in Figure 16.
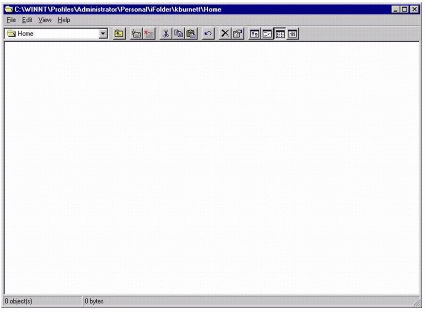
The iFolder directory looks like a standard Windows directory.
Move the files you want to work on into this iFolder directory. These files will then be updated to the iFolder server.
By right-clicking on the iFolder icon in the System Tray, you can access other features of the iFolder client. For example, you can see general account information such as your User ID, local folder location, the name of the iFolder server, server disk space usage, and client information. You can also view an activity log and configure synchronization preferences. There are also menu options such as Logout, Sync Now, View Conflict Bin, iFolder Website, and others.
To change the location of your local iFolder directory (if allowed by your system administrator), right-click on the iFolder icon in the System Tray, select Account Information, and then select "Set iFolder Location" from the File menu. You will be prompted to log out of iFolder. Once you do so, the screen shown in Figure 17 appears.
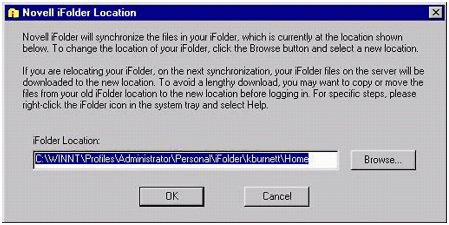
Changing the iFolder directory location.
If you want to have your files synchronized on other computers that you use, install the iFolder client on the other machines where you want your files updated. And remember, you can use a Web browser to access your files when you are on a computer or device that doesn't have the iFolder client installed on it.
Conclusion
Novell iFolder is the new Net services software solution that allows your files to automatically follow you everywhere you go, across multiple systems and the Internet. Files saved in an iFolder are always available, on your hard drives or through a browser, since changes are automatically and intelligently updated across all your computers through any simple Internet connection. iFolder provides worry-free security, ensuring that all your files are always safe, secure, and up to date. Now your files can be as mobile as you are-at work, at home, or on the go.
For more information about Novell iFolder Professional Edition 2.0, including pricing and availability, visit http://www.novell.com/products/ifolder.
* Originally published in Novell AppNotes
Disclaimer
The origin of this information may be internal or external to Novell. While Novell makes all reasonable efforts to verify this information, Novell does not make explicit or implied claims to its validity.