Understanding the Atlas Feature in ZENworks for Servers 3
Articles and Tips: article
Software Consultant
Novell, Inc.
sanand@novell.com
Rajni Kant Lal
Senior Software Engineer
Novell, Inc.
lrajni@novell.com
11 Jan 2002
This AppNote explains the basics of the Atlas feature of ZENworks for Servers (ZfS) 3, which divides the internetwork map into a set of hierarchical maps for ease in viewing and managing devices in large enterprise networks.
- Introduction
- Formation and Representation of Network Entities
- Representation of the Entire Network in ConsoleOne
- Customizing the Device Information
- Conclusion
|
Topics |
network discovery, network management, server management, ZENworks for Servers |
|
Products |
ZENworks for Servers 3 |
|
Audience |
network administrators, support technicians |
|
Level |
intermediate |
|
Prerequisite Skills |
familiarity with basic network management concepts |
|
Operating System |
NetWare, Windows NT/2000 |
|
Tools |
ConsoleOne |
|
Sample Code |
no |
Introduction
The discovery system in Novell ZENworks for Servers (ZfS) 3 allows you to discover various network entities such as routers, printers, servers, and workstations. (For more information, see "How to Configure and Customize the Discovery System in ZENworks for Servers 3" in the October 2002 issue of Novell AppNotes, available online at http://support.novell.com/techcenter/articles/ana20021004.html.) Traditionally, most network management systems (including ManageWise) display the internetwork map as a monolithic page, grouped by networks, which is not very easy to comprehend in the case of large enterprise networks.
ZfS introduces the concept of an "atlas" to replace the old monolithic type of map. The ZfS Atlas divides the internetwork map into a set of hierarchical maps. The concepts followed are similar to those found in a road atlas, where a map of a country is divided into maps of states. The top level of the ZfS Atlas displays the view of the Wide Area Network (WAN) structure of the network. LAN-connected areas across the network interconnected via WAN segments form the second-level hierarchy.
This AppNote discusses the formation logic and representation of the entities displayed in the ZfS Atlas. It also discusses some special views and actions in ConsoleOne that will assist you in using the ZfS Atlas.
Formation and Representation of Network Entities
The ZfS discovery system scans the network and collects information about the devices according to the scope specified by the user. The following sections describe the formation and representation of the various network entities.
Formation and Representation of Nodes
A node is displayed in the map, provided the network address of this node is specified in the scope of the discovery. Additional information, such as operating system, services running, and implemented SNMP MIBs, helps the Atlas to provide a correct representation of the device in the map.
Figure 1 displays the icons used to represent a node. If a node features in more than one category, the icon listed earlier in the list takes priority. For example, if an IP Router is also an RMON Agent, the icon for IP Router is displayed for that node.
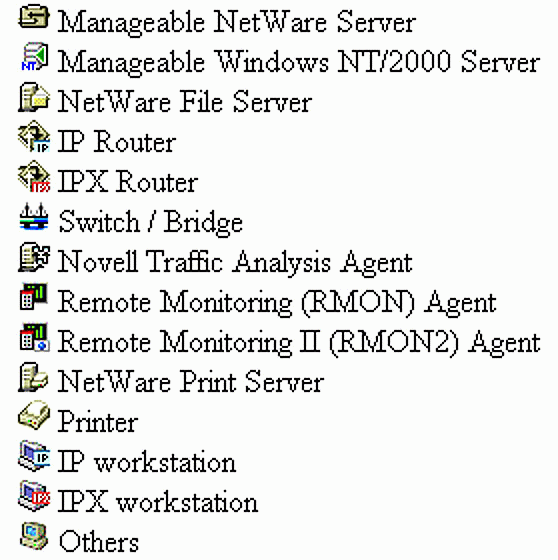
Icons used to represent nodes in ZfS 3.
A device is identified by a variety of names. For example, the machine 10.10.10.10 may be known as x.provo.novell.com, or as cn=xyz,ou=zfs,o=novell, or as sysName_x. Further, the administrator might want this machine to be displayed as "Root server for Building 1" in the map. ZfS Atlas applies the following simple rule to determine the name that should be displayed in the map.
Select the first available name in order, as given in the following list:
Name defined by the user (you can define this name by renaming the object)
Name to which the machine's IP Address resolves using DNS
Name of the server in the eDirectory tree to which the server belongs
Name fetched by querying the SNMP tables
IP address
IPX address
Depending on the logic ZfS applies to select an icon and a name for the discovered devices, the name and the icon of a device may change when the ZfS Discovery System discovers additional information about the device.
The list of information displayed when a node is expanded depends on the SNMP MIBs implemented by the node. The information in the expanded list would therefore vary from one device to another. Figure 2 displays the hierarchy when a managed Windows NT server is expanded.
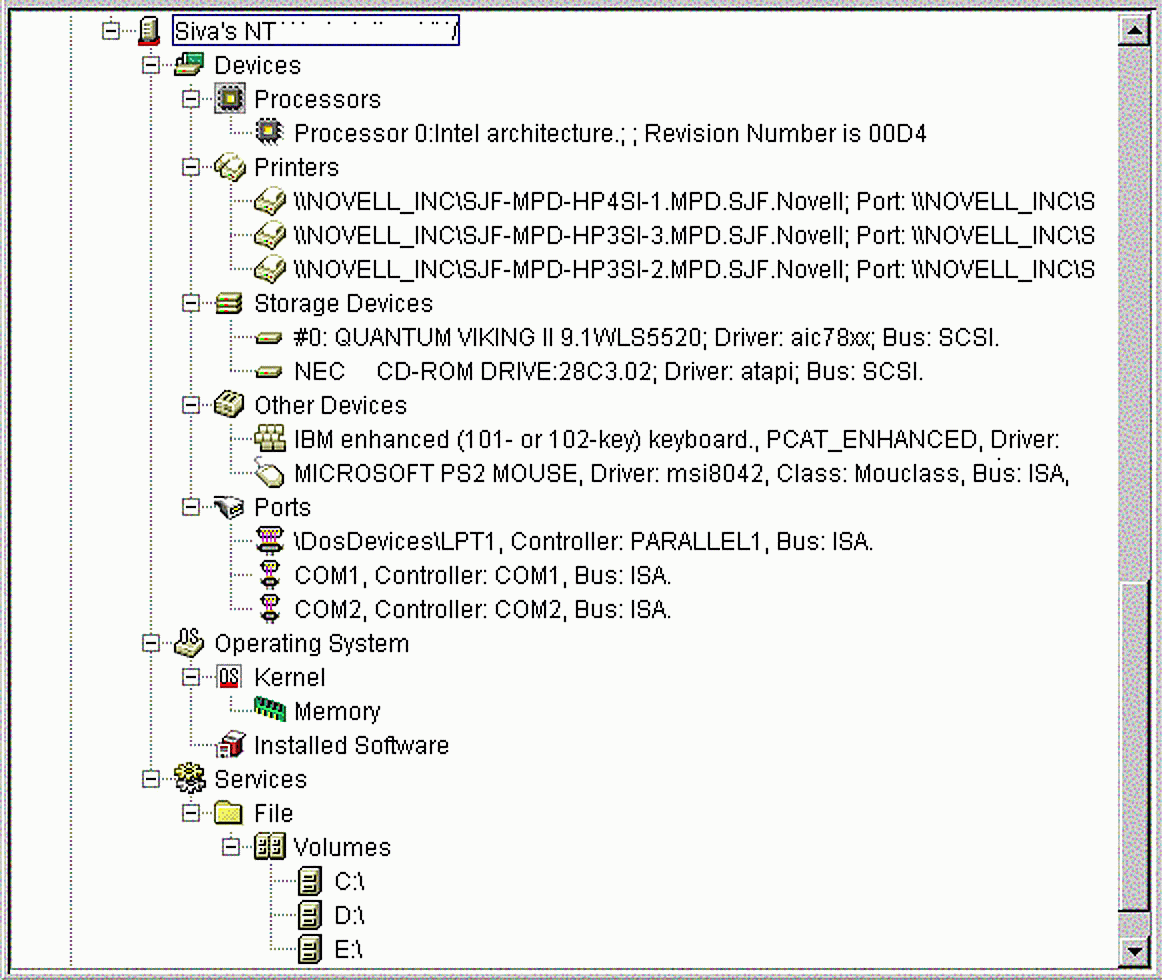
An expanded Windows NT Server.
Formation and Representation of Segments
The discovered nodes are grouped together to form segments. These segments are based on the network numbers of the nodes. The discovery system tries to group all machines in a related network together. For example, in an Ethernet environment, all the machines in the same "collision domain" are grouped together to form a segment. Similarly, in an FDDI environment, all machines in the ring are grouped together to form a segment.
If the network has switch devices, the segments represent the ports of the switch. For example, if there is an 8-port switch on the network with four machines connected to each port, ZfS Atlas displays eight segments. Each segment displays five machines, which includes the four connected machines and the switch itself.
The segment is represented by one of the icons listed in Figure 3. The icon that represents the segment depends on the media type of the segment.
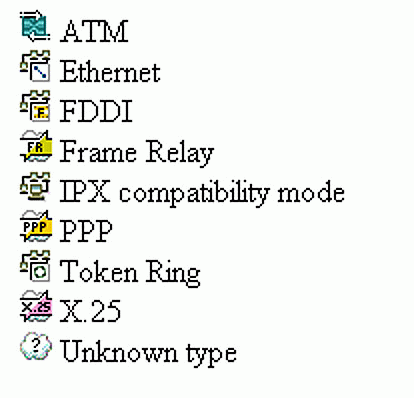
Icons used to represent segments.
The segment name depends on the network number of the machines that are grouped together in that segment. For example, if a segment has machines belonging to network numbers 200.200.200.0 and 200.200.201.0, the name of the segment is displayed as "200.200.200.0 200.200.201.0".
The segments that represent the ports of a switch device are named slightly differently. The set of network numbers is prefixed by the IP address of the switch and its appropriate port number. For example, a segment is named "200.200.200.10 #5 200.200.200.0" if it represents the port number 5 of a switch with IP Address 200.200.200.10. However, you can rename the segment to suit the specific needs of your organization.
Formation and Representation of Connections
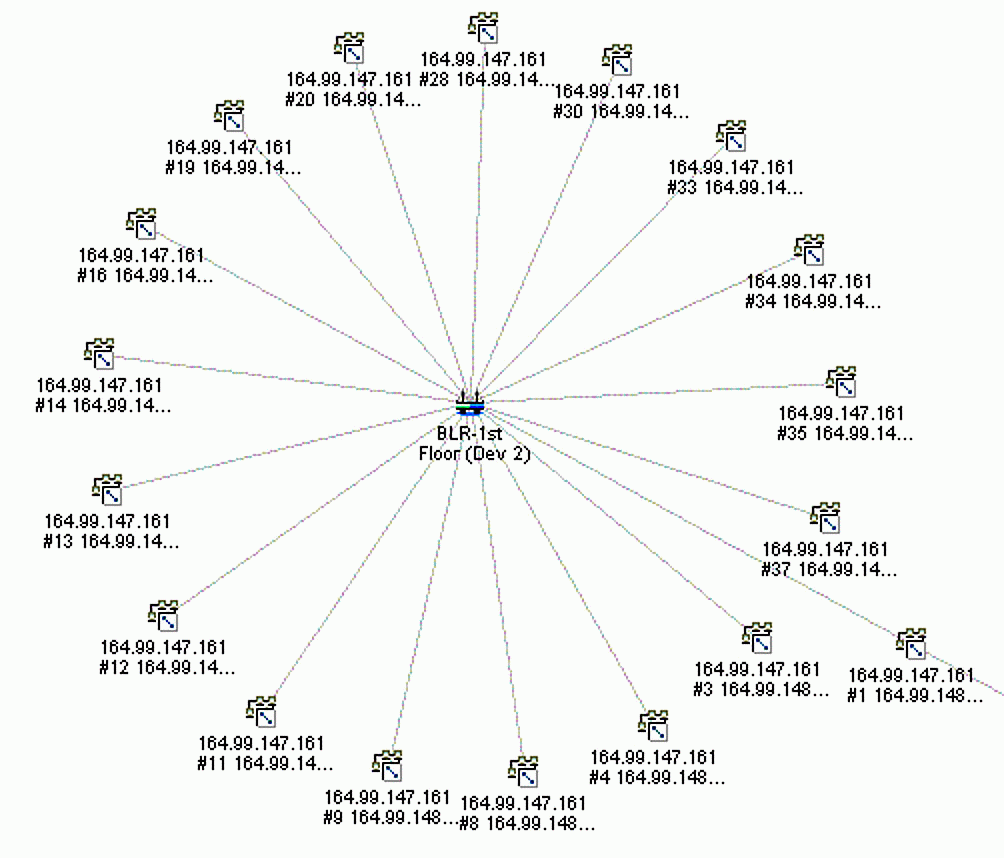
The discovery of connecting devices such as routers and switches helps in determining the connectivity between the segments. For example, if a router is responsible for routing packets between segments A and B, ZfS Atlas displays the information that segments A and B are connected via the router. Similarly, ZfS Atlas also displays the connectivity between a switch and the segments that represent a port of that switch.
Connectivity is represented through lines drawn between the devices and the segments. Figure 4 shows an example of router connectivity.
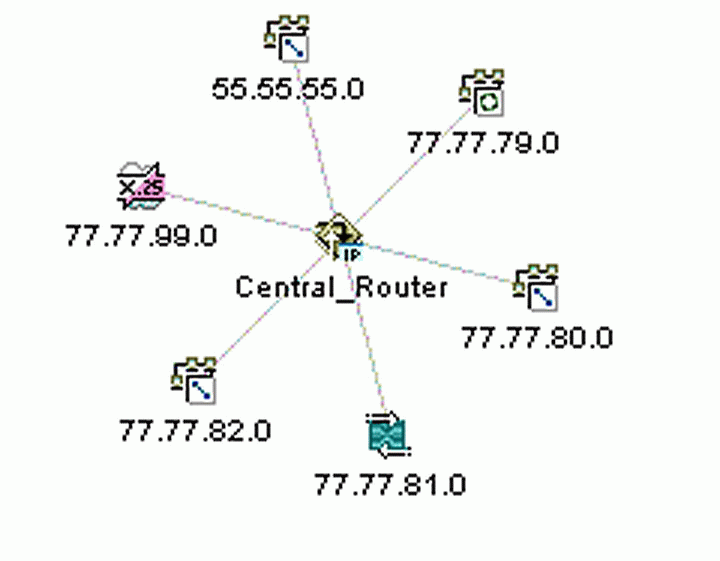
A router connecting multiple segments.
Figure 5 shows an example of switch connectivity.
A switch and its switch port segments.
In some cases, a switch or hub may not be discovered by the discovery system because the device is not SNMP-enabled, or the valid SNMP credentials are not supplied to the discovery system. When the discovery system tries to determine the connectivity, it may deduce that there should be a switch connecting the segments. In such cases, it introduces a special device called the "Virtual Switch". The only purpose of this device is to display a meaningful connectivity between the segments. This device cannot be used for managing your network because the IP/IPX address of this device is unknown.
The icon used to represent this device is same as that of a switch. These switches are named as "Switch on xxxx" where xxxx represents a network number.
Formation and Representation of Area Pages
The discovery of segments in the network and their connectivity helps in grouping the machines into Area pages (also known as "campuses"). An Area page is a group of segments and devices in a LAN-connected area.
The ZfS Atlas can display the following three types of pages:
LAN Area Page. A LAN Area page represents a geographical location of the network. For example, if your organization has offices located in different buildings or cities, ZfS Atlas divides the network into multiple LAN Area pages. Each LAN Area page represents an office at a different location. ZfS divides the network into LAN areas on the basis of the WAN segments.
A LAN Area is named by the WAN router that connects maximum number of segments. If the LAN area does not have any WAN routers, the area is named after the LAN router (or switch) having maximal connectivity. You can rename the area page to suit the specific needs of your organization.
WAN Page. The WAN page represents the WAN structure of the network. The WAN page displays the connectivity between various LAN pages using the WAN routers and segments.
Islands Page. The Islands page is a special page that displays all the segments for which the connectivity is not yet determined. If a router or switch that connects some of the segments in Islands page is discovered, these segments are moved from the Islands page to an appropriate LAN Area page.
Figure 6 provides an example of connectivity displayed in a typical WAN page. It also enlists the icons for the different types of area pages.
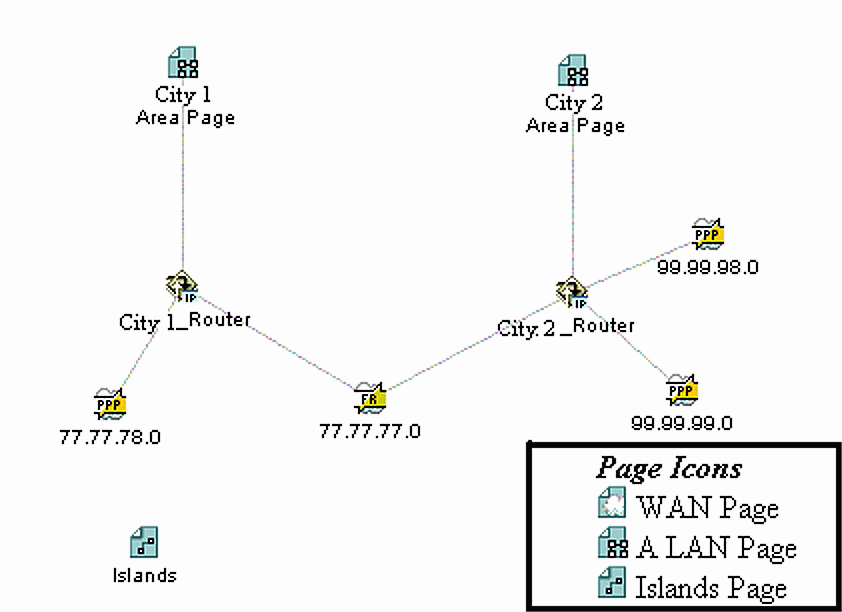
A WAN page showing connected LAN Area pages.
Representation of the Entire Network in ConsoleOne
ZfS 3 uses ConsoleOne to display the network information that we have discussed in the previous sections.
Special Subtree Structure (Different Namespace)
All the management site servers installed in the tree (that you are currently logged in to) are listed under "ZfS Sites". The "ZfS sites" is a different subtree than the NDS Namespace. Each ZfS site has an "Atlas" object, which groups all the Area pages in the internetwork. The internetwork is limited by the scope that has been set for the discovery system for the site.
When you expand an Area page, all the segments and the connectivity devices (routers and switches) are displayed. The segments can be expanded to list the nodes that are contained within the segment. The nodes can be expanded to display the manageable information.
To obtain an accurate (real-time) reading of the manageable state of a node, use the "Probe Manageability" option on the device.
You can also manage a server using the NDS Namespace. When you expand an NCP Server object, you can see the same information that is displayed in the "ZfS sites" subtree. Because the other entities (such as routers, switches, and segments) are not represented in eDirectory, you must use the ZfS Namespace to manage them.
The left pane of the screen shown in Figure 7 represents the ZfS Namespace. The right pane represents the behavior of the Server object as seen in the NDS Namespace. Observe that the same server can have different names in the two namespaces.
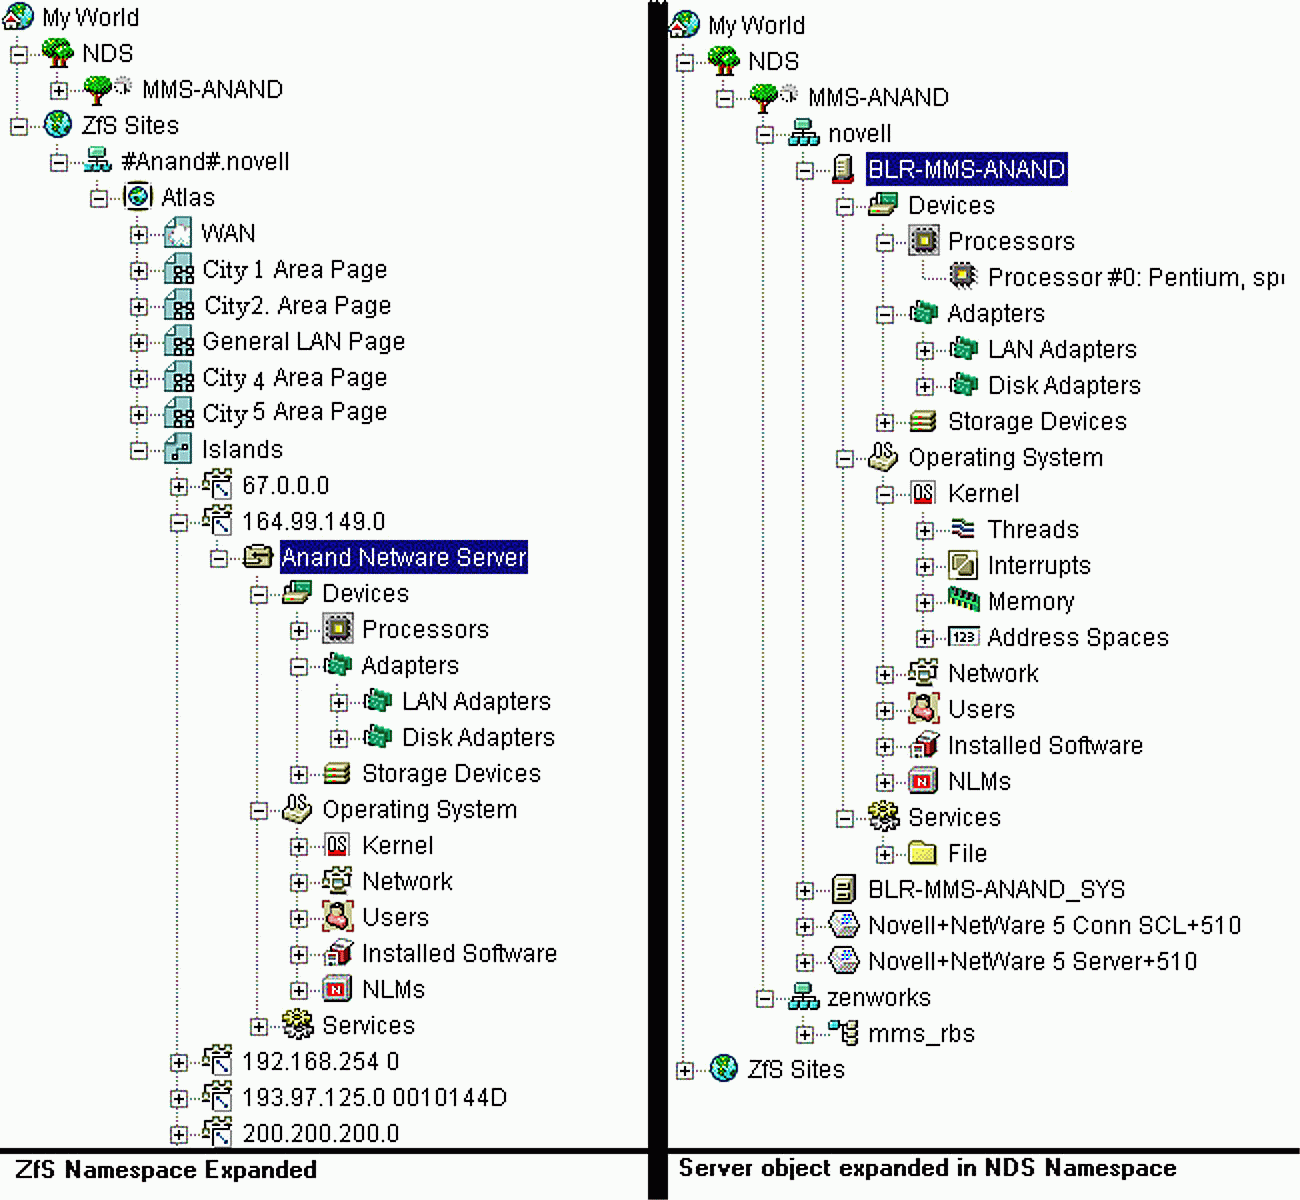
A node as seen in the ZfS Namespace (left pane) and in the NDS Namespace (right pane).
Atlas View
You can view the segments and the Area pages as an Atlas View. The Atlas View displays the connectivity details in a graphical manner. It allows you to choose a background image for the view (use File > Import to choose the background image when the Atlas View is up).
The ZfS Atlas uses a variety of algorithms to provide the best possible layout for the devices on the screen. You can change the layout to suit the specific needs of your organization (select and drag a node to any location). For example, you can select a country map as the background and place the routers/segments/pages at an appropriate location to help you identify them more easily. You can revert to the default layout pattern using the View > Layout in the Atlas view.
The Atlas View also helps you identify any faults in the network. Devices affected by an alarm are indicated by different colors. The indication is displayed hierarchically up the grouping order. For example, if a printer has a critical alarm, the Atlas View displays the printer with a different color (for example, red). Also, the segment on which the printer is located, as well as the Area page that contains the segment, are indicated with the red color.
Figure 8 represents an Atlas View with a background image and alarm indication.
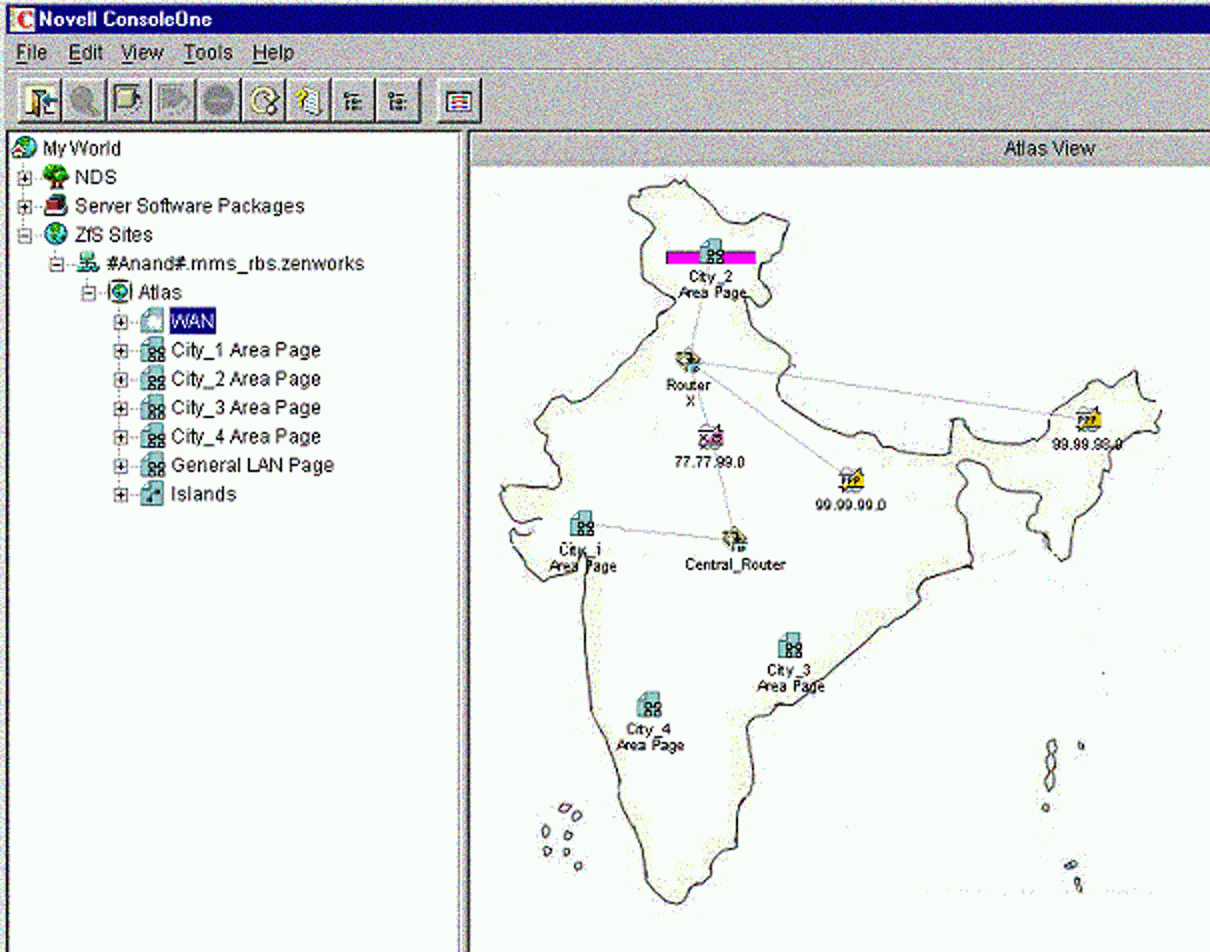
An Atlas View with a background image and alarm indications.
Figures 4, 5, and 6 are also examples of the Atlas View.
Locating an Object
Locating an object becomes more tedious as the number of discovered devices grows. A simple way to locate an object is by using the "Find" feature (select View > Find). This allows you to find the node by any of the names that the device is addressed by. You can search by name, IP/IPX address, or by the MAC address. You can also locate an object by verifying whether that particular view allows you to directly navigate to the required device. For example, the Alarms view allows you to jump to the node that is affected by the alarm. Other views, which display data about nodes in tabular format, allow you to perform an action on the node by selecting the particular row.
Viewing All Devices of a Similar Type
In some scenarios, it may be useful to view all the devices of a particular type in a single view. For example, you may want to list all the printer devices in a single view to monitor them for any alarm conditions. You can select the "Unified Services View" to do this. This view lists all the devices based on the criteria you specify, and indicates the most severe alarm on that device. The Unified Services View also helps you in single-click navigation to the object in the map.
Customizing the Device Information
The ZfS Auto-Discovery feature uses a variety of techniques to obtain information about a device. You can use the Database Object Editor (DOE) to modify information for the discovered devices. For example, if the operating system of a server has been discovered as "Unknown", you can modify the information to a more descriptive label such as "Windows-2000". Such changes are effective only in the ZfS database, and not on the device. For example, if you modify the IP address of the server (using the DOE feature) from 10.10.10.10 to 10.10.10.11, the IP address of the actual device will remain unchanged.
ZfS uses a Sybase database to store all the information about the maps. It is a good idea to make a backup copy of this database after you have customized the layout and other information. The "Database Administration" tab on the ZfS Site Server property page allows you to make a backup of the topology information on the server. The backed-up database also contains a snapshot of all the alarms and other settings at that time.
Conclusion
This AppNote has explained the formation logic and representation of various network entities within the ZfS Atlas. It has also discussed some special views and actions you can perform in ConsoleOne. This information should help you use the Atlas feature in ZENworks for Servers 3 more effectively.
* Originally published in Novell AppNotes
Disclaimer
The origin of this information may be internal or external to Novell. While Novell makes all reasonable efforts to verify this information, Novell does not make explicit or implied claims to its validity.