Tuning the NetWare 6 TCP/IP Stack via SET Parameters
Articles and Tips: article
Senior Software Engineer
Novell, Inc.
AKumar@novell.com
B Thavamani Rajan
Senior Software Engineer
Novell, Inc.
RThavamani@novell.com
01 Jul 2002
This AppNote discusses how to use SET parameters available in the TCP/IP stack for NetWare 6 SP1 or later to change some of the default parameters or enable/disable the various features provided in Novell TCP/IP stack. It also discusses some user/testing scenarios and suggests ways in which you can optimize the performance of the stack.
- Introduction
- ARP Tuning Parameters
- Oversized Packets Handling
- Receive Buffers Count
- Interactive Data Flow
- Memory Allocation
- TCP Parameters
- MTU Tuning
- Attack Protection
- Miscellaneous SET Parameters
- Conclusion
|
Topics |
TCP/IP stack, performance tuning, SET parameters |
|
Products |
NetWare 6 (TCP/IP Stack) |
|
Audience |
network administrators, consultants, integrators |
|
Level |
intermediate |
|
Prerequisite Skills |
familiarity with the TCP/IP protocol suite |
|
Operating System |
NetWare 6 |
|
Tools |
n/a |
|
Sample Code |
no |
Introduction
The SET parameter options discussed in this AppNote allow you to configure certain TCP/IP parameters on NetWare 6 SP1 and higher. The parameters can be executed from the command line on the host server. The SET options are entered at the server console as commands, and the configuration changes made this way are applied to the whole system rather than to an individual interface. Many of the SET parameters will not change the behavior of the existing connections. Most of these parameters are valid for new connections.
ARP Tuning Parameters
This group comprises SET parameters related to the Address Resolution Protocol (ARP).
ARP Entry Expiry Time
Syntax: set arp entry expiry time = n Range: 240 -14400 (seconds) Default: 300
This parameter changes the expiry time of ARP entries in the ARP cache. An ARP entry is the mapping between the IP address and physical MAC address. The value is specified in seconds and can be set in the STARTUP.NCF file.
This parameter specifies a timeout period for a cache table entry to be removed from the ARP cache table if the entry has not been used for some time. Reducing this timer may stop some ARP hijacking and ARP spoofing attacks. Reducing the timer also avoids resource exhaustion or performance degradation that can occur when the ARP cache is filled with bogus entries. It is recommended that you retain the default value and reduce this setting only if you see lots of invalid ARP values on the network.
If you are in a static network environment where MAC addresses rarely change, you may want to increase the ARP Entry Expiry Time. The ARP Entry Expiry Time should be less than or equal to the ARP Entry Update Time.
ARP Entry Update Time
Syntax: set arp entry update time = n Range: 240 - 14400 (seconds) Default: 300
This parameter changes the update time of the ARP entries. The parameter specifies a timeout period for a cache table entry to be removed from the ARP cache if the entry has not been updated. The value is specified in seconds and can be set in the STARTUP.NCF file.
The ARP Entry Update Time should be greater than or equal to the ARP Entry Expiry Time.
Oversized Packets Handling
This group includes SET parameters related to the handling of oversized UDP packets.
Largest UDP Packet Size
Syntax: set largest udp packet size = n Range: 0 -65536 (bytes) Default: 16384
This parameter specifies the size of the largest UDP packet that can be received. Setting this parameter provides protection against UDP flooding by discarding oversized packets. This parameter has to be used with Discard Oversized UDP Packets. The upper limit for this parameter is set with the assumption that the MTU is 1500 (Ethernet).
Discard Oversized UDP Packets
Syntax: set discard oversized udp packets = string Range: On | Off Default: On
This parameter determines whether or not the server will discard UDP packets larger than the current setting of Largest UDP Packet Size. The screen shown in Figure 1 illustrates the warning notification displayed whenever a server receives and discards an oversized UDP packet. In this case, the largest UDP packet size was set to 2048, but the server is receiving (and discarding) packets of 3028 bytes.
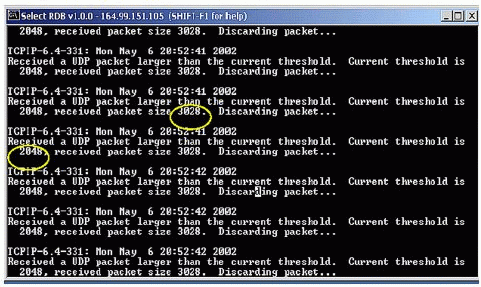
Warning messages displayed when a server discards oversized UDP packets.
To avoid discarding the UDP packets, either set the Discard Oversized UDP Packets parameter to Off, or increase the Largest UDP Packet Size threshold to a value larger than currently received oversize UDP packet: in this case greater than 3028.
You can monitor your Discard Oversized UDP Packets by switching over to the logger screen.
Largest Ping Packet Size
Syntax: set largest ping packet size = n Range: 0 - 65536 (bytes) Default: 10240
This parameter specifies the size of the largest ping packet that can be received, and must be used with the Discard Oversized Ping Packets parameter.
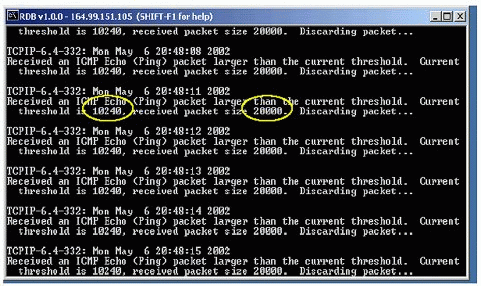
The screen shown in Figure 2 illustrates the warning notification displayed whenever a server receives an oversized ICMP Echo (ping) packet. In this case, the largest ICMP packet size was set to 10240, but the server is receiving (and discarding) packets of 20000 bytes.

Warning messages displayed when a server receives ICMP packets larger than the current threshold.
To avoid these kinds of warnings, increase the threshold to a value larger than the currently set value for the received oversized ICMP packet: in this case the ICMP packet size is 20000.
You can monitor your Largest Ping Packet Size by switching over to the logger screen.
Discard Oversized Ping Packets
Syntax: set discard oversized ping packets = string Range: On | Off Default: On
This parameter determines whether or not to discard the ICMP packets larger than the current setting of Largest Ping Packet Size.
The screen shown in Figure 3 illustrates the warning notification displayed whenever a server receives and discards an oversized ICMP packet. In this case the largest ICMP packet size was set to 10240.
Warning messages displayed when a server discards oversized ICMP packets.
To avoid discarding these packets, make sure this parameter is set to Off or increase the threshold to a value larger than the currently received oversize ICMP packet. In this case, the ICMP packet size is 20000.
You can monitor your Discard Oversized Ping Packets by switching over to the logger screen.
Receive Buffers Count
This group consists of the parameters for setting the minimum and maximum receive buffer count.
Minimum Packet Receive Buffers
Syntax: set minimum packet receive buffers = n Range: 10 - 32768 (buffer count) Default: 2000
This parameter specifies the minimum number of packet receive buffers allocated by the server. This is a driver-level parameter that tunes the resources reserved for packet reception at the driver level.
If the server is supposed to run in a high traffic (stressed) condition, it is recommended to increase the value of this parameter from the default value.
You can monitor your Minimum Packet Receive Buffer threshold value by entering the "\e" command at the server console.
Maximum Packet Receive Buffers
Syntax: set maximum packet receive buffers = n Range: 10 - 32768 (buffer count) Default: 10000
This parameter specifies the maximum number of packet receive buffers allocated by the server. This is a driver-level parameter that tunes the resources reserved for packet reception at the driver level. it helps you tune the maximum number of packet receive buffers that is allocated to the system.
If the server is supposed to run in a high traffic (stressed) condition, it is recommended to increase the value of this parameter from the default value.
The screen shown in Figure 4 illustrates a scenario in which lots of ECBs fail. You can monitor your ECB Allocation failures by entering the "\e" command at the server console.
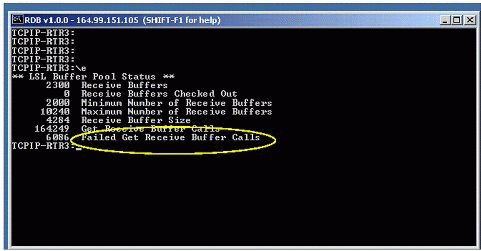
LSL Buffer Pool statistics displayed when an ECB Allocation failure occurs.
Interactive Data Flow
These parameters help regulate interactive data flow in TCP communications.
Delayed Acknowledgement
Syntax: set tcp delayed acknowledgement = string Range: On | Off Default: On (enabled)
This parameter is used to enable or disable the Delayed Acknowledgment support. Normally TCP does not send an ACK the instant it receives data. Instead, it delays the ACK hoping to have data going in the same direction as the ACK so the ACK can be sent along with the data. TCP uses four system ticks (approximately 224 milliseconds, based on the TCP timer schedule rate) to delay the ACK.
With delayed acknowledgements, the number of ACK frames is reduced (especially in relatively fast networks) because several packets are received before the timer expires. Note that slow starts result in an increase of the congestion window. However, as the increase in the congestion window depends on the reception of acknowledgement frames, the congestion window does not open as quickly as it would if it were not using delayed acknowledgements.
Avoiding the use of delayed ACKs during a slow start would appear to help in a satellite channel in the case of small file transfers. For large file transfers, delayed ACKs can help avoid packet loss due to congestion by controlling the bursting from large bunches of ACKs. Delayed ACKs may also be helpful in highly asymmetric channels where ACK bunching may occur. Such bunching could lead to bursting and congestion loss. However, delayed ACKs also cause slower congestion window growth when congestion is avoided. While this is still a topic for research, it is clear that for small transfers delayed ACKs hurt, while for large transfers they can help. An obvious approach is to turn delayed ACKs on only after slow start has gotten the connection up to a reasonable rate.
Nagle Algorithm
Syntax: set tcp nagle algorithm = string Range: On | Off Default: On
This parameter is used to enable or disable support for the Nagle algorithm. This algorithm helps improve performance for wide area networks where there is an excessive number of "tinygrams" (small segments) that can necessitate retransmissions, cause lost packets, and hamper propagation speed through congestion in switching nodes and gateways. This algorithm states that when a TCP connection has outstanding data which has not been acknowledged, small segments cannot be sent until the outstanding data is acknowledged. Instead, small amounts of data are collected by TCP and sent in a single segment when the acknowledgement arrives.
The Nagle algorithm should be used in TCP in cases of one-way bulk data transfer or Telnet-style two-way data transfer.
Minshall's Algorithm
Syntax: set tcp minshall algorithm = string Range: On | Off Default: Off
This parameter is used to enable or disable support for Minshall's Algorithm. An interaction between the sender's Nagle Algorithm and the receiver's Delayed ACK policy can create an especially severe problem: that of a temporary deadlock. The Nagle Algorithm prevents the sender from transmitting more data until it receives an outstanding ACK, while the delayed ACK policy prevents the receiver from transmitting an ACK until more data arrives. Sooner or later, the delayed-ACK timeout breaks the deadlock, but this adds delays to operations that should have completed much faster.
Minshall's Algorithm is an enhancement to the Nagle Algorithm that helps avoid the deadlock without disabling the Nagle Algorithm. The algorithm states that a small packet should be sent only if the connection does not have a small packet unacknowledged. From this statement, it is clear that the Minshall Algorithm allows one unacknowledged small packet per connection.
Memory Allocation
These parameters help with memory allocation related to TCP communications.
Pre-Allocated PCB Count
Syntax: set tcp number of preallocated pcbs = n Range: 10 - 150000 (count) Default: 1024
This parameter specifies the number of PCBs to be pre-allocated when the stack is initialized. Once the PCBs are pre-allocated, for each connection the PCBs from this buffer pool are reused instead of allocating memory each time. Thus this parameter helps in avoiding the memory allocation overhead.
The default value of this parameter is 1024. However, if the server is handling an average of x connections at a time, it is desirable to set this value to x. This specifies that, on an average, the stack already has the memory allocated for the PCBs for all new connections. If you set this parameter to a high value, that much memory is reserved and cannot be used for other applications.
The currently available PCBs status can be seen from the TCP Statistics such as Total PCBs and PCBs in Use.
Note: You must restart the server for a change in this parameter to become effective.
Maximum Small ECBs
Syntax: set tcp ip maximum small ecbs = n Range: 10 - 150000 (count) Default: 1024
This parameter specifies the maximum number of small ECBs to be pre-allocated when the stack is initialized. ECB failures can be identified from IP Statistics such as Total Small ECBs, Free Small ECBs, Max Small ECBs Allowed, and Maximum Small ECBs Allowed.
Problem Description. One possible problem scenario is one in which an application creates loopback connections and initially all the connections work perfectly. However, when the number of loopback connections is increased, the application sends out error # 61/60, meaning that the connections are timing out or no more new connections are being established.
Possible Cause. When an application creates a large number of loopback connections, a large number of Small ECBs will be used to handle these connections. Hence, there is possibility that there is a depletion of the Small ECB pool.
Figure 5 shows a scenario in which a lot of Small ECBs are being depleted.
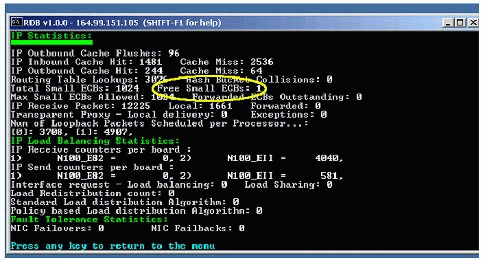
IP Statistics screen showing a low number of Free Small ECBs.
You can monitor your Small ECB count by entering the "_IP" command at the server console. If you are having problems, verify the statistics of Free Small ECBs; if this value is less than 10, the problem could be due to an insufficient number of Small ECBs.
Action. By default, 1024 buffers are pre-allocated for IP applications. Increase the free small ECBs to a higher value. Increase the above SET command value by a factor of 2 and see if it helps.
TCP Parameters
These parameters have to do with general TCP communications.
TCP Retransmission Threshold
Syntax: set tcp maximum packet retransmission = n Range: 0 - 12 (count) Default: 12
This parameter can be used to change the maximum number of packet retransmissions in TCP. If the number of retransmissions for a TCP connection exceeds this threshold, the connection will be aborted.
The value of this parameter should be lowered from the default only if the connectivity is stable and the congestion is very low. A lower value will reduce the retransmissions in network, possibly leading to connection terminations.
TCP Timer Schedule Rate
Syntax: set tcp timer schedule rate = n Range: 3 - 4 (system ticks) Default: 3
This parameter can be used to change the TCP Timer Schedule Rate. This parameter defines the TCP tick ratio which is the duration of TCP tick in milliseconds. TCP timer functions are automatically invoked in intervals of TCP ticks. The default value is 3, which corresponds to 3*System Tick or 3*56 = 168 milliseconds.
TCP Minimum Retransmission Timeout
Syntax: set tcp minimum retransmission timeout = n Range: 3 - 8 (TCP ticks) Default: 2
This parameter can be used to change the minimum packet retransmission timeout. This is specified in TCP ticks. A system tick is 1/18 of a second, or 56 milliseconds. The relationship between TCP ticks and system ticks is given in the following equation:
TCP Tick = System Tick * TCP Tick Ratio
The TCP Tick Ratio is set by the TCP Timer Schedule Rate parameter, whose default value is 3. The default minimum retransmission timeout value is 2, which will converge to 2*3*1/18 = 336 milliseconds.
Problem Description. A problem could occur in either of these scenarios:
Whenever data transfer is performed to the server that is separated across a slow WAN link, the connections would be reset.
Whenever a heavy data transfer is performed to the server that is separated across a slow WAN link, the connections would be reset.
Possible Cause. When you have a slow WAN link or a lot of traffic on a WAN link, latency (delay) is introduced between the packets. Hence, TCP may reset the connection. The problem can be verified by checking the TCP retransmissions counter (check TCPCON > Statistics > TCP > Retransmissions). This counter should have a large value.
Action. To resolve such an issue, it is recommended to increase the TCP Minimum Retransmission Timeout interval from the default of 2 TCP Ticks to a higher value such as 4. (Remember, 1 TCP Tick = 224 milliseconds.)
TCP Connection Establishment Timeout
Syntax: set tcp connection establishment timeout = n Range: 0 - 446 (TCP ticks) Default: 335
This parameter can be used to change the TCP Connection Establishment Timeout value in TCP Ticks. The default value of this parameter is 335 TCP Ticks, which converges to 335 * 168 milliseconds = 56 seconds. This parameter is governed by the TCP Timer Schedule Rate. Once the connection establishment time exceeds this threshold, the connection will be reset from the stack.
TCP Maximum Initial Window
Syntax: set tcp maximum initial window = n Range: 2 - 4 (value) Default: 4
Use this parameter to change the maximum initial window size for a TCP connection (Reference: RFC 2414). This specifies an increase in the permitted upper bound for TCP's initial window from one segment to between two and four segments.
The advantages of a larger initial window are:
When the initial window is one segment, a receiver employing delayed ACKs is forced to wait for a timeout before generating an ACK. With an initial window of at least two segments, the receiver will generate an ACK after the second data segment arrives. This eliminates the wait on the timeout (often up to 200 milliseconds).
For connections transmitting only a small amount of data, a larger initial window reduces the transmission time (assuming at most moderate segment drop rates). For many e-mail (SMTP) and Web page (HTTP) transfers that are less than 4KB, the larger initial window would reduce the data transfer time to a single RTT.
For connections that will be able to use large congestion windows, this modification eliminates up to three RTTs and a delayed ACK timeout during the initial slow-start phase. This would be of particular benefit for high- bandwidth, large-propagation-delay TCP connections, such as those over satellite links.
TCP Max Port Limit
Syntax: set tcp max port limit = n Range: 4999 - 54999 (value) Default: 54999
This parameter is used to modify the upper limit of TCP ephemeral port range. If applications want to reserve some ports, the ephemeral ports must be restricted for that range.
TCP UDP Diagnostic Services
Syntax: set tcp udp diagnostic services = string Range: On | Off Default: Off
This parameter can be used to start or stop diagnostic services over TCP and UDP. The diagnostic services are Echo (which listens on Port No 7), Discard (which listens on Port No 9), and Chargen (which listens on Port No 19).
In Echo mode, once a connection is established any data received will be sent back to the client. In Discard mode, once a connection is established any data received is discarded and no response is sent. In Chargen mode, once a connection is established a stream of data is sent out in the connection.
Note: These services should be used only for testing purposes.
MTU Tuning
These parameters deal with the Maximum Transfer Unit (MTU) in TCP communications.
Use Specified MTU
Syntax: set use specified mtu = string Range: On | Off Default: Off
Use this option to force IP to use a user-specified MTU size. The default MTU size is 576. This can be changed via the SET Maximum Interface MTU parameter. This parameter is applicable only for TCP applications. It is recommended that this parameter be used only for testing purposes.
Maximum Interface MTU
Syntax: set maximum interface mtu = n Range: 576 - 5000 (MTU size) Default: 576
This parameter can be used to define the maximum value of the interface's MTU when the Use Specified MTU parameter is set to On. This parameter is applicable only for TCP applications. It is recommended that this parameter be used only for testing purposes. This will help us restrict packet sizes greater than the maximum interface MTU from the host.
Attack Protection
These parameters can help protect your network against TCP/UDP land attacks and TCP FIN attacks.
TCP/UDP Land Attack Protection
Syntax: set tcp defend land attacks = string Range: On | Off Default: Off
This parameter can be used to defend against TCP/UDP land attacks. A "land attack" is a spoofed attack where a connection appears to be addressed to an address:port combination from the same address:port combination so that system goes into infinite loop trying to complete the TCP connection.
Figure 6 shows a scenario in which a land attack has occurred. To view this screen, go to the TCP Connections Table.
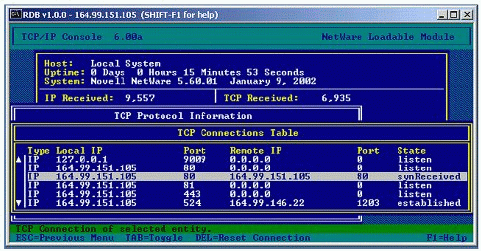
TCP Connections Table showing the occurrence of a land attack.
Use this parameter to enable the land attack checks. Disabling the parameter gives you a performance edge by avoiding per-packet checks.
FIN Attack Protection
Syntax: set maximum wait states = n Range: 1 - 100000 Default: 0 (disabled)
The TCP Defend FIN Attack feature provides a simple, single-tuning Maximum Wait States threshold parameter. In the TCP stack, the wait states (FIN_WAIT1, FIN_WAIT2, CLOSED_WAIT, LAST_ACK and CLOSING) are arranged in ascending order of importance by determining which of the states are less risky to terminate. The order is static.
The stack assumes that there is no risk in terminating all connections in a less important state. According to the arrangement of states, if a less important connection is overusing resources, then it is selected. Alternately, if an important state is overusing resources and the less important states do not dominate, it would be selected for reset only. At any given point in time, a Minimum Threshold number of connections will be permitted.
Figure 7 shows a scenario in which a FIN attack has occurred. To view these statistics, enter the "_TCP" command at the server console.
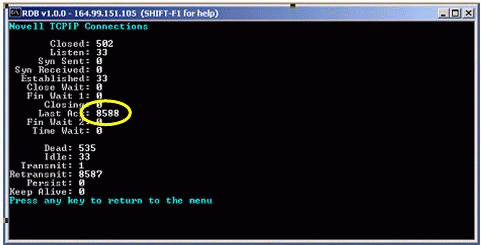
TCPIP Connections screen showing the occurrence of a FIN attack.
Miscellaneous SET Parameters
This last section lists several miscellaneous TCP/IP-related SET parameters.
BSD Socket Buffer Tuning
Syntax: set bsd socket default buffer size in bytes = n Range: 4096 bytes - 1 GB Default: 32768
This parameter sets the default size of the socket send and receive buffers. It is applicable only to TCP sockets using the BSD interface. Every socket has a send buffer and a receive buffer. TCP uses the receive buffers to hold received data until it is read by the application. With TCP, the available room in the socket receive buffer is the window that TCP advertises at the other end. The maximum value supported is 1 GB.
TCP Connections Backlog Tuning
Syntax: set maximum pending tcp requests = n Range: 128 - 4096 (connections) Default: 128
The SET Maximum Pending TCP Requests parameter specifies the maximum number of pending TCP connections. This is the maximum number of queued connections for a listening end-point. All of these queued connections should have been accepted by the TCP (the three-way handshake should be complete) and the connections should be waiting to be accepted by the application. If there is no room in the queue for a new connection, TCP ignores the received SYN and the connection is refused.
This parameter is applicable only for BSD Socket applications. It is advised that you retain the minimum default value under normal circumstances. Scale this parameter to a higher value only when the TCP statistics show service attempt failures.
Large Window Support
Syntax: set tcp large window option = string Range: On | Off Default: On (enabled)
This parameter enables or disables the scaling capability of the TCP window. TCP performance problems arise when the bandwidth * round_trip_delay is large (greater than or equal to 106 bits). In such a situation, extending the window size larger than 216 can enhance performance.
This parameter, when enabled, defines an implicit scale factor that is used to multiply the window size value found in a TCP header to obtain the true window size. The scale factor is automatically chosen by TCP, based on the size of the receive buffer. The window scale option is sent only in the SYN segment by both sides. The upper limit of TCP window will be 65535 * 214 (1 GB). This is usually applicable to Gigabit, transcontinental networks.
Selective Acknowledgement (SACK)
Syntax: set tcp sack option = string Range: On | Off Default: On (enabled)
This parameter is used to enable or disable Selective Acknowledgment (SACK) support in the stack. SACK is a mechanism that includes a retransmission algorithm which helps overcome weak links on an unstable, high-delay Internet path. This can allow better handling of the retransmission queue in the event of multiple packet losses in a single window.
The selective acknowledgment extension uses two TCP options:
An enabling option that is SACK-permitted. This option can be sent in a SYN segment to indicate that the SACK option can be used once the connection is established. The SACK-permitted option is a two-byte option.
The SACK option itself. This option can be sent over an established connection once both the sender and the receiver have successfully negotiated the SACK-permit option.
Whenever there is loss of data, the data receiver can send the SACK option to acknowledge the out-of-order segments. Thereby the receiver can notify the data sender of the non-contiguous blocks of data that have been received and queued (Reference: RFC 2018).
A maximum of four blocks can be specified within the 40-byte TCP options.
Path MTU Black Hole Detection and Recovery
Syntax: set tcp path mtu black hole detection and recovery = string Range: On | Off Default: Off (enabled)
This parameter provides the facility to detect a connection failure due to "black hole" routers and helps the stack to recover from such connections. Whenever a router gets a datagram with a Don't Fragment (DF) bit set in its header and the packet size is greater than the next MTU, the router cannot forward the packet. In such a case, the router sends an "ICMP Destination Unreachable DF bit set" message to the host.
Often routers do not send such a message; instead, they ignore the datagram. Typically, an IP datagram cannot be forwarded because its maximum segment size is too large for the receiving server and the DF bit is set in the header of the datagram. Routers that ignore these datagrams and send no message are called Path MTU Black Hole routers. Some routers might silently drop large frames, even when the DF bit is not set. Firewalls are often misconfigured to suppress all ICMP messages.
To respond effectively to black hole routers, the stack now provides a Path MTU Black Hole Detect feature. This feature recognizes repeated unacknowledged transmissions and responds by turning off the DF bit and reducing the maximum segment size. After a datagram is transmitted successfully, the recovery algorithm is invoked, which gradually increases the maximum segment size and turns the DF bit back on.
Problem Description. The client is able to ping to the server and perform some interactive TCP connections to the destination host. These connections work fine. However, bulk transfers fail with the first large packet, and the connection eventually times out. Such a scenario is particularly annoying with an application such as FTP. FTP and similar applications work perfectly as long as they use small packets for control information, but they fail on bulk transfers.
Possible Cause. This scenario occurs when a host sends a huge packet with the DF bit set in the IP header. If the packet is too large for a router to forward to a particular link, the router must send an "ICMP Destination Unreachable - Fragmentation Needed" message to the source address. Many routers fail to send these ICMP messages. This happens for a variety of reasons, ranging from lack of support in the router to firewalls being misconfigured to suppress ICMP messages. The result is that the upper-layer protocol continues to try to send large packets without the ICMP messages, but it never discovers that it needs to reduce the size of those packets. Hence for bulk data transfer, TCP will completely fail (under some conditions).
The problem could be verified where the router should not send an ICMP Code 3 Type 4 messages. This shows up as a TCP connection that hangs (fails to make progress) until it is closed by a timeout.
Action. To resolve such issues, it is recommend that you enable the Path MTU Black Hole detection and recovery algorithm. To do so, change the value of the SET TCP Path MTU Black Hole Detection and Recovery parameter to On.
ICMP Route Aging
Syntax: set icmp redirect timeout = n Range: 0 - 525600 (minutes) Default: 3
This parameter gives the user the option of setting the ICMP learned routes to timeout between 0 - 525600 minutes. ICMP (Internet Control Message Protocol) is at the same relative layer as IP and its purpose is to transmit information needed to control IP traffic. It is used mainly to provide information about routes to destination addresses. ICMP Redirect messages inform hosts about more accurate routes to other systems, whereas ICMP Unreachable messages indicate problems with a route. When you set this value to 0, the learning of ICMP redirect routes is disabled.
An ICMP Redirect message is sent only in the following scenario:
Host A is sending a packet to Host B. Host A's default IP router is router R1. Because Host B is a remote host, Host A forwards the packet destined for Host B to its default router R1.
R1 checks its routing table and finds that the next hop for the route to the network for Host B is router R2.
If Host A and R2 are on the same network that is also directly attached to R1, an ICMP Redirect message is sent to Host A informing it that R2 is the better route when sending to Host B.
Router R1 then forwards the IP datagram to R2.
Host A adds a host route to its routing table for Host B's IP address with router R2's IP address as the forwarding address. Subsequent datagrams from Host A to Host B are forwarded by means of router R2.
If the gateway is changed, this expiration timer prevents the ICMP learned routes from being present in the routing table indefinitely. Once the ICMP learned route is aged, it is removed and must be relearned through another ICMP Redirect.
Problem Description. A large number of ICMP Redirect messages are flowing in the network. When the user sees the routing table of the host, he is able to see that it has learned a new (better) route through ICMP, in addition to the configured default router.
Possible Cause. This is happening because, to inform the host about a better route to reach the same destination, the router uses ICMP Redirect messages. Consider this example:
We assume that the host sends an IP datagram to R1, since R1 is the default router for the host.
R1 receives the datagram, performs a lookup in its routing table, and determines that R2 is the correct next-hop router to forward the datagram. When it sends the datagram to R2, it detects that it is sending over the same interface through which the datagram first arrived.
R1 sends an ICMP Redirect to the host, telling it to send future datagrams to that destination to R2 instead of to R1.
The host therefore creates a routing entry indicating that, to reach that destination, the next hop is R2.
The routing information in the host remains valid for 3 minutes, by default. After that, a new ICMP Redirect must be sent by R1.
Action. The aging of ICMP Redirect routes can be tuned. To do so, adjust the ICMP Redirect Timeout parameter to a higher value so that the route information will be valid for a longer time interval.
Type of Service
Syntax: set tos for ip packets = n Range: 0 - 127 (tos value) Default: 0
This parameter is used to set the Type-of-Service (ToS) in the IP header for all outgoing packets for all interfaces. Every IP packet has an 8-bit field called the ToS byte. The ToS byte has two subfields:
The first sub-field, called the precedence field, uses 3 bits. By using these 3 bits, the protocol can sustain eight levels of priority. Coincidentally, the same number of priority levels are offered by 802.1P and 802.1Q. By cross- mapping, IP can match one-for-one the priority values supported in Ethernet, enabling the network to continue the same level of service between Ethernet at Layer 2 and IP at Layer 3.
The second sub-field has 4 bits, each of which contains additional information that can be used by the network to determine the level of service. Each bit corresponds to one of the four network characteristics: delay, throughput, routing, and cost. The bit that is turned on determines how the network responds to the packet. For example:
Delay. An active delay bit tells the router to choose a high speed to minimize delay.
Throughput. An active throughput bit specifies that high capacity links should be used.
Routing. An active routing bit directs routing protocols and network management applications to select fault-tolerant paths.
Cost. An active cost bit is for low-priority applications and tells the network to choose the lowest cost path.
If no bit is activated in this sub-field, the IP packet is prioritized as "best effort."
The ToS byte's eighth bit is unused.
Unless a service provider supports ToS and ToS/QoS is backed by a service level agreement, ToS doesn't really help much because the service provider will treat the IP packet just like any other best-effort transmission.
Force IP Fragmentation
Syntax: set always allow ip fragmentation = string Range: On | Off Default: Off
This parameter can be used to force IP to allow fragmentation. The IP header has a Flags field called Don't Fragment. If this is set to On, IP will not fragment the datagram. This option will forcefully set the bit Off for all IP packets sent. If the interface to which the IP datagram has to be sent has an MTU less than the datagram size and if the Don't Fragment bit is On, an ICMP "Fragmentation needed but Don't Fragment bit set" error is sent to the originator of the packet. It is recommended that this parameter be used only for testing purposes.
Conclusion
This AppNote has discussed the use of SET parameters to enable/disable the various features provided in Novell TCP/IP stack available with NetWare 6 SP 1 or later versions. The facts and figures provided herein are strictly from test scenarios; there can be deviations from these figures in real-world scenarios. Novell recommends that you verify configuration changes on a simulated test network before you deploy any of these configuration changes directly in a production environment. Additional SET parameters will be introduced as requirements arise for enhancements to the TCP/IP stack.
* Originally published in Novell AppNotes
Disclaimer
The origin of this information may be internal or external to Novell. While Novell makes all reasonable efforts to verify this information, Novell does not make explicit or implied claims to its validity.