Managing Browser Configuration for Novell BorderManager Proxy Clients
Articles and Tips: article
Consultant
Novell, Inc.
swsmith@novell.com
01 Apr 2002
This AppNote describes various approaches to configuring and distributing your client browser configurations to match updated proxy configuration in your network environment. It covers manual, automatic, and programmatic methods for updating proxy and other browser configuration settings in the current popular browsers.
- Introduction
- Proxy Fundamentals
- Desktop Interaction with Proxy Servers
- Automatically Configuring Web Browsers to Use the Proxy Server
- Manually Configuring Web Browsers to Use the Proxy Server
- Conclusion
|
Topics |
browser configuration, proxy servers, proxy auto-configuration (PAC) scripts, Web Proxy Auto-Discovery (WPAD) protocol, workstation management |
|
Products |
Microsoft Internet Explorer, Netscape Communicator / Navigator, Novell ZENworks for Desktops |
|
Audience |
network administrators, integrators, technicians |
|
Level |
intermediate |
|
Prerequisite Skills |
familiarity with Web browsers and proxy settings |
|
Operating System |
n/a |
|
Tools |
none |
|
Sample Code |
no |
Introduction
This AppNote describes the various approaches to configuring and distributing your client browser configurations to match updated proxy configuration in your environment. In particular, it discusses how you can use proxy auto-configuration (PAC) and the Web Proxy Auto-Discovery Protocol (WPAD) methods to create logic to assist the browser in making the best configuration possible to the user. This will be supplemented with any proprietary methods available from current popular browser vendors. Finally, it outlines the advantages of these two approaches and describes deployment solutions within the enterprise.
Proxy Fundamentals
Before we discuss the approaches of configuring browser configurations, let's quickly review the functionality of proxies and the reasons to deploy them in an enterprise.
What Is a Proxy Server?
Webopedia (http://www.wepopedia.com) defines a proxy server as a server that sits between a client application, such as a Web browser, and a real server. It intercepts all requests to the real server to see if it can fulfill the requests itself. If not, it forwards the request to the real server.
Schematically, a proxy server sits between a client program (typically a Web browser) and some external server (typically another server on the Web). The proxy server can monitor and intercept any and all requests being sent to the external server or that come in from the Internet connection.
Novell BorderManager (NBM) is Novell's premium solution for offering proxies (among other functions) to networked clients. For more information on this solution, visit http://www.novell.com/products/bordermanager.
Why Use a Proxy Server?
This positioning gives the proxy server three key capabilities: filtering requests, improving performance, and sharing connections. Thus a proxy server has three main advantages:
Speed
The major advantage of using a proxy is that it saves time and bandwidth. For modem users in particular, caching frequently-accessed Web content via a proxy server can increase the speed of page retrieval dramatically.
Security
Another advantage is increased security. Because traffic going back to your machine appears to come from the proxy server, it's harder for hackers to find its true location. This protects your machine against typical security attacks, and it also makes it more difficult for anyone to track you for profiling or advertising purposes.
Proxy servers can inspect all traffic (in and out) over an Internet connection and determine if there is anything that should be denied transmission, reception, or access. Since this filtering cuts both ways, a proxy server can be used to keep users out of particular Web sites (by monitoring for specific URLs) or restrict unauthorized access to the internal network by authenticating users. Before a connection is made, the server can ask the user to log in. To a Web user, this makes every site look like it requires a login. Because proxy servers are handling all communications, they can log everything the user does. For HTTP (Web) proxies, this includes logging every URL; for FTP proxies, this includes every downloaded file. A proxy can also examine the content of transmissions for "inappropriate" words or scan for viruses, although this may impose serious overhead on performance.
Sharing Connections
In a scenario where a proxy is acting as a caching Web accelerator, many more clients can connect through the proxy server and economies of scale result. This optimizes the usage of the company's Internet connection while maximizing the speed of delivering Web pages to the users' desktops.
Desktop Interaction with Proxy Servers
If installing and configuring a proxy server was the only thing an administrator had to do, life would be easy. But alas, this is not the case. The second half of the job requires the administrator to determine how to configure the client's browser configuration with the appropriate settings to communicate to the proxy.
In broad terms, there are currently three ways to configure Web browsers to use a Web cache:
"Manual" Configuration. The hostname and port settings are entered explicitly for each protocol (the details could differ between protocols), along with any exclusions for sites that should always be accessed directly. This option is available with all but truly ancient browsers that pre-dated the invention of Web proxy and cache servers.
Proxy Auto-Configuration Script. A single URL is configured which identifies a configuration script that tells the browser which cache (if any) to use for each request (and with the choice potentially varying according to the request URL). Because this requires JavaScript support in the browser, it is supported by all but the earliest versions of Netscape and Microsoft browsers.
Web Proxy Auto-Discovery Protocol (WPAD). The browser is told to "use WPAD" and it will try various potential sources of information in the expectation that one will identify a proxy auto-configuration script, which is then used just as if it had been entered manually (but without the need for explicit configuration initially or if the URL needs to change). Currently, Netscape 4.5 and higher and Microsoft Internet Explorer 5.0 and higher (on Windows) are the only widely-used browsers that support WPAD, though as a draft Internet standard it is likely to become more widely available over time.
Using "Manual" Browser Configuration
The most basic and widely available option is "manual" configuration, using whatever means may be offered by the browser (such as configuration menu, configuration file, or setting environment variables) to define the Web cache hostname and port number for each protocol that should use the cache, along with defining any exclusions which should always be accessed directly and ensuring that other protocols (such as SSL) are not fetched via the cache.
Manual configuration has a number of disadvantages compared to the newer alternatives: it is error-prone, time-consuming if many browsers need to be configured individually (initially and for any subsequent changes), and typically does not provide any "fallback" option of fetching direct in the event that the configured cache is inaccessible. Additionally, the browser must be reconfigured explicitly if switching to or from a non-corporate connection (as in the case of employees connecting via an ISP during vacations), since the Web cache can be used only by computers connected to the corporate network infrastructure.
On the other hand, it may be the best choice for individual users who need to bypass the cache routinely for particular sites that they need to access directly for some reason, but which aren't appropriate for special handling by the Web cache or proxy auto-configuration script.
The procedures for "manual" configuration vary between browsers, but the requirements are to:
Define the appropriate server and port for HTTP, FTP, and Gopher requests.
Ensure that no proxy is configured for other protocols (SSL/secure HTTP/ https, WAIS, and so on) and that any option to define a "SOCKS" proxy (a particular means of getting requests through a network firewall) is not set.
Set up exclusion or "no proxy" lists for intranet sites and any others for which there may be a local need to send requests directly to the origin server rather than via the cache.
Achieving this with an unfamiliar browser may require some investigation, as there are many variations on the same general theme.
For the proxy settings, it usually involves specifying the hostname and port either separately (and repeated for each protocol) in a browser configuration form, in a pseudo-URL style as in a configuration file, or as settings for UNIX environment variables. Apart from checking the hostname and port number are entered correctly, bear in mind that with some browsers it is much easier to misconfigure than to configure correctly (for example, enabling use of the cache for all protocols, instead of the specific ones intended).
Configuring exclusions ("no proxy" settings) is less predictable. For intranet sites, the main exclusion requires that servers with hostnames ending in the local site domain should be excluded, which might be specified (for example) as novell.com, .novell.com, or *.novell.com, depending on the browser. If multiple exclusions are needed, the separator between list entries also varies between browsers, commonly being either a comma, a semi-colon, or a space.
Using the Proxy Auto-Configuration Script
The proxy auto-configuration script is a specialized JavaScript script retrieved from a Web server. It is executed for each URL accessed to determine the appropriate proxy (if any) to be used to access the resource. User agents must be configured to request this script upon startup. There is no bootstrap mechanism, so manual configuration is necessary. Despite manual configuration, the process of proxy configuration is simplified by centralizing it within a script at a single location.
The proxy auto-configuration script option is simpler and in most respects more convenient than "manual" configuration, since the only browser configuration is to define the URL from which the script should be loaded. Any changes to the script are loaded automatically by the browser, which will periodically check whether there is a new version for it to use.
The main disadvantage is that individual users cannot override the script's decisions about how to handle requests, except by temporarily disabling use of the Web cache entirely, or by switching to manual configuration. This might be necessary if, for example, they need to add some personal special-case exclusions, perhaps for sites involved in collaborative work that limit access to specific client systems. However, its disadvantage is considered a strength by network administrators who want to guarantee browser configurations in very large deployments.
The Netscape and Microsoft browsers that support auto-configuration scripts are not dependent on whether configuration settings allow execution of JavaScript in Web pages-that can be disabled (due to security concerns, for instance) without affecting the auto-configuration mechanism.
The URL for configuring the centrally-provided PAC script is:
http://[web site URL]/[proxy configuration file].pac
The corresponding JavaScript definitions can be viewed as text using the following URL:
http://[web site URL]/[proxy configuration].as-text
(The former is served with content type application/x-ns-proxy-autoconfig and cannot be viewed directly; the latter is the same file, served as text/plain.)
Note: You can also configure the browser to look for a "local" file. The syntax for Netscape browsers is "file:///x|dir/dir/proxy.pac" (where x is the drive letter - note the use of the three slashes and vertical bar). For IE, the syntax is "file://x:/dir/dir/proxy.pac".
While using the auto-configuration script makes the browser dependent to some extent on availability of the Web server in addition to the Web cache, this isn't usually a problem. The Web server is needed only for loading the script initially and checking periodically if the script has been updated. Browsers will typically cope sensibly if that fails (due to network or server problems), either using an existing saved copy or simply fetching all requests directly instead of using the Web cache (and possibly asking the user's permission first). As long as the script URL is correctly configured, the script should get fetched later once it is accessible.
Creating the Proxy Auto-Configuration Script. The proxy autoconfig file is written in JavaScript. The file must define this function:
function FindProxyForURL(url, host)
This function will be called by the browser in the following way for every URL that is retrieved by it:
ret = FindProxyForURL(url, host);
where:
url is the full URL being accessed.
host is the hostname extracted from the URL. This is only for convenience; it is the exact same string as between :// and the first : or / after that. The port number is not included in this parameter. It can be extracted from the URL when necessary.
ret is the (the return value) a string describing the configuration. The format of this string is defined as follows:
If the string is null, no proxies should be used.
The string can contain any number of the following building blocks, separated by a semicolon:
DIRECT (connections should be made directly, without any proxies)
PROXY host:port (the specified proxy should be used)
SOCKS host:port (the specified SOCKS server should be used)
The following table lists JavaScript functions that can be used in building the proxy auto-configuration script.
|
Function
|
Description
|
|
isPlainHostName(url) |
Checks for the existence of a domain name in the url. Returns Boolean (true/false) |
|
dnsDomainIs(host, domain) |
Checks for the existence of domain in host. Returns Boolean (true / false) |
|
localHostorDomainIs(host, hostdom) |
Checks for existence of host in hostdom. Returns true if the hostname matches exactly the specified hostname, or if there is no domain name part in the hostname, but the unqualified hostname matches. Returns Boolean (true / false) |
|
isResolvable(host) |
Tries to resolve host. Returns Boolean (true / false) |
|
isInNet(host, pattern, mask) |
Checks to determine if the IP address of the host matches the specified IP address pattern. Returns Boolean (true /false) |
|
dnsResolve(host) |
Resolves the host name into an ip address Returns string that resembles the resolved ip address. |
|
myIpAddress() |
Returns string that resembles the client's ip address. |
|
dnsDomainLevels(host) |
Returns the number (integer) of DNS domain levels (number of dots) in the hostname. |
|
shExpMatch(str, shexp) |
Returns true if the string matches the specified shell expression. |
|
weekdayRange(wd1, wd2, gmt) |
Only the first parameter is mandatory. The second, the third, or both may be left out. If only one parameter is present, the function yields a true value on the weekday that the parameter represents. If the string "GMT" is specified as a second parameter, times are taken to be in GMT, otherwise in local time zone. If both wd1 and wd1 are defined, the condition is true if the current weekday is in between those two weekdays. Bounds are inclusive. If the "GMT" parameter is specified, times are taken to be in GMT, otherwise the local time zone is used. |
|
dateRange(day) dateRange(day1, day2) dateRange(mon) dateRange(month1, month2) dateRange(year) dateRange(year1, year2) dateRange(day1, month1, day2, month2) dateRange(month1, year1, month2, year2) dateRange(day1, month1, year1, day2, month2, year2) dateRange(day1, month1, year1, day2, month2, year2, gmt) |
Day is the day of month between 1 and 31 (as an integer). month is one of the month strings: JAN FEB MAR APR MAY JUN JUL AUG SEP OCT NOV DEC year is the full year number, for example 1995 (but not 95).Integer. gmt is either the string "GMT", which makes time comparison occur in GMT timezone; if left unspecified, times are taken to be in the local timezone. Even though the above examples don't show, the "GMT" parameter can be specified in any of the 9 different call profiles, always as the last parameter. If only a single value is specified (from each category: day, month, year), the function returns a true value only on days that match that specification. If both values are specified, the result is true between those times, including bounds. |
|
timeRange(hour) timeRange(hour1, hour2) timeRange(hour1, min1, hour2, min2) timeRange(hour1, min1, sec1, hour2, min2, sec2) timeRange(hour1, min1, sec1, hour2, min2, sec2, gmt) |
hour is the hour from 0 to 23. (0 is midnight, 23 is 11 pm.) min minutes from 0 to 59. sec seconds from 0 to 59. gmt either the string "GMT" for GMT timezone, or not specified, for local timezone. Again, even though the above list doesn't show it, this parameter may be present in each of the different parameter profiles, always as the last parameter. |
Use the
isInNet()
,
isResolvable()
, and
dnsResolve()
functions judiciously, as they require DNS server to be consulted (whereas all other autoconfig-related functions are mere string matching functions). Most of the time these functions are not necessary to achieve the desired result.
Following are two example scripts that show how to use these functions.
Example Script: Subnet
    function FindProxyForURL(url, host)
    {
        if (isPlainHostName(host) ||
            dnsDomainIs(host, ".mydomain.com") ||
            isInNet(host, "198.95.0.0", "255.255.0.0"))
            return "DIRECT";
        else
            return "PROXY proxy.mydomain.com:8080";
    }
Example Script: Setting Proxy Based on Protocol
  function FindProxyForURL(url, host)
        {
            if (url.substring(0, 5) == "http:") {

                return "PROXY http-proxy.mydomain.com:8080";
            }
            else if (url.substring(0, 4) == "ftp:") {

                return "PROXY ftp-proxy.mydomain.com:8080";
            }
            else if (url.substring(0, 7) == "gopher:") {

                return "PROXY gopher-proxy.mydomain.com:8080";
            }
            else if (url.substring(0, 6) == "https:" ||
                     url.substring(0, 6) == "snews:") {

                return "PROXY security-proxy.mydomain.com:8080";
            }
            else {

                return "DIRECT";
            }
        }
Deploying the Proxy Auto-Configuration Script. Follow these steps to deploy the proxy auto-configuration script for Internet Explorer.
Create a standard netscape proxy auto-configuration (PAC) file.
Store the file in the document root directory of your Web server as wpad.dat. You should be able to use an HTTP redirect if you want to store the wpad.dat file somewhere else. You can probably even redirect wpad.dat to proxy.pac:
redirect /wpad.dat http://other.server.com/proxy.pac
If you do nothing more, a UTL such as http://www.your.domain.name/ wpad.dat should bring up the script text in your browser window.
Insert the following entry into your Web server mime.types file (maybe in addition to your PAC file type, if you've done this before):
application/x-ns-proxy-autoconfig dat
You will probably need to restart your Web server for new mime type to work. (You can try skipping this step to see if it works for your particular Web server.)
Create/install/implement a DNS record so that wpad.your.domain.name resolves to the host above where you have a functioning auto config script running. Also you can use your computer's Hosts file for creating a mapping:
wpad.your.domain.name <IP-address your web-server>
From IE's Tools menu, select Internet Options | Connections | Settings (or LAN Settings). Set only "Use Automatic Configuration Script" to be the URL for the location of your new wpad.dat file. For example, this might be http://wpad.your. domain.name/wpad.dat. Test to make sure this all works with your script and network.
Finally, go back to the setup screen detailed in Step 6 above and turn everything off except the "Automatically Detect Settings" option.
It may prove useful to restart Internet Explorer.
Using Web Proxy Auto-Discovery (WPAD)
Web Proxy Auto-Discovery (WPAD) provides a way for Web clients to locate an auto-configuration script (appropriate to their current location within the network) without requiring any explicit configuration (for example, of a script URL). WPAD does not specify which proxies will be used. WPAD discovers the configuration URL (CURL), and the configuration file (CFILE) is retrieved and interpreted to determine browser configuration settings.
It is worth carefully noting that the goal of the WPAD process is to discover the correct CURL at which to retrieve the CFILE; the client is not trying to directly discover the name of the proxy.
In addition, it is worth noting that different clients requesting the CURL may receive completely different CFILEs in response. The Web server may send back different CFILES based on a number of criteria such as "user agent" header, "accept" headers, client IP address/subnet, and so on. Conversely, different CFILEs can also be received by the same client in situations such as round-robin load balancing, for example.
WPAD defines a range of methods by which Web proxy configuration details may be located, though most are optional. The browser should try all the WPAD options it supports, in a standard sequence; it does not need to be configured to use the particular method that is provided on a particular network.
The following methods for WPAD to determine its proxy auto-configuration are described in RFC 3040 (although not all are actually implemented in today's browsers).
Dynamic Host Configuration Protocol (DHCP). To supply the auto- configuration proxy file via DHCP, option 252 must be set. This option should point to the specific URL and file that hosts the configuration file (for example, http://intranet.novell.com/proxydfg.pac).
Service Location Protocol (SLP). Although mentioned in the RFC, this method is not currently implemented in any browsers on the market today.
DNS "A" Records. Using the DNS method, the "well known" alias WPAD is required to identify the target location for the configuration file. Using this standard browsers expect to see wpad.dat at the Web server.
The client performs the following DNS lookup:
QNAME=wpad.TGTDOM., QCLASS=IN, QTYPE=A
Each A RR, which is returned, contains an IP address which is used to replace the <HOST> default in the CURL.
DNS "SRV" Records. The client issues the following DNS lookup:
QNAME=wpad.tcp.TGTDOM., QCLASS=IN, QTYPE=SRV
If it receives SRV RRs in response, the client should use each valid RR in the order specified in RFC 2052. Each valid record will specify both a <HOST> and <PORT> to override the CURL defaults.
DNS "TXT" Records. The client should attempt to retrieve TXT RRs from the DNS to obtain "service: URLs" contained therein. The "service: URL" will be of the following format, specifying a complete candidate CURL for each record located:
service: wpad:http://<HOST>:<PORT><PATH>
The client should first issue the following DNS query:
QNAME=wpad.TGTDOM., QCLASS=IN, QTYPE=TXT
Client WPAD clients (such as browsers-most notably Internet Explorer 5 and later) follow a specific order of resolution in requesting resource discovery. Clients only attempt mechanisms that they support. Every time a discovery attempt succeeds, the client uses the information obtained to construct a CURL. If a CFILE is successfully retrieved at that CURL, the process is complete. If not, the discovery process continues until either a CFILE is successfully retrieved or no proxy is configured for use by the client.
Discovery for WPAD typically uses the above-noted services in the following order:
DHCP
SLP
DNS "A" Records
DNS "SRV" Records
DNS "TXT" Records
As an example, consider a client with hostname desktop.development.novell.com. Assume the Web client software supports all of the mechanisms listed above. This is the sequence of discovery attempts the client would perform until one succeeded in retrieving a valid CFILE:
DHCP
SLP
DNS A lookup on QNAME=wpad.development.novell.com
DNS SRV lookup on QNAME=wpad.development.novell.com
DNS TXT lookup on QNAME=wpad.development.novell.com
DNS A lookup on QNAME=wpad.novell.com
DNS SRV lookup on QNAME=wpad.novell.com
DNS TXT lookup on QNAME=wpad.novell.com
WPAD Limitations. Because WPAD is a proposal and not a standard, only the latest browsers support this at any great level. Even previous generation browsers produced undesirable effects because there is no clear indication of whether WPAD is being used successfully when enabled-and producing unclear messages at best when it is not correctly functioning. For example, an incorrect CURL may produce an error in Netscape while IE simply continues silently. This appears to be attributed to specific implementation of the proposal. In most cases, WPAD can be used as a fallback "catch all" in configuring browser settings.
Automatically Configuring Web Browsers to Use the Proxy Server
Now that you understand the basic approaches to configuring browser settings, let's take a look at some methods of automatically deploying browser settings to the desktop.
Using desktop management software to deploy "manual" browser settings
Using automatic browser settings along with proxy auto-configuration files in deploying browser settings
Using a vendor-specific approach
Using a hybrid approach
Using Desktop Management Software to Deploy Browser Settings
With most organizations, changes occur in the environment quite quickly, and sometimes these changes force administrators to react quickly to these rapidly- changing computing conditions. As such, there is a need to change or add infrastructure components and then have clients properly configure themselves for the new change. Instead of using manual brute force to implement these updates, you can use a desktop management product such as Novell ZENworks for Desktops to implement these changes.
The various approaches for updating browser configurations using ZENworks for Desktops include:
Using application management features to configure changes. The degree of success of utilizing this approach depends on the version of the browser and the target desktop operating system. In general, newer operating systems and browsers should use supported options from the vendor, as discussed later.
To capture potential settings for a browser (assuming the OS/browser supports it), use the snapshot method:
Perform a "before" snapshot before changes are recorded.
Make the changes to the browser.
Perform the "After" snapshot to record the settings.
Create the Application object in eDirectory and modify it as appropriate.
Test the Application object.
Deploy the Application object.
Using Group Policies. In a company-standard environment of Windows 2000 or later with Internet Explorer as the browser, you can update browser proxy settings (among others) troughh the use of Group Policies. Figure 1 shows the Group Policy Proxy Settings screen.
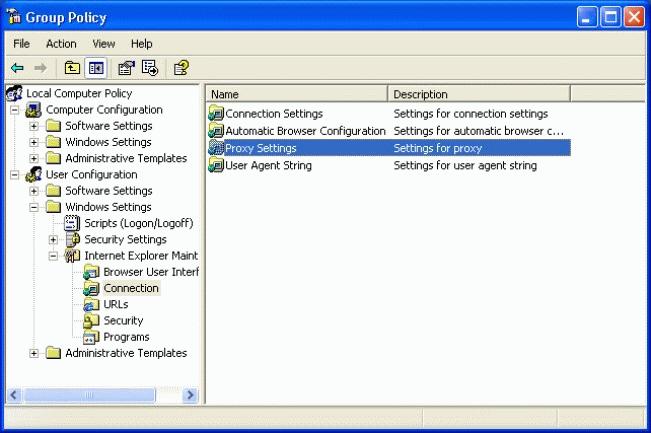
Screen for deploying Proxy Settings in a Group Policy.
For more information on how Novell ZENworks can reduce desktop management tasks, visit http://www.novell.com/products/zenworks.
Using Automatic Browser Settings
If you have standardized on the newer browsers that support the methods discussed earlier (WPAD), you can easily deploy new configurations to the desktop. This is possible because existing protocols (DNS/DHCP) are utilized to point to the appropriate configuration file (CFILE). Since this file is centrally located on Web browsers, changes can be made that force changes across wide number of clients in a short period of time. However, for most organizations, it takes multiple configuration files to accomplish this since there is usually a general mix of installed browsers, versions, and operating systems.
Using a Vendor-Specific Approach
Both Microsoft and Netscape provide alternate methods of installing and configuring browser configurations and products. These primarily consist of "administrator kits" through which the administrator can install new versions of browser software and also configure the browser settings. The resulting self-installing EXE can be distributed through ZENworks for Desktops or another software management solution.
This method works best in which new versions of browsers are being deployed and many new settings (including proxies) need to be reconfigured at the same time.
To configure your browsers with this approach, follow these steps.
Download the administration kits. You can download the Microsoft Internet Administrative Kit (IEAK) from http://www.microsoft.com/windows/ieak/default.asp. You can download the Netscape Client Customization Kit at http://home.netscape.com/bisdev/distribution/index.html.
Note that agreements with these vendors must be acknowledged and adhered to before distributing customized browsers. Please refer to the vendor's Web site for more details.
Run the administrative kit. You will need to download the required browser software during this process. You will have an opportunity to change many browser settings, with proxy settings being just one of the many settings at your disposal.
Deploy the browser utilizing your desktop management solution.
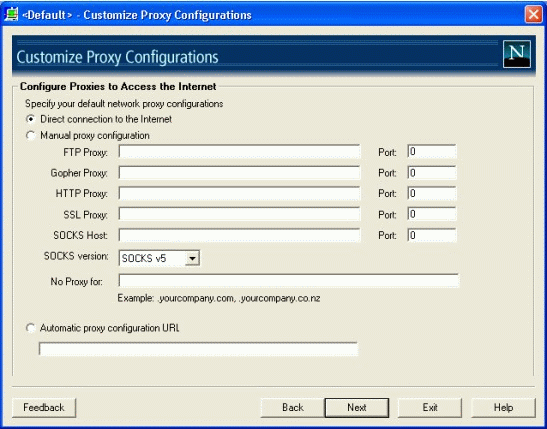
Figure 2 shows a screen from the Netscape Client Customization Kit.
Configuring proxies via the Netscape 6 Client Customization Kit.
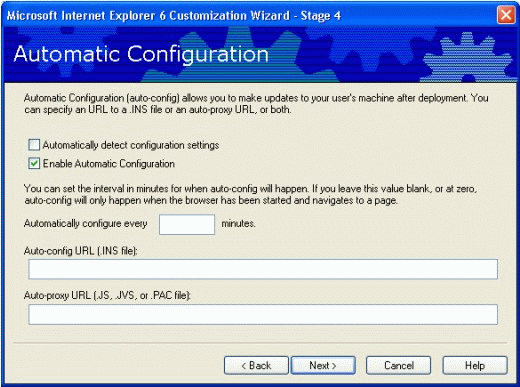
Figure 3 shows a screen from the Internet Explorer 6 Customization Wizard.
Configuring proxies via the Microsoft Internet Explorer 6 Administration Kit.
Microsoft also allows you to configure the browser settings without having to deploy the browser by using the Internet Explorer Profile Manager. This utility comes with the IEAK (see Figure 4).
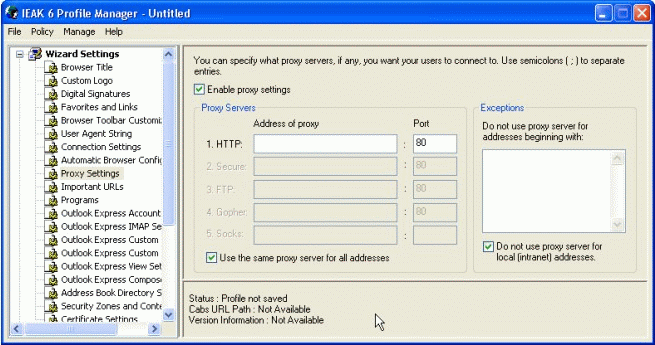
Configuring proxies with the IE Profile Manager.
Netscape provides a browser management product called Netscape Mission Control Desktop which provides functionality very similar to that of the Microsoft IE Profile Manager, but extending beyond configuration to include deployment assistance. Netscape Mission Control Desktop gives IT professionals a new level of control and manageability over their intranet client environment, making it easy for them to deploy Netscape Communicator within the intranet, configure Communicator for the enterprise, centrally manage Communicator through Netscape Console, and automatically distribute updates to Communicator. For more information, visit http://home.netscape.com/communicator/missioncontrol/ v4.5/index.html?cp=n4ictr.
Once the appropriate settings have been configured, you can save the file as an .INS file on a Web server where the client's browser can point to this HTTP URL. Performing browser updates in this manner covers all aspects of the browser configuration process and eliminates the requirement of manually building JavaScript configuration files.
Using a Hybrid Approach
Because each of the above approaches has its advantages and disadvantages, you may elect to mix and match in various combinations to provide the best solution for your deployment requirements. For instance, you may want to upgrade your browsers to the latest version. Using the resource kits from vendors may provide the best option, because you can also configure the required settings. Those just requiring smart proxy utilization may opt for a proxy auto-config file and then use ZENworks for Desktops or another desktop management solution to make sure the clients are correctly configured. The choice is up to you.
Manually Configuring Web Browsers to Use the Proxy Server
This section details how to manually configure the two most popular browsers- Microsoft Internet Explorer and Netscape Navigator-on various platforms.
Internet Explorer 6.0, 5.5 and 5 for Windows
From the Tools menu, select "Internet Options".
Click on the Connections tab. You should see the window shown in Figure 5.
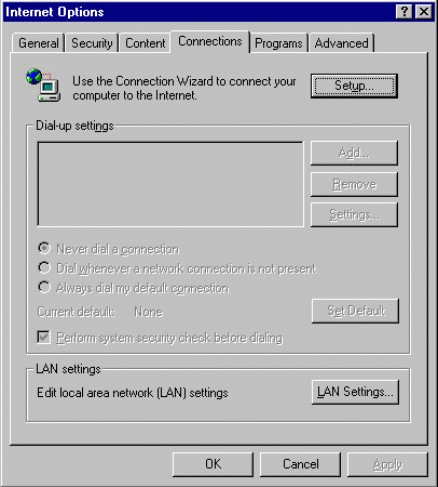
The Internet Options, Connections tab.
Click on the LAN Settings button.
Make sure "Automatically detect settings" is selected, as shown in Figure 6.
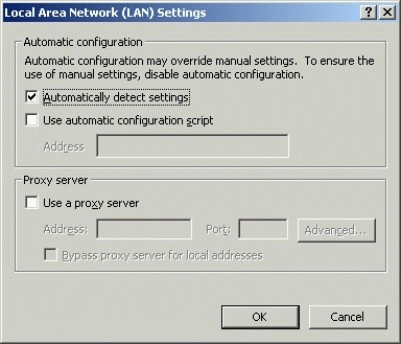
The Local Area Network (LAN) Settings window.
Click on OK to close the LAN Settings window.
Click on OK to close the Internet Options window.
Internet Explorer 5 for Macintosh
From the Edit menu, select "Preferences".
From the list of categories down the left-hand side of the Preferences window, expand the Network section by clicking on the triangle to the left of Network and then click on "Proxies".
Enter the values shown in Figure 7.
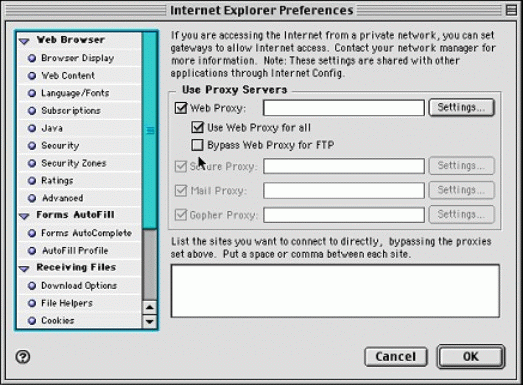
Internet Explorer Preferences.
Click on the Settings button to the right of the Web Proxy box and complete as shown in Figure 8.
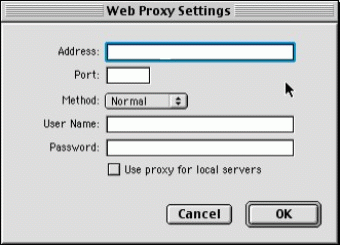
The Web Proxy Settings window.
Click OK to exit each settings window.
Internet Explorer 4.5 for Macintosh
From the Edit menu, select "Preferences".
Scroll down the list of options on the left-hand side of the window until you get to Network. If the triangle to the left of the word "Network" is not pointing down, click on it once so that it is. There should now be an option named "Proxies". Click on this option.
Complete the settings screen as shown in Figure 9.
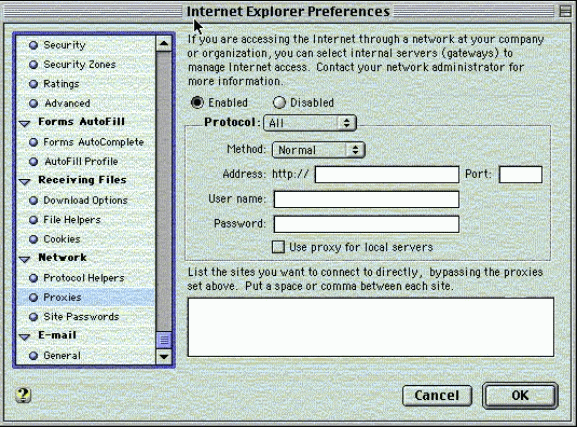
The Internet Explorer Preferences window.
Click OK to close the window.
Internet Explorer 4 for Windows
From the View menu, select "Internet Options".
You will see the window shown in Figure 10. Click the Connection tab at the top of the window as shown.
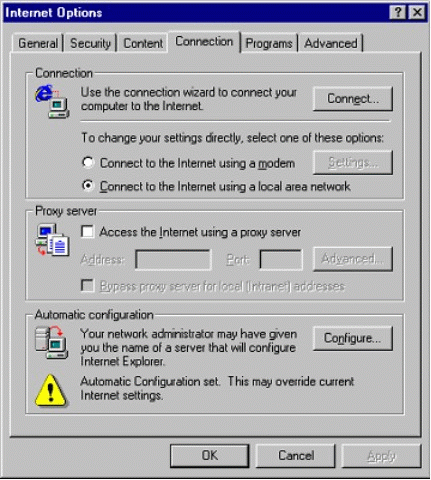
The Internet Options window.
In the bottom section of the window, click on the Configure button.
In the URL box shown in Figure 11, type in the URL of your configuration file.
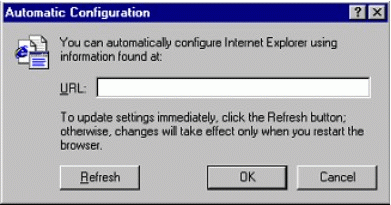
The Automatic Configuration window.
Click the OK button.
Internet Explorer 3.x
From the View menu, select "Options".
Click on the Advanced tab.
Click on the Automatic Configuration button at the bottom of the window.
Note: On some older versions of Internet Explorer, the Automatic Configuration button does not exist. We have experienced some problems when using such versions of Internet Explorer. You should either upgrade Internet Explorer 3 to version 3.02 using the Microsoft Patch or install a later version of Internet Explorer.
In the URL box, type in the URL of your configuration file.
Click the OK button to close the Automatic Configuration window.
Click the OK button to close the Options window.
Netscape 6.21
From the Edit menu, select "Preferences". This will open a window which contains all the configuration details for Netscape.
In the left-hand panel, click on the triangle next to the "Advanced" option. The menu will expand with more options.
Choose "Proxies". The window view on the right-hand side of the screen will change to show the proxy configuration setup shown in Figure 12.
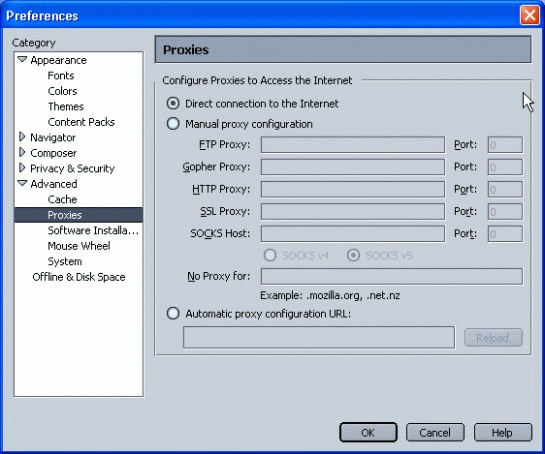
The Preferences window.
Select the "Automatic proxy configuration URL" option.
Type in the URL to the configuration file in the box.
Netscape 4.7, 4.6, 4.5 and 4
From the Edit menu, select "Preferences". This will open a window which contains all the configuration details for Netscape, as shown in Figure 13.
In the left-hand window, click on the "+" sign next to the Advanced option. The menu will expand with more options.
Choose "Proxies". The window view on the right-hand side of the screen will change to show the proxy configuration setup.
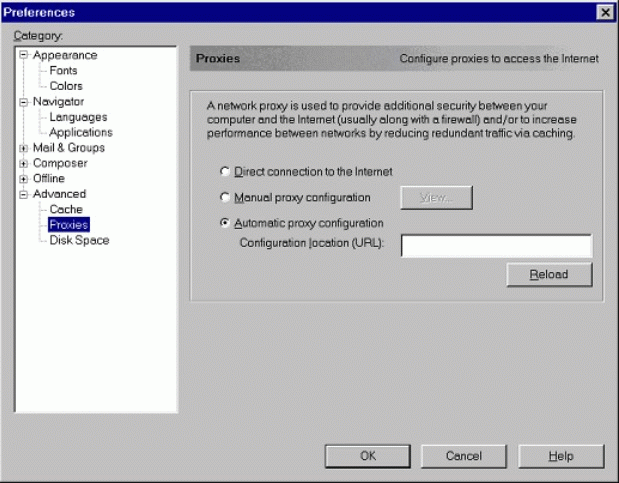
The Preferences window.
Select the "Automatic proxy configuration" radio button.
Type in the URL to the configuration file in the box.
Netscape 2 and 3
From the Options menu, select "Network Preferences".
Select the Proxy tab.
Select the Auto proxy config option.
In the "auto proxy config" box, type in the URL to your configuration file.
Netscape 1
From the Options menu, select "Preferences".
Select the Proxies tab.
In the "http proxy" box, type in the configuration file and port.
Type in the appropriate information into the "Gopher" and "FTP" boxes.
Conclusion
This AppNote has described the various methods and procedures by which browsers can manually, automatically, and programmatically update proxy and other configuration settings. In addition, it discussed various methods of using third-party solutions and procedures to apply these browser updates.
* Originally published in Novell AppNotes
Disclaimer
The origin of this information may be internal or external to Novell. While Novell makes all reasonable efforts to verify this information, Novell does not make explicit or implied claims to its validity.