Novell iChain 2.0 Installation and Configuration Quick Start
Articles and Tips: article
iChain Escalation Engineering
Novell, Inc.
ncashell@novell.com
Shane Johns
iChain Escalation Engineering
Novell, Inc.
sjohns@novell.com
01 Mar 2002
This AppNote highlights the new features and enhanced capabilities of Novell iChain 2.0 and provides a quick-start installation and configuration guide. For additional information about iChain 2.0, visit the product Web site at http://www.novell.com/products/ichain.
- Overview of iChain 2.0
- New Features in iChain 2.0
- Installing iChain 2.0
- Configuring iChain 2.0
- Configuring the iChain 2.0 User Services
- Conclusion
|
Topics |
iChain, LDAP, security, Web application development |
|
Products |
Novell iChain 2.0 |
|
Audience |
network administrators, integrators, developers |
|
Level |
intermediate |
|
Prerequisite Skills |
familiarity with Web applications and security |
|
Operating System |
n/a |
|
Tools |
none |
|
Sample Code |
no |
Overview of iChain 2.0
iChain is Novell's leading-edge solution to provide scalable LDAP-based security to your Web servers and critical business applications. The latest release (v2.0) includes many new features that enable it to provide the reliable, high- performance, distributed directory security that enterprise Web services require. For Web applications that do not use a secure LDAP directory to govern authentication and access control, iChain 2.0 allows you to easily "directory- enable" those applications. iChain 2.0 also includes pre-packaged Java-based services that allow you to provide LDAP-based user self-registration, user account/attribute modification, and the ability for users to manage their own passwords.
Architecture
A minimum iChain 2.0 installation includes three servers:
The iChain 2.0 proxy accelerator server
An (NDS) eDirectory server (the "Authorization Server")
Any Web server
iChain 2.0 fronts your Web servers and provides user authentication and security by validating user identities via the eDirectory Authorization Server (see Figure 1).
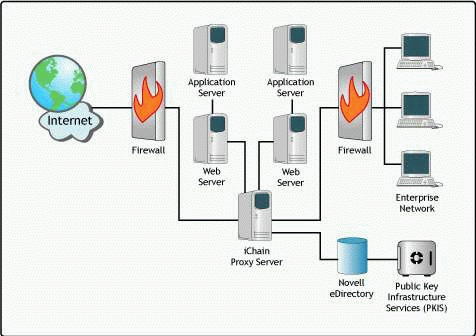
The Novell iChain 2.0 architecture.
Authentication and Authorization
To understand the steps that iChain 2.0 takes to perform user identity validation and provide security to your Web services, you need to understand two terms:
Authentication is the process of determining whether the user is known to the system. It is typically performed through some sort of username and password validation.
Authorization is the process of determining what rights the user has (Access Control).
Note: Authorization occurs after authentication is successful.
Figure 2 illustrates the steps in the iChain authentication process.
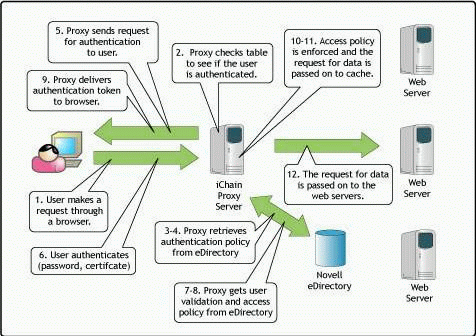
The iChain authentication process.
Here is a brief explanation of the authentication steps shown in Figure 2.
A user requests a resource via a URL such as "www.test.com".
When the iChain proxy receives the user request, it checks to see if a cookie is included in the request. If so, it compares the cookie from the request with the user identification table in memory.
The DNS name in the request is compared against currently configured accelerators to determine if authentication is required.
If authentication is required, iChain checks to see what type of authentication profile is defined (LDAP, Radius, mutual, and so on).
If authentication is required and either no cookie accompanies the request or the cookie is no longer valid (invalid ID, timed-out, and so on), iChain redirects the user to begin the authentication process to identify themselves by the method defined in the authentication profile for that accelerator.
The user sees the iChain login page, which can ask for a username, password, certificate, and so on.
The user identity is validated against the LDAP directory.
If authentication is successful per Step 7, user authorization (access control) begins. Users may successfully authenticate themselves against the directory, but not actually have rights to the resource they are requesting.
When authentication is successful, iChain sets a temporary cookie in memory that will accompany all subsequent requests for that user while that user session is still valid. User sessions and cookies become invalid when the user session times out or the user logs out or closes the browser.
The authorization access rules are enforced that define what resources the user has rights to access.
The user's session ID and static content is cached at the iChain proxy.
The user's now authenticated and authorized request is passed to the Web server.
Web-based Single Sign-On
iChain 2.0 allows a single sign-on (SSO) capability to multiple Web services using one of three different methods.
HTTP Authorization Header (Basic Authentication). iChain 2.0 can forward a user's ID/username and password in the HTTP Authorization Header (AuthHeader) to any back-end Web server. The user's credentials can be in LDAP format (comma-delimited, fully distinguished) or in CN (Common Name) format. Web servers using Basic Authentication will normally require the credentials in CN format.
Basic Authentication is the authentication mechanism when you see a pop-up box asking for a username and password. iChain 2.0 can elegantly and securely single sign-on to such services so that your users never are prompted with this pop-up box again.
Object-Level Access Control (OLAC). OLAC provides an option to use logon credentials other than username/ID and password. Any eDirectory user attribute can be used. For example, instead of the employee's username, the user's Employee Number can be provided to a back-end Web server for login purposes. OLAC parameters are passed either in the QueryString or in the HTTP header.
Two special OLAC parameters have been defined-ICHAIN_UID and ICHAIN_PWD-which can be mapped to any LDAP attribute to modify the format of the credentials in the AuthHeader. Note that enabling these two OLAC parameters will overwrite the default fully_distinguished_username:password combination that is forwarded in the Authheader by default.
XML Form Fill. This method uses either encrypted directory attributes or the high encryption Secret Store product to store user credentials for Web applications. XML Form Fill allows you to single sign-on to any HTML or dynamically generated login pages (as opposed to the pop-up box for Basic Authentication).
New Features in iChain 2.0
Following are some noteworthy new features in iChain 2.0:
XML-based Form Fill. Using XML, iChain 2.0 can provide single sign-on to virtually all Web-based applications and data, without requiring customized programming or plug-ins.
Advanced authentication. iChain 2.0 gives customers the option of adding token-based authentication from leading vendors such as ActivCard, RSA Security, and Vasco to their Web-based systems, in addition to the username/ password, smart cards, and certificate-based methods currently available.
Improved management. iChain 2.0 has several new management wizards that reduce basic installation time to as little as two hours.
Increased scalability. Customers can link a virtually unlimited number of iChain 2.0 servers together to balance the load created by potentially millions of authentication requests, while maintaining uninterrupted service to users.
Enhanced performance. iChain 2.0 is significantly faster at processing user authentication requests, allowing users to quickly connect to Web resources.
Comprehensive List of Features
iChain 2.0's features can be divided into several core services:
Proxy Services
Secure Exchange (SSL'izer). Accelerates and converts a standard HTTP Web server page to HTTPS without having to set up and manage server keys or modify the Web pages themselves.
DNS mapping. Allows the iChain Proxy to resolve and secure a URL such as "www.novell.com/army" to "army.novell.com". This hides a company's internal environment from being viewed externally.
Multihoming. Provides the ability to define multiple internal Web servers with the same public (external) IP address and port.
No Cache Enforcement. Allows an administrator to stop all information on a specific accelerator from being cached both on the proxy and the browser regardless of whether the origin pages themselves can be cached.
User Self-Provisioning Services. Allows users to self-register to the directory, modify/update their own account information, and manage their passwords themselves.
Authentication Services
Flexible LDAP Authentication. Allows LDAP user verification by several different methods, such as fully distinguished-name (DN), common name (CN), or any other LDAP user attribute such as "social security number" or "email address".
Advanced Authentication. Supports token-based methods and Radius.
PKI Certificate-based Mutual Authentication. Authenticate via standard X.509 certificates, including third-party certificates.
PKI Certificate Revocation List (CRL). Provides the ability to check a CRL when doing certificate authentication.
Multiple CA Support. Provides the ability to support Multiple Certificate Authorities for certificate-based authentication. The administrator must specify which certificate authorities iChain will trust.
Authorization Services
URL Exception. Provides the ability to make all areas of a site public except for the URLs defined in the exception list.
Tunnel for RDP and ICA. Allows a tunnel for RDP and ICA protocols
Management Services
Password Policy Enforcement. Administrators can enforce password rules to increase security. This is configured and managed in a single location: the iChain Service Object (ISO). Password rules include: minimum length, dictionary search, alpha/numeric minimum requirements, re-use (history/uniqueness), and grace/expire periods.
Strong Cryptography. You can configure SSL for strong cipher support only (to prevent access from weak SSL browsers), or both strong and weak cipher support. This is on a "per iChain box" basis, not on a per accelerator basis. Use the "Set authentication strongserverenable = yes" console command.
Performance and Scalability
LDAP Failover. Provides the ability to define multiple LDAP directories and the search order for defined directories. A configured LDAP address that is unresponsive or not available is removed from the "active" list until that LDAP address is back up.
Session Failover (Session Broker). Provides the ability to failover a valid user session to another iChain box running Session Broker to provide seamless user access and not prompt multiple times in case of hardware failure. This feature provides near-unlimited scalability of iChain boxes by allowing multiple iChain boxes to be "clustered" together for high- performance, redundancy, and scalability.
Installing iChain 2.0
The installation of iChain 2.0 is simple. Just insert the iChain 2.0 Proxy Server CD into your server's CD drive and reboot the server. After you type "YES" to accept the License Agreement, the installation will proceed automatically.
Note: If you see the message "This is NOT a valid ICS box!!!", type "BLAST" at the DOS prompt to begin the installation.
The server will reboot a few times during the installation procedure. You will know the installation is complete when you see a ">" prompt on the System Console screen.
Configuring iChain 2.0
This section describes how to configure the iChain 2.0 Proxy Server you have just installed.
Initial Setup
Follow these steps to perform the initial setup of the iChain 2.0 Proxy Server.
Set the LAN adapter IP address.
After installation, the first LAN adapter on the iChain Proxy Server is preconfigured with the IP address 10.1.1.1 and subnet mask 255.255.255.0. To manage the server using the browser-based administration utility, you will either need to have a client workstation with an IP address on the same subnet (such as 10.1.1.2) or you will need to use the command-line interface to set the IP address on the iChain Proxy Server.
Entering the following commands from the iChain proxy server console will configure the first LAN adapter with an IP address of 123.45.67.89 and a subnet mask of 255.255.252.0:
unlock
At the Password prompt, press <Enter> (no password exists yet). Then type:
set eth0 address = 123.45.67.89/255.255.252.0 apply
To verify that the IP address and mask were set correctly, type "get eth0" at the console. You should see the eth0 address that you just configured.
Configure the gateway address (if necessary).
If you are going to configure the iChain Proxy Server from a different segment than the one the iChain Proxy Server is on, you will also need to enter the following commands to configure the gateway:
set gateway nexthop = 123.45.69.254 apply
To verify that the gateway address is set correctly, type "get gateway" at the console. You should see the gateway that you just configured.
Restart the server.
After setting the IP address and gateway, type "restart" at the server console.
These are the only steps that need to be completed from the iChain server console. The remaining steps should be performed from a remote workstation via the browser-based, graphical iChain Administration utility.
Note: If the iChain proxy is behind a firewall (as in a Demilitarized Zone, or DMZ, scenario), be sure that TCP ports 1100, 1959, and 2222 are open for the IP address of the workstation that will be running the Web management utility. For external browsers accessing the same iChain proxy server, the firewall should allow TCP ports 443 and 80 for the HTTP authentication and data.
Start the iChain Web Administration utility and log in.
Start the iChain Web Administration utility by pointing your browser to:
http://YourApplianceIPAddress:1959/appliance/config.html
You will be prompted to log in as username "config". Since no password is set yet, just click on the OK button.
Enable the mini-FTP server (if you will be using the iChain Wizard in ConsoleOne).
This step enables the mini-FTP server on the iChain 2.0 proxy server, which allows the iChain Wizard in ConsoleOne to refresh the iChain proxy server when changes are made to iChain objects in ConsoleOne.
Note: Enabling an insecure protocol like FTP can be a security risk on your network. We recommend that you enable the FTP server on an IP address which is only accessible from a private network such as an isolated hub or crossover cable.
To enable the mini-FTP server, click on the Configure icon on the left-hand side of the iChain Proxy Services Configuration screen, and then click on the FTP tab (see Figure 3).
In the "Server IP addresses" box, select the administration IP address (the one you set with the "eth0" command above), then click the Apply button.
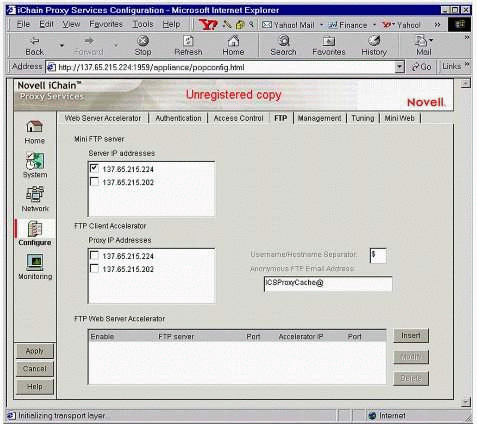
The iChain Proxy Services Configuration "FTP" page.
Apply the iChain 2.0 Schema Extensions for eDirectory.
The schema extensions for iChain 2.0 are located on the Authorization Server CD. Run START.EXE from the root of the CD. Once this program has started, click on "Install iChain Schema" and follow the prompts. Note that for iChain 2.0, eDirectory 8.5 or later is required.
Install the iChain 2.0 ConsoleOne snap-ins.
The ConsoleOne snap-ins for iChain 2.0 are also located on the Authorization Server CD. Run START.EXE from the root of this CD. Once this program has started, click on "Install ConsoleOne Snapins" and follow the prompts. For iChain 2.0, use ConsoleOne version 1.2d.1 (11/30/2000) or later.
Register iChain 2.0.
To register your copy of iChain 2.0, go to the following URL:
http://www.novell.com/products/ichain/licenseform.html
After you fill out the online "iChain License Request Form" above and submit your request, Novell will send you an e-mail with the license file included as an attachment. To install this license, do the following:
Copy the attached license file to a blank diskette.
Unlock the proxy server by typing "unlock" at the server console. When the password prompt appears, press <Enter> (no password has been assigned yet).
Insert the diskette with the license file into the floppy drive of the proxy server.
At the proxy server console, enter "getlicensefromfloppy".
Reboot the proxy server.
Configuring Access Control
Use ConsoleOne to create an iChain Service Object (ISO). Then return to the iChain Administration utility, click on the Configure icon, and follow these instructions to configure access control.
Click on the Access Control tab to see the screen shown in Figure 4.
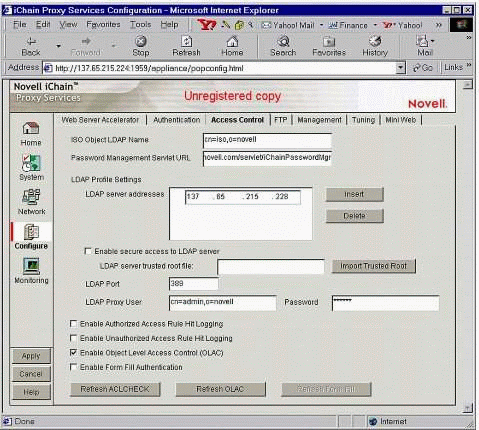
The iChain Proxy Services Configuration "Access Control" page.
Fill in the information on this page as follows:
ISO Object LDAP Name: Enter the name you used when you created the ISO in LDAP format (fully distinguished and comma-delimited).
Password Management Servlet URL: Leave this field blank for now (we'll enter a value later).
LDAP server addresses: Enter the IP address(es) of your directory server(s).
LDAP Port: Enter 389 (the default).
LDAP Proxy User: Enter the name of your directory's admin user, in LDAP format. This user must have both Browse and Read rights to the directory.
Password: Enter the password of your LDAP Proxy User.
Click the Apply button in the bottom-left corner of the screen to save your changes.
Configuring Authentication
To configure authentication, click on the Authentication tab to see the screen shown in Figure 5.
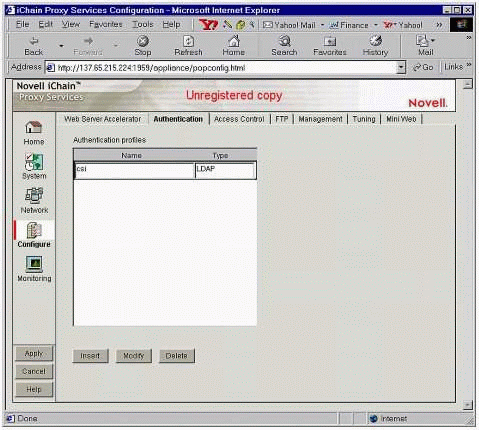
The iChain Proxy Services Configuration "Authentication" page.
Click on the Insert button to create a new Authentication profile. You will see the screen shown in Figure 6.
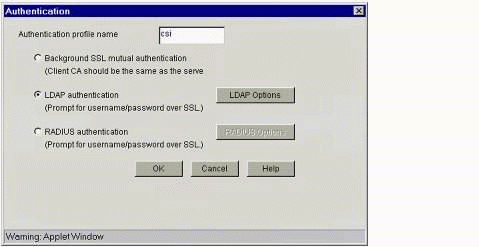
The "Authentication" dialog box.
Fill in this "Authentication" dialog as follows:
Enter a name for your Authentication profile.
Click the "LDAP authentication" radio button and then click on the LDAP Options button. You will see the screen shown in Figure 7.
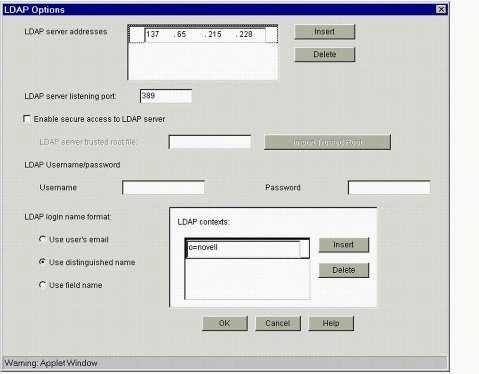
The "LDAP Options" dialog box.
Fill in the information in this dialog as follows:
LDAP server addresses: Enter the LDAP server address of your directory server. This is most likely the same IP address you entered on the Access Control tab.
LDAP server listening port: Enter 389 (the default).
If [PUBLIC] has Read rights to your directory, you can leave the "LDAP Username" and "Password" fields blank. Otherwise, enter the LDAP Proxy User from the Access Control tab.
LDAP login name format:
Select "Use user's email" when authenticating using the user's e-mail address
Select "Use distinguished name" when authenticating using the user's fully distinguished name (default)
Select "Use field name" when authenticating using a defined LDAP attribute. Note that this LDAP attribute must be mapped to a corresponding eDirectory attribute in the LDAP server's group object.
LDAP contexts: Click the Insert button and enter the eDirectory container in which your User objects reside. This is where iChain will search for users when they attempt to authenticate. (This is how iChain provides contextless login. You can list multiple containers here.)
Click OK to close the "LDAP Options" window, then click OK to close the "Authentication" window. Click on the Apply button in the bottom-left corner of the main iChain Proxy Services Configuration screen to save your changes.
Configuring Web Server Accelerators
In this sense, an "accelerator" is a Web server that your iChain Proxy Server is fronting. One iChain proxy appliance can front multiple Web servers (accelerators), and you can list multiple Web servers on the Web Server Accelerator screen (see Figure 8).
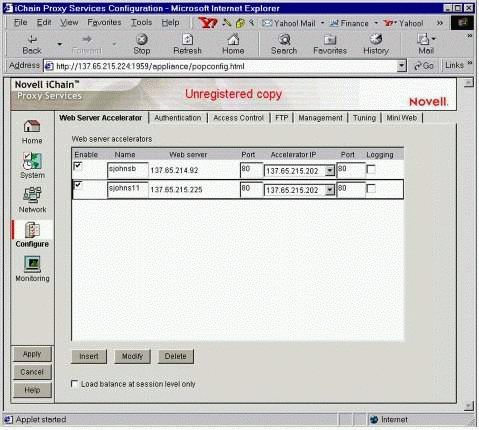
The iChain Proxy Services Configuration "Web Server Accelerator" page.
From the Web Server Accelerator page, click the Insert button to create a new accelerator. You will see the screen shown in Figure 9.
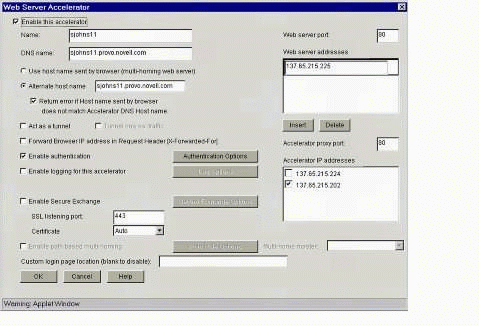
The "Web Server Accelerator" dialog box.
Fill in the information on this screen as follows:
Make sure the "Enable this accelerator" checkbox is checked.
Name: Enter the name of the accelerator. This is simply a descriptive name you will use to reference this accelerator.
DNS name: Enter the public DNS name (not the IP address) that users will use to get to your Web server (through the proxy). Your Web servers will actually have private IP addresses, probably on a private network, that users will not be able to access directly because those Web servers are fronted by the proxy. The proxy will have a public DNS name and IP address assigned to it (besides its own administrative IP address) that it listens for and then routes traffic through itself to the private Web server IP address(s) which it can access even though the users can't access the private ("real") Web server addresses directly.
Accept the defaults for everything else, except as noted below.
Web server addresses: Click the Insert button and enter the "real" (private) IP address of the Web server.
Accelerator IP addresses: There should be an IP address listed there that is what the DNS name in the "DNS name" box above actually resolves to. Select the matching IP address.
At this point if you simply clicked OK and Apply to save your selections, the iChain proxy appliance would be configured to provide caching and acceleration of your Web server(s) and would pass user sessions through to the Web server(s) without requiring user authentication. You'll notice that there is a "Enable authentication" checkbox near the middle of this page. By selecting this checkbox, you can enable the service on the caching appliance to require user session authentication before it passes the user session traffic to the Web servers behind it.
Select (check) the "Enable authentication" checkbox, and click the Authentication Options button. You will see the screen shown in Figure 10.
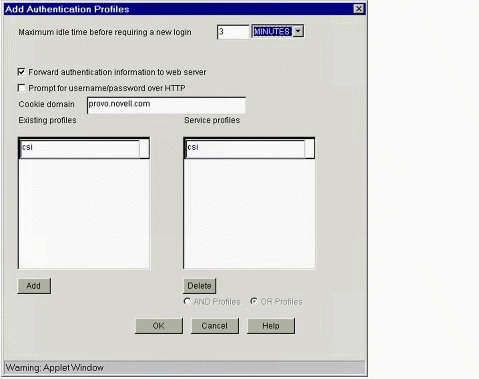
The "Add Authentication Profiles" dialog box.
Fill in the information on this screen as follows:
"Forward authentication information to web server" checkbox: This is the entry that tells the iChain proxy to inject the User ID into the Authorization section of the HTTP header when it passes traffic to the Web servers behind it. If you have servlets or scripts on your Web servers that need to know the user session's identity in order to provide customized content back to the user, you will want to select this entry.
Do not select "Prompt for username/password over HTTP". This tells the iChain box to use non-secure HTTP (instead of HTTPS) when asking for a user's username and password during user login.
Existing profiles: You should see the authentication profile listed here that you entered previously on the Authentication page. To move this entry into the "Service profiles" box on the right, click the Add button below the "Existing profiles" box. The authentication profile should now be listed in the "Service profiles" box.
Click OK at the bottom of this screen to close the "Add Authentication Profiles" window, then click OK to close the "Web Server Accelerator" window. Click the Apply button in the bottom-left corner of the main iChain Proxy Services Configuration screen to save your changes.
Repeat the above steps for each Web server that you want to be fronted by the iChain Proxy Server.
Configuring Protected Resources on the ISO
"Protected Resources" are defined on the Protected Resource tab of the iChain Service Object (ISO). A Protected Resource is a URL with a designated access level. Protected Resource entries usually look similar to the DNS name entries in the Web Server Accelerators you've defined on the Web Server Accelerator tab in the administration utility. Protected Resources are commonly defined with wildcard characters to designate the whole site (URL) or a group of subdirectories to have the same access level.
For instance, if a "DNS name" entry on a Web Server Accelerator was "test.novell.com", then you might have a similar Protected Resource entry on the ISO in ConsoleOne that looks like: "test.novell.com/*". (Here the wildcard asterisk "*" character is used to define the base DNS name and any resource under this URL).
The asterisk ("*") wildcard character means: everything at this URL level and below. The question mark ("?") wildcard character means: only resources at this URL level.
When you define a Protected Resource, you also must define its security level. You can select from three different security level designations that give you great flexibility and a high level of granularity over the security restrictions for each Protected Resource: Secure, Restricted, and Public. Each security level designation has different combinations of Authentication and Authorization to apply to each Protected Resource. The table below shows the Authentication/ Authorization matrix for the ISO Protected Resource security level values:
|
Authentication
(Who is this user?)
|
Authorization
(Access Control)
|
|
|
Secure |
Yes |
Yes |
|
Restricted |
Yes |
No |
|
Public |
No |
No |
Note: If authorization is performed, an iChain Access Control Rule object is required. If you only need the user to log in (to verify that the person really is a valid user in eDirectory), use the Restricted option instead. It is much easier because it does not require an Access Control object.
Follow the steps below to create and configure a Protected Resource.
If you haven't yet created an iChain Service Object (ISO), do so now by clicking in the container where you want to put the ISO. This is typically the container where your User objects reside. (Use ConsoleOne to create and manage the ISO.)
After the ISO is created, right-click on the object and select Properties. You will see a window similar to Figure 11.
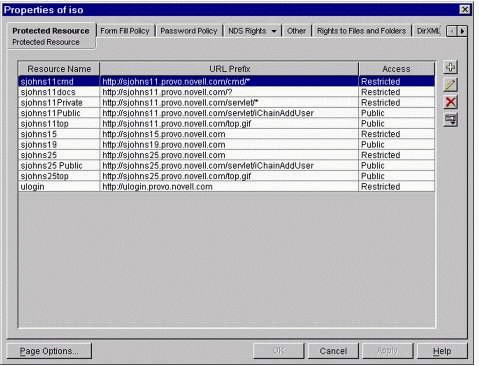
The ISO "Protected Resource" page.
To create a new Protected Resource entry, click on the button with a plus sign ("+") in the top-right corner of the Protected Resource page.
The window shown in Figure 12 is where you define the "URL Prefix" and other settings for your protected resource.
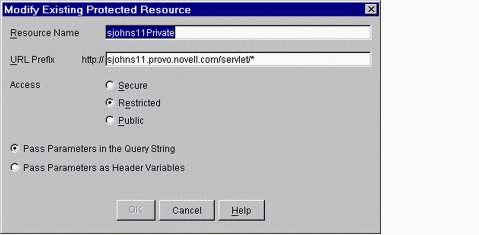
The "Modify Existing Protected Resource" window.
The URL entry (the "URL Prefix") is similar to the "DNS name" entry on the Web Server Accelerator, but is commonly followed with a wildcard designator, such as "/*" to include all content under a certain URL.
Note: If you don't use a wildcard designator, only the literal URL that you define as the "URL Prefix" will be included in the security level for that specific Protected Resource.
Fill in the information in the screen as follows:
URL Prefix: If the "DNS name" in your Web Server Accelerator was "sjohns11.provo.novell.com" and you wanted to define a new Protected Resource for your servlet directory, you would enter the following in the "URL Prefix" box: "sjohns11.provo.novell.com/servlet/*". The "http://" is already provided for you, so do not enter that part in the "URL Prefix" box.
Access: Select "Restricted" for this example (which will provide Authentication but not Authorization, per the matrix shown above).
Leave the "Pass Parameters in the Query String" option selected (the default).
Click OK to close the window, then click Apply to save the settings.
AuthHeader Verification
To test that the user credentials are being passed from the iChain proxy to the back-end Web server, use the iChainAuthHeader servlet located in the Tools directory on the iChain 2.0 Authorization Server CD. (See the iChainTools.txt file for complete instructions.)
Before running the servlet, make sure the "Forward authentication information to web server" option is enabled on the Web Server Accelerator | Authentication Options screen for your Web server accelerator. This is what configures the iChain proxy to pass the user credentials to the back-end Web servers (via the Authorization section of the HTTP header).
Define this "/servlet/iChainAuthHeader" as a new resource in your ISO in ConsoleOne. To obtain the user's identity, be sure to define this resource as Restricted (or Secure, but this requires an ACL object). If you define this resource as Public, users will not be asked to log in, and you won't see the user's identity in this servlet.
The output of this servlet should look something like Figure 13.
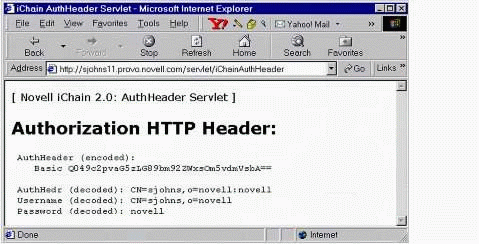
The iChain Authorization HTTP Header output.
OLAC Verification
OLAC allows you to send eDirectory user attribute data to any back-end Web server, either in the QueryString or in the HTTP header. To test OLAC functionality, there is an iChainOLAC servlet you can use to verify that OLAC information is being passed correctly. There is also an ASP script version of this OLAC verification that will run on Microsoft IIS servers. Both the servlet and the iChainAuthOLAC.asp script are located in the Tools directory on the iChain 2.0 Authorization Server CD. (See the iChainTools.txt file for complete instructions.)
Before proceeding, be sure to select the "Enable Object Level Access Control (OLAC)" checkbox on the iChain Administration utility's Access Control page, and click Apply.
OLAC is configured on the ISO object on a "per Protected Resource" basis. Each Protected Resource could send different eDirectory information to different back-end Web servers. For example, one back-end Web server might be a PeopleSoft HR server that requires the user's EmployeeID (a number) to log the person in; it cannot use the eDirectory user ID because the unique key in a PeopleSoft database is the EmployeeID number. Another back-end Web server, say an Oracle database, might need the employee's full name rather than simply the CN. OLAC provides the flexibility to pass both back-end Web servers the specific eDirectory information they need for user authentication.
The following example configures OLAC to pass the eDirectory GivenName, the Surname (last name), and the CN values to the back-end server.
On your ISO in ConsoleOne, select the Protected Resource you want to configure, then click the fourth button down (the bottom button) on the right to bring up the OLAC parameters window shown in Figure 14.
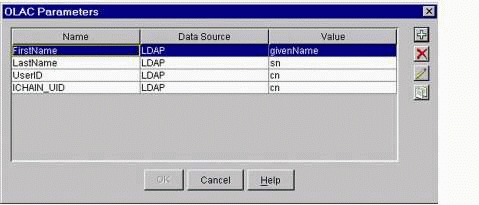
The OLAC Parameters window.
When you click the Plus ("+") button (to add), the dialog box shown in Figure 15 will be displayed.
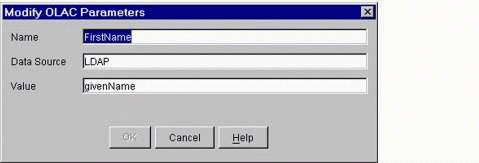
The "Modify OLAC Parameters" window.
Configure the parameters as shown below:
Name: This is the "name" entry in the "name=value" pair that iChain will pass in the QueryString.
Data Source: This is always LDAP for now.
Value: Enter the LDAP name of the eDirectory attribute you want to use. If you are unsure of the LDAP name of a certain attribute, you can view the LDAP-to-eDirectory mapping on the Attribute Map page in the LDAP Group object in ConsoleOne, as shown in Figure 16.
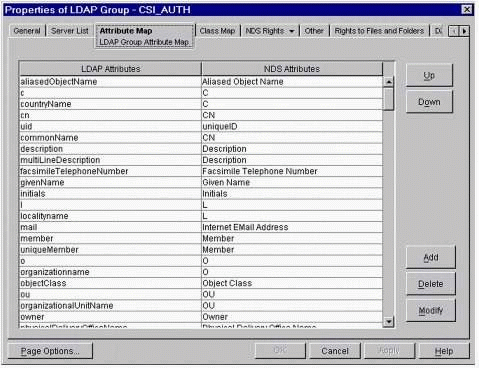
The LDAP-to-eDirectory attribute map.
Once you've set up the OLAC parameters for your Protected Resource, you can view the OLAC screen on the iChain Proxy Server to verify your settings. On the iChain Proxy Server, look for one of the screens with a title "Java Interpreter ###: com.novell.ichain." (You'll have to unlock the proxy console to get to this screen). The settings, as configured above, appear on the proxy as shown in Figure 17.
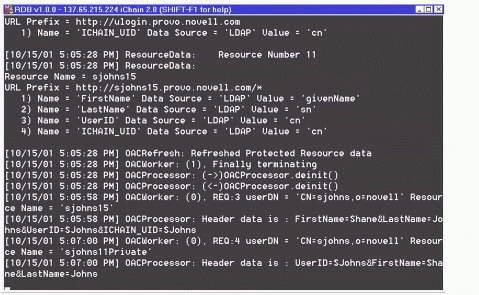
The OLAC console screen.
Once OLAC is configured and you've verified that the proxy server recognizes the values, you can use the iChainOLAC servlet to verify that the OLAC parameters are being passed to the back-end Web server. Configure the iChainOLAC servlet as a Restricted resource on the Protected Resource tab of the ISO object in ConsoleOne. When you access this servlet (after logging in), you should see results similar to those shown in Figure 18.
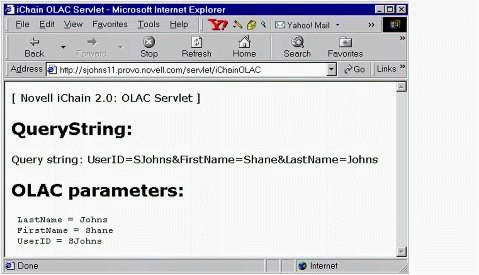
The iChain OLAC verification servlet output.
Configuring an XML Form Fill Script
XML Form Fill is configured on the ISO in ConsoleOne, by clicking on the Form Fill Policy tab (see Figure 19).
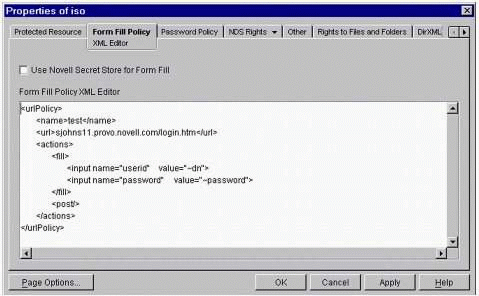
The ISO Properties "Form Fill Policy" page.
Use the following XML script as a base for your Form Fill Policy:
<urlPolicy> <name>test</name> <url>sjohns11.provo.novell.com/servlet/icLogin</url> <actions> <fill> <input name="username" value="~cn"> <input name="password" value="~password"> </fill> <post/> </actions> </urlPolicy>
For more information and example XML Form Fill scripts, see the iChain 2.0 Administration Guide (the PDF file on the iChain 2.0 Authorization Server CD). The "Form Fill" section includes both simple and complex Form Fill scripts.
Configuring the iChain 2.0 User Services
In iChain 2.0, User Services are provided via four Java servlets that offer a lightweight and easy-to-manage user self-provisioning environment based on the LDAP standard. No Novell Client software is needed. The iChain User Services are designed to replace the legacy iChain Community Services, which are no longer supported by Novell.
The four iChain user self-provisioning services include:
User self-registration (iChainAddUser servlet)
User account modification (iChainModifyUser servlet)
Change password (iChainPasswordChange servlet)
Password Manager and redirection (iChainPasswordMgr servlet)
This section outlines how to configure these four servlets.
Requirements
In order for these servlets to run, you will need the following installed on the Web server:
A Java servlet engine
Java Virtual Machine (JVM) 1.2.x or higher
Novell Java LDAP (JLDAP) libraries available from http://developer.novell.com/ndk. Look for "LDAP Class Libraries for Java" on the NDK-there is one download file for "NetWare and Windows" and a separate download file for "Unix and Linux". See the installation instructions that come with this kit for directions to install the LDAP class libraries to your Web server platform.
Note: Though the iChain User Services are functional and usable right out of the box, Novell includes the full Java source code for these servlets for those customers who require more functionality or more customization than is provided with the core user services.
User Self-Registration
User self-registration is accomplished by accessing the iChainAddUser servlet. Normally you would configure this servlet as a Public resource on the Protected Resource page of your ISO object, since you'll want users who are not yet in your directory to register themselves. Figure 20 shows the User Self-Registration screen.
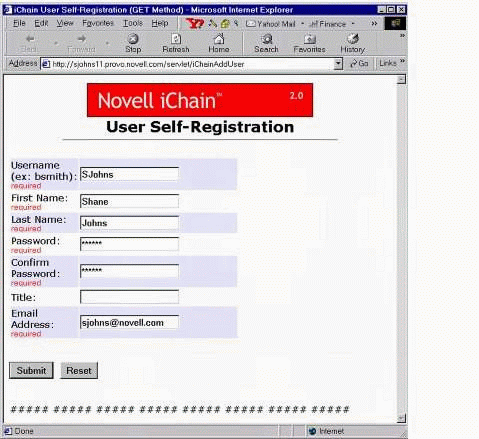
User Self-Registration servlet screen.
User Account Modification
Users can authenticate and modify their own accounts by accessing the iChainModifyUser servlet. Configure this servlet as Restricted on your ISO object. Figure 21 shows the User Account Modification screen.
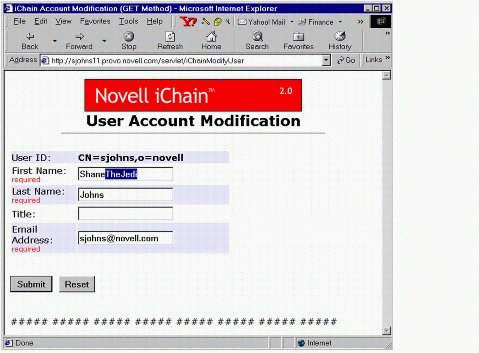
User Account Modification servlet screen.
Change Password
Users can access the iChainPasswordChange servlet to change their passwords (no more Help Desk calls!) Figure 22 shows the Change Password screen.
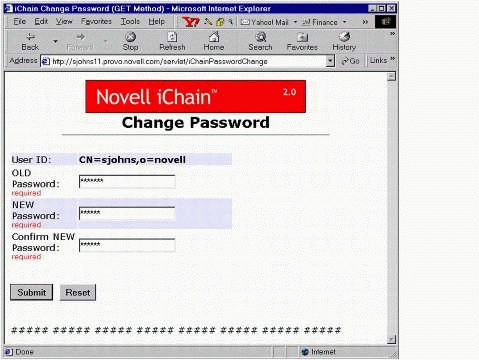
The Change Password servlet screen.
Password Manager
The iChainPasswordMgr servlet provides users a way to change their passwords after they have expired. You configure the iChain Proxy Server to use this servlet when a user's password has expired by entering "/servlet/iChainPasswordMgr" in the "Password Management Servlet URL" box on the Access Control page in the iChain administrative utility.
Note: You must restart the proxy after adding this entry. Simply clicking Apply isn't enough.
The Password Manager checks (and displays for the user) the number of grace logins remaining. If the number of remaining grace logins is greater than 1, users have the option to bypass the password change and continue on to their destination (see Figure 23).
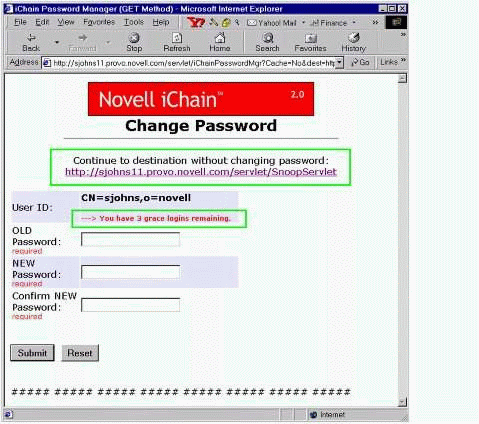
Change Password screen showing the number of grace logins remaining.
If the number of grace logins remaining equals 1, the user is forced to change the password (see Figure 24). The Password Manager provides an automatic destination redirection once the password is successfully changed.
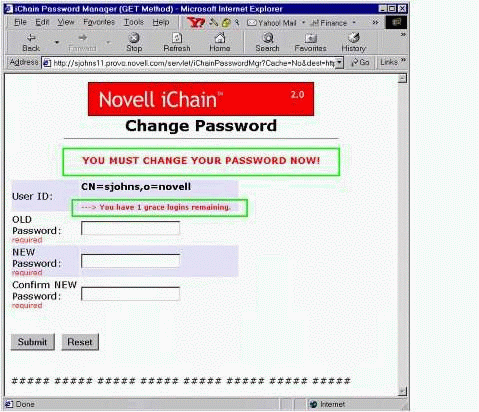
Change Password screen requiring user to change the password.
Installation of iChain User Services
In order for iChain User Services to work correctly, seven files must be placed in the proper locations:
Place the four servlets (iChainAddUser.class, iChainModifyUser.class, iChainPasswordChange.class, iChainPasswordMgr.class) in the servlet directory of your servlet engine.
Place the iChainAddUser$ISOPasswordTemplate.class file in the same directory along with the servlets.
Place the iChainAppConfig.txt configuration file in the same directory where you placed your servlets.
Place the top.jpg image file in your Web server's root documents directory. For IIS, this is C:\InetPub\wwwroot; for Netscape/Novonyx, it is Novonyx\suitespot\docs.
Note: Make sure that the directory path where these *.class files reside on your server is in the run-time "CLASSPATH" of your servlet engine's JVM! If not, the servlets will fail upon initialization due to the "getClass().getResourceAsStream (configFileName)" method call that they make when attempting to read the configuration text file when the servlets initialize.
Configuration File
The iChain servlets read a configuration file upon initialization to customize their functionality to your environment and to easily provide localization (or modification) of all message and error strings. This configuration file also allows you to make any LDAP directory attributes available to the user for user account creation or modification. The name of this required configuration file is iChainAppConfig.txt.
Note: The servlets expect this configuration file to reside in the same directory as the servlets themselves (where you place the *.class servlet files).
You can modify the iChainAppConfig.txt configuration file to match your environment. The settings that can be modified or customized via this configuration file are:
HostName (IP Address of LDAP directory)
AdminName
AdminPassword
UsersContainer (container where users are created during self-registration)
iso (iChain Service Object)
LDAP directory attributes for user creation/modification
Message and error strings
Here is an example of the format and syntax for making the LDAP attributes of "title" (Job Title) and "mail" (Email Address) available to the user during account creation or modification:
# ATTRIBUTES for User Creation or Modification # Format: <LDAP name>, <"HTML display">, <Required: yes/no> # Example: givenName, "First Name", yes # NOTE: "cn", "givenName", "surname", & "userPassword" are # automatically provided and required by default # (do NOT list these 4 attributes in this file) NumberOfAttributes=2 attr1=title, "Job Title", no attr2=mail, "Email Address", yes
The attributes can be designated as "required" or "not required" when they are presented to the user during account creation or modification.
Auxiliary Class Support. The iChainAppConfig.txt file does support auxiliary class attributes. If the attributes you want to list are in an auxiliary class, you'll have to add an extra entry at the end of the "attrX" line as follows:
attr3=commerceAccountID, "Commerce ID", no, commerceAcct
where commerceAccountID is the LDAP attribute name, and commerceAcct is the auxiliary class that this attribute is a member of.
HTTP Header Authentication. In order for the servlets to get the user identity and credential information via the Authorization section of the HTTP header, you must enable the "Forward authentication information to web server" option on the iChain proxy server for the Web server running these servlets.
The servlets in the iChain User Services are optimized for use with iChain 2.0. This means that the work of user authentication is offloaded to the iChain proxy server rather than having the servlets themselves perform user authentication.
Of the four servlets, one of them is designed to be configured as an iChain Public resource (users can access this servlet without having to authenticate), and the other three servlets are designed to be configured as Restricted or Secure resources (user authentication is required before access):
iChainAddUser - Configure as Public resource
iChainModifyUser - Configure as iChain private (Restricted or Secure) resource
iChainPasswordChange - Configure as iChain private (Restricted or Secure) resource
iChainPasswordMgr - Configure as iChain private (Restricted or Secure) resource
The three Restricted or Secure servlets extract the user's identity from the base64-encoded Authorization section of the HTTP header, which is populated by the iChain proxy server after the user authenticates.
Configuring the Password Manager Servlet
To configure the Password Manager servlet, point to this servlet from the iChain 2.0 Proxy Server on the Access Control tab in the "Password Management Servlet URL" field (in the iChain administration utility). For example:
/servlet/iChainPasswordMgr
You must restart the proxy server after clicking the Apply button for this to take effect.
Password Dictionary
To enable support for a Password Dictionary file (which lists passwords that users are not allowed to use):
Select the ISO object in ConsoleOne and click on the Password Policy tab. The screen shown in Figure 25 will be displayed.
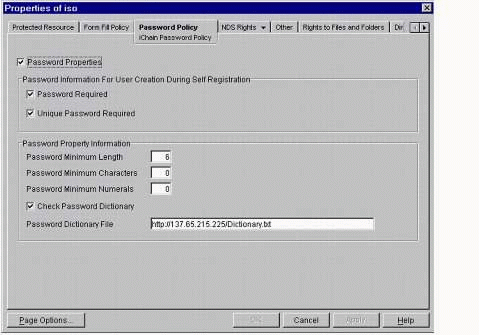
The ISO Password Policy page.
Select (check) the "Check Password Dictionary" checkbox near the bottom.
In the Password Dictionary File field, list the full HTTP URL where the Dictionary.txt file resides; for example, http://137.65.215.225/Dictionary.txt.
The dictionary file is a text file with each word listed on its own separate line. For example, the contents of your text file might look like the following:
A Aaa Abc Ansi Az ...
Conclusion
iChain 2.0 is a powerful solution for today's business requirements. It provides reliable, scalable, Web-based security to protect your vital Web services and critical business applications. It is based on open standards and allows you to easily directory-enable applications that aren't yet taking advantage of directory-based LDAP management and security.
* Originally published in Novell AppNotes
Disclaimer
The origin of this information may be internal or external to Novell. While Novell makes all reasonable efforts to verify this information, Novell does not make explicit or implied claims to its validity.