Cluster-Enabling a ZENworks for Servers 2 Deployment
Articles and Tips: article
Consultant
Novell Canada Ltd.
mschouls@novell.com
01 Jan 2002
This AppNote explains how to install and configure ZENworks for Servers 2 in a Novell Cluster Services environment. It covers the deployment of the ZENworks for Servers software, including the Distributor service and the Subscriber service.
- Introduction
- ZENworks for Servers Software Deployment
- Create Policy Packages
- Configure the Load and Unload Scripts of the Virtual Server
- Start the Distributor and Test Failover
- Deploy ZENworks for Servers Subscriber Service
- Modify the Routing Hierarchy of the Distributor
- Conclusion
|
Topics |
Novell Cluster Services, ZENworks for Servers, fault tolerance, network management |
|
Products |
Novell ZENworks for Servers 2.0, Novell Cluster Services |
|
Audience |
network administrators, consultants, integrators |
|
Level |
intermediate |
|
Prerequisite Skills |
NetWare server support and administration |
|
Operating System |
NetWare 5.x, 6.x |
|
Tools |
n/a |
|
Sample Code |
no |
Introduction
Novell's ZENworks for Servers 2 is a comprehensive server management automation solution that provides policy-based server management, highly scalable server-to-server distribution, and a full-featured SNMP management console. ZENworks for Servers 2 increases your control of local and remote servers while cutting administrative costs-for example, allowing companies to distribute software to servers across the Net.
Novell Cluster Services is software that permits you to combine a number of individual network servers into a cluster, thereby providing users with virtually uninterrupted access to their critical network resources such as data, applications, server licenses, and other services. If one network server (cluster node) in the cluster happens to fail, another will automatically take over the resources and services it provided. Novell Cluster Services promises higher levels of availability than other Intel-based clustering systems: you can provide true multi-node clustering with support for up to 32 server nodes in a cluster. In addition, Novell Cluster Services does not require any proprietary hardware: you can install it on off-the-shelf Intel architecture systems.
Cluster-enabling the ZENworks for Servers 2 Distributor service will provide fault tolerance when synchronizing critical data stored on a Storage Area Network (SAN). In the event that the node hosting the Distributor service fails, the service will "failover" to another node in the cluster, and distributions can continue. For example, if you are synchronizing data from one cluster to a second (the second being your backup and recovery cluster), it would be beneficial to ensure that distributions take place, and finish, even in the event of a server failure. Cluster- enabling the ZENworks for Servers 2 Subscriber service provides a method to distribute data from the Distributor to your cluster volumes.
A number of steps are involved in the process of deploying, configuring, and testing the integration of ZENworks for Servers 2 with Novell Cluster Services. These steps were documented based on proof-of-concept testing. It is recommended that, prior to installing the software, you read through the entire procedure to get a firm understanding of the process of cluster-enabling the ZENworks for Servers Distributor process and the Sybase database.
The steps in this AppNote are based on the installation of the ZENworks for Servers Distributor service on a two-node cluster (with Novell Cluster Services), although this is not a limit. The limit is with how many nodes can participate in the cluster.
This AppNote covers the deployment of the Distributor service, the Sybase database, and the Subscriber service on Novell Cluster Services.
For the purpose of this AppNote, it is assumed that Novell Cluster Services is already installed. For further information on Novell Cluster Services, refer to the online documentation at http://www.novell.com/documentation.
ZENworks for Servers Software Deployment
This section describes the installation of the necessary ZENworks for Servers 2 software components.
Install JVM 1.1.7b (If Required)
The first step in the installation process is to ensure that the proper Java Virtual Machine (JVM) code is installed on your servers. JVM 1.1.7b is required for ZENworks for Servers Policy and Distribution Services (TED). To see what version you have, type "MODULES JAVA.NLM" at the server console prompt, and check the Novell JVM version number.
The September 19, 2000 revision of this JVM is provided on the ZENworks for Servers Companion CD. A newer version (v1.2.2, dated June 2001) can be downloaded from http://support.novell.com, but I have not tested this solution with JVM v1.2.2.
If you are up-to-date on your Java code, you can move on to the next step.
Install ZENworks for Servers
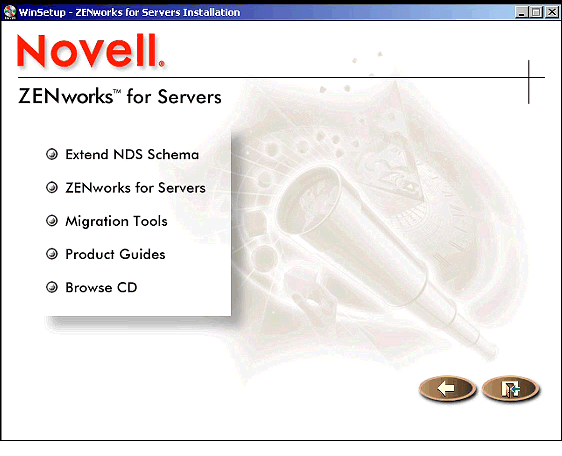
To install ZENworks for Servers 2, start the installation wizard by running WINSETUP.EXE found on the root of the ZENworks for Servers 2 CD. The main ZENworks for Servers Installation screen is displayed (see Figure 1).
The ZENworks for Servers install program's main screen.
Extend the eDirectory Schema
The first step in a production installation of ZENworks for Servers is to extend the eDirectory schema, if you have not already done so. This step prepares eDirectory for the installation to take place and for the ZENworks for Servers objects to be created in the eDirectory database.
If you need to extend the schema, follow these steps.
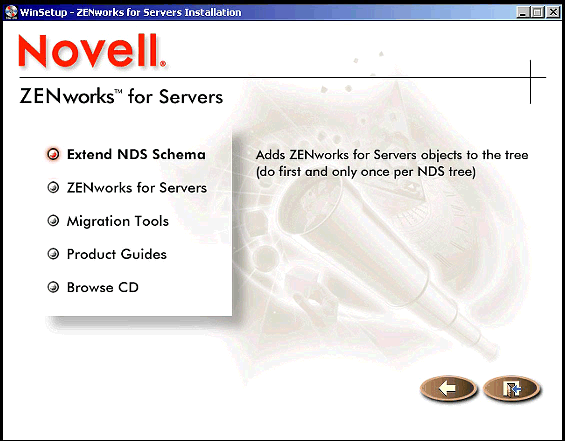
From the install main menu, select "Extend NDS Schema" as shown in Figure 2.
Selecting the "Extend NDS Schema" option.
You next must provide the name of the tree whose schema you want to extend. To do this, select the tree name from the list, as shown in Figure 3 (the default tree is automatically detected by the Schema Extension Wizard). If you need to log in, you can do so by clicking the Login button.
Screen for selecting the tree on which you want to extend the schema.
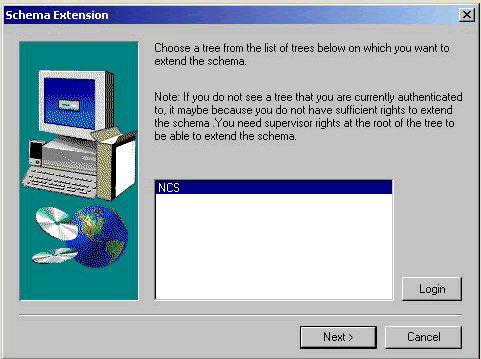
Once you have selected a tree, click Next > and follow the onscreen instructions to complete the schema extension.
Install ZENworks for Servers Policy and Distribution Services
Once the schema has been extended, you are ready to install the Policy and Distribution software and set up your Tiered Electronic Distribution (TED) hierarchy. To do this, follow these steps.
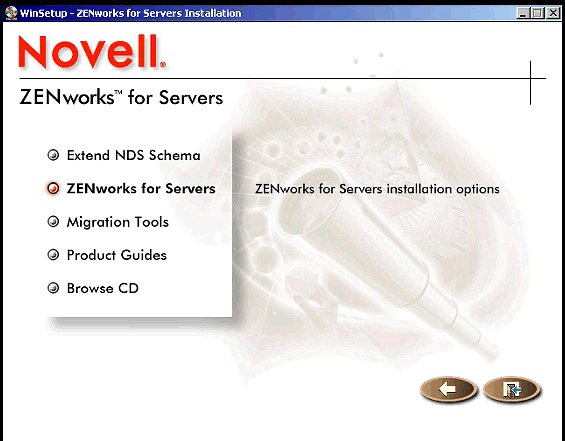
From the Installation main menu, select "ZENworks for Servers" as shown in Figure 4.
Selecting the "ZENworks for Servers" option.
From the next screen (see Figure 5), select "Install Policy and Distribution Services" from the menu.
Selecting the "Install Policy and Distribution Services" option.
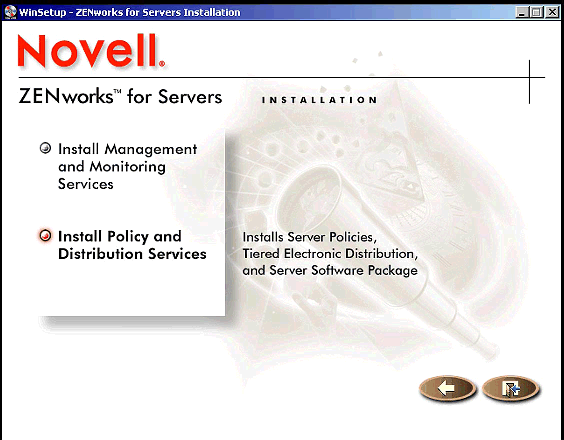
The next screen displays the License Agreement. After reading the terms of the agreement, click the "Accept" radio button and click Next > to continue with the installation process.
In the next screen (see Figure 6), you need to select the tree containing the ZENworks for Servers target servers.
Screen for selecting the tree that contains the target servers.
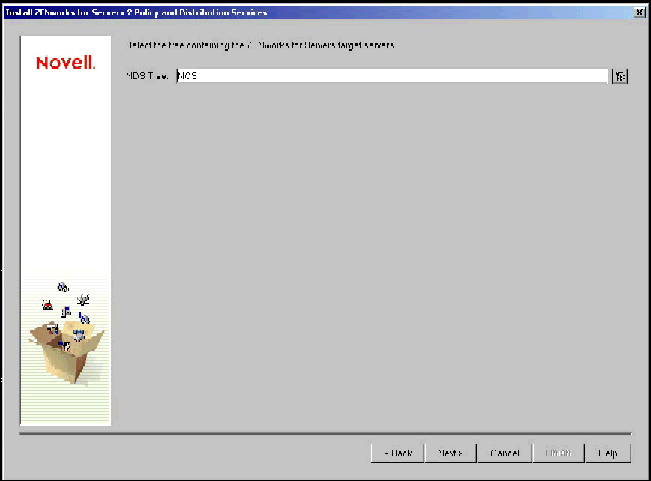
Either type in the name of your tree, or click the browse button to find and select your tree name. After you have selected the target tree, click Next > to continue with the installation process.
In the next screen (see Figure 7), you need to specify where to install the product licenses.
Screen for specifying where to install the product licenses.
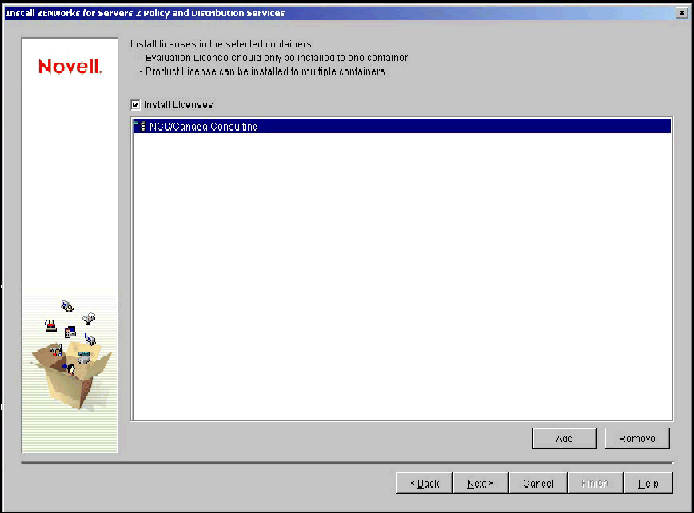
Click the "Install Licenses" checkbox, click the Add button, and then browse to the container where you will install the license object (in eDirectory). Select the same container where the Distributor object will be created.
Although the location of the license object does not matter, it should be kept close to the servers that will be accessing it. Servers should not have to cross partitions or WAN boundaries to access the license object. Note that you can install multiple instances of the ZENworks for Servers license object in your tree, but you cannot install multiple instances in the same container.
After you have specified the location of the license object, click Next > to continue with the installation process.
The next screen allows you to specify the target servers on which the ZENworks for Servers software will be installed. I refer to this as the deployment matrix (see Figure 8).
Screen showing the ZENworks for Servers deployment matrix.
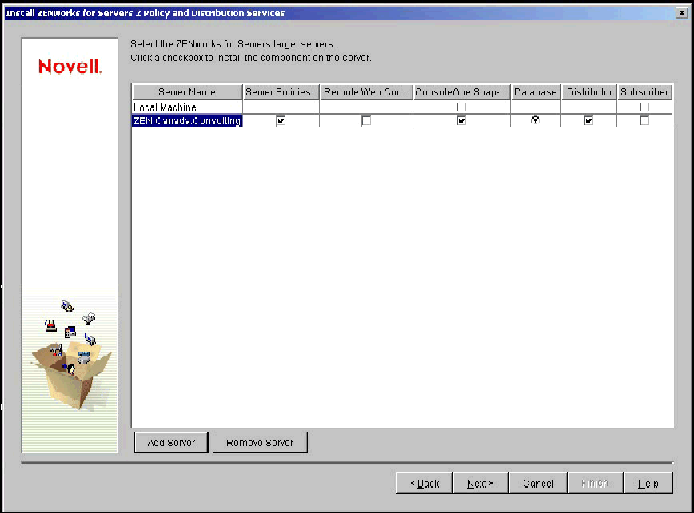
The deployment matrix has seven (7) columns:
Server Name - The name of the target server on which software will be installed
Server Policies - Checking this box will install the software necessary to use and enforce server policies on the target server
Remote Web Console - Checking this box will install the software necessary to run the Remote Web Console (RWC), which allows the administrator to access information regarding servers in the TED infrastructure (you need only install the RWC service on one server, and have it monitor all servers in the TED infrastructure)
ConsoleOne Snapins - Checking this box will install the ConsoleOne snapins necessary to manage ZENworks for Servers; you can install these on the target server or on the local workstation from which you are running the installation
Database - Clicking this radio button will install the software and database necessary for TED logging purposes; you should select to install the database on the Distributor
Distributor - Checking this box will install the software necessary to run the Distributor service (multiple Distributors are allowed in one tree, and the server acting as a Distributor can also run the Subscriber service)
Subscriber - Checking this box will install the software necessary to run the Subscriber service
Clicking the Add Server button will allow you to browse the tree looking for servers on which to install the software. Once you have located the server object (NCP Server Object), and the server object is highlighted, click the Select button and OK to accept.
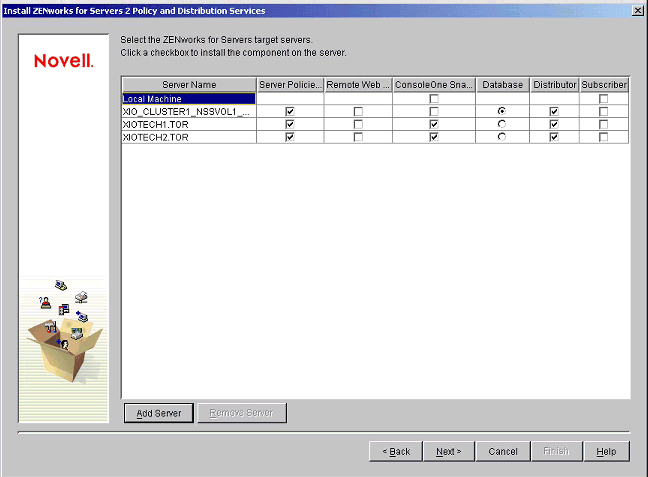
In this case, you will be installing the Distributor service on a Novell Cluster to cluster-enable the Distributor service. In order to deploy the Distributor software properly in a Cluster environment, click the Add Server button and browse the tree looking for physical server objects (NCP Server objects) and the Virtual Server object. Select all objects, and click OK to accept your selections. The objects should now be listed in the deployment matrix; for example:
Physical Node #1
Physical Node #2
Virtual Node - Cluster_TED_SERVER
Select the following options for each of the nodes in the matrix:
NodeOptionsPhysical Node #1
Server Policies, ConsoleOne Snapins, Distributor
Physical Node #2
Server Policies, ConsoleOne Snapins, Distributor
Virtual Node
Server Policies, ConsoleOne Snapins, Database, Distributor
When you are finished, your selections should look something like the ones shown in Figure 9.
Completed deployment matrix screen for the cluster-enabled environment.
At this point, you have identified what servers the Distributor software will be installed on. You still need to specify which server(s) will run the TED Subscriber service.
Because you are installing in a cluster environment, I suggest that you install the Distributor service software first as described in the previous step. Then, after you have the Distributor configured and running properly, go back and re-run the installation wizard and specify what server(s) will be running the Subscriber service.
Do this by clicking Add Server and browsing the tree for the location of each server object you want to be a Subscriber. Once you have located the object and selected it, click OK to go back to the matrix. The only options you will enable for server acting as a Subscriber are Server Policiesand Subscriber. (Do not install the Distributor software again.)
Note: If you will be running ConsoleOne from any of the servers, ensure that you also select to install the ConsoleOne Snapins on all of the servers, or at the server(s) from which you will be running ConsoleOne.
Once you have finished building the deployment matrix, click Next > to continue with the installation process.
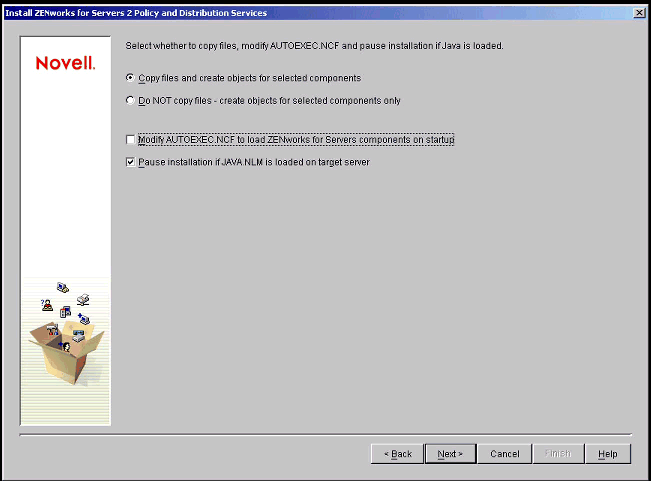
In the next screen, you will select whether to copy files, modify the AUTOEXEC.NCF file, and pause installation if Java is loaded.
The only action you need to take here is to uncheck the box labeled "Modify AUTOEXEC.NCF to load ZENworks for Servers components on startup". You will be loading the Distributor process from the Load script of the Virtual Server. Your selections should look like the ones shown in Figure 10.
Screen for ZENworks for Servers installation options.
Click Next > to continue with the installation process.
In the next screen (see Figure 11), you will specify the location to install the TED database software (Sybase) and the database engine.
Screen for specifying the location for the TED database software and engine.
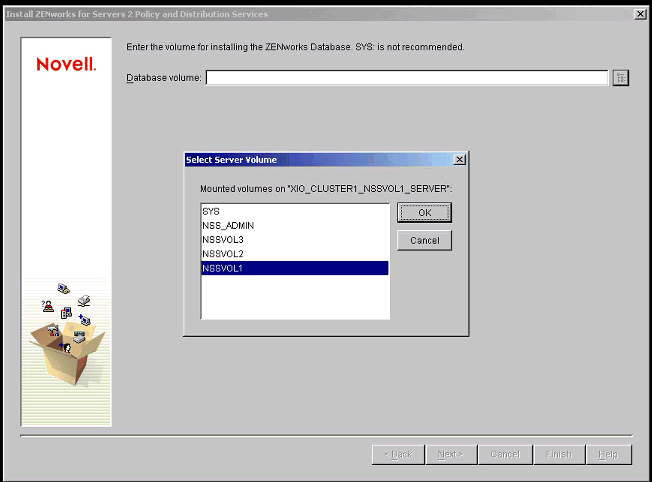
Note: You should specify one of the Cluster virtual volumes, so that you can failover the database when required.
Once you have selected the volume to store the database and database software, click Next > to continue with the installation process.
In the next screen (see Figure 12), you have the opportunity to create a TED Channel object that the Distributor will monitor.
Screen for listing the channels that will be available to subscribers.
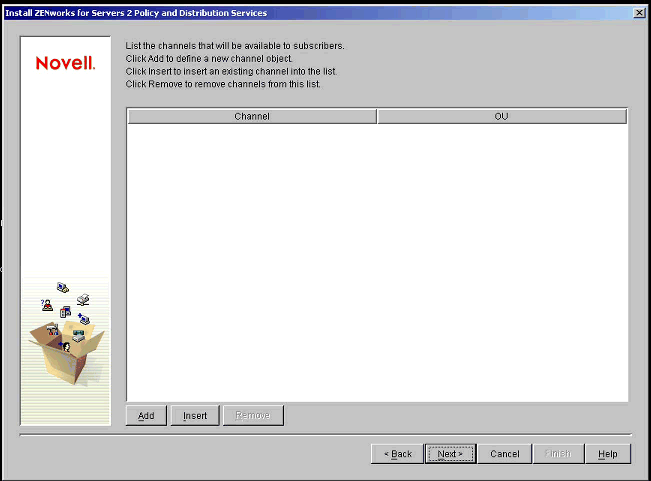
You will manually create this later, after the installation process is complete. If you choose to create it now, you can; otherwise click Next > to continue with the installation process.
The next screen (see Figure 13) allows you to change the location of the Working Directory and Log File directory for the Distributor.
Screen for changing the location of the Distributor directories.
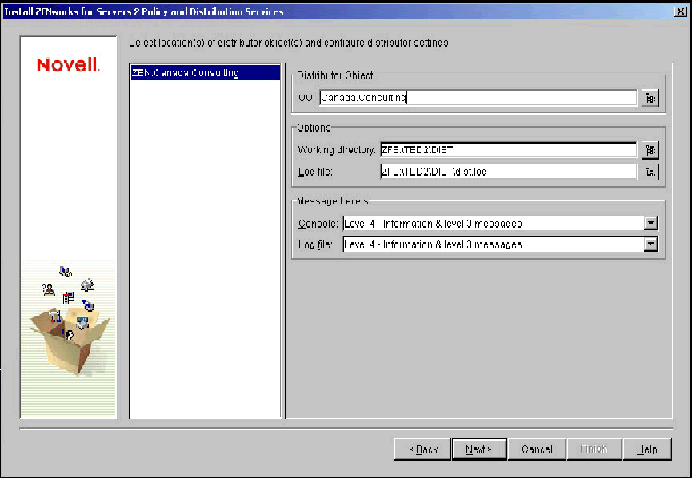
In the left-hand pane, select the Virtual Server name, and change the Working directory and Log File directory to point to the same volume on which you specified to install the Database (this will be the Virtual Volume name). You only need to change the volume name from SYS to whatever volume you are working with.
Once you have made the necessary changes, click Next > to continue with the installation process.
At this point, the installation summary screen is displayed, indicating all of the choices you have made (see Figure 14).
Installation summary screen.
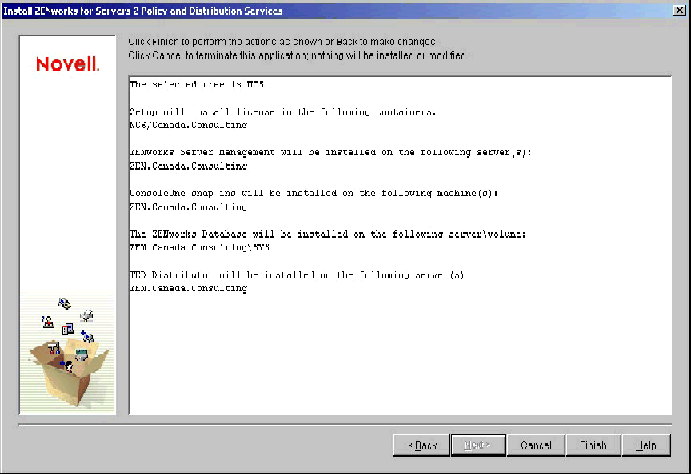
Once you have reviewed the summary for accuracy, click Finish to complete the installation process.
The software will now be copied to the servers, and the ZENworks for Servers objects will be created in eDirectory. Allow this to complete.
Here is a list of default objects that are created during the installation process:
Distributor object(s)
ZENworks for Servers License object(s)
ZENworks for Servers Database object
Once the installation process is complete, review the "Readme" file for any errors that may have been encountered during the process.
Install ZENworks for Servers 2 Support Pack 1A
Once you have completed the installation of ZENworks for Servers 2, you need to update it with Support Pack 1A. This can be downloaded from the Novell Support Connection at http://support.novell.com. The self-extracting EXE is named ZFS2SP1A.EXE.
To apply the Support Pack, use the following method:
Run the self-extracting EXE to extract the software to the root of the SYS volume; a Temp directory with subdirectories will be created under SYS.
Type the following command at the server console to start the Package Processor, which installs the software package (you will need to patch each physical node that is participating in the cluster):
SYS:\TEMP\ZFS2SP1A\NETWARE\POLYDIST.NCF
After installing the software package, review the log file created by the Package Processor to ensure that the installation was successful. This log file can be found at:
SYS:\TEMP\ZFS2SP1A\NETWARE\UPGRADE.LOG
The log file provides detailed information about the success or failure of the Support Pack installation. The default reporting level is 4, which includes successes, warnings, errors, and information.
Clean Up eDirectory Objects
After you have successfully installed the ZENworks for Servers 2 software and Support Pack 1A, you can now clean up unnecessary objects in eDirectory.
Start ConsoleOne and browse to the container where the Distributor objects were created. There should be three Distributor objects in the container (based on two-node Cluster): one for the Virtual Server, and one for each of the Physical Nodes in the cluster.
Locate the two Distributor objects which are associated with the two physical nodes, and delete them.
Note: Do not delete the Distributor object associated with the Virtual Server.
Modify NCF Files
In order for the Distributor to run properly, you need to make a couple of changes to two NCF files that were created during the installation process. The changes you make essentially cluster-enable the Distributor service.
Modify DIST.NCF. First you need to modify DIST.NCF (located in the SYS:\TED2 directory on each of the clustered servers) to include the DN of the Distributor object associate with the Virtual Server, rather than the DN of the physical node. To do this, follow these steps.
At the server console, type:
EDIT sys:\ted2\dist.ncf
Change the name of the Distributor object (at the BOTTOM/END of the NCF file) to the name of the Distributor object associated with the Virtual Server. (When you first view the contents of the NCF file, you will see that the last line references the name and location of the old Distributor object, which you deleted earlier. You simply need to change this to the name and location of the Distributor object created for the Virtual Server.)
Close the file and save the changes.
Repeat these steps for each physical server participating in the cluster.
Modify MGMTDBS.NCF. This NCF file is responsible for starting the ZENworks for Servers database. You need to make one minor change to this NCF file to ensure that the database loads properly. To do this, follow these steps.
At the server console, type:
EDIT mgmtdbs.ncf
If you get a message stating that MGMTDBS.NCF does not exist and asking if you want to create one, answer "Yes" and follow the steps outlined in "Manually Creating the MGMTDBS.NCF File" below.
You will see an IP address listed at the end of the LOAD line. Change this to the IP address of the Virtual Server Volume that is hosting the database (where you installed the database during the installation process).
Close the file and save the changes.
Repeat these steps for each physical server in the cluster.
Manually Creating the MGMTDBS.NCF File. If for any reason the MGMTDBS.NCF file is missing in the SYS:\SYSTEM directory on any of the servers in the cluster, you can manually create or rebuild one.
At the server console type "EDIT sys:\system\mgmtdbs.ncf" and when asked if you want to create the file, answer "Yes". Enter this command in the file:
<<<< Start of File >>>> LOAD <vol>:\ZENWORKS\DATABASE\DBSRV7.NLM -c 16M -x tcpip -tl 300 -ti 0 -gn 50 -m -n <IP_addr> <vol>:\ZENWORKS\DATABASE\ZFSLOG.DB <<<< End of File >>>>
where <vol> is the volume on which you installed the Database and Database software, and <IP_addr> is the IP address of the Virtual Server.
Modify the Distributor Object
To ensure that the Distributor object is working properly, you will need to make one change to the Distributor object in eDirectory. To do this, follow these steps.
Start ConsoleOne and locate the Distributor object in eDirectory.
Right-click on the Distributor object and select Properties.
When the Properties page is displayed, click the Other tab.
Click on the Network Address attribute, and then click Add.
Change the NetAddress Type to IP and enter the IP address of the Virtual Server volume.
Save the addition, and close the Distributor Properties page to apply the changes.
Create Policy Packages
To ensure that the Distributor service loads without any errors, that licenses can be located, and that the database can be found, you will need to create several Policy Packages in eDirectory.
Container Policy Package
The Container Policy Package allows you to enable and associate a Search Policy, which dictates how far up the tree the server will search for policies.
To create the Container Package, follow these steps.
Right-click the container where the Distributor object is located, and then select "New" and "Policy Package".
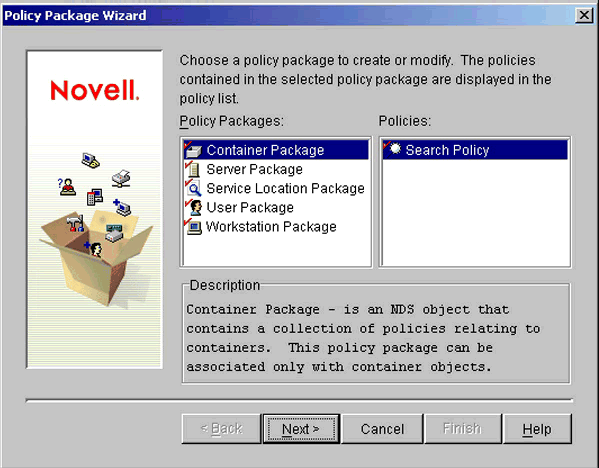
In the next screen (see Figure 15), select "Container Package" from the Policy Packages list and click Next > to continue.
Screen for selecting a Container Package.
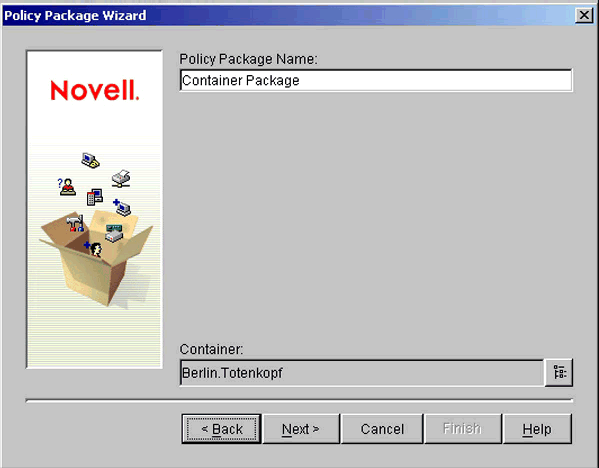
In the next screen (see Figure 16), name your Container Package and click Next > to continue.
Screen for naming the Container Package.
In the next screen, click the "Define Additional Properties" checkbox and click Finish.
Check the "Enabled" checkbox next to the Search Policy, then click the Properties button.
Change the "Search for Policies up to" selection to your preferred choice.
Click the Associations tab, and click the Add button.
Select the container where the Distributor object is located, click OK, and click OK again to close the Container Package Properties page (association location will vary depending on how your tree is structured and partitioned).
You have now created a Container Package with an enabled Search Policy.
Service Location Package
The Service Location Policy Package allows you to enable and associate a ZENworks Database policy and ZENworks for Servers License policy, which specifies the location of the ZENworks for Servers Database and License objects.
To create the Service Location Package, follow these steps.
Right-click on the container where the Distributor object is located, and then select "New" and "Policy Package".
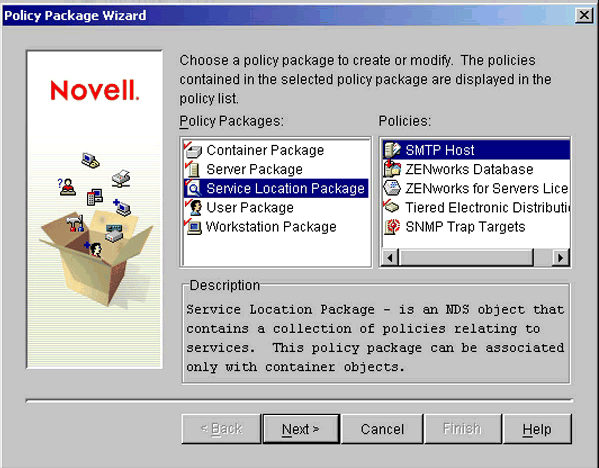
In the next screen (see Figure 17), select "Service Location Package" and click Next > to continue.
Screen for selecting a Service Location Package.
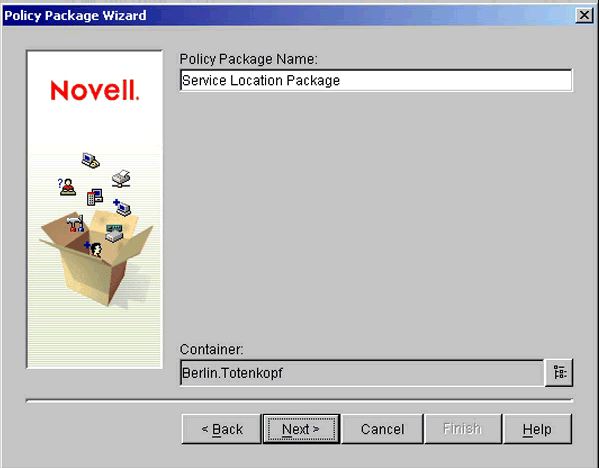
In the next screen (see Figure 18), name your Service Location Package and click Next > to continue.
Screen for naming the Service Location Package.
In the next screen, click the "Define Additional Properties" checkbox and click Finish.
Check the "Enabled" checkbox next to the ZENworks Database and ZENworks for Servers License.
Highlight the "ZENworks Database" policy, and click the Properties button.
Click the ZFS Database tab.
Browse to the location of the ZfS Database object in eDirectory (named ZfS Database). The location should be the same as the location of the Distributor object, thus the same location where you created the Service Location Package (you specified where to create this object during the installation phase).
Once you have populated the DN field with the location of the database object, click OK to accept the change.
Highlight the "ZENworks for Servers License" policy, and click the Properties button. Browse to the location of the ZENworks for Servers License object in eDirectory (you specified this location during the installation process).
Once you have populated the DN field with the location of the license object, click OK to accept the change.
Click the Associations tab, and click the Add button.
Select the container where the Distributor object is located, click OK, and click OK again to close the Service Location Package Properties page. Alternatively, you can select the servers to apply the package/policies to. If you select the container where the servers reside, the policies will apply to all servers in the container. You may not want this.
You have now created a Service Location Package with enabled policies to locate the database and license objects in eDirectory.
Configure the Load and Unload Scripts of the Virtual Server
You now need to configure the Load and Unload scripts of the Virtual Server by adding several commands to each one.
Load Script
The Load script is shown in Figure 19.
Virtual Server Load script.
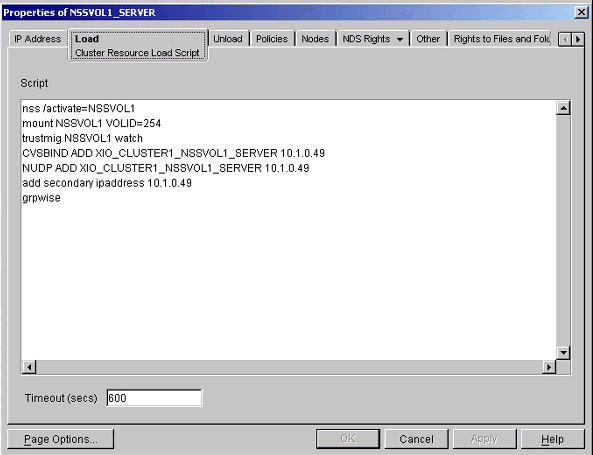
Place the following five commands at the bottom of the Load script:
MGMTDBS.NCF SYS:\zenworks\java\lib\PBROKER.NCF SYS:\TED2\DIST search add SYS:\SMANAGER ZFS.NCF
Unload Script
The Unload script is shown in Figure 20.
Virtual Server Unload script.
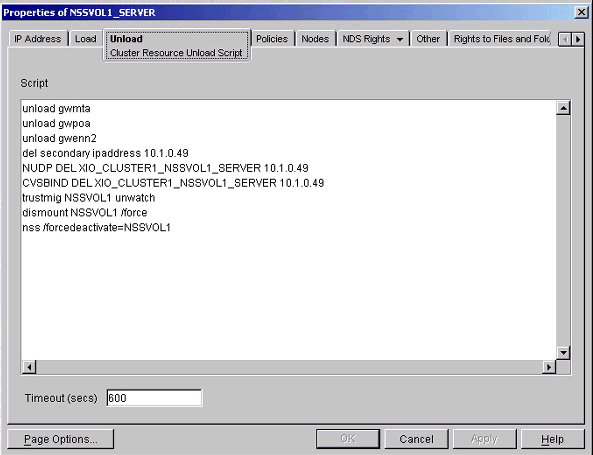
Place the following three commands at the bottom of the Unload script:
java -killdexit java -killpexit unload dbsrv7.nlm
The first command exits the Distributor service, the second exits the Port Broker service, and the third unloads the Sybase database.
The reason you want to have the ZENworks for Servers Load and Unload commands in the cluster Load/Unload scripts is to allow the ZENworks for Servers components to failover to the next cluster node, in the event of a server crash or failure. This is why we removed the option to place the ZENworks for Servers Load commands in AUTOEXEC.NCF at the beginning of the procedure.
Start the Distributor and Test Failover
You now need to start the Distributor service for the first time. You will do this on the server currently running the Virtual Server (the best option here is to take the Volume offline, and bring it back online so the service automatically loads). In this case, you are testing the auto-load sequence.
If for some reason you receive an error when attempting to load the Distributor process (errors are displayed on the Distributor console screen) and the meaning of the error is not obvious, first try to reapply Service Pack 1A to all cluster nodes. If the cause of the error is obvious, resolve the problem and run the load sequence again.
After the Distributor service is running, copy the KEYPAIR.OBJ file from the SYS:\TED2\SECURITY\PRIVATE directory to the SYS:\TED2\SECURITY\ PRIVATE directory on each of the physical servers participating in the cluster.
You should also test the failover process to ensure that the Distributor loads properly.
Deploy ZENworks for Servers Subscriber Service
ZENworks for Servers can be installed on a single server, or it can be cluster- enabled. Installing the Subscriber Service on Novell Cluster Services is done in the exact same fashion as outlined in the steps to install the Distributor Service and Database to a Novell cluster, with a few key differences:
The ZENworks for Servers Subscriber Service can be installed on the Virtual Server as well as each physical node participating in the cluster. This is accomplished by deploying ZENworks for Servers to each of the nodes (physical and virtual) as outlined in the steps above, but you will not need to delete any objects from eDirectory.
The Subscriber Service is a passive service, and does not actively become involved in TED communications on its own. All communications and transmissions are instigated by the Distributor Service. The Subscriber Service simply sits and waits for instructions from the Distributor Service. It does not read eDirectory for any of its own configuration parameters; the Distributor reads the parameters and pushes them to the Subscriber Service.
In this case, the Subscriber Service can actively run on the Virtual Server, so you can deploy software and data to the Virtual Volumes. It can also run on each of the Physical Servers, so you can deploy to the servers' Physical Volumes (such as SYS). This exposes the physical servers to participate in the automatic deployment of NetWare Support Packs.
You will not be deploying the ZENworks for Servers Database to any of the servers participating in the TED infrastructure, as a Parent Subscriber or Subscriber.
You will not need to perform the steps to modify any NCF files on the Subscriber. The Subscriber does not authenticate to eDirectory; it simply waits for instructions from the Distributor Service.
Modify the Routing Hierarchy of the Distributor
Here is where you get into modeling the TED infrastructure for each Distributor in the tree. Each Distributor manages distribution of content to Subscribers throughout the tree by using a routing hierarchy, which is configured for each Distributor as a property of the Distributor object in eDirectory.
Follow these easy steps to configure the Distributor's routing hierarchy.
Locate the Distributor object in the eDirectory tree.
Right-click on the object and select Properties. The Properties screen shown in Figure 21 is displayed.
Distributor object Properties screen.

The Routing Hierarchy is configured on the Routing tab. Simply click the Add button to add Subscribers to the hierarchy.
Conclusion
This AppNote has described the steps necessary to cluster-enable a ZENworks for Servers 2 deployment. In summary, after Novell Cluster Services is installed, configured, and patched, you can install ZENworks for Servers 2 on the cluster, patch it, and configure it. The ZENworks for Servers installation is a multi-step process in that it involves the installation of the software, and the creation and configuration of eDirectory objects (such as Policy packages). When installing on a cluster, the added step is that you need to manually modify the NCF files so that the software loads and functions properly in the cluster environment.
Together, Novell Cluster Services and ZENworks for Servers are a powerful duo.
For Additional Information
Following are some resources I recommend for additional information on ZENworks for Servers:
To help with questions regarding the day-to-day administration of the TED infrastructure, purchase Novell's ZENworks for Servers 2 Administrator's Handbook (ISBN 0-7645-4732-1) from Novell Press. This book is for intermediate to advanced users.
You can obtain additional ZENworks for Servers documentation at http://www.novell.com/documentation.
Also keep your eyes on http://www.novell.com/coolsolutions/zenworks.
* Originally published in Novell AppNotes
Disclaimer
The origin of this information may be internal or external to Novell. While Novell makes all reasonable efforts to verify this information, Novell does not make explicit or implied claims to its validity.