How to Install ZENworks for Desktops 3
Articles and Tips: article
MCNE
cschafer@myrealbox.com
01 Sep 2001
This Appnote demonstrates how to install and configure ZENworks for Desktops 3 in a simple Novell NetWare environment.
- Introduction Introduction
- Overview of New Items Overview of New Items
- Explanation of Scenario Explanation of Scenario
- Installation Process Installation Process
- Conclusion Conclusion
|
Topics |
installation, configuration, ZENworks for Desktops 3 |
|
Products |
NetWare 5.x, ZENworks for Desktops 3 |
|
Audience |
system engineers, network administrators |
|
Level |
beginner |
|
Prerequisite Skills |
familiarity with NDS |
|
Operating System |
NetWare 4.x, 5.x |
|
Tools |
workstation, server |
|
Sample Code |
no |
Introduction
ZENworks for Desktops is a desktop management tool that enables you to centrally create and manage policies and user profiles for Windows 2000, Windows NT, and Windows 95/98 workstations. This tool can make desktop deployment and management tasks easier- reducing the effort required to perform everyday tasks. I guess that's why "ZEN" stands for Zero Effort Networks.
This article is intended to help administrators or engineers who aren't familiar with this very impressive product "get their feet wet." We discuss many of the basic items in a standard install and cover the most important steps of the installation process.
Specific concerns, such as migrating from previous versions of ZENworks for Desktops, are outside the scope of this document. For information on migration see http://www.novell.com/documentation/lg/zfd3/docui/index.htm.
It is important when evaluating any product to establish a test environment. A test lab allows you to dissect the whole installation and configuration process of a new product. While having a spare server is nice, you can get by with two workstations (one of which will play the role of a server); system requirements are listed later in this article.
Overview of New Items
ZENworks for Desktops 3 has enhancements in workstaion management, application management, and remote management.
Workstation Management
Automatic Workstation Import/Removal: ZENworks for Desktops 3 leverages the power of the NDS directory more than its predecessors. ZfD3 automatically imports and removes workstation objects from the directory. This function is provided by a Java applet that runs as a service on your network server. The service looks at a policy that you configured in NDS. The workstation object is created and associated with the workstation automatically; the object is named based on the format specified in the policy. A policy can also be set with a time period limiting how long a workstation may be absent from the network; workstations that exceed this limit will have their objects removed automatically.
Imaging: This is probably my favorite feature. I could write a whole article about it but I'll keep this short and informative. ZfD3 imaging consists of imaging a standard workstation(s) up to the server. Administrators can then distribute workstation images by booting off a Linux partition or floppies. To make a long story short, imaging a workstation can be automated so network administrators do not have to visit each workstation that needs to be re-imaged.
Application Management
MSI Integration: Newer applications often use MSI (Microsoft System Installer) to install on to workstations. ZENworks for Desktops 3 supports MSI files natively, allowing you to publish applications without running through the snAppShot process.
Application Uninstall: Applications installed via ZENworks for Desktops can be uninstalled from the workstation. This feature can uninstall applications that have been installed by ZENworks 2; the uninstall process was somewhat trickier in ZEN2.
Disconnected Application Launcher: NAL can now have the capability to run when the user is disconnected from the network. Applications can be marked as downloadable having the application downloaded and cached in the local file system.
Application Reporting Enhancements: The system can write directly to a database instead of generating SNMP events.
Imaging Application Launcher Support: Store a workstation image on the server and have an image object point to it in NDS. Administrators can then inject application objects into the image created in the tree.
Tiered Electronic Distribution Integration: TED (Tiered Electronic Distribution) gives the network administrator the capabilities to distribute files to any or all servers within the network.
Remote Management
Remote control software has been updated to improve performance. Remote control supports Windows 95/98, Window NT and Windows 2000.
Wake on LAN: If by chance your hardware supports Wake on LAN functionality, the network administrator can use the workstation object to send a Wake on LAN packet to that workstation. The workstation must be imported and run an inventory scan before this function is available.
Administration Tools: ConsoleOne replaces NWAdmin as the utility used to manage ZENworks for Desktops. The most viewable change is the combining of the workstation policy into a single workstation policy package.
Explanation of Scenario
This scenario describes an "out of the box" installation. This process consists of installing all the ZEN components on a specified server. It extends the schema of the NDS tree, copies the files to the server or servers, TID10056752 and creates the new Applications objects in the server's container.
Server Hardware Requirements
The following table shows the server hardware requirements.
|
Resource
|
Minimum Disk Space
|
Minimum Hardware Requirements
|
|
ZENworks server without Workstation Inventory database |
160 MB |
NetWare 4.11, 4.2, or 5.x servers: minimum 128 MB of RAM with 7 MB free |
|
ZENworks server with Workstation Inventory database installed |
220 MB * |
256 MB of RAM on NetWare 4.11, 4.2 or 5.x servers with 40 MB free |
*Prepare for the Workstation Inventory database to expand upon usage.
Server Software Requirements
The following table shows the server software requirements.
|
Platform
|
Minimum Software Requirement
|
|
NetWare 4.x |
NetWare 4.11 or 4.2; NW4SP8A.exe patch or later applied JVM 1.1.7b with JAVA.NLM (dated April 11, 2000 or later) available in JVM.EXE shipping on the ZENworks For Desktops Companion CD (install after patch) ORB.EXE shipping on the Companion CD- install after support pack IP protocol stack and available on the servers |
|
NetWare 5.0 |
NW5SP5.exe patch or later applied IP protocol stack bound and available on the servers |
|
NetWare 5.1 |
NW51SP1.exe patch or later applied IP protocol stack bound and available on the servers |
|
Windows NT server |
NDS Corporate Edition of NDS eDirectory IP protocol stack bound and available on the servers |
|
Windows 2000 server |
NDS eDirectory on Windows 2000 update |
Client Hardware
The following table shows the client hardware requirements.
|
Resource
|
Minimum Disk Space
|
Minimum Hardware Requirements
|
|
User workstation with complete ZENworks install |
5 MB |
Pentium processor, 75 MHz, 16 MB of RAM |
|
User workstation with ZENworkds remote management installed |
2 MB |
Disk space on drive where workstation operating system is installed |
Client Software
The following table shows the client software requirements.
|
Platform
|
Minimum Software Requirement
|
|
Window 95/98 |
Novell Client version 3.3 or later |
|
Windows NT/2000 |
Novell Client version 4.8 or later |
Pre-Installation Check List
The following is the pre-installation check list:
Authenticate to the network as admin or equivalent
Check that no JAVA Runtime Environments are running on NDS for NT servers
Authenticate into servers to which you want to install ZENworks
Make sure JAVA applets aren't running on NetWare servers (Java -exit)
Make sure no programs are running from SYS:\Public
Quit any unnecessary applications running on the workstation you're using
Set your resolution to at least 800 x 600 for ConsoleOne
Be certain you have two good backups of the NDS tree and servers
Installation Process
-
Login into the tree you want ZENworks installed on. You do not want to mistakenly install on another server or tree, as the installation will make NDS schema changes.
-
Launch the Winsetup.exe on the ZENworks CD. You will have only one option; select English as your language and continue.
-
Next, you will have four options. You can read the documentation at your leisure. For now, choose Install ZENworks (see Figure 1).
WinSetup for ZENworks for Desktops.

-
The Novell Installation screen, which shows recommendations and legal stuff. Click Next.
-
Next, is the license agreement. Click Accept.
-
The following page will list the Install Prerequisites. Select Accept.
-
Next you are asked to select a ZENworks install type. You are doing a very basic installation, so select Typical (see Figure 2).
ZENworks Install Types.

-
The following screen will list NDS tree's that are logged in on the install workstation. Select your tree and then select Next.
-
Servers are next in the process. The next screen will show a list of servers the install workstation has authenticated into. Select the server that the installation will install files onto. After that select Next.
-
Now it's decision time. The next screen will show the server you selected or do not install database. This where you decide if you want to utilize the inventory database or not. I'm going to use it. Select Next.
-
Depending if you selected to use the database or not. The next decision is to put the database on what volume. I recommend installing on a volume other then SYS (see Figure 3). Select Next.
Inventory Database Volume Selection.

-
A little box will pop-up reminding you of components that load on your file server. Don't be alarmed select OK.
-
Select English as your language. Select Next.
-
Next you need to decide if you want to use workstation removal/import, import, removal or none (don't use neither). See Figure 4. I'm going to use removal/import.
Automatic Workstation Import Management.

-
Next you are introduced to Inventory Server Roles. Each role has their own job to do when collecting inventory data (see Figure 5). If you want to know more depth of each role go to: http://www.novell.com/documentation/lg/zfd3/docui/index.htm and select deployment. For now I will select standalone. My server will only be the only server handling attached workstations and is connected to the database. We are asked about placing the Scandir on a volume. This volume will hold the scan data for the workstations. The directory will grow upon implementation, it is recommended to place on a volume other then SYS. I'm going to select my VOL1. Select Next.
Inventory Server Roles.

-
Site location is next. You need to enter a unique site location (3 numeric characters) and site name. The reason is for the inventory databases, if by chance you have remote sites using inventory database you can query an individual database. I will put in 224 for SiteID and Wrkst-DB for the Site Name (see Figure 6). Be sure to make note of what you have put down for each. When selecting Next you be reminded about not using the same SiteID. Select OK.
Site ID for Database.

-
The following screen will show an Install Summary. Select Finish. Sit back and watch the fireworks. You might get file date conflicts. I always select never overwrite newer.
Check Your Work
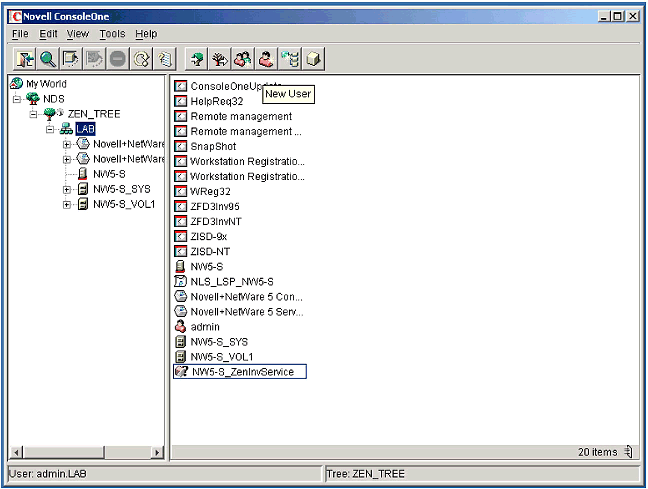
Launch Console One (see Figure 7). You will notice the application objects that it created and also how the schema has been extended for ZENworks.
Novell ConsoleOne.
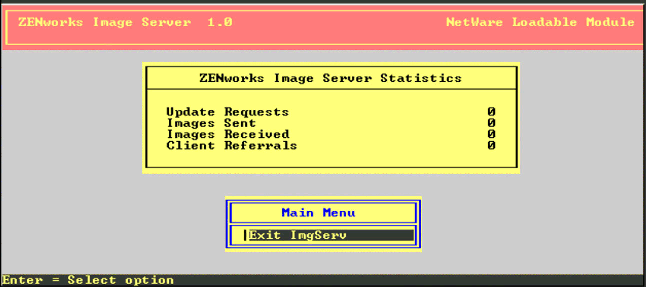
Check the server console. This is the console screen for the ZENworks Image Server (see Figure 8). This will give you a count of images going out and coming in.
Console screen for ZENworks Image Server.
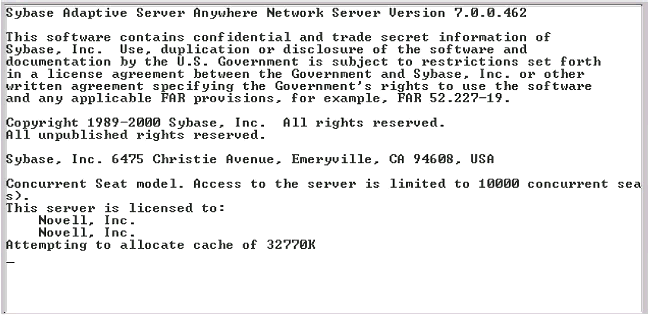
This is the inventory database screen (see Figure 9). This console screen tells you that the database is loaded and ready to go.
Console screen.
Conclusion
In this article, we've discussed the enhancements to ZENworks for Desktops 3. Along that line, we pointed out the requirements for installation. Then the installation process.
In the end, the key to working with ZEN is having a suitable test environment. Being able to play around with each aspect of the product would be a benefit in the long run. From testing you can decide how and where processes would be setup. Having a set plan before you upgrade or implement can also make the experience more manageable.
Just remember the philosophy behind it all: Zero Effort Networking.
* Originally published in Novell AppNotes
Disclaimer
The origin of this information may be internal or external to Novell. While Novell makes all reasonable efforts to verify this information, Novell does not make explicit or implied claims to its validity.