Moving Novell's Legacy Print Services Between Volumes and Servers
Articles and Tips: article
Senior Consultant
DreamLAN Network Consulting, Ltd.
peter@dreamlan.com
01 Sep 2001
This AppNote explains how to move Novell's legacy (queue-based) print services from one NetWare server to another, or move the print queues located on one NetWare volume to another, without having to re-create the associated printing objects in the Novell Directory Services (NDS) environment. The discussion starts with an overview of the internal workings of NetWare's legacy print services. It then outlines the procedures for moving Novell's legacy print services to another volume on the same server, and to another server. Finally, the AppNote presents some tools that can manipulate the various print service-related objects to facilitate the moving of printing services.
- Introduction Introduction
- Overview of Queue-Based Network Printing Overview of Queue-Based Network Printing
- Moving Novell's Queue-Based Print Services Moving Novell's Legacy Queue-Based Print Services
- Tools of the Trade Tools of the Trade
- Summary Summary
|
Topics |
network management, printing, server consolidation |
|
Products |
NetWare |
|
Audience |
network administrators, consultants, integrators |
|
Level |
intermediate |
|
Prerequisite Skills |
familiarity with NetWare print services |
|
Operating System |
NetWare 4.x, 5.x |
|
Tools |
PCONSOLE, ConsoleOne, HostDev, HostEditor, NDSPIE |
|
Sample Code |
no |
Introduction
As powerful server-class hardware becomes more affordable, it is common to consolidate two or more NetWare servers into one to simplify server management. Often, these file servers host NetWare print services. Since the Novell queue-based print services are somewhat server-centric (given their roots in the pre-NetWare 4 days), certain NDS attribute changes are required to effect the moving of legacy print services from one server to another. Unfortunately, not all of these NDS attributes are directly available for editing through the standard print management utilities, such as PCONSOLE or NetWare Administrator (NWAdmin); one must use either ConsoleOne or custom tools. Then there is the question of which NDS attributes need to be changed.
The focus of this AppNote is to first identify the NDS attributes that must be updated when you move legacy print services from one server to another, or from one volume to another. Next we outline the basic procedures for making the move. We then present a few utilities (from Novell and from third-party vendors) that can help you to easily implement the necessary changes to these NDS attributes.
Overview of Queue-Based Network Printing
To understand why only certain NDS attributes in the print services- related objects, such as Print Queue and Print Server, need to be changed, you need an insight into the internal workings of Novell's legacy print services.
The architecture of Novell's legacy queue-based print services is based on three components: printers, print queues, and print servers. To set up queue-based printing in an NDS environment, you first create these objects in NDS, using PCONSOLE or NWAdmin. You then link them together to establish their relationships: a print queue is serviced by a printer, and a printer is associated with a print server. Figure 1 shows how these printing components work together.
Note: The Print Services Quick Setup feature in NWAdmin and the Quick Setup option in PCONSOLE automatically create the necessary printing objects with default settings and assignments.
Relationship between the legacy print services components.
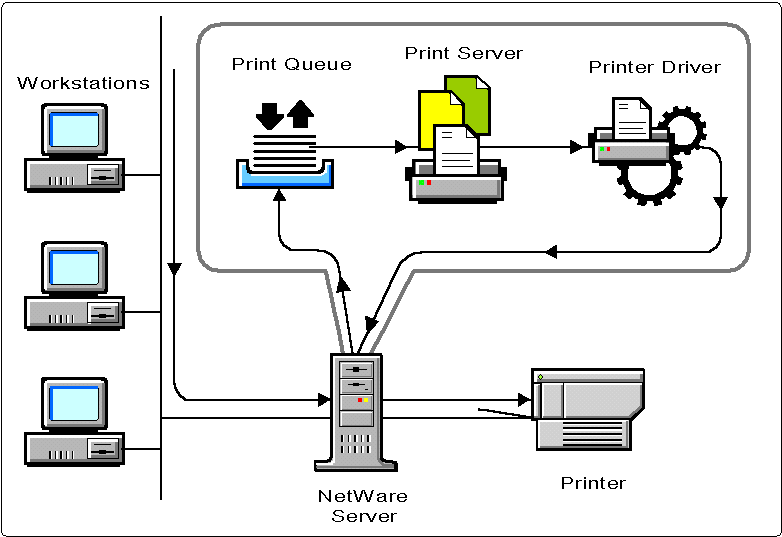
Print Queues and Their Spool Directories
When a user selects the option to print a document within a word processing program or other application, a print job is created. A print job is simply a file that is sent to a print queue. The print queue is nothing more than a directory where the print job is stored until it is serviced by a print server. As soon as a print server has successfully sent the file to the printer, the print job is deleted from the queue directory.
Each print job is assigned a filename consisting of a variation of the first four digits of the print queue directory ID, four more numerals, and a .Q extension. In NetWare 4 and higher, the four-digit print queue directory ID in the filename is byte-swapped; for example, if the ID is 79030003, the four digits used in the print job filename are 0379.
When a print queue is created, either through NWAdmin or the PCONSOLE utility, a corresponding subdirectory is created under the QUEUES directory on the volume of your choosing on the file server where the print queue resides. The NetWare operating system uses this directory (commonly referred to as the spool directory) to hold the print job files that are waiting to be printed. The SYS volume is used by default, but you can select any other volume on the server.
Note: It is generally a good idea to place the print queues on a volume other than SYS. If the SYS volume runs out of disk space, NDS can become non-functional.
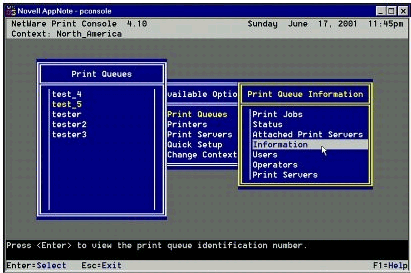
When you examine the QUEUES directory, you'll see print queue directory names such as AC010015.QDR or 0400000B.QDR. The directory name corresponds to the Object ID number you can see when you select the "Information" option for a print queue in the PCONSOLE utility (see Figure 2).
Viewing the Print Queue ID through PCONSOLE's "Information" option.
Note that in the directory name, the Object ID is high-low word- and byte-swapped. For example, if the Object ID is 03000379, the directory name is 79030003.QDR.
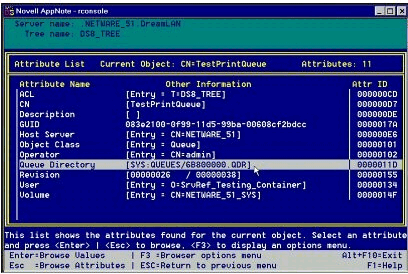
Note: For NetWare 5 where PCONSOLE is not included with the OS, you can use DSBROWSE.NLM to view the Object ID (see Figure 3).
Viewing the Print Queue Object ID through DSBrowse.
The following is an example of what you might see when you look into a print queue directory containing print jobs waiting to be printed. In this case, the directory name is 79030003.QDR.
G:\QUEUES\79030003.QDR>NDIR
Files            = Files contained in this path
Size             = Number of bytes in the file
Last Update      = Date file was last updated
Owner            = ID of user who created or copied the file

SATURN_1/SYS:QUEUES\79030003.QDR\*.*
Files                      Size Last Update     Owner
----------------- ------------- --------------- -------------------------
03790001.Q              141,454  5/16/01  9:52p admin
03790002.Q              141,454  5/16/01  9:55p admin
Q_0379.SRV                    0  5/16/01  9:52p SATURN_1.SolarSystem
Q_0379.SYS                  840  5/16/01  9:55p SATURN_1.SolarSystem

       283,748  bytes (when the files are not compressed)
        67,072  bytes (disk space used by compressed and non-compressed files)
            4  Files
The print job filenames include part of the queue ID and end with a number according to the order in which they are received; using PCONSOLE or NWAdmin to change the print sequence does not change the print job filenames. When the print services finish sending a print job to the printer, the print job is deleted from the queue and the file is immediately deleted from the queue directory.
Note: Although a printed job's file is deleted, the file is not automatically purged from the volume. Therefore, it is possible to salvage a print job and reprint it by submitting that file to the queue again. However, simply undeleting a printed job's file in the queue directory will not make it show up as an available print job in the queue. This is because some required control information would be missing (see the discussion about the .SYS file below). By the same token, if you are printing sensitive documents, it is advisable to flag your print queue directories as "Purge" so printed jobs are not salvagable.
As a job is removed from the queue, that print job number is freed up and is reused by the next print job submitted to the queue. So when job 03790001.Q is finished printing, the next print job placed in the queue will also be named 03790001.Q.
The last two files have .SRV and .SYS extensions; they are flagged as Hidden and are maintained by the NetWare server. The .SRV file contains information about the print servers that are attached to the directory's queue. If no print server is currently attached to the queue, the file is zero bytes in size.
The .SYS file is specifically for Novell's Queue Management Services (QMS), the engine behind the queue-based print services. The file contains information the server needs to maintain queues. All queues have this information, which includes the station that sent the job, the user's ID number, the print job file names, when the jobs were entered in the queue, when they are to print, and a record area for information (such as banner and number of copies) specified via CAPTURE.EXE or in the client's Default Capture properties. This type of information is stored for all print jobs files in the directory, and is updated as new print jobs are added and old ones are deleted.
The location of the spool directory of a given print queue is stored in the Print Queue object in NDS using the following attributes:
Host Server - the NDS object representing the server on which the volume resides (for example, SATURN_1.SolarSystem)
Queue Directory - the volume and directory names (for example, VOL2:QUEUES\79030003.QDR)
Volume - the name of the NDS Volume object (for example, SATURN_1_VOL2.SolarSystem)
Also stored in the Print Queue's NDS attributes are the NDS object names of the print queue operator (attribute name Operator) and print queue users (attribute name User) for this print queue.
Print Servers
A print server is a server that takes print jobs out of a print queue and sends them to a network printer. NetWare print servers can run as a NetWare Loadable Module (PSERVER.NLM) on a NetWare server, or the PSERVER logic can be embedded directly in the hardware inside the printer (for example, the JetDirect cards for HP printers). On NetWare 4 and higher, PSERVER NLM can support up to 255 printers and can service any number of print queues assigned to the printers.
When you create a print server through PCONSOLE or NWAdmin, NetWare creates a corresponding directory under the SYS:SYSTEM directory. Like print queue directories, print server directory names are a combination of numbers and letters, such as 7A03001B. The directory name corresponds to the Object ID number you see when you select the "Print Server ID" option from PCONSOLE's "Print Server Information" menu.
In the NDS environment, there are no files in these print server directories; they are created to be backwards compatible with bindery-based printing. All print server-related configuration information, such as associated printers and notification settings, is stored in NDS.
Among the various Print Server object attributes, there is one that is server-specific: Host Device. This attribute is used by the print service auditing function (not to be confused with NDS auditing) to specify on which server the audit log file should be created. This log files is always created in the SYS:SYSTEM\xxxxxxx directory on that server. Therefore, when moving print services, the Host Device attribute of Print Server objects should be updated to reflect the change, especially if the old server is being removed from the tree.
Note: Even if you don't enable print service auditing, PSERVER.NLM will always check for the availability of the server specified in the Host Device attribute. To prevent unwanted error messages should the server be unavailable, it is best to ensure that the Host Device is pointing to the server running PSERVER NLM. (This does not apply to dedicated hardware- based print servers such as Intel NetPort or HP JetDirect.)
Printers
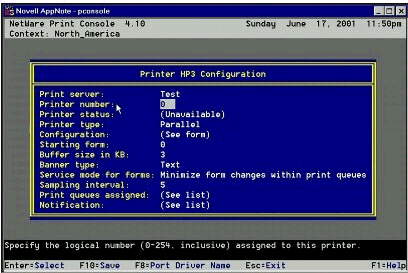
Under NetWare's bindery mode, print configuration data is stored as PRINT.0nn files in the print server directories, where nn is the printer number you assigned when creating the printer using PCONSOLE (see Figure 4).
Viewing the printer number in PCONSOLE.
In NDS mode, each printer's configuration information is stored in the Printer object in NDS. No files are created in the print server directories. Since a Printer object contains only information relevant to the printer and makes no reference to server or volume information, no changes to the Printer objects are needed when you move legacy print services from one volume to another, or from one server to another.
Printer Drivers
Although not part of the Novell queue-based print services architecture, every application requires a printer driver to process a print job for correct formatting and output on the printer. Printer drivers are usually installed locally on each workstation; sometimes they are embedded as part of the workstation application.
No changes are required of the printer drivers themselves when you move Novell legacy print services from one volume to another, or from one server to another.
Windows Registry Entries
The introduction of Windows workstations where configuration information is stored in the local registry adds one more piece to the printing puzzle. On the Windows 95/98 platform, Novell's Client 32 software does not track server-specific information that is associated with a network printer (print queue). However, on Windows NT/2000 (Client 32 v4.5 and higher), Client 32 keeps track of information for each network printer using the following registry keys under HKEY_LOCAL_MACHINE:
SOFTWARE \ Novell \ Print \ NDSConnections \ Tree_Name \ Queue_Name
SOFTWARE \ Novell \ Print \ NDSConnections \ Tree_Name \ Queue_Name.Context
As an example, for the print queue named MoonBase in the ALPHA_QUADRANT tree, the keys are:
SOFTWARE \ Novell \ Print \ NDSConnections \ ALPHA_QUADRANT \ MoonBase
SOFTWARE \ Novell \ Print \ NDSConnections \ ALPHA_QUADRANT \ MoonBase.SolarSystem
If the server is IP-based, the following key values and data are associated with the first key:
DirectoryContext = context where print queue exists (for example, SolarSystem)
HostAddress = address in Port:Address format (for example, 020c894157c1 where 020c indicates Port 524 and 894157c1 is IP address 137.65.87.193)
HostAddresstype = transport type (0x00000009 for IP)
HostServer = fully distinguished name for the server holding the queue directory (for example, SATURN_1.SolarSystem)
A similar set of key values is associated with the second key (except for the DirectoryContext value, as that is part of the key name).
If the server is IPX-based, the key values and data for the first key are:
DirectoryContext = context where print queue exists (for example, SolarSystem)
HostAddress = address in NetAddress:Node:Socket format (for example, 123456780000000000010451 where 12345678 is the Network Address, 0000000000001 is the Node Address, and 0451 is the socket address)
HostAddresstype = transport type (0x00000001 for IPX)
HostServer = fully distinguished name for the server holding the queue directory (for example, SATURN_1.SolarSystem)
Similarly, the same set of data is associated with the second key, except for the DirectoryContext value.
The newer versions of Client 32 are less dependent on these keys, because they poll NDS more often for updated information. However, you may encounter a situation where you can print successfully, but when attempting to open the print queue under Start | Settings | Printers | Print_Queue_Name you receive a "Failed to open, retrying" error in the title bar of the queue window. This indicates that some of these subkeys are missing or there is a mismatch in the data for the keys.
If you are using CAPTURE in the login script to associate print queues with LPT ports, none of the above keys will be created in the registry, even on Windows NT/2000 machines.
Printing from a Workstation to a Network-Attached Printer
To get a clearer understanding of how the whole NetWare printing process works (and thus get a better idea of what NDS attributes need changing when moving print services), let's follow a print job on its journey from its creation in an application to its appearance as a final printout at the network printer.
When you choose the print option from within an application, the software first creates a file out of the print job. This file is temporarily stored at the workstation, either in memory or on a local disk, and is submitted for printing at a later time. Or, the application might bypass this step and send the data directly to the print services. The Client 32 software redirects print jobs from the workstation to the proper print queue, and therefore to the printer servicing the queue.
Client 32 first does an NDS lookup on the print queue to determine the server on which the print queue is located. It does so by reading the Host Server attribute from the Print Queue object. (Some versions of Client 32 will instead use the Windows registry key values for the server information, as discussed in the previous section.)
Client 32 then converts the application request for print services to a NetWare print service call. This NetWare Core Protocol (NCP) "Create Queue Job and File" call opens a queue job on the target server and gives the job a file handle in the queue directory that stores the file. QMS determines the queue directory by reading the Volume and Queue Directory attributes of the Print Queue object. Client 32 then sends the print job to that file handle.
When the application finishes sending the print job data, Client 32 sends the "Close File and Start Queue Job" call. QMS interprets this to mean, "This print job is ready to be printed." The print job is flagged as "Ready," allowing the print server to service the job.
The print server polls print queues at regular intervals (PSERVER NLM does this every 15 seconds) to see if there is a job flagged "Ready" for printing. If the print queue has been busy and the print server just finished one of its print jobs, the print server immediately checks the queue for another job that is ready to print. When the print server picks up the next queued job, it gets the file handle of the file that has the actual data and checks the printer to see if it is ready to receive data. If the printer is ready, the print server streams the print job to the printer until the whole file is sent.
The print server then polls the print queue for the next job that is flagged "Ready," and the whole process repeats itself.
Moving Novell's Queue-Based Print Services
In the previous sections you learned about the location-specific dependencies in Novell's legacy queue-based print services. These dependencies are summarized in the table below.
|
Item
|
Dependencies
|
|
Print Queue object |
Host Server (server-specific) Queue Directory (not server-specific but volume-dependent) Volume (not server-specific but volume-dependent) |
|
Print Server object |
Host Device (server-specific) |
|
Windows Registry keys |
HKEY_LOCAL_MACHINE | SOFTWARE | Novell | Print | NDSConnections | Tree_Name | Queue_Name HKEY_LOCAL_MACHINE | SOFTWARE | Novell | Print | NDSConnections | Tree_Name | Queue_Name.Context HostServer (server-specific) HostAddress (server-specific) HostAddresstype (server-specific) |
Depending on whether you are moving the print services between volumes or between servers, some or all of the above settings need to be updated.
Moving Print Services to Another Volume on the Same Server
The procedure for moving legacy print services from one NetWare volume to another is fairly straightforward. The print queue's spool directory needs to be physically moved and the corresponding NDS attributes updated. The steps are as follows.
Determine the Object ID of the print queue you want to move. This can be accomplished using PCONSOLE, DSVIEW.NLM, or DSBROWSE.NLM. This will give you the name of the corresponding .QDR directory name located under the volume:QUEUES directory.
On the NetWare volume to which you are moving the print queue, create a QUEUES directory (if it doesn't already exist) directly under the root, and then create the .QDR directory under that, using the name determined in the previous step.
Update the Print Queue object's Queue Directory and Volume attributes with the name of the new volume.
Restart any print servers (PSERVER.NLM or dedicated hardware-based print servers) so the new volume information will be used.
Restart all Windows workstations, as they may cache the volume information in memory. No changes to the Windows registry are necessary.
You can perform the above steps "on the fly," without taking the server down or having to first log users out of the network. However, it is best to do this when no print jobs are pending in the queue.
Troubleshooting
.If printing does not work after the change, you can troubleshoot as follows. First, submit a job to the queue and use PCONSOLE or NWAdmin to see if it shows up in the queue. If you don't have PCONSOLE or NWAdmin handy, check the QUEUES\ xxxxxxxx.QDR directory to see if any .Q files are being created. If you see the jobs, that means the new Queue Directory and Volume values are correct and are in effect. Otherwise, restart the workstation you are using to ensure it is using the new information and not old settings that may have been cached in RAM.
If the jobs are being created in the new spooling area but are not making it to the printer, the most likely cause is that the print server for the queue is still looking in the old location and not the new directory. Restart the print server.
Moving Print Services to Another Server
The procedure for moving legacy print services from one NetWare server to another is a little more involved. The steps are as follows.
Determine the Object ID of the print queue you want to move. This can be accomplished using PCONSOLE, DSVIEW.NLM, or DSBROWSE.NLM. This will give you the name of the corresponding .QDR directory name located under the volume:QUEUES directory.
On the NetWare volume to which you are moving the print queue, create a QUEUES directory (if it doesn't already exist) directly under the root, and then create the .QDR directory under that, using the name determined in the previous step.
Update the Print Queue object's Queue Directory and Volume attributes with the name of the new volume.
Update the Print Queue object's Host Server attribute with the name of the new server.
Update the Print Server object's Host Device attribute with the name of the new server.
Restart any print servers (PSERVER.NLM or dedicated hardware-based print servers) so the new server and volume information will be used.
For Windows NT/2000 machines, update the HostServer, HostAddress, and HostAddresstype key values of the two Registry keys discussed above.
Restart all Windows workstations, as they may cache the volume and server information in memory.
These steps are best performed when no print jobs are pending in the queue and when users are logged out of the network (so they are not submitting new jobs).
Troubleshooting
.The troubleshooting process here is similar to the case of moving print queues between volumes, but with the added complexity of also having workstations in the equation.
Tools of the Trade
This section presents some of the utilities available from Novell and third-party developers that can help you accomplish the necessary NDS attribute changes to facilitate the moving of print services.
HostDev: Host Device Change Utility
HostDev is a Novell-developed utility that allows the Host Device attribute of a Print Server object to be changed without having to delete the Print Server object and recreate it.
Written in AppWare, HostDev requires VLM version 1.20 or greater and Windows 3.1 and higher. Although specifically written for the Windows 3.x environment, HostDev runs under Windows 95/98 and NT. Follow these steps to install HostDev:
Download HOSTDEV.EXE from http://download.novell.com/Download?buildid=jWVvEhflRSc~.
Extract the contents of this file into a desired directory.
Copy BWCC.DLL to the WINDOWS\SYSTEM directory (unless a copy already exists), if you want to run the program from other than that directory.
The following are instructions for using the Host Device Change Utility:
Log in to NDS as Admin (or another user with sufficient rights to modify objects in the tree).
Start the Host Device Change utility.
Browse the tree to select the Print Server object which requires a change, and then click on the Change Host Device button (see Figure 5).
Selecting the Print Server object in the Host Device Change utility.
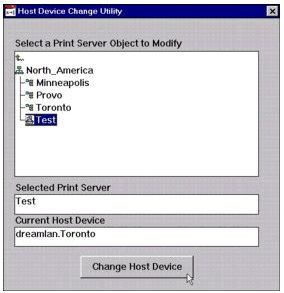
Browse the tree again and select the file server you want to use as the new Host Device.
Click on the Modify button.
Repeat steps 3 through 5 as necessary until you have modified all Print Server objects to have the desired server as the Host Device.
Novell provides HostDev free of charge as a courtesy to users; therefore, it is not a Novell-supported product.
ConsoleOne
You can download the latest version of Novell's ConsoleOne utility from http://www.novell.com/download. Although ConsoleOne is shipped with NetWare 5.0 and higher, you can download and use it with NetWare 4.x as well.
Through ConsoleOne, you can edit the attributes of any objects in your NDS tree (with the exception of streams-based attributes). If the attribute you want to edit is not available from one of the custom property pages, simply use the Other page, as shown in Figure 6.
Locating the print services-related attributes in ConsoleOne.
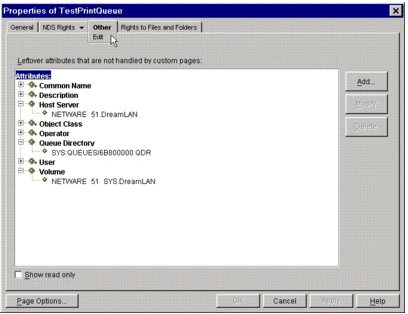
From this page, you can edit the Host Device attribute of Print Server objects, as well as the Host Server, Volume, and Queue Directory attributes of Print Queue objects.
The following steps outline how to change the Queue Directory attribute of a Print Queue object.
Log in to NDS as Admin (or another user with sufficient rights to modify objects in the tree.)
Start ConsoleOne; you can run it either on your workstation or on the NetWare 5 server console.
Browse the tree and select the Print Queue object which requires a change.
Double-click the object to display its properties.
Click the Other tab at the top of the screen.
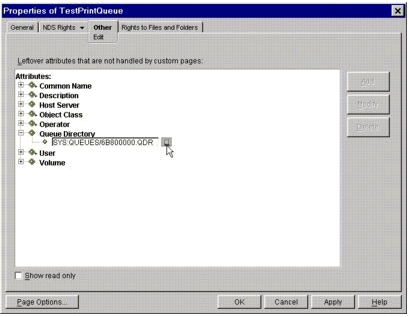
Double-click on "Queue Directory" to display the current setting.
Select the displayed value and click on the Modify button, or simply double-click on the displayed value, and enter the new queue directory location in the edit box (see Figure 7).
Changing the Queue Directory setting in ConsoleOne.
Click on the Apply button to save your change.
Repeat steps 3 through 8 as necessary until you have modified all Print Queue objects to have the desired values for the Queue Directory setting.
The procedures for updating the Host Device of Print Server objects and the Host Server and Volume attributes of Print Queue objects are similar to the above. However, for these attributes you can also click on the browse button to select the target object, instead of manually entering the fully distinguished name of the target object.
HostEditor
The HostEditor utility can make the changes to host/volume-related attributes for the following object types:
Host Device attribute value of Print Server objects
Host Device attribute value of Directory Map objects
Host Server, Volume, and Queue Directory attribute values of Print Queue objects
Host Device attribute value of Volume objects
You can download HostEditor from http://www.dreamlan.com/ hostedit.htm. HostEditor has several advantages over ConsoleOne:
HostEditor's browse function displays only objects of relevance. For example, when browsing for Server objects, those are the only ones that will be displayed. With ConsoleOne, on the other hand, you see all object types while browsing. If you specify an object of the wrong object type for one of these NDS attributes, you will have a non-functional print configuration.
Unlike ConsoleOne, which is written in Java, HostEditor is developed using C and is therefore extremely small and fast. In fact, HostEditor is less than 0.5 MB in size!
HostEditor comes with a MAKE-QDR utility to facilitate batch creation of .QDR directories on the new volume.
The following steps illustrate how simple it is to use HostEditor to change the Host Server, Volume, and Queue Directory attributes of a Print Queue object.
Log in to NDS as Admin (or another user with sufficient rights to modify objects in the tree.)
Launch HostEditor.
Select the object class you want to modify from the pull-down list.
Browse the tree and select the Print Queue object which requires a change.
Click on the Select button to display the current Host Server, Volume, and Queue Directory settings (see Figure 8).
Changing the NDS attributes of a Print Queue object using HostEditor.
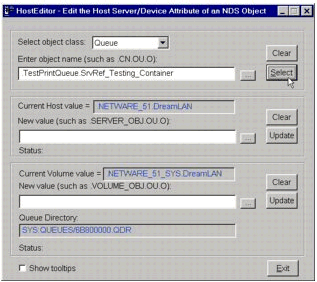
Use the browse (. . .) button in the Host section to browse the tree again and select the file server you want to use as the new Host Server.
Click the Update button in the Host section to change the value.
Use the browse (. . .) button in the Volume section to browse the tree and select the Volume which will host the queue.
Click the Update button in the Volume section to change the value. The volume information in the Queue Directory is automatically updated as well.
NDSPIE: NDS Printing Import Export Utility
All the utilities discussed above were designed to modify one object at a time. This makes them rather inefficient when you have a large number of print queues and print servers to modify. The NDS Printing Import Export (NDSPIE) utility is a GUI-based tool that addresses this shortfall by having a batch processing mode.
You can download NDSPIE from http://www.dreamlan.com/ ndspie.htm.
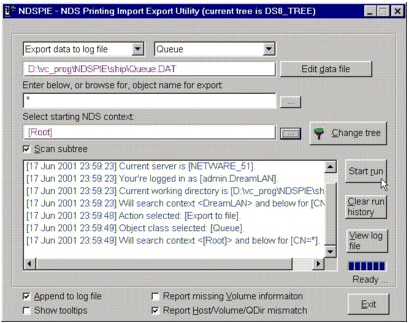
Using NDSPIE, you first export the necessary NDS attributes from one or more Print Queue or Print Server objects to a text file. You can select the objects by name using wildcards and starting NDS context (see Figure 9).
Using wildcards and a starting NDS context to select multiple objects in NDSPIE.
You edit the text file with the new settings and then update NDS using this modified data file.
The following procedure illustrates how you can use NDSPIE to change the Host Server, Volume, and Queue Directory attributes of all the Print Queue objects in your tree.
Log in to NDS as Admin (or another user with sufficient rights to modify objects in the tree.)
Launch NDSPIE.
At the top of the screen, select "Export data to log file" as the action and "Queue" as the object class.
Click on the displayed default filename to choose a new one, if you want to use a different one.
Leave the object name as wildcard (" * "), or click the browse icon to select a specific object.
Browse the tree and select the starting NDS context. Ensure that the Scan subtree box is checked.
Click on the Start run button to export the data to the selected text file.
Edit the resulting log file and update it with the new attribute values; you need to change the values for the Host Server and Volume attributes as well as the volume name portion of the Queue Directory values. (You can click on the "Edit data file" button to launch NotePad to edit this file from within NDSPIE.)
Change the action from "Export data to log file" to "Import changes to NDS".
Click on "[Select input file]" to browse for your data file.
Click on the Start run button to import the data into NDS.
Similar to HostEditor, NDSPIE is able to make changes to Print Server, Print Queue, Directory Map, and Volume objects.
Summary
This AppNote has outlined how to move Novell's legacy queue- based print services from one NetWare server to another, or move the print queues located on one NetWare volume to another without having to re-create the associated printing objects in the NDS environment.
For more information about Novell's network printing solutions, see http://www.novell.com/products/printing.
* Originally published in Novell AppNotes
Disclaimer
The origin of this information may be internal or external to Novell. While Novell makes all reasonable efforts to verify this information, Novell does not make explicit or implied claims to its validity.