Troubleshooting the Novell BorderManager 3.6 VPN Client
Articles and Tips: article
Support Engineer
Novell Technical Support
ncashell@novell.com
Caterina Luppi
Networking and Security Consultant
Novell Support Connection Volunteer
caterina@wirediguana.com
01 Sep 2001
This AppNote presents information, tools, and procedures that will help you understand and troubleshoot problems with the Novell BorderManager 3.6 Virtual Private Networking (VPN) Client.
- Introduction Introduction
- IPsec and NAT: General Concepts IPsec and NAT: General Concepts
- VPN Client Solutions through NAT VPN Client Solutions through NAT
- Protocol-Specific Changes Protocol-Specific Changes
- Troubleshooting Tools and Steps Troubleshooting Tools and Steps
- Conclusion Conclusion
|
Topics |
BorderManager, Virtual Private Networks, Network Address Translation (NAT), remote access, troubleshooting |
|
Products |
BorderManager 3.6 |
|
Audience |
network administrators, support personnel |
|
Level |
advanced |
|
Prerequisite Skills |
familiarity with remote access through VPN |
|
Operating System |
NetWare |
|
Tools |
TCPCON, VPNSTATS, DSTRACE, NWAdmin, others |
|
Sample Code |
no |
Introduction
This AppNote will cover general concepts that are important to understand when working with Novell BorderManager 3.6's Virtual Private Networking (VPN) Client. It documents useful tips and tools required to troubleshoot problems with the BorderManager VPN Client, specifically when used in conjunction with Network Address Translation (NAT).
IPsec and NAT: General Concepts
It is not the aim of this AppNote to discuss every technical aspect of IPsec and NAT in depth. However, it is worth clarifying some general concepts that are needed to understand IPsec issues through NAT.
Network Address Translation (NAT)
NAT was invented initially to overcome the shortage of IP addresses that could be officially assigned by the Internet Assigned Numbers Authority (IANA). Thanks to NAT, multiple devices with private or illegal address ranges can communicate on the Internet by using one single officially-registered IP address.
When the device that is performing NAT receives a packet directed to the Internet, it translates the source IP address into an officially-registered IP address, and then forwards the packet to the destination. When it receives an incoming packet, it translates the destination registered IP address into the internal IP address, and then forwards it to the real recipient. When NAT translates TCP packets, it also changes the checksum to make it compatible with the modified IP address.
According to its original specifications (RFC 1631), NAT should only translate TCP and UDP packets. It should not work for protocols, such as FTP, that contain IP addresses within the data field of the packet. Most vendors have now extended NAT features to allow the ICMP protocol and several other protocols containing IP addresses in the data portion of the packet.
For a more detailed description of NAT and Novell's implementation of this technology, see the article entitled "Network Address Translator (NAT) Theory and Troubleshooting" in the March 1998 issue of Novell AppNotes (http://support.novell.com/techcenter/articles/ana19980304.html).
The IP Security Architecture (IPsec)
IPsec stands for "IP security architecture." The last word, "architecture," is important to remember; IPsec is not a protocol by itself, but is rather a framework of protocols. Its components work together to provide the state-of-the-art secure transport of data over an unsecure network. The IPsec specifications regulate how these different protocols interact.
Some essential concepts used in IPsec are Security Associations, Tunneling mode, and Transport mode.
Security Association (SA) is a parameter used to identify the IPsec connection between two systems. The value of the SA depends on different parameters, including the destination IP address and the Security protocol (AH or ESP, see below).
Tunneling is a technique in which one packet is wrapped into a new IP header. In general, tunneling is used to carry traffic of one protocol over a network that doesn't support that protocol. A typical example is the encapsulation of IPX packets into IP packets to route them over the Internet or across a WAN link.
In Tunneling mode, the IPsec packet is encapsulated within a standard TCP or UDP packet, increasing the security of the connection. Tunneling can be used only when there is a gateway at either end of a Security Association (as in the case of the site-to-site BorderManager VPN). This is because the gateway must take care of removing the external IP header, retrieving the original packet, and sending it to the final destination.
In Transport mode, the header of the encryption packet (AH or ESP) is inserted right after the IP header. Therefore, it is neither encrypted nor authenticated. Transport mode is only used by hosts, not by gateways. Gateways aren't even required to support the transport mode.
The three main protocols constituting IPsec are: the Authentication Header (AH), the Encapsulating Security Payload (ESP), and the protocol for the exchange of the encryption keys. IPsec regulates how these different protocols and procedures operate together.
The Authentication Header (AH) is used to provide authentication and integrity of the IP packets. AH is identified by the protocol number 51. One part of the AH header is used for the Integrity Check Value (ICV) of the packet. This is a number calculated with an algorithm specified in the SA. When a packet crosses a device performing NAT, the Integrity Check fails and the packet is discarded. The AH protocol can be used in both transport mode and tunnel mode.
The Encapsulating Security Payload (ESP) provides integrity checking, authentication, and encryption for the IP packet. The SA determines what options are enabled. Authentication and integrity checking always work together, while encryption can be enabled independently from the other options. These services are all connectionless, and therefore operate on a per-packet basis. ESP is identified by the protocol number 50. The ESP protocol can be used in both transport and tunnel mode.
Note that ESP seems to do everything AH does and more, because it also encrypts the data. The main difference between ESP and AH is that ESP doesn't encrypt the IP header of the packet; therefore, it is less secure. Maintaining two encryption protocols instead of one allows more flexibility and control of the security.
The number of possible permutations with encryption protocols, modes, security options, and so on, is regulated by the SA. The IPsec standard also identifies the need for a protocol to automatically negotiate the SA and generate the cryptographic keys.
In the early days of IPsec, two protocols were identified for this role: the Simple Key Management for Internet Protocols (SKIP) and the Internet Key Exchange (IKE) protocol, also known as ISAKMP/Oakley. The BorderManager VPN was engineered before the IETF identified the IKE protocol as the standard framework to manage the security associations and encryption keys for IPsec. Therefore, BorderManager VPN uses only the SKIP protocol.
VPN Client Solutions through NAT
The standards-based VPN solution using IPSec is widely used today for secure remote access. However, there is an issue when this standard VPN is implemented over NAT.
Standard VPN Over NAT Issue
Most remote users come through an Internet Service Provider or ISP, using dial-up, ISDN, DSL, or Cable Modem for access. Some of the ISPs that provide high-speed Internet access assign a private IP address to incoming users, and use NAT to handle their traffic to the Internet. These so-called "traditional" NATs can only understand TCP and UDP (where the protocol-id in the IP header matches to any of the above protocols).
The IP header protocol-id for BorderManager's VPN traffic based on SKIP is specified as SKIP (57). The traditional dynamic NATs that sit between the Tunnel end-points translating TCP and UDP traffic cannot understand these protocols and may drop them, or pass them through untranslated. Similarly, if NAT is using static (one-to-one) mapping of private-to-public address, the IPSec authentication fails at the receiving end of the tunnel; the Authentication Header which authenticates the whole packet (including the header) fails because the IP address changes.
One more thing to note here is that, after a successful authentication, remote users are associated to the IP address they are coming from (a "NATed" address if NAT is enabled). This IP address would be used to identify the Security Association. So if many users are coming through the same NAT, this will cause the VPN connection to break for all of those users.
Many draft proposals have been submitted to the IPsec charter of the IETF to try to address this problem, but there doesn't yet appear to be one dominant design. To work around this issue, the BorderManager 3.6 development team came up with a proprietary design that would enable its VPN client traffic to successfully communicate through NAT.
Novell's Solution to the VPN over NAT Issue
The VPN components of BorderManager 3.0 and 3.5 used SKIP and inherited the VPN over NAT problem described above. Since all IPX or IP traffic was tunneled over IP (encapsulation), the end packet IP header looked like this:
IP+SKIP+AH+ESP
where the ESP contained the original IP+DATA or IPX+DATA encrypted.
Furthermore, after the VPN client users logged in and successfully authenticated, the authentication gateway (AUTHGW.NLM) would associate the users with the IP address they were coming in from. In a NAT environment, all users would be coming in with the same IP address. This meant that, when designing a VPN NAT solution, users needed to be differentiated in some other manner.
A typical NAT scenario is depicted in Figure 1.
Typical NAT scenario.
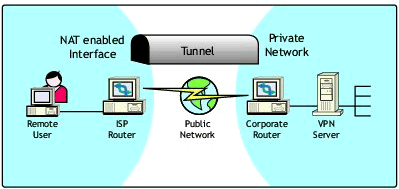
The BorderManager 3.6 VPN Client tunnel was designed to use UDP (Port 2010), which traditional NATs can understand. During the authentication of remote users, the VPN Server auto-detects whether the users are NATed. If so, it will:
Use UDP tunneling at the server side, and
Notify the VPN Client to switch to the UDP tunneling mechanism
The SKIP component was also enhanced to use IP address Name Space with Master-KeyID in the SKIP header being the Client or Server's actual, bound IP address. This meant that the source address lookups performed at the authentication gateway were based on the Client's actual IP address, and not on the NATed address.
Protocol-Specific Changes
This section describes the protocol-specific changes that were made to the BorderManager VPN Client.
Authentication Stage
The BMEE VPN client-to-server authentication protocol is modeled after the NDS client authentication protocol. Basically, the VPN server authentication gateway (AUTHGW.NLM) acts as a proxy on behalf of the client to authenticate to NDS. During the VPN User login phase, this Authentication Gateway can detect whether the user is coming through NAT by doing the following:
The VPN Client (VPNLogin) opens a TCP/IP connection to the VPN server (AUTHGW.NLM) using port 353.
The VPN Login GUI sends an indication that it is a NAT-enabled VPN Client and also send its actual IP address in one of the reserved fields of the AUTH_HEADER packet (see the "Packet Format" section below).
The BorderManager 3.6 Authentication Gateway compares the TCP connection IP address with the IP address specified in the reserved field of AUTH_HEADER packet. If they are different, it informs the VPN Login to switch to UDP-based Tunneling after successful authentication of the user.
Notes:
If the reserved field of the AUTH_HEADER packet is zero, the Authentication Gateway knows that the VPN Client is not NAT-enabled and will not use the encapsulation for the SKIP packets.
The Authentication Gateway module from VPN 3.0 or 3.5 does not look at this field. Therefore it is backwards-compatible.
After the user has successfully authenticated:
The VPN Login module notifies the VPTunnel driver (SYS or VXD, depending on what Windows platform the client is running on) to use either UDP-based Tunneling or SKIP-based on whether the Authentication Gateway is aware of a NAT.
The Authentication Gateway notifies VPNINF about the user's actual IP address (instead of the current NATed IP address the packet came in with), the user's DH public values, and the NAT Enable flag.
Data exchanges between the VPN client and server are transmitted over UDP port 2010.
Packet Format
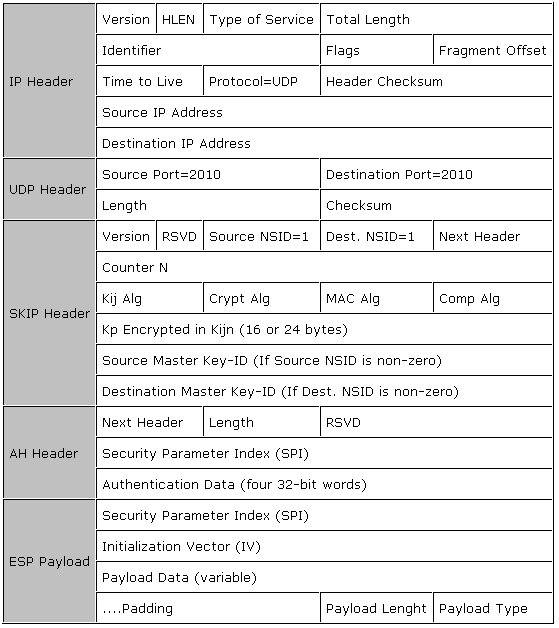
This section describes the packet format used between VPN Clients going through a NAT and the VPN Server. The packet format is detailed in Figure 2.
Packet format for VPN Client communication.
|
IP Header |
Version |
HLEN |
Type of Service |
Total Length |
|
|
Identifier |
Flags |
Fragment Offset |
|||
|
Time to Live |
Protocol=UDP |
Header Checksum |
|||
|
Source IP Address |
|||||
|
Destination IP Address |
|||||
|
UDP Header |
Source Port=2010 |
Destination Port=2010 |
|||
|
Length |
Checksum |
||||
|
SKIP Header |
Version |
RSVD |
Source NSID=1 |
Dest. NSID=1 |
Next Header |
|
Counter N |
|||||
|
Kij Alg |
Crypt Alg |
MAC Alg |
Comp Alg |
||
|
Kp Encrypted in Kijn (16 or 24 bytes) |
|||||
|
Source Master Key-ID (If Source NSID is non-zero) |
|||||
|
Destination Master Key-ID (If Dest. NSID is non-zero) |
|||||
|
AH Header |
Next Header |
Length |
RSVD |
||
|
Security Parameter Index (SPI) |
|||||
|
Authentication Data (four 32-bit words) |
|||||
|
ESP Payload |
Security Parameter Index (SPI) |
||||
|
Initialization Vector (IV) |
|||||
|
Payload Data (variable) |
|||||
|
....Padding |
Payload Lenght |
Payload Type |
The changes for the VPN 3.6 packet format over VPN 3.5 are as follows:
IP Header. The Protocol ID in the IP Header is UDP (17) instead of SKIP (57). This is required for translation at the NAT.
UDP Header. A new UDP header (with source and destination port = 2010) is inserted between the IP and SKIP headers.
SKIP Header. The Source and Destination NSID (name space Identifier) is now 1 instead of 0. This indicates that the IP name space is used and that the key lookup is now based on the Master Key-ID field.
A new 32-bit field for Source and Destination Master Key-ID has been added. This field contains bound source and destination IP addresses respectively (and not the NATed IP address).
Troubleshooting Tools and Steps
This section lists some tools that you can use to troubleshoot the BorderManager 3.x VPN Client. It then outlines the recommended troubleshooting steps for the VPN Client 3.6.
Troubleshooting Tools
There are a number of tools you can use for troubleshooting the borderManager VPN Client 3.x.
Novell VPN Login Screen. This screen (see Figure 3) is useful for verifying at what stage of the login procedure the VPN client is failing.
The Novell BorderManager VPN Client login screen.
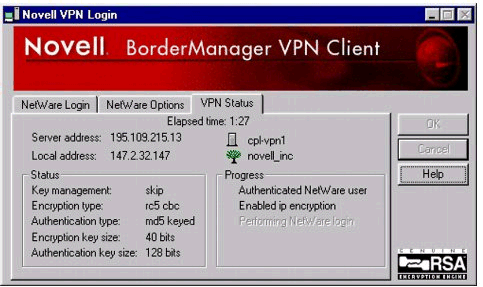
The progress box lets you know where in the authentication process the problem is occurring. You can also verify the negotiated key information.
Network Settings in Control Panel. The Network settings in the Windows Control Panel must be used to verify that:
No IPX protocol is bound to the actual interface of the client (DUN or LAN interface) if the NetWare client was installed with both IPX and IP protocols.
There are no more than four IPX devices in the network properties at the client.
No IP address is bound to this LAN interface if the VPN client is connecting to a modem using DUN and the PC has a NIC enabled with IP bound to it. (Windows will often try to use the NIC IP address instead of the IP address assigned to the modem for IP communication.)
Windows TELNET Utility. You can Telnet to TCP Port 353 (AUTHGW) to verify that the listener is available and processing incoming requests.
TCPCON Utility. Use can also use this utility at the VPN Server console to verify what TCP ports are listening.
Load TCPCON | Protocol Information | TCP | TCP Connections and verify that the authentication gateway port 353 is listed there.Load TCPCON | Protocol Information | UDP | UDP Listeners and verify that the authentication gateway port 353 is listed there, as well as the data port 2010.
VPNSTATS Utility. Use this utility to diagnose problems and to determine the status of the tunnel (see Figure 4).
The Novell VPN Statistics screen.
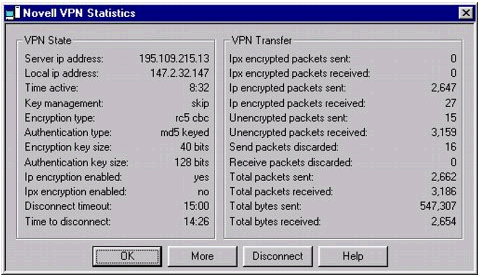
You can also use this utility to verify whether any packets were sent through the tunnel, and whether or not they were successfully encrypted.
NETSTAT -R and TRACERT. Use the Windows "netstat -r" and "tracert <destination_IP_address>" commands to diagnose routing problems with the client. Connectivity problems often lead to failed VPN client sessions.
NETSTAT -S. Use the Windows "netstat -s" command to verify whether any IP, ICMP, or TCP errors are occurring on the client. You can verify the state of the TCP connections (for example, on port 353), and view any errors that are occurring at the TCP and UDP layers.
SLPINFO. Use the "slpinfo /d" command to diagnose IP-only login problems. (See TID #10060136 at http://support.novell.com for information on how to troubleshoot using this tool.)
DSTRACE. Use the SET DSTRACE command output file to determine whether any NDS errors are being reported at the time of a client login failure.
NetWare Administrator (NWAdmin). Use the NWADMN32.EXE logging utility for BorderManager to verify that the ACLCHECK rules have not blocked access to the VPN or NetWare server for this user. You can also check the VPN client audit logs in this utility to get more information about the failed VPN connection attempts.
LISTDLL. Use this tool to verify that the correct VPN-related DLLs are running on the system. Many versions of the same driver may be found in different directories and problems may arise if the loaded driver is not the version our VPN client expects. (LISTDLL can be downloaded from http://www.sysinternals.com/listdlls.htm.)
SET TCP IP DEBUG Command. Use the "SET TCP IP DEBUG =1" command to make sure that no Discards are happening at the TCP/IP stack level of the server.
Troubleshooting Steps
Following are the recommended steps to take when troubleshooting problems with the BorderManager 3.6 VPN Client.
-
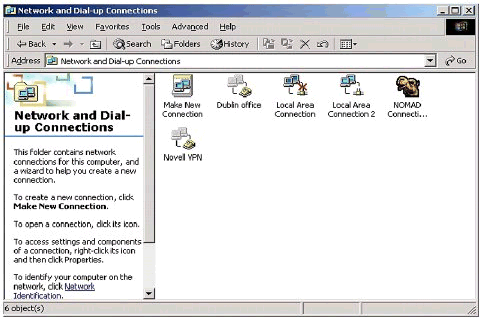
Make sure that the driver is seen in the Network Properties (see Figure 5).
Novell VPN entry in Network and Dial-up Connections.
-
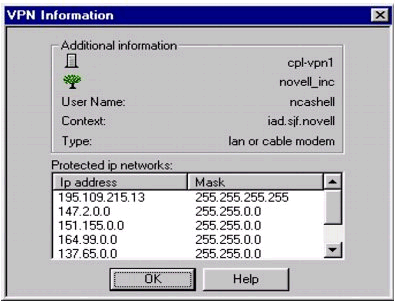
Check in NWAdmin (or the Novell VPN Statistics screen shown in Figure 6) to make sure that the parameters configured are appropriate for your VPN network.
List of "Protected ip networks" in the VPN Information screen (accessed by clicking the More button on the Novell VPN Statistics screen).
Verify the WAN client IPX network address.
Check for a correct list of protected networks (if any). The list of "protected ip networks" should include internal networks that you want to advertise through the encrypted VPN tunnel. That is, you want this VPN Server advertise to other VPN members that "to get to network x.x.x.x, go through me." It is common for administrators to incorrectly use this field to list all remote networks for which they want traffic to be encrypted.
Check that the inactivity and disconnect timeouts are not set too small. That may result in unnecessary disconnects from the VPN network.
Verify that the data encryption and authentication parameters between the VPN Client and Server are in sync. There is no client-specific setting here, but if the VPN Server is using 3DES and the Client must use the Server's security settings, the client needs to be a domestic version.
-
Make sure that the VPN dial-up server type is "PPP Server".
Note: If the VPN LAN client is configured, you may not necessarily have Dial-Up Networking (DUN) installed on that workstation, and a dial-up network server will not have to be configured.
-
Ascertain whether the problem is a DUN problem or a VPN problem by removing VPN and verifying that the dial-up functionality works to a dial-up PPP server type without the VPN.
-
Using the Novell VPN Login screen, identify what stage of the login process is failing (dial-up, authentication, encryption, or login).
In a pure IP NetWare 5 environment, statically configure at least one Directory Agent (DA) under the NetWare 5 Client properties Service Location tab, or attempt login via IP address rather than via the server's name. Multicast detection of the DA will fail. (DA should only be configured when connecting to a NetWare 5 server, not a NetWare 4.11 server.)
If IPXWAN negotiation always fails, make sure IPXRTR.NLM is loaded and has WAN client support enabled.
Also, make sure that your client doesn't have more than four IPX devices in the Network properties.
If configuration is set to encrypt all IP traffic but the number of unencrypted packets continues to increase, the machines in the intranet have found a route back to the VPN Client without going through the VPN server. This can happen if, for example, a server other than the VPN server also has a connection to the Internet. (See TID #2949583 for details about both server-to-server and client-to-server configurations that have this problem.)
-
If the NetWare client was installed with IPX and IP, verify that there is no IPX protocol bound to the actual interface of the client (DUN or LAN interface).
-
If the VPN client is connecting to a modem using DUN and there is also a NIC enabled on the PC, make sure that there is no IP address bound to this NIC. If there is, Windows will try to use the NIC IP address instead of the IP address assigned to the modem for IP communication.
-
Verify whether any NATs are running on routers between the client and the VPN server. If there is, do a test avoiding the NAT to see if this makes any difference.
Note that the BorderManager 3.6 VPN client solution will work when the VPN client is located behind a NAT. If the NAT Server is located behind a NAT, communication with the VPN client will fail. The VPN Server must not be located behind a NAT, as the information it stores and propagates at the application layer contains private IP addresses that are not accessible to public clients.
-
Verify that no IP or IPX packet filtering is enabled on the NetWare servers that may block the various incoming requests from the client (manually unload IPFLT and IPXFLT at the server console). Use the "SET TCP IP DEBUG =1" command to verify that there are no Discard messages shown on the server console when the client logs in.
Note: Client-to-site communication requires TCP port 353 to be opened for authentication on the firewall, UDP port 353 for keep alive to the authentication gateway, and UDP port 2010 (decimal) for data.
-
Verify that there are no NDS problems on the VPN server, or on the NetWare server containing a replica (Read/Write or Master) of the User object trying to log in. TID #2909026 entitled "DSTRACE Commands, Filters and Processes" displays the various command options that may be used to establish the NDS request/reply communication, and how to dump it to file.
-
Verify that the ACLCHECK module is not blocking access to the VPN server for that user. The BorderManager administrator utility in NWADMN32 can be configured to log requests from the client; use this log to verify that the VPN client has been allowed through.
-
Using the VPNSTATS utility, verify that traffic through the tunnel is being encrypted. What often happens is that outbound traffic from the VPN is encrypted, but the reverse traffic is not. This is due to the fact that the best route to the destination is not through the VPN, but through a LAN router. NAT can be used to fake the client's IP address and force the responding packets to go through the VPN Server. (See TID #10055792 at http://support.novell.com for details.)
-
If there is a Login Policy object in the VPN server's tree's security container, make sure there is a rule defined to allow users to use the VPN service.
-
If you cannot log in to NetWare using the VPN Login, uncheck the "login to NetWare" box in VPNLogin and then attempt to log in using the Novell Client after VPNLogin completes.
Conclusion
This AppNote has covered several important concepts, tools, and procedures that will help you understand and troubleshoot the BorderManager VPN Client.
VPN Reference Material
Here are some additional sources of information you may want to consult:
BorderManager VPN Client Quick Start (see Novell TID # 2946630 or Primus Solution #3.0.328812.2205046)IPsec information: RFC 1825 (Architecture), 1826 (AH), 1827 (ESP), 1828 (keyed MD5), 1829 (DES-CBC), 1851 (3DES-CBC), 1852 (keyed SHA1), 2104 (HMAC MD5/SHA1)
VPN with IPSEC (ftp://ftp.ietf.org/internet-drafts/draft-ietf-ipsec-vpn-00.txt)SKIP (http://skip.incog.com/spec/SKIP.html and http://sunsite.uakom.sk/sunworld/swol-06-1997/swol-06-skip.html)
Security links:
VPN White Paper (http://www.firstvpn.com/)
Security White Paper (http://www.aventail.com/)
List of security products (http://www.securityspace.com/)
* Originally published in Novell AppNotes
Disclaimer
The origin of this information may be internal or external to Novell. While Novell makes all reasonable efforts to verify this information, Novell does not make explicit or implied claims to its validity.