How to Use Novell Directory Control (NWDir), Part 3
Articles and Tips: article
Senior Network Analyst
MindWorks, Inc. of Kentucky
porter@digitalme.com
01 Aug 2001
The previous AppNotes in this series covered the history of the control and the syntax surrounding the control. In this AppNote, we will write a program, bringing together many of the techniques that you will use to solve other eDirectory challenges. We begin by developing some basic skills-searching the tree, enhancing the code to display attributes, and finally, editing attributes for a given object.
- Searching the Tree for Objects
- Displaying Attribute Values
- Editing Attribute Values
- Access Control Rights
- Displaying Trustee Rights
- Creating and Deleting Objects
- Conclusion
|
Topics |
directory services, NDS eDirectory, ActiveX,Novell Directory Control (NWDir) |
|
Products |
NDS eDirectory |
|
Audience |
developers, administrators |
|
Level |
intermediate |
|
Prerequisite Skills |
familiarity with NWDir |
|
Operating System |
NetWare 4 or 5, Windows 95/98/NT/2000 |
|
Tools |
Rapid Application Development (RAD) |
|
Sample Code |
yes |
Searching the Tree for Objects
Searching the tree for an entity is a slightly more involved process than you experienced in the last AppNote, but you now have all the tools necessary to make it seem easy. After this section, finding any object-anywhere in the tree-will be, as they say, "A walk in the park."
Instead of FindEntry, as we did in the last AppNote, we will use the Search method because we are locating items from places unknown to us. We'll begin by designing a form to suit our needs and then write code.
-
Start by launching Visual Basic and select "Standard EXE."
-
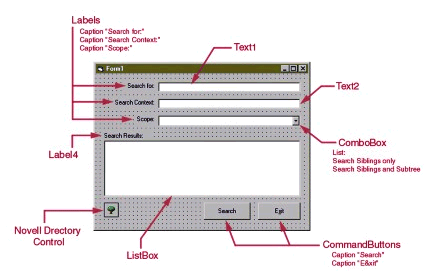
Add the Novell Directory control to the Toolbox menu and then add it to the form. Figure 1 displays the form that we will use to search for objects and display their attributes.
Form used to search the tree for an NDS object.
-
Place the following code in the Form1 code section:
Private Sub Form_Load()
Text1.text = ""
Label4.Caption = ""
Combo1.ListIndex = 0
Text2.Text = NWDir1.FullName
End Sub
In the Form_Load code above, we first set the Label4 caption property to null. We're only going to use this Label to indicate when the program is searching and when results have been found.
-
Next we set the ComboBox list to 0, which resets the index to show the first item listed. Don't forget to fill the ComboBox list property with the items "Search Siblings only" and "Search Siblings and Subtree." The order in which these items appear in the list is important. Finally-you guessed it- we're going to use current context to fill the TextBox, Text2. This TextBox will be used later to indicate the beginning context for the search.
-
Next, we'll add code for the CommandButtons. Double-click on the Exit button and add the following code:
Private Sub Command1_Click()
End
End Sub
It's always important to provide the user with a graceful way of ending a program-unless, of course, you enjoy the facially twisted look that your users will have when they try to end the program and can't.
-
Double-click on the Search button and add the following code:
Private Sub Command2_Click()
    List1.Clear
    Label4.Caption = "Searching..."
    Call NWDir1.Search(Text1.Text, "User", Combo1.ListIndex + 1,
        Text2.Text)
End Sub
In the above code, we first empty the list of anything that might be there. We change Label4 to indicate that a search is commencing. For the ClassFilter, we are using "User" object class-we could search just as easily for any other object class, or even a combination of object classes by comma delimiting the filter within the quotes. Finally, we do the search. Instead of using either SEARCH_SUBORDINATES or SEARCH_SUBTREE as scope parameters, we use the variable that has been set in the ComboBox. If the value of this variable is "2" the subtree is searched-all other values will cause the method to search only the subordinates.
A valid way of looking at the scope parameter (and less confusing, I think) is to imagine the room that you're in as the FullName context. All items in the room are your siblings. When the scope is set to search Subordinates or any numeric value except "2", you're actually searching a single level of the tree equal to the context defined by the FullName property-searching within your room. If the scope is set to Subtree or the value "2", you're asking the search engine to search both the current context and all subordinate contexts-your room plus all drawers, boxes, and closets.
-
Next, we display the results. At the top of the Form1 code page, select the NWDir1 object from the pull-down menu. From the procedures menu just to the right, select the SearchCompleted event for the pull-down menu. The following code will be automatically placed in your code page.
Private Sub NWDir1_SearchCompleted(ByVal Results As Variant)

End Sub
Add the following code:
Private Sub NWDir1_SearchCompleted(ByVal Results As Variant) Label4.Caption = "Search Results:" If IsEmpty (Results(0)) Then MsgBox "No Items found", vbExclamation Else For Each NDSObj In Results List1.AddItem (NDSObj) Next End If End Sub -
Next we change the caption of Label4 to read "Search Results". We next need to test to see if the array is empty (a Variant will always appear to be an array). If it is, simply place a message box on the screen indicating that fact. If the array isn't empty, we display each of the results in the ListBox.
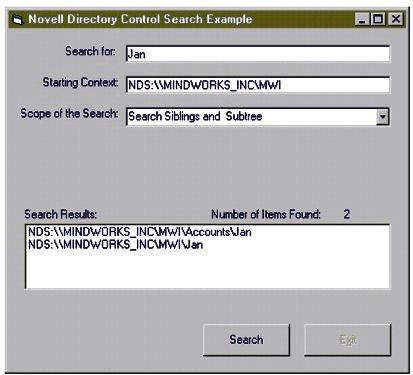
Figure 2 displays the results of running the above code in the MindWorks organization of the NDS tree named NDS_Tree.
Using the Search code to search for Jan's object in the tree named MINDWORKS_INC finds that there are two objects matching the query.
Displaying Attribute Values
Now that you can easily locate and select objects in the NDS tree, it's time to write code that will allow you to change attribute information for objects. We're going to start by writing a program that will display certain attributes for a User object.
-
Launch Visual Basic and select "Standard EXE."
-
Add the Novell Directory control to the toolbar and to your form.
-
Design a form using the form tools similar to the one in Figure 3.
The first of two parts, this form displays attribute values of the selected object.
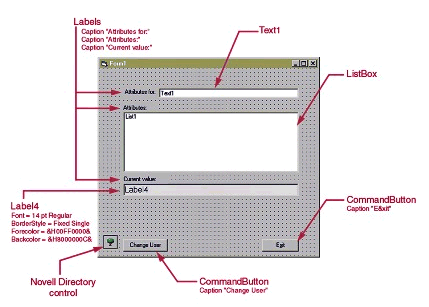
Later we will add a "Change attribute value" button and a corresponding TextBox. For now, though, we're going to display the attributes of the object indicated in the Text1 TextBox.
-
Let's start by declaring a General variable. Right click on the form and select "view code". Select General from the Objects pull-down menu on the Form1 code page. Select Declarations from the Procedures menu. Add the following line of code:
Dim entry As NWEntry
By declaring entry in the General declarations section, it becomes a global variable and has scope throughout the program. While we're at it, we may as well add the Exit button code now as well. Enter the following to the form:
Private Sub Command1_Click() End End Sub -
Okay, let's really get started. Add the following code to the form:
Private Sub Form_Load()
Dim NDSAttrs As Variant
Text1.Text = NWDir1.LoginName
Set entry = NWDir1.FindEntry(Text1.Text)
For Each NDSAttrs In entry.Layout.Fields
    If NDSAttrs.TypeName = "String" And _
NWDir1.FieldTypes.Item(NDSAttrs.Name).SingleValued = True Then
        List1.AddItem (NDSAttrs.Name)
    End If
Next
If List1.ListCount > 0 Then
    List1.Selected(0) = True
End If
End Sub
Note: It is extremely important to observe the spelling of the TypeName String above. The first letter must be capitalized in order to work properly.
The code above is very much like the code we used to display attribute syntax. We declare the attribute variable as Variant. Next we fill the value of a TextBox with the ID of the currently logged in user and set focus on this User. Next we pour through a list of attributes, seeking only the single-valued strings (just to make this code simpler) and display the results in a ListBox. Finally, we select the first value in the list so that the value files can have an initial entry.
In order to see the contents of the attribute, select List1 from the Object menu at the top of the Form1 code screen and then select Click from the Procedure pull-down menu. Enter the following code:
Private Sub List1_Click()
Label4.Caption = entry.GetFieldValue(List1.Text, " ")
End Sub
We perform the lookup on the current entry object-getting the contents of the attribute highlighted in the ListBox. Notice there is no initial value for the attribute field; however, we could have entered a default value such as "Attribute currently has no value."
We have the single-value string attributes listed in the ListBox and the value of the selected attribute displayed in Label4 but there's one thing missing-the ability to change users. We can accomplish that with the following code:
Private Sub Command2_Click()
NWDir1.FullName = Text1.Text
Set entry = NWDir1.FindEntry(Text1.Text)
List1_Click
End Sub
Note: It is not necessary to set the FullName to Text1.Text here. The FindEntry statement in this case works equally well without it. If a forthcoming command needs to be executed from the context that holds the User object; then it can be handy at this point to change the current context to reflect the location of the object. Whether it's good practice or not-I do it automatically by habit.
In order to change users, we make the Text1 TextBox available for update and set the default FullName from its contents. Next we set focus on the selected object and finally get the attribute value for the currently selected attributes by issuing a click event on the ListBox. All subsequently selected attributes will be displayed using information on the new entry.
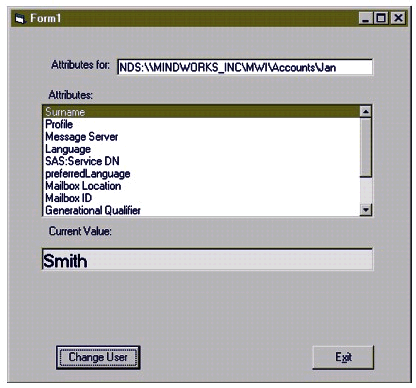
Figure 4 shows the completed form running in the MINDWORKS_INC tree.
Jan's attribute values are displayed as each attribute is selected in the ListBox.
Some of you may have a slightly different view of the data than what is displayed above. If you are using eDirectory, your Form may look like the one displayed in Figure 5.
If you are using eDirectory, your results may look like this due to schema modifications to support LDAP v3.
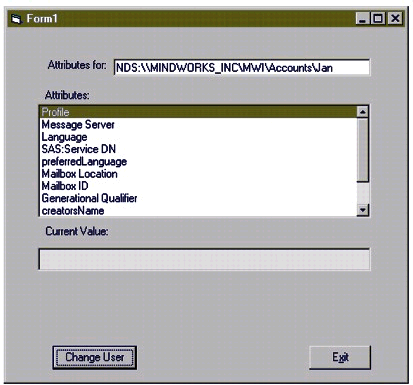
The reason for the difference is because Novell removed the Single-valued flag from Surname to make eDirectory more LDAP v3 compliant. You will only have this change if eDirectory has been introduced into your tree or with some of the latest Service Packs.
You may be wondering, "How do I get the Surname value displayed on the screen if I'm running eDirectory?" There are several ways to go about this but the easiest is to simply include it in the If statement of the code.
If (NDSAttrs.TypeName = "String" And
NWDir1.FieldTypes.Item(NDSAttrs.Name).SingleValued = True) Or
    NDSAttrs.Name = "Surname" Then
By adding this simple Or statement, you have solved the problem. Isn't this easy?
We're now writing useful code. I know you're asking, "How about changing those attributes?" That will prove to be just as simple. Let's try editing next.
Editing Attribute Values
Adding new information or editing information that already exists for an attribute is simple. In the following example, you'll modify existing code to allow editing of attributes.
Editing Existing Information
In order to change attribute values, we're going to next make modifications to the existing form. Edit your form to resemble the one shown in Figure 6.
The display attribute form turns into a change attribute form by adding the three elements displayed.
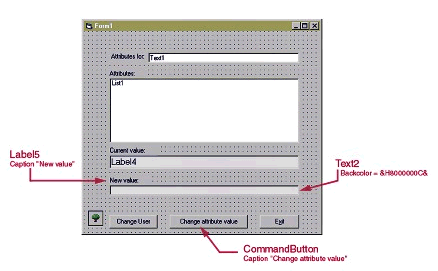
Add the following code, by double-clicking on the new CommandButton labeled "Change attribute value":
Private Sub Command3_Click()
Dim NewValue as Variant
Err.Clear
On Error GoTo ErrorHandler
If Text2.Text = "" Then
        NewValue = entry.SetFieldValue(List1.Text, Null)
    Else
        NewValue = entry.SetFieldValue(List1.Text, Text2.Text)
End If
If NewValue Then
        entry.Update
        List1_Click
    Else
        entry.Abort
        MsgBox "Unable to change field value"
End If
Text2.Text = ""
Exit Sub
ErrorHandler:
If Err.Number = 672 Then
        MsgBox "Insufficient rights to change value", vbCritical,
            "Error 672"
    Else
        MsgBox "Unrecognized error while attenpting change. " +
            Err.Description,
vbCritical, Err.Number
End If
Text2.Text = ""
End Sub
Note: Don't forget to give Text2.Text an initial value of null before beginning. You can do this by either changing the initial value in the Visual Basic IDE Properties or by declaring it in the Load Form section.
In this subroutine, we begin by clearing the error counter, which we will use to indicate an unsuccessful attempt to update a field. If there is an error, ErrorHandler code at the bottom of the subroutine will help determine the source.
The real "meat" of the code begins by examining the TextBox for a Null value. If nothing exists, we use the SetFieldValue() method to set the NewValue variable with a Null value for the selected attribute. If text exists, we use the same method to place the contents of Text2.Text in NewValue.
At this point the attribute value can be changed by using the entry.Update() method. If an error exist entry.Abort() is used, instead.
The most common error encountered is an NDS error that indicated the user doesn't have the rights assignment necessary to complete the update. This error is -672. Some of you comfortable with NDS may say that this error can also represent a replica ring mis-match. In fact, during Brainshare USA I joked on stage with three of the NDS Core Software Engineers that a -672 is absolutely -Replica Ring Mismatch, however, each error in the 600 - 700 series is specific and can be a signature of a different underlying problem. That's why the TIDs (Technical Information Documents) list several causes and solutions for each error number.
In our case here, however, we can check for the error number and report it appropriately to the user. If any other error occurs, it is also trapped and reported to the user, accordingly. As different errors are encountered, this list can be updated to make troubleshooting much easier.
Access Control Rights
Access Control Rights govern privileges for an object. This may seem like a very basic statement; it is-but read it carefully. It states that the list of rights to an object is held by the object to which those rights have been granted, not with the privileged. Intuition usually suggests otherwise. In the case of ACL rights, intuition would be wrong! If the user Judy has rights to Jan's User object, the entry right that states that fact is stored in Jan's ACL attribute, not in Judy's ACL. This is a very important concept that is frequently overlooked or misunderstood by the programmer new to NDS. Many programmers look at an ACL as a ring of keys-in order to open a door, it is necessary that the trusted individuals possess a key. But in the case of NDS, everything is backwards. A method used by many NDS programmers is to imagine a top-secret installation. In order to get in, you must prove you are who you say you are (public key/private key). Then access is controlled by a list containing trusted individuals and their access privileges held by the installation's security personnel.
Another word used to describe the privileged is trustee. Trustees of an object are a list of other objects that have rights to the object.
Access Control List (ACL) is an NDS attribute of an object, which maintains a list of rights that other objects have to the object.
Note: NDS rights to an object are stored with that object. An example: If Jan has object rights to Judy that include Browse and Rename, then there will be an entry stored in the Object ACL of Judy's NDS user object similar to the following: NDS:\\NDS_Tree\MindWorks\Accounts\Jan, [Entry Rights], 9.
Rights in NDS are granular, allowing separate assignments for objects and object attributes. This means that a User object can have the rights to delete another user object, or even change its name, but may not have rights to view any of the object's attributes.
There are two types of rights in NDS-rights to an object, and rights to an object's properties (NDS Attributes). They are commonly referred to as object rights and property rights. Property rights are further divided into two categories:All Properties and Selected Properties. There is an inheritance involved with property rights. If an object has read and write All Property rights, but has an explicit assignment to an attribute of Read, then the effective right to the attribute is Read-only! This concept of explicit rights is a universal concept at Novell. The concept is the same whether talking about file and directory rights or NDS rights. Object rights and Property rights have different arguments because of the vast differences in concepts. We'll explore both.
Object Rights
Rights to objects are also called entry rights, usually written as [Entry Rights]. These rights describe trustee privileges to the entire object. When you read "entire object" it's important to understand - "just the object", and not the object's properties (NDS Attributes). There is an exception to this rule-we'll get to that shortly, but before we do, let's discuss the individual object rights.
Rights are stored as whole bytes. Rights are calculated by determining which bits are set in the rights assignment.
|
Right
|
Bit Value
|
Description
|
|
Browse |
1 |
Grants the ability to view an NDS entry |
|
Create |
2 |
Grants the ability to delete an NDS object, including subordinates |
|
Delete |
4 |
Grants the ability to delete an NDS object, including subordinates |
|
Rename |
8 |
Grants the ability to change an NDS object name |
|
Supervisor |
16 |
Grants all rights to an NDS object including its attributes |
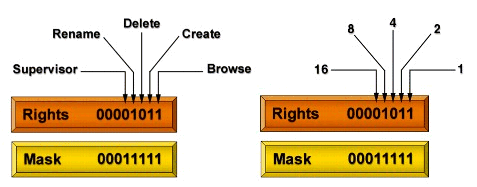
Referring to the table above, the first position (least significant bit) is 20 or 1, the next bit position is 21 or 2, then 22 or 4, then 23 which is 8, and finally 24 which equals 16. Figure 7 demonstrates the bit positions along with the associated right.
Object rights are stored as whole bytes that can be broken down to determine rights assignments. In the case above, the rights assigned (00001011) are equivalent to Browse, Create and Rename.
Property or Field Rights
To minimize confusion, remember that property rights, attribute rights, and field rights are all the same things. I use the terms field, attribute and property interchangeably. This is necessary because some of the reading audience has a strong NDS background (hence use of the terms property and attribute), while Visual Basic programmers are more familiar with the term field. For the remainder of the AppNote, these terms should be viewed as the same conceptually.
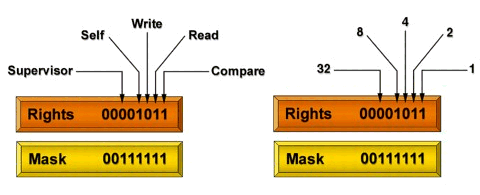
Property rights are very similar to [Entry Rights]. As shown in Figure 8, bits 1-4 and 6 are used to record property rights assignments. The table below displays the rights, their values, and a brief description of each.
|
Right
|
Bit Value
|
Description
|
|
Compare |
1 |
Grants the ability to compare a given value an NDS field value |
|
Read |
2 |
Grants the ability to read an NDS field value |
|
Write |
4 |
Grants the ability to add or edit an NDS field value |
|
Add Self |
8 |
Grants the ability to add ones entry object as a member of a group |
|
Supervisor |
32 |
Grants all rights to all NDS fields |
Property rights are similar to object rights, however, the mask is different. In the example above, the rights recorded as (00001011) represent Compare, Read, and Add Self.
Displaying Trustee Rights
Reading this trustee information is rather simple and involves the NWDir control. Since ACL is a multi-valued field, we will treat it the same as the variables in the previous section.
-
Open Visual Basic and select "Standard EXE."
-
At the top of Form1, place a narrow rectangle using the Label tool and change the caption to read "ACL information for:" Change the alignment to be right justified.
-
Using the label tool again, place another long rectangular box just to the right of Label1. This box will serve as our subject indicator.
-
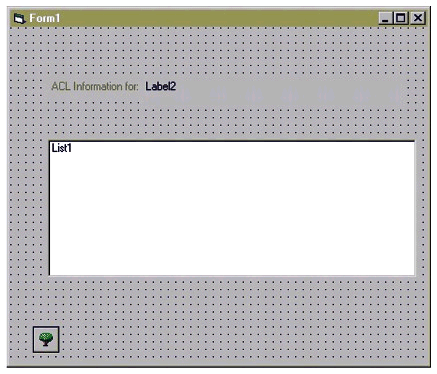
Next, draw a wide rectangle on the form with the ListBox tool. We'll use this tool a lot; it allows us to easily place a list of items inside a window with scroll bars, if needed. You may have to stretch the form to the right, and then subsequently stretch the ListBox. Each line of information that is going to be displayed will be rather long. Figure 9 displays the form with the three boxes.
The design form for displaying ACL information is similar to the other attribute forms, the information contained in the ACL is formatted differently from other attributes.
-
Next, we'll supply some code to fill in the two variables, Label2 and the ListBox. Here, we'll be displaying rights for the currently logged-in user.
Private Sub Form_Load()
'Declare the variables
Dim entry As NWEntry
Dim ACLlist As Variant
‘Select the entry
Set entry = NWDir1.FindEntry(NWDir1.LoginName)
Label2.Caption = NWDir1.LoginName
'Read the ACL values and fill a Listbox with the results
ACLlist = entry.GetFieldValue("ACL", , True)
For n = LBound(ACLlist) To UBound(ACLlist)
    List1.AddItem (ACLlist(n))
Next n
End Sub
Figure 10 displays the results of the code above.
Displaying the contents of the ACL of a user is easy using this code.
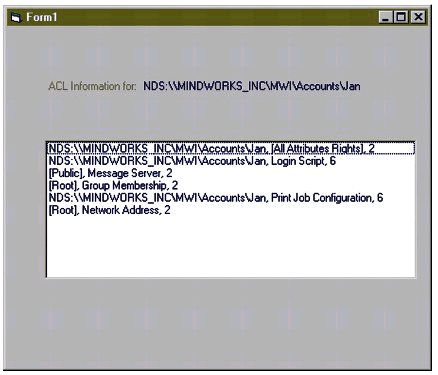
Once an object has been defined, it's easy to display the contents of any attribute with the ActiveX method GetFieldValue(). In addition, by declaring ACLlist as variable type Variant instead of NWACL, we can use the Upper and Lower bound commands to easily display the entire contents of the ACL field.
To bring a familiar identity to the form, include the following code.
Private Sub Form_Load()
'Declare the variables
Dim entry As NWEntry
Dim ACLlist As Variant
‘Select the entry
Set entry = NWDir1.FindEntry(NWDir1.LoginName)
Label2.Caption = "." + NWDir1.ContextFromFullName(NWDir1.LoginName)
        + " in the tree " + NWDir1.TreeFromFullName(NWDir1.LoginName)
'Read the ACL values and fill a Listbox with the results
ACLlist = entry.GetFieldValue("ACL", , True)
For n = LBound(ACLlist) To UBound(ACLlist)
    List1.AddItem (ACLlist(n))
Next n
End Sub
Figure 11 displays the results.
Making the screen friendlier requires just a few changes to the Label Caption.
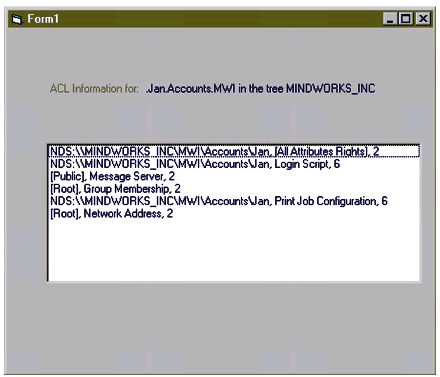
Normally, the FullName of an object is displayed in the standard ActiveX fashion but we can play a trick to get NDS standard typeless naming. For those of you familiar with NDS, this ought to bring some soothing comfort-I know you've been yearning to see a traditional fully qualified name.
In order to change ACL rights, we will use another control, the User Group control, therefore, we will not change attribute values for the ACL now. It is more appropriate to save that discussion for another AppNote when we can examine the User Group Control more thoroughly.
Creating and Deleting Objects
There are two more concepts that are considered essential, they are creating and deleting objects. Basically, creating objects, reading information stored about them, editing that information and later deleting the object encompasses most of what you'll need to do in the beginning.
Creating Objects
Creating objects with the Novell Controls for ActiveX is easy by comparison. There are essentially four steps to remember:
Declare -a variable declared as NWEntry will be used to add the object to NDS
Create -using the NWDIR1.Entries.Add method, the object is prepared for update
Set -the mandatory attributes for the object must be defined before entry update
Update -the object, with its attributes, is created in NDS
During the Set phase of the operation outlined above, optional and mandatory attributes can be populated as well. An object cannot be created without its mandatory fields having a value.
In the following example, we will add a user to NDS, providing a field for the User ID and the Surname. We will also need a Text box for the context.
-
Launch Visual Basic and select Standard EXE.
-
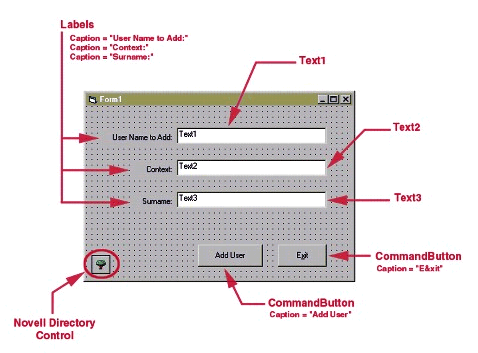
Design the form displayed in Figure 12.
The Form used for User Creation.
-
Add the following code to the main form by double-clicking in the body.
Private Sub Form_Load()
Text1.Text = ""
Text2.Text = NWDir1.FullName
Text3.Text = ""
End Sub
All we are doing in the main section is clearing two of the text boxes and displaying the current context in the other. All the real "Action" will be associated with the click of a button, particularly the CommandButton labeled "Add User". Notice, however, that the Text3.Text field becomes a variable that can be changed to determine where the User will be added in the tree.
Let's provide a graceful way to exit the program by adding the following code.
Private Sub Command1_Click()
    End
End Sub
Note: You can also double-click on the CommandButton and add the command End.
Now we're going to add the "meat" -the code for the "Add User" CommandButton.
Private Sub Command2_Click()
Dim Success As NWEntry
NWDir1.FullName = Text2.Text
Set Success = NWDir1.Entries.Add("User", Text1.Text)
If Success.SetFieldValue("Surname", Text3.Text) Then
    Success.Update
Else
    Success.Abort
End If
Text1.Text = ""
Text3.Text = ""
End Sub
Notice above that we defined a variable, Success, as NWEntry. Then we set the variable equal to an add method for the Entries collection of the NWDir control. This method requires an object class definition (so NDS knows what kind of recipe to follow in making the object, and a CN-or login ID. Don't forget that you cannot add a user into the tree without supplying all of its mandatory attributes. In an upcoming AppNote, we'll discover how to read the schema recipe for each object class, but for now, I'll just tell you that a User object class must have a CN and a Surname (or lastname) before it can be created or even exist in the tree.
The way we accomplish this during the creation event is to stuff this information into a buffer just before we create the entity. There are several methods to accomplish this but one of the easier ways is to follow my example above to set the attribute value. Notice that here, too, I had to define the recipe that I wanted to follow-in this case "Surname"-in order to input the attribute value for Surname. Instead of statically adding the users Surname between two quotes, I took the text value of the Text3 field on the form. This allows the user (or administrator) to select the desired last name during program execution.
The If statement provide a second function, and that is to test the results of the previous actions. If they are successful to this point, I update the attribute-which performs the actual create in NDS. If the action is unsuccessful, we abort the attempt. Actually, we can get fancy here and return error codes and update the screen, etc. but for now, we'll stay simple.
As a quick review, we Declared a variable as NWEntry, we used the Create method to define the object, we Set the Surname attribute, and we used the Update method to actually create the object.
Deleting an Object
Deleting an object requires you set the NWDir1.FullName property equal to the context where the object exists. There is no mechanism to use the FullName property (which identifies the location of the object in the tree) as the argument for deletion. Only the ShortName (also called RDN-relative distinguished name) is used to identify the object.
First we must add a CommandButton to the form and, just to be informative, we will add a Label to display the results of the delete operation. Add the features displayed in Figure 13 to the form.
To add the capability to delete users to the existing form a Delete User button and a "results" label was added to the form. You may also want to make the Label, Label4-center justified, as well.
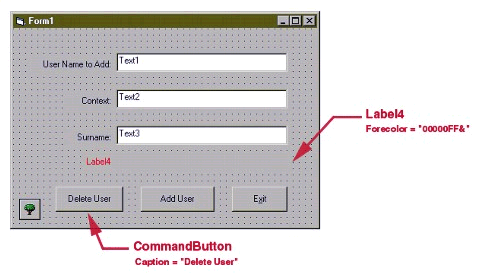
For the Delete User button, add the following code.
Private Sub Command3_Click()
Dim Success As Variant
NWDir1.FullName = Text2.Text
Success = NWDir1.Entries.Remove(Text1.Text)
If Success = False Then
        Label4.Caption = "User NOT deleted!"
    Else
        Label4.Caption = "User deleted!"
End If
End Sub
Notice that, since each RDN within a context must be unique, we did not have to supply any additional information on the object. It's very easy to delete an object from the code point-of-view, but from the engines point-of-view, it takes a lot of work to delete an object.
The process that removes items from the eDirectory database is the obituary process. This process is necessary because eDirectory can have multiple instances of the same data. Those familiar with NDS might call this replication. In order for NDS to return consistent and persistent information to every client, no matter where that client is asking from or who, a very methodical process must be followed to delete, move or rename an object. Most objects must go through four stages before actual deletion occurs. This means that every server that holds the object must exchange information about the object with all other servers a number of times before it is gone. Deletion is serious business! The qualifier "Most" in one of the preceding sentences is exactly what I meant to say. Not all objects step from flag 0, to flag 1, to flag 2, to flag 4. It all depends on what kind of object it is.
Conclusion
In this AppNote, we learned how to find things, display their attributes and edit the attribute values. We also discovered how rights are actually stored in the database and how to list them to the screen. We created users and wrote code to delete them. At this point, you have most of the tools that you need to be successful.
In the next Appnote in this series, we will explore the eDirectory schema-one of the most exciting concepts to know and understand.
* Originally published in Novell AppNotes
Disclaimer
The origin of this information may be internal or external to Novell. While Novell makes all reasonable efforts to verify this information, Novell does not make explicit or implied claims to its validity.