Enhancing ZENworks for Desktops 3 Imaging with ENGL Zim
Articles and Tips: article
Consultant
ENGL
heath_upton@engl.co.uk
Steve Thompson
Consultant
ENGL
steve_thompson@engl.co.uk
01 Aug 2001
This AppNote discusses ways that ENGL's Zim product can be used to provide a consistent and easily customisable front-end for ZENworks for Desktops 3 imaging in a Linux client environment.
Since this AppNote was written in the U.K., it retains the British spelling used by the authors.
- Introduction
- Recovery Using Bootable CD-ROM
- Recovery Using the Local Linux Partition
- Enhanced Options for LAN-Connected Machines
- Zim Reference
- In the Pipeline
- Summary
|
Topics |
desktop management, PC imaging, third-party products, ZENworks for Desktops |
|
Products |
ENGL Zim, Linux, ZENworks for Desktops 3 |
|
Audience |
network designers, administrators, integrators |
|
Level |
intermediate |
|
Prerequisite Skills |
familiarity with ZENworks for Desktops 3 imaging |
|
Operating System |
n/a |
|
Tools |
Pico editor, ISO Creation utility |
|
Sample Code |
yes |
Introduction
ZENworks for Desktops 3 (ZfD3) features directory-enabled imaging that operates in both connected and disconnected LAN environments.
During ZfD3 design and implementation projects, our customers have continuously requested that we customise the Linux imaging front-end to become more functional and user friendly. Some customers wanted a bootable CD-ROM that featured a emergency image recovery menu, and some required a maintenance menu for administrators.
To customise the environment, we took the ZENworks imaging boot diskettes and modified the boot menu and Linux BASH scripts to accommodate the customers' requirements. These modifications would typically take several days depending on the complexity. Once the modifcations were completed, we would provide the customer with a new media set, such as a CD-ROM.
As customisation of the Linux environment required advanced knowledge of shell scripting and an understanding of the mechanics of the ZENworks Linux boot process, the customer would need our assistance to make further modifications. This would become costly for the customer and would incur inherent time delays whilst changes were made.
There had to be an easier way for the customer to easily make changes without requiring a Linux expert on site-and thus Zim was born.
Developing Zim
In December 2000, ENGL Zim (ZENworks Imaging Menu) was developed as a replacement for the unfriendly ZENworks for Desktops 3 Linux imaging interface.
Zim is a self-contained Linux executable that has a built-in BASIC-like script interpreter called ZimScript. With ZimScript, you can display various types of dialog boxes, pop-up windows, menus, and file-copy progress bars. Additionally, ZimScript can perform string and numeric logical operations and launch external Linux commands, such as Novell's Imaging Engine (img) command.
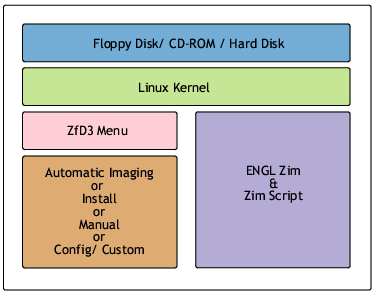
Figure 1 shows how Zim fits into the ZENworks for Desktops 3 Linux client model. Zim can act like a wrapper, hiding the ZENworks imaging engine (img). So it isn't surprising that we are often asked whether Zim performs the imaging, replacing the ZENworks imaging engine-the answer is no.
How Zim fits into the ZENworks for Desktops 3 Linux client model.
The Zim interpreter processes a BASIC-like script language called ZimScript. ZimScript has a rich set of functions and methods that can be used to customise the ZENworks imaging environment. By default, Zim will attempt to load and execute the zim.cfg file as ZimScript. Alternatively, a command-line switch can be used to load a different ZimScript file. The Zim Reference section at the end of this AppNote details the ZimScript functions and behaviour.
Recovery Using Bootable CD-ROM
Imaging provides the ability for roaming users to quickly and easily rebuild a damaged machine without it needing to be returned to base. ZENworks for Desktops 3 provides a standard bootable CD image (bootcd.iso) that can be used as the basis for a non-LAN connected imaging solution.
In order to invoke Zim as the user interface, a number of modifications to the standard ZfD3 Linux environment are required:
Pico editor available at: http://www.novell.com/coolsolutions/zenworks/features/a_linux_drivers_zw.html#utilities)
TID 10055585 at http://support.novell.com details how to modify the contents of the ROOT.TGZ file
ISO Creation utility
-
Obtain the standard boot image file (bootcd.zim) from the bootcd.iso file in \SYS\PUBLIC\ZENworks\Imaging directory of the ZfD3 installation.
-
Extract this file and modify the syslinux.cfg file as follows to ensure that Zim is the first user interface.
default Imaging label Imaging kernel Kernel append 2 initrd=initrd.gz label manual kernel Kernel append 5 initrd=initrd.gz label config kernel Kernel append 7 initrd=initrd.gz label install kernel Kernel append 4 initrd=initrd.gz label lilo kernel Kernel append 3 initrd=initrd.gz -
Place the Zim executable into the /bin directory, and place the customised zim.cfg ZimScript file into the root directory. The ZimScript can call the ZfD3 img executable and perform specific imaging operations, such as only re-imaging the C: drive and leaving other partitions untouched.
; **************************************************************** ; ZimScript (zim.cfg) - Recovery using CDROM ; **************************************************************** set:title,"Itchy & Scratchy Unlimited" set:cdrompath,"/mnt/cdrom" set:image,"cpi-w98-2.zmg" set:_help,"For assistance please call the Help Desk on ext.1234.^ ^Press a key to continue." ; --> Recovery menu menu:title,"%title% Recovery Menu" menu:item,restore,"Rebuild this PC " menu:item,reboot,"Restart machine" label:show_menu menu:display ; --> Restore image from CD label:restore set:source,%cdrompath%/%image% dialog:ask,"Warning!","Restoring image will erase all data! Continue (y/n)?",yn,red if:var,_ask,eq,n jump:show_menu end: if:file,notexist,%source% dialog:ask,"Error!","Image file '%source%' not found." ,_any,red jump:show_menu end: dialog:popup,"Restoring image, please wait...",blink file:run,"/bin/img rl a1p1 %source%",silent dialog:popupclose screen:auto,off file:run,"lilo.s",verbose screen:auto,on jump:umount ; --> Dismount CDROM label:umount file:run,"umount /mnt/cdrom",silent dialog:ask,"","Please remove CDROM from drive then press a key." ,_any,blue jump:reboot ; --> Reboot system label:reboot dialog:popup,"Restarting, please wait...",blink pause:2 dialog:popupclose file:run,"reboot",verbose jump:theend ; --> Finished! label:theend -
The /bin/runme.s script determines what will happen based on the option selected from the standard ZfD3 menu. In this configuration it will be skipped; therefore, Linux will boot with the default RUNLEVEL = 2. To boot directly into Zim, modify the script as follows:
#!/bin/ash if [ $initrd ] then . /tmp/bootmedia fi export INPUTRC=/bin/.inputrc sysctl -w net.ipv4.tcp_syn_retries=2 > /dev/null 2>&1 if [ $RUNLEVEL = '2' ] then startzim.s boot elif [ $RUNLEVEL = '3' ] then lilo.s boot elif [ $RUNLEVEL = '5' ] then prompt.s boot elif [ $RUNLEVEL = '4' ] then install.s boot else config.s boot fi -
Create the startzim.s BASH script file to launch Zim and perform any other required functions.
#!/bin/ash

/bin/zim

ash
-
A new ISO file can then be created containing the new bootcd.zim and root.tgz files, and the required ZENworks image file. The ISO file should use the bootcd.zim file as its boot image.
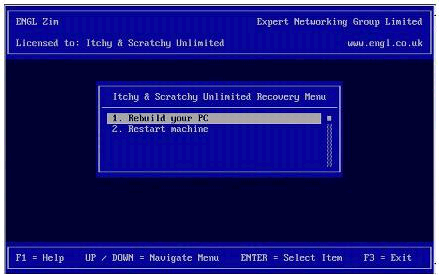
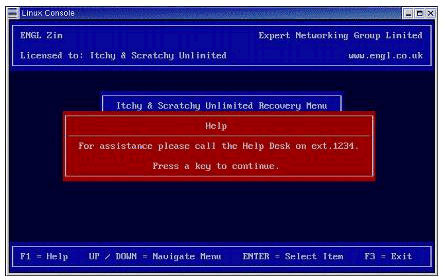
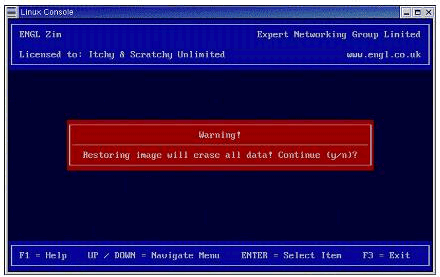
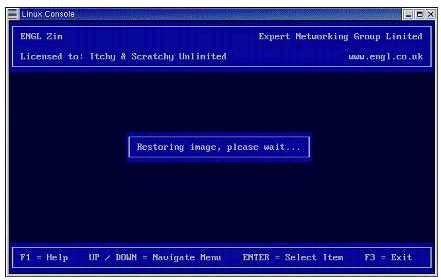
Figures 2 through 5 show the sequence of menus that the user will see when reimaging a PC with the Zim interface.
The initial screen presents the Zim recovery menu.
Pressing F1 at the recovery menu displays the help window.
Displaying a warning message to the user that requires a key press.
Hiding the standard ZENworks image restore with a Zim pop-up window.
Recovery Using the Local Linux Partition
An alternative to using removable media such as a CD-ROM to restore images is to install a Linux partition to the local hard disk. This scenario is ideal if you want to provide self-healing for laptop and home workers. When used together with the disconnected caching features of ZfD3's NAL, engineers will need only visit these users to address hardware problems.
To achieve this, we recommend creating an installation CD-ROM that will boot and create a large ZfD3 Linux partition on the hard disk of the PC. Using the same methodology as for a bootable CD-ROM, an installation CD-ROM can perform the following:
Create a large (1GB) Linux partition
Install the ZfD3 Linux environment, including Zim
Copy image files to the Linux partition
The root.tgz file is modified as before to run Zim on boot-up.The installation CD-ROM also requires a modified ZfD3 SETTINGS.TXT file that will specify the size of Linux partition to create, as shown below.
** Extract from SETTINGS.TXT **
#PARTITIONSIZE should be set to the linux partition size in MB, to be
#created on install

PARTITIONSIZE=1024
Note: Installing Linux from the CD-ROM will create a Linux partition on the hard disk and copy the contents of the root.tgz file, which should include Zim and the ZimScript.
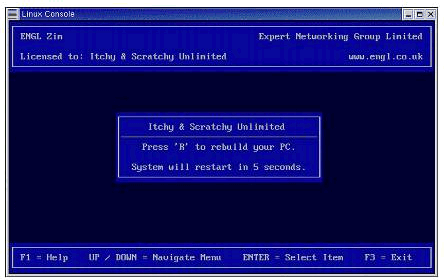
Using Zim's countdown function, a "Press R to rebuild" option is presented to the user (see Figure 6). If the R key is pressed, the machine re-images using the image stored in the Linux partition. If a key is not pressed, the normal OS boot process continues.
; ****************************************************************
; ZimScript (zim.cfg) - Recovery from Local Hard disk
; ****************************************************************

set:title,"Itchy & Scratchy Unlimited"
set:hdiskpath,"/images"
set:image,"cpi-w98-2.zmg"

; --> Countdown
dialog:countdown,%title%,"Press 'R' to rebuild your PC.","System
    will restart in",9,"seconds.",r,blue
if:var,_ask,ne,-1
    jump:start_recovery
end:
jump:reboot

label:start_recovery

; --> Restore image from HDD
set:source,%hdiskpath%/%image%
dialog:ask,"Warning!","Restoring image will erase all data!
    Continue (y/n)?",yn,red
if:var,_ask,eq,n
    jump:reboot
end:

if:file,notexist,%source%
    dialog:ask,"Error!","Image file '%source%' not found."
    ,_any,red
    jump:reboot
end:

dialog:popup,"Restoring image, please wait...",blink
file:run,"/bin/img rl a1p1 %source%",silent
dialog:popupclose
screen:auto,off
file:run,"lilo.s",verbose
screen:auto,on

; --> Reboot system
label:reboot
dialog:popup,"Restarting, please wait...",blink
pause:2
dialog:popupclose
file:run,"reboot",verbose
jump:theend

; --> Finished!
label:theend
Displaying a Zim countdown, ideal for recovery menus.
Enhanced Options for LAN-Connected Machines
By replacing the standard ZfD3 environment with Zim, users can be presented with a "less technical" experience when machines are remotely re-imaged by Support personnel. Zim has the ability to hide the normal img screen and display a simple "Please wait, don't press anything" type message to the user, as shown in Figure 7.
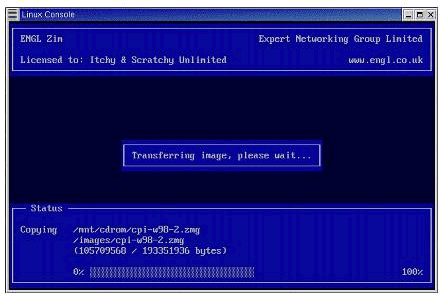
Copying an image from CD-ROM to the local Linux partition.
An engineering/maintenance menu could be made available also by use of the countdown function and a known key sequence, therefore enabling support staff/hardware engineers to utilise ZENworks for Desktops imaging without knowledge of the environment of command-line syntax.
All of the required functions can be pre-selected and entered using ZimScript so that the user need only select a menu option.
; ****************************************************************
; ZimScript (zim.cfg) - Maintenance Menu
; ****************************************************************

set:_copydisplay,on
set:_copyverify,on

set:title,"Itchy & Scratchy Unlimited"
set:hdiskpath,"/images"
set:cdrompath,"/mnt/cdrom"
set:image,"cpi-w98-2.zmg"

set:_help,"For assistance please call the Help Desk on ext.1234.^
    ^Press a key to continue."

; --> Countdown
dialog:countdown,%title%,"Press 'R' for Recovery Menu.","System
    will restart in",9,"seconds.",r,blue
if:var,_ask,ne,-1
jump:start_recovery
end:

; --> Query image proxy server
screen:auto,off
dialog:popup,"Checking for imaging jobs, please wait...",blink
pause:2
file:run,"img auto",silent
dialog:popupclose
screen:auto,on
jump:reboot

; --> Recovery menu
label:start_recovery
dialog:banner,"Welcome to the %title% Recovery Menu",2,green

menu:title,"%title% Recovery Menu"
menu:item,opt1,"Restore image from local disk"
menu:item,opt2,"Copy image from CDROM"
menu:item,opt3,"Display machine information"
menu:item,opt4,"Display disk partitions"
menu:item,reboot,"Restart machine"

label:show_menu
menu:display

; --> Restore image from local disk
label:opt1
set:source,%hdiskpath%/%image%
dialog:ask,"Warning!","Restoring image will erase all data!
    Continue (y/n)?",yn,red
if:var,_ask,eq,n
    jump:show_menu
end:

if:file,notexist,%source%
    dialog:ask,"Error!","Image file '%source%' not found."
    ,_any,red
    jump:show_menu
end:

dialog:popup,"Restoring image, please wait...",blink
file:run,"/bin/img rl %source%",silent
; ... you could add error checking, where _error is errorlevel
; ... if:var,_error,eq,0
dialog:popupclose
screen:auto,off
file:run,"lilo.s",verbose
screen:auto,on
jump:show_menu

; --> Copy image from CDROM to local disk
label:opt2
set:source,%cdrompath%/%image%
set:target,%hdiskpath%/%image%
dialog:ask,"","Insert CDROM into drive. Continue (y/n)?"
    ,yn,blue
if:var,_ask,eq,n
    jump:show_menuend:
end:
screen:auto,off
dialog:popup,"Mounting CDROM",blink
file:run,"cdrom.s",silent
screen:auto,on
if:file,notexist,%source%
    dialog:ask,"Error!","Image file '%source%' not found."
    ,_any,red
    jump:umount
end:

dialog:popup,"Transferring image, please wait...",blink
file:copy,%source%,%target%
dialog:popupclose
if:var,_error,ne,0
    dialog:ask,"Error!","Unable to copy image '%source%'."
    ,_any,red
else:
    dialog:ask,"","Copy completed. Press a key to continue."
    ,_any,blue
end:

label:umount
file:run,"umount /mnt/cdrom",silent
dialog:ask,"","CDROM dismounted. Remove CDROM from drive then
    press a key.",_any,blue
jump:show_menu

; --> Display ZENworks inventory
label:opt3
screen:auto,off
file:run,"/bin/img i",verbose
file:run,"echo -n Hit any key to return to the Main Menu  "
    ,verbose
file:run,"kbhit",silent
screen:auto,on
jump:show_menu

; --> Display disk partitions
label:opt4
screen:auto,off
file:run,"/bin/img dbg",verbose
file:run,"echo -n Hit any key to return to the Main Menu  "
    ,verbose
file:run,"kbhit",silent
screen:auto,on
jump:show_menu

; --> Reboot system
label:reboot
dialog:popup,"Restarting, please wait...",blink
pause:2
dialog:popupclose
file:run,"lilo.s",verbose
file:run,"reboot",verbose
jump:theend

; --> Finished!
label:theend
Zim Reference
The following table shows Zim's command-line usage.
|
Command
|
Example
|
Description
|
|
-s:[script_file] |
-s:zim.cfg |
Specify path to Zim script file (default is ‘zim.cfg') |
|
-l:[log_file] |
-l:zim.log |
Specify log file (default is ‘zim.log') |
|
-noexit |
-noext |
Disables use of F3 exit key at menu |
|
--help |
--help |
Display help command line usage and version details |
The following table shows Zim's functions.
|
Function
|
Method
|
Descripton / Syntax
|
|
dialog |
ask |
Display message and wait for a character from keys before exit.dialog:ask,<title>,<message>,<keys>,<colour> |
|
banner |
Display banner message for specified number of seconds.dialog:banner,<message>,<seconds>,<colour> |
|
|
countdown |
Display a window with a decreasing countdown from specified seconds.dialog:countdown,<title>,<message>,<pre-text>, <seconds>,<post-text>,<keys>,<colour> |
|
|
input |
Display a dialog message and wait for carriage-line terminated input.dialog:input,<message>,<variable> |
|
|
popup |
Display a popup window with message with specified attribute.dialog:popup,<message>[,<attribute BLINK>] |
|
|
popupclose |
Close last popup window.dialog:popupclose |
|
|
else (if) |
All future script lines will be processed if condition is FALSE.else: |
|
|
end (if) |
All future script lines will be processed if condition is FALSE.end: |
|
|
file |
copy |
Copy a single file from source to target. Source and target must contain the full path and file name.file:copy,<source>,<target> |
|
log |
Appends message to log file.file:log,append,<message> |
|
|
run |
Runs a shell command in either silent or verbose mode.file:run,<shell_command>,<mode VERBOSE|SILENT> |
|
|
if |
file |
Checks for file existance.if:file,<condition EXIST|NOEXIST>,<file> |
|
var |
Compare the value of a variable.if:var,<variable>,<operator EQ|NE|LT|LE|GT|GE>,<compare> |
|
|
jump |
Finds the specified label and continues script execution.jump:<label> |
|
|
label |
Specifies a label.label:<name> |
|
|
menu |
title |
Specifies the title displayed at the top of the menu window.menu:title,<title> |
|
item |
Add an item to the menu.menu:item,<id>,<description> |
|
|
display |
Displays the menu.menu:display |
|
|
pause |
Suspend ZimScript execution for a specified number of seconds.pause:<seconds> |
|
|
screen |
auto |
Enables or disables automatic redraw and focus to the Zim console window, following a file:run execution.screen:auto,<flag ON|OFF> |
|
redraw |
Redraws and changes focus to the Zim console window.screen:redraw |
|
|
set |
Create or modify an existing variable.set:<name>,<value> |
The following variables control the Zim runtime environment or are used to return input data and error levels.
|
Variable
|
Description
|
Values (* default)
|
|
_copydisplay |
Enables / disables progress dialog. |
*ON / OFF |
|
_copyverify |
Enables / disables verification. |
*ON / OFF |
|
_help |
Specifies the message displayed when ‘F1' is pressed whilst the menu is displayed. |
*"No help available." |
|
_error |
Last errorlevel (numeric). |
n/a |
|
_ask |
Last key pressed at dialog (case-sensitive char). |
n/a |
Both Linux system and Zim runtime variables can be referenced in any ZimScript command. When Zim finds a variable in a script line, it will first resolve the variable against the Linux system variables and then against ZimScript variables.
set:image_file,cpi-w2k.zmg
set:server_name,itchy-nw1
dialog:popup, "Restoring image %image_file% from server
    %PROXYADDR%",blink
file:run,"img rp %PROXYADDR% //%server_name%/data/images/
    %image_file%",silent
Colour Usage for Dialogs
The majority of ZimScript dialog functions can be passed a background colour. The foreground colour will automatically be set to a visible colour as shown in the following table:
|
Background
|
Foreground
|
|
red |
white |
|
green |
white |
|
brown |
black |
|
blue |
white |
|
magenta |
black |
|
cyan |
black |
|
white |
black |
|
black |
white |
In the Pipeline
Following feedback from Zim customers around the world, we have been working on some new features that should be available by the time you read this AppNote:
ZISD (ZENworks Image-Safe Data) - read/write of NETBIOS computer name, workgroup
Multi-level menu's
Customisation and control of header / footer
Complete customisation of front-end
Password protected menu items
And lots more . . .
Summary
In this AppNote, we have touched upon several ways that Zim can be used to provide a consistent and easily customisable front-end for ZENworks for Desktops 3 imaging. We hope this AppNote has given you some new insight into the possibilities of ZENworks imaging. To summarise, the key features of ENGL Zim are:
Self-contained Linux executable (less than 100KB)
Compatible with ZENworks for Desktops 3.x
Suitable for disconnected and LAN-connected environments
Suitable for local disk and removable media such as CD-ROM or Jazz disk
Hides the ZENworks imaging engine
Provides a friendly, colourful interface to match your organisation's requirements
Can provide administration and recovery menus with optional countdown
A trial copy of ENGL Zim, together with the latest documentation, can be downloaded from http://www.engl.co.uk.
* Originally published in Novell AppNotes
Disclaimer
The origin of this information may be internal or external to Novell. While Novell makes all reasonable efforts to verify this information, Novell does not make explicit or implied claims to its validity.