Quick Guide to Installing and Configuring Novell iChain 1.5 Authorization Services
Articles and Tips: article
Consultant INovell Consulting
smessick@novell.com
Stefan Evans
Server AnalystGulfstream Aerospace Corporation
01 Jun 2001
This AppNote takes you step-by-step through the process of installing iChain 1.5 Authorization Services, which provides user authentication and access control within the iChain system. For information on installing iChain 1.5, see "Quick Guide to Installing and Configuring Novell ICS and iChain 1.5" in the May 2001 issue of Novell AppNotes.
- Introduction
- Installing iChain 1.5 Schema Extensions
- Installing iChain 1.5 ConsoleOne Snap-Ins
- Configuring iChain 1.5 Authorization Services
- Optional Considerations
- Conclusion
Introduction
Novell iChain is a set of components for building an electronic business infra- structure. It is comprised of the iChain Internet Caching System, iChain Authori- zation Server, iChain Community Services (running on NetWare Enterprise Web Server), NDS eDirectory 8.5, Public Key Infrastructure Services, the iChain ICS browser-based administration utility, and iChain Snap-Ins for ConsoleOne.
The iChain Authorization Server provides two basic functions: user authentication and access control. In addition to being the repository and access point for user authentication information, the iChain Authorization Server is also the repository and access point for access privilege and community membership information for your iChain implementation. This information is stored in the Novell Directory Services (NDS) database. The iChain Authorization Server accesses this data directory to determine the appropriate access for iChain users.
The purpose of this document is to demonstrate the initial configuration needed to implement iChain authorization services.
Installing iChain 1.5 Schema Extensions
To install iChain services software as an Authorization Server on NetWare 5.1 with Service Pack 2a and eDirectory 8.5 or later, complete the following steps.
-
On a client workstation, log in as Admin to the production NDS tree into which iChain 1.5 is to be installed.
-
Run the START.EXE program that comes with the iChain Authorization Services software. This file is located on the iChain CD.
-
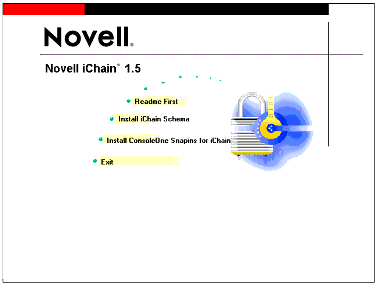
From the startup screen (see Figure 1), click on "Install iChain Schema".
The Novell iChain 1.5 startup screen.
-
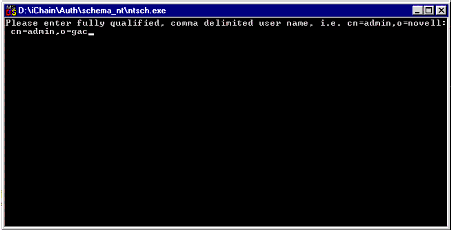
You will see a pop-up DOS window asking you for a username, password, and IP address (see Figure 2).
The pop-up DOS window prompts you to enter a user name.
-
At the first prompt to enter a fully qualified, comma-delimited user name, type the name of a user who has administrator privileges to the NDS tree. Then press <Enter>.
-
You are next prompted to enter a password. Type the password for the user you previously specified and press <Enter>.
-
You are next prompted to enter an IP address for a server holding a Read/Write or Master replica of the [Root] partition. Once you have done this, press <Enter>.
This completes the schema extensions necessary for the iChain Authorization Services component.
Installing iChain 1.5 ConsoleOne Snap-Ins
To install the ConsoleOne snap-ins for iChain 1.5, complete the following steps.
-
Returning to the iChain install screen (which should still be open), click on the "Install ConsoleOne Snapins for iChain" option.
-
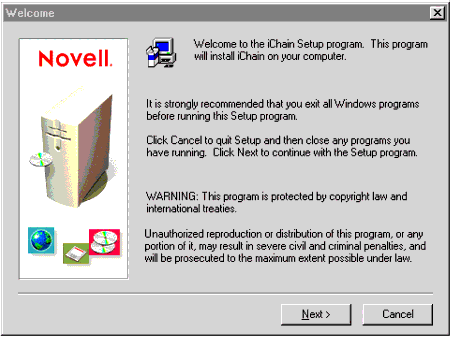
The iChain Setup program displays the welcome screen shown in Figure 3. Click Next to continue.
The iChain Setup program welcome screen.
-
The program next displays the software license agreement screen. After reading the terms, click Yes to accept the license agreement and continue.
-
The next screen asks you to specify the location of the ConsoleOne snap-ins for iChain (see Figure 4).
The ConsoleOne Snap-ins screen.
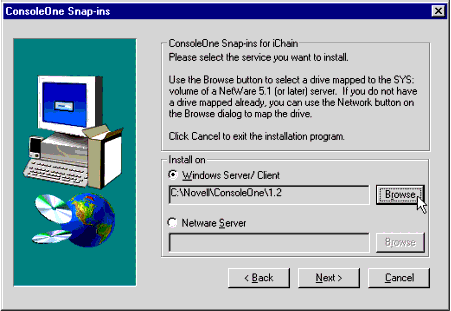
If your local installation of ConsoleOne is anywhere but the default path of C:\Novell\ConsoleOne\1.2, click on the Browse button to select the path. Alternatively, you could click the Netware Server radio button and add the iChain snap-ins to a server-based installation of ConsoleOne. Once you have specified the path, click Next to continue.
-
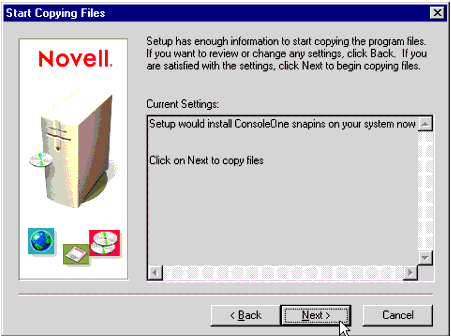
The next screen allows you to confirm the current settings. Click Next to start copying the files.
The Start Copying Files confirmation screen.
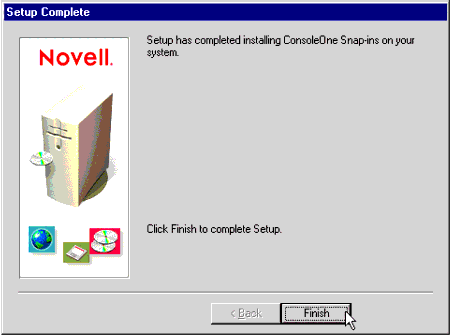
The Setup Complete screen.
-
When the file copying process is complete, the program displays the screen shown in Figure 6. Click Finish to exit the Setup program.
This completes the installation of the ConsoleOne snap-ins. You are now ready to configure the iChain Authorization Services.
Configuring iChain 1.5 Authorization Services
To configure the Authorization Services for iChain 1.5, you need to complete the steps outlined in the following sections. Before you begin, do the following:
-
Log in to the NDS tree whose schema was extended for iChain objects.
-
Open the ConsoleOne utility.
Creating the iChain Guest User
First we need to create the iChain guest user, which will be used for all public- access content that does not require authentication. It is advisable that this User object be placed in a partition that is stored locally on your Authorization Server.
-
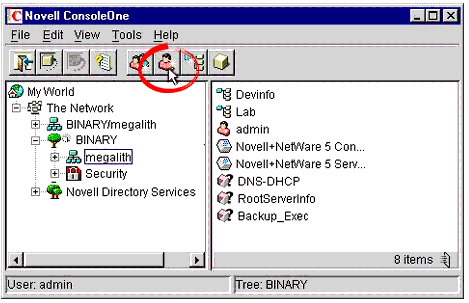
In ConsoleOne, click on the Create New User icon, as shown in Figure 7.
The Create New User icon in ConsoleOne.
A pop-up window appears, prompting you to enter information about the new user (see Figure 8).
The New User information screen for the guest user.
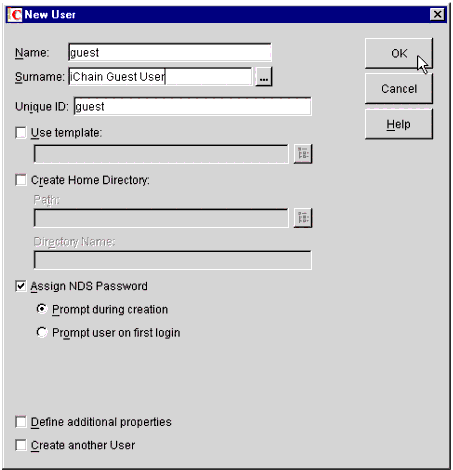
In the Name field, type the login ID for your guest User object. In this example, I have used the name "guest". You may assign this object any name, according to your own organization's standards.
Ensure that the Assign NDS Password box is checked, and that the "Prompt during creation" radio button is selected. Click OK to continue.
-
A pop-up window is displayed, prompting you to set the guest user's password (see Figure 9).
The Set Password window.
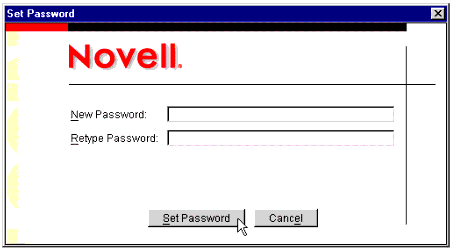
Leave both password fields empty. The reason for this is that you do not want users who are just visiting the public content of your intranet/extranet to be prompted to log in. Click the Set Password button to continue.
-
You will see a prompt reminding you that failure to enter a password can present a security risk. Click Yes to continue without entering a password.
You should now be able to see the new guest User object in the ConsoleOne pane.
Creating the LDAP User
You now need to create the LDAP user that iChain will use for pulling information out of NDS.
-
In ConsoleOne, click on the Create New User icon. You will again see the New User information screen, as shown in Figure 10.
The New User information screen for the LDAP user.
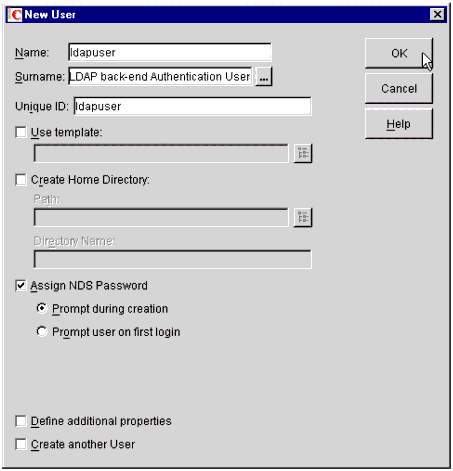
In the Name field, type the name of your LDAP back-end authentication user. In this example, I have used the name "ldapuser". You may assign this object any name, according to your own organization's standards.
Ensure that the Assign NDS Password box is checked, and that the "Prompt during creation" radio button is selected. Click OK to continue.
-
A pop-up window is displayed, prompting you to set the LDAP user's password (see Figure 11).
The Set Password window.
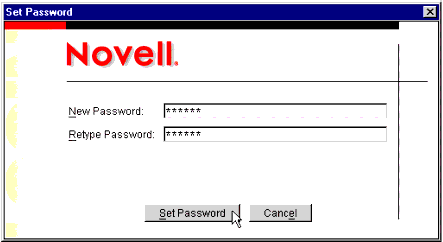
In the New Password and Retype Password fields, type a strongly-designed password of your choice for the LDAP user. Click the Set Password button to continue.
You should now be able to see the new LDAP user object in the ConsoleOne pane.
Note: This LDAP User object should have rights at the [Root] of the NDS tree granting Browse and Inheritable object rights, as well as Compare, Read, and Inheritable property rights. Optionally, if you later choose to allow for member self-registration, this user should also have all object and property rights in the container where such users will be created, as defined in the NewRegister.html file on the Community Server. Refer to "Self-Registration Feature" in the "Optional Considerations" section at the end of this AppNote for further details.
Creating the iChain Service Object
You now need to create an iChain Service Object (ISO). The ISO unifies all of the various aspects of iChain. Each component of iChain, as well as the other new object types, will refer to or have NDS object links to this object. All global-level configuration is performed here, such as password restrictions for Web access, identifying the guest/public content user, and defining the hosts that iChain will be protecting and accelerating. For most situations, you only need one ISO per tree.
-
To create the iChain Service Object, click on the iChain icon (it's a blue icon located on the top navigation bar of ConsoleOne).
-
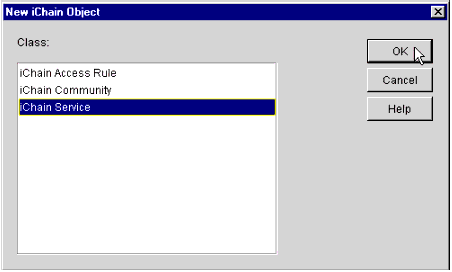
You will see the pop-up window shown in Figure 12, prompting you to select which kind of iChain object you want to create.
The New iChain Object screen.
-
Select iChain Service and click OK to continue.
-
A new pop-up window prompts you to name the new iChain Service (see Figure 13).
The New iChain Service name entry window.
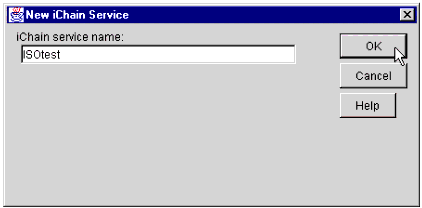
In the iChain service name field, type a name for your new iChain Service object. In this example, I have used the name "ISOtest". You may assign the object any name, according to your own organization's standards.
You should now be able to see the new iChain Service object in the ConsoleOne pane.
Configuring the iChain Service Object
You now need to configure your iChain Service object.
-
To do this, double-click on the ISO you just created in ConsoleOne.
-
You will see a pop-up Properties window similar to the one shown in Figure 14, with the General tab selected.
The iChain Service object Properties screen.
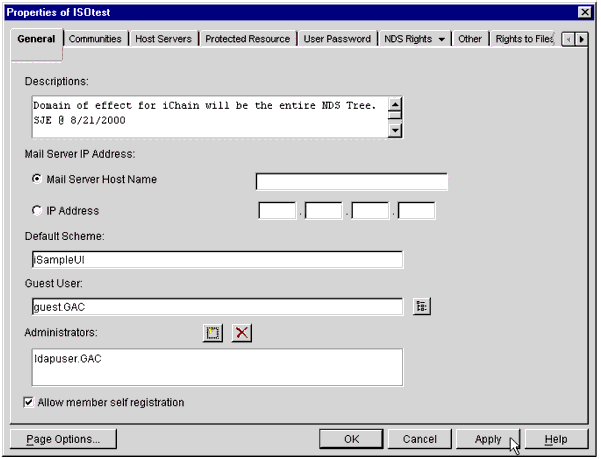
In the Default Scheme field, type "iSampleUI".
Note: "iSampleUI" is the default user interface scheme that ships with iChain 1.5 Community Services. Later, your organization may want to devise its own user interface scheme to customize the look and feel of iChain.
In the Guest User field, type the full context or browse for the guest User object that you previously created.
In the Administrators field, type the full context or browse for the LDAP User object that you previously created.
Optionally, check the "Allow member self-registration" box. (As mentioned before, if you plan to enable this feature of iChain 1.5, see "Self-Registration Feature" in the "Optional Considerations" section of this AppNote.)
When you are finished, click the Apply button.
-
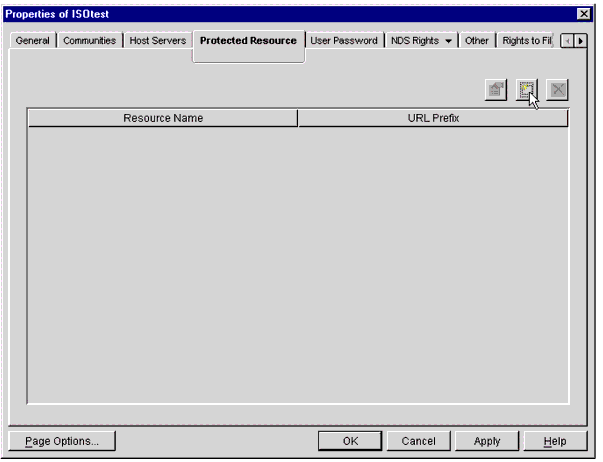
Next, select the Protected Resource tab. A Protected Resource record needs to be created for each Web Server in your environment. Protected Resources tie directly into Access Rule objects, which will be created later on. Together, they determine whether a user is allowed access to any given URL on the Web Server.
-
On the Protected Resource page, click on the icon for creating a new Protected Resource, as shown in Figure 15.
The Protected Resource screen.
-
A pop-up window appears, prompting you to name the new resource (see Figure 16).
The Protected Resource pop-up window.
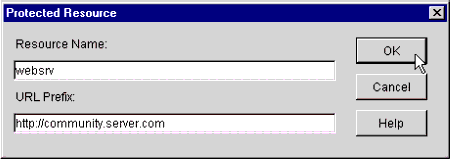
In the Resource Name field, type a name for your resource. In this example, I have named the resource "websrv". You may assign this resource any name, according to your organization's standards, so long as it does not exceed eight characters in length.
Note: These names should exactly match the names of the Web Accelerators defined on the iChain 1.5/ICS proxy, or else the ACL Rules you define later will not function. For more information, refer to the AppNote entitled "Quick Guide to Installing and Configuring Novell ICS and iChain 1.5" in the May 2001 issue.
In the URL Prefix field, type the public DNS address of this resource.
Note: Even if you will be enabling the SSLizer for this resource later, do not prefix the URL with "https". Here it is required that you use "http" in all instances.
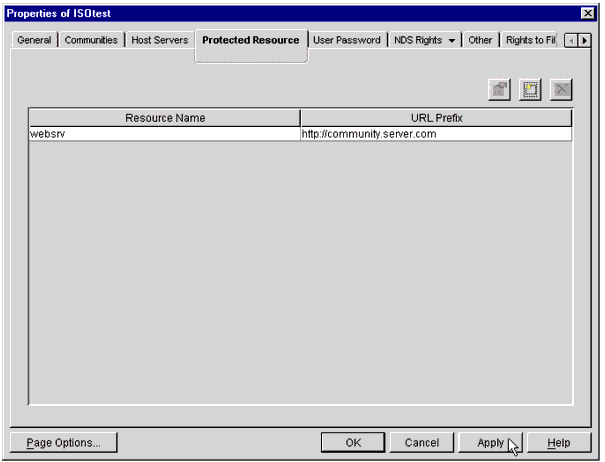
When you have entered this information, click OK. Your newly-defined resource will be displayed on the Properties screen, as shown in Figure 17.
The Properties screen with the newly-defined resource listed.
-
You can add as many Protected Resources as is necessary by repeating steps 4-5 above. When you have finished adding all of your Protected Resources, click the Apply button.
-
Next, select the User Password tab. You will see the screen shown in Figure 18.
The Properties screen with the User Password tab selected.
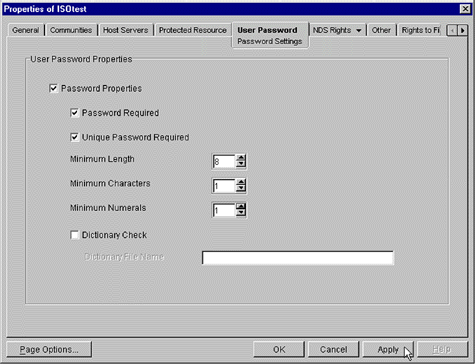
Adjust the User Password Properties according to the standards of your organization. When you are finished, click the Apply button.
This completes the configuration of the iChain Service object. You can now close the Properties window.
Creating an iChain Access Rule Object
You now need to create an iChain Access Rule object, or ACL Rule. This object determines which URLs a user or set of users may access on a Web Server protected by iChain.
-
To create an iChain Access Rule object, click on the blue iChain icon located on the top navigation bar of ConsoleOne.
-
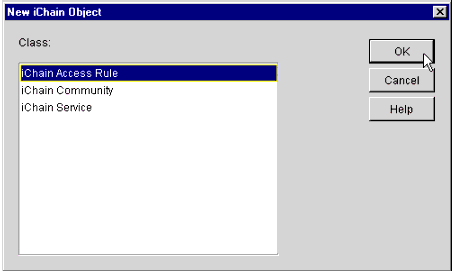
You will see the pop-up window shown in Figure 19, prompting you to select which kind of iChain object you want to create.
The New iChain Object screen.
-
Select iChain Access Rule and click OK.
-
A new pop-up window prompts you to name this new Access Rule (see Figure 20).
The New iChain Access Rule name entry window.
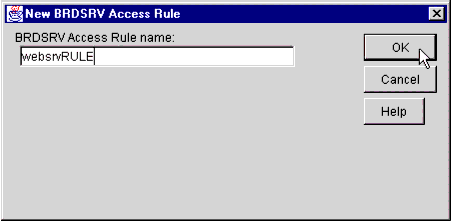
In the Access Rule name field, type a name for your new Access Rule. In this example, I have used the name "websrvRULE". You may assign the object any name, according to your own organization's standards.
Note: In this example, I named the rule "websrvRULE" since it correlates to the Protected Resource named "websrv" that was defined earlier. Creating an intuitive naming scheme such as this will simplify administration.
You should now be able to see the Access Rule object in the ConsoleOne pane.
Configuring the Access Rule Object
You now need to configure the new Access Rule.
-
To do this, double-click on the Access Rule you just created.
-
You will see a pop-up Properties window similar to the one shown in Figure 21, with the iChain Access Rules tab selected.
The iChain Access Rules Properties screen.
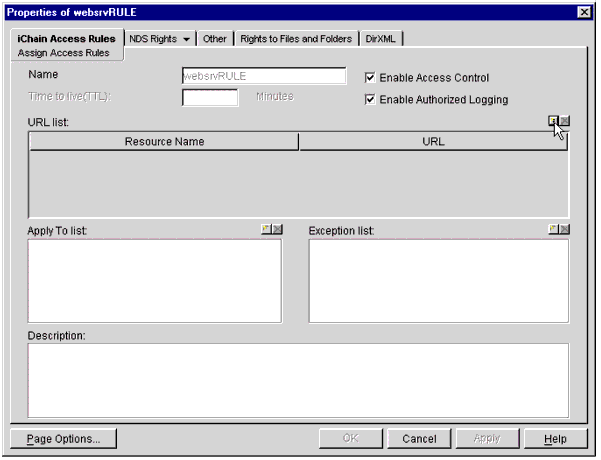
Ensure that Enable Access Control is checked.
Select or deselect the Enable Authorized Logging option, as desired.
-
Click on the Assign New URL button, as shown in the screen shot.
-
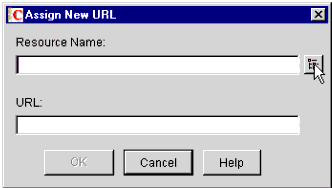
You will see the pop-up window shown in Figure 22. Click on the browse button to the right of the Resource Name field.
The Assign New URL pop-up window.
-
You will see a "Select ISO Protected Resource" window, prompting you to select a resource for which the rule will be applied (see Figure 23).
The Select ISO Protected Resource window.
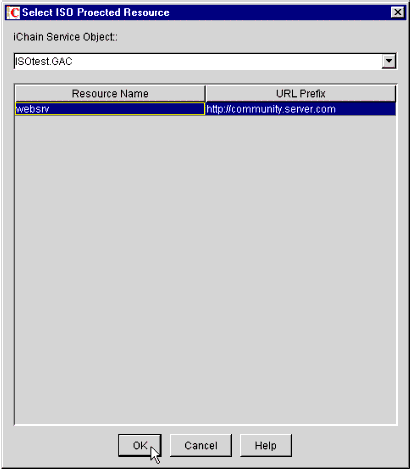
In the iChain Service Object field, you will see the ISO that was created earlier. In the Resource Name and URL Prefix columns, you will see the Protected Resources that were defined earlier.
Select the resource that you want to associate with this Access Rule. In this example, I have selected the resource named "websrv". Click OK to continue.
-
You are returned to the Assign New URL pop-up window. As shown in Figure 24, enter the relative URL path to which you would like to allow access. Click OK to continue.
The Assign New URL window with Resource Name and URL entered.
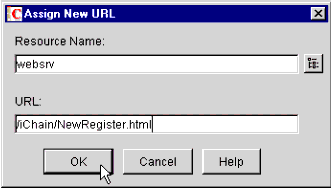
Note: This security can be very granular. You can grant access to the entire host (/*), a particular subfolder (/documents), or even just a single file. The URL list is not limited to one Protected Resource. The same rule can be used to specify access to a variety of different hosts.
-
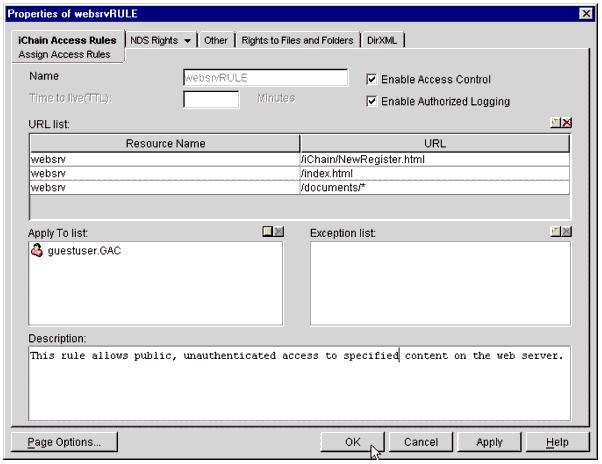
Enter as many URLs as your situation requires. When you are finished, you will see your new entries listed in the URL column as shown in Figure 25.
The Access Rule Properties window with URLs listed for the Protected Resource.
-
In the "Apply To list" field, use the browse button to locate User, Group, or Organization Unit objects for which you want this rule to apply. You can add as many as your situation requires.
Note: Sub-containers of any Organizational Units listed in the Apply To list will inherit the access granted to the parent container.
-
In the "Exception list," you can specify users, groups, and organizational units that should be exempt from the "Apply To list."
-
When you are finished, click OK.
This completes the configuration of the iChain Access Rule object.
Creating an iChain Community Object
You now need to create an iChain Community object. An iChain Community acts as a centralized forum for managing and disseminating information to a certain subset of users. Customized content such as links of interest and targeted messages can be posted for the members of the Web communities alone to view upon sign-on.
-
To create an iChain Community object, click on the blue iChain Object icon located on the top navigation bar of ConsoleOne.
-
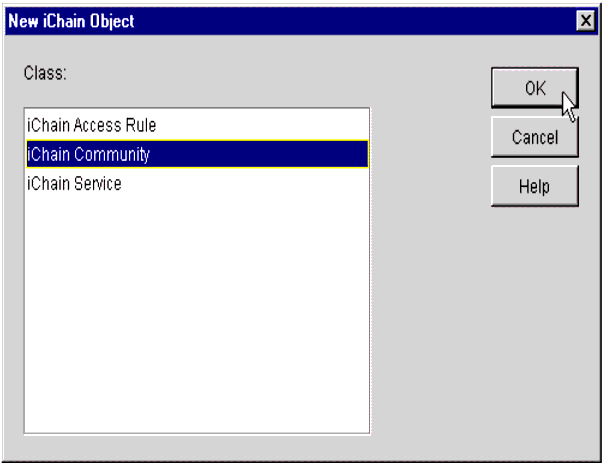
You will see the pop-up window shown in Figure 26, prompting you to select which kind of iChain object you want to create.
The New iChain Object screen.
-
Select iChain Community and click OK.
-
A new pop-up window prompts you to configure this new Community (see Figure 27).
The New iChain Access Rule name entry window.
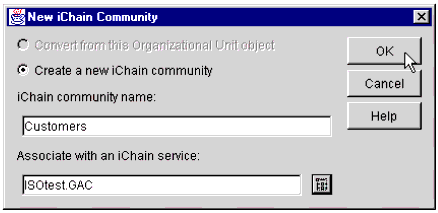
You can either convert an existing Organization Unit object into a Community, or you can create a new Community. The processes are similar for either selection. In this example, I am creating a new iChain Community.
Ensure that the "Create a new iChain community" radio button is selected.
In the iChain community name field, type a name for your new Community. In this example, I have used the name "Customers". You may assign any name, according to your organization's standards.
In the Associate with an iChain service field, browse to locate the ISO for your NDS tree. When you are finished, click OK.
You should now be able to see the Community object in the ConsoleOne pane.
Configuring the Community Object
You now need to configure the new Community.
-
To do this, right-click on the Community object you just created and select Properties.
-
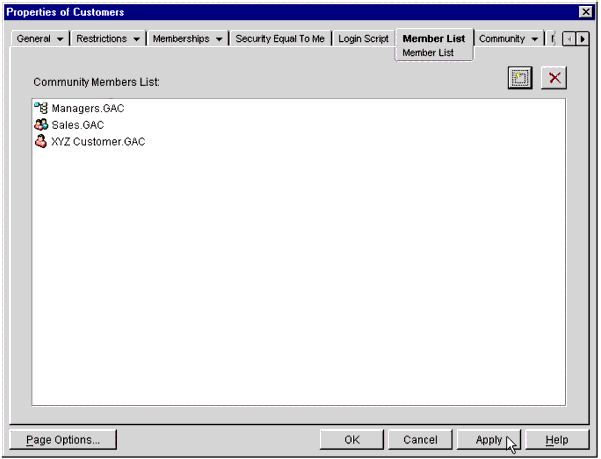
You will see a pop-up Properties window similar to the one shown in Figure 28.
The iChain Community Properties screen.
-
Select the Member List tab. You will see the Community Members List page. Click on the browse button to select which objects will be members of this Community. You can select User, Group, and Organizational Unit objects. When you have selected all appropriate members, click the Apply button.
-
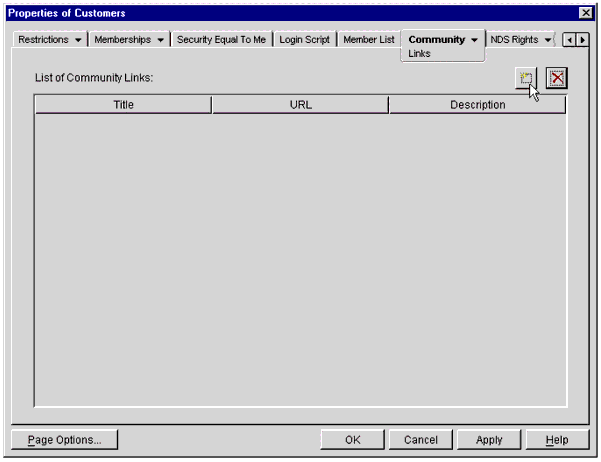
Under the Community tab there are four drop-down options: Updates, Documents, General, and Links. For the purposes of this example, select Links.
-
You will see the List of Community Links screen (see Figure 29). Click on the button as shown to create a new link.
The Community object Links page.
-
You will see the pop-up New Customers Links window shown in Figure 30.
The New Customers Links pop-up window.
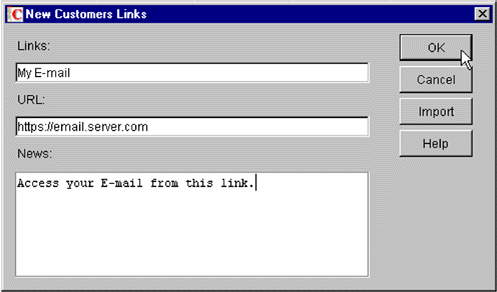
In the Links field, type a label for the link. Members of this Community will see this name on the Web.
In the URL field, type the full address that the link will point to, prefixing it with "https" as necessary if the host was set up to use the SSLizer on the iChain 1.5/ICS proxy.
In the News field, you can optionally enter a brief description of the link.
Note: A list of Communities that the user belongs to, as well as a list of all the links and news they inherit from those memberships, can be displayed by accessing the iChain Community Services server or any other customized portal solution that your organization has programmed to tie into iChain and NDS.
When you have finished, click OK.
-
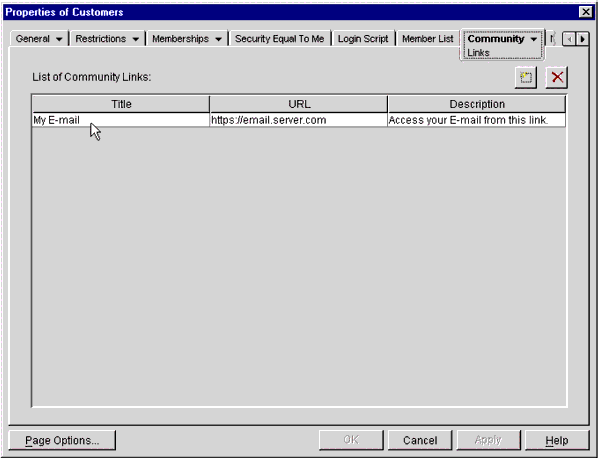
You will see that the Community link you just created (in this case, "My E-mail") is now listed under Community Links, as shown in Figure 31.
The Community object Properties window with Community Links listed.
You can add as many links as you need for this Community, or set of users.
To customize the other Community fields such as Updates, Documents, and General, simply go to the corresponding tab. When you have finished, you can close the Properties window.
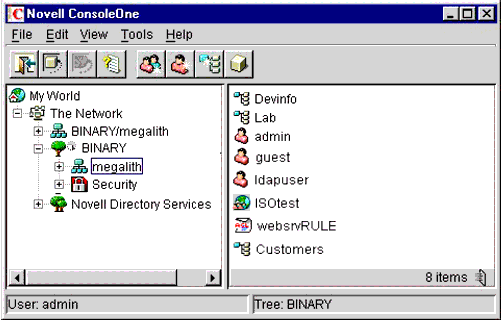
This completes the configuration of iChain's Authorization Services. Figure 32 shows all of the objects you have created as they should now appear in ConsoleOne.
The iChain-related objects as displayed in ConsoleOne.
Optional Considerations
This section describes some optional considerations you can make for your iChain Authorization Services implementation.
Self-Registration Feature
If you plan to use the user self-registration feature of iChain 1.5, complete the following steps:
-
Through ConsoleOne, ensure that the ISO allows member self-registration. Within the ISO is a checkbox which you can check to allow member self-registration or uncheck to not allow it. The default is unchecked.
-
Launch a text editor and open the NewRegister.html file in the following location: \\community_servername\sys\novonyx\suitespot\docs\iSampleUI\.
-
Search for "DefaultContext" and change the value to match the container in which self-registering users should be placed (see Figure 33).
Editing the NewRegister.html file.
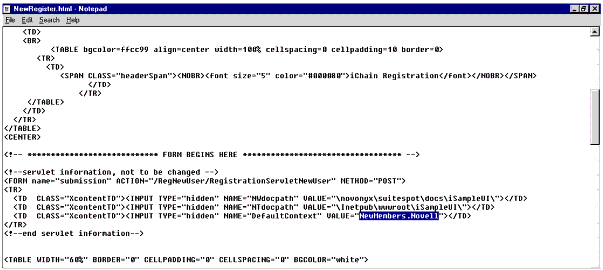
Note: Depending on your circumstances, you may or may not want this container to be one from which users are allowed to actually log in, as defined in the Cache | Authentication | Modify <LDAP-profile-name> | LDAP Options | LDAP Contexts option of the iChain 1.5/ICS appliance. You may prefer to not allow logins to occur from within this container until someone or some mechanism within your organization can appropriately review the information for authenticity before granting the account access into your security infrastructure. For instance, you might create two containers, OU=SELFREG.O=XYZ and OU=CUSTOMER.O=XYZ. Member self-registration will place a new User object into the SELFREG container, but until some validation process has occurred and the User object is moved (automatically or manually) to the CUSTOMER container, that User object will not be able to actually sign on.
-
Once this is completed, save and close the NewRegister.html file.
Object-Level Access Control (OLAC)
OLAC allows for the customization of content that will be injected into HTTP request headers. The request headers are only passed between the proxy and the back-end Web Server, never between the user's browser and the proxy.
Two components affect this process. The first part resides on the iChain 1.5/ICS appliance and sets up the proxy's connection to your organization's NDS tree via LDAP Services. The other half is a part of the Authorization Server and is modified through ConsoleOne. This is where the NDS content that will be retrieved by the proxy's LDAP connection is actually customized.
-
For the first part of this operation, map a drive from your workstation to the iChain 1.5/ICS appliance: \\143.126.76.15\sys\ichain\oac.
-
Launch a text editor and open the oac.properties file (see Figure 34).
Editing the oac.properties file.
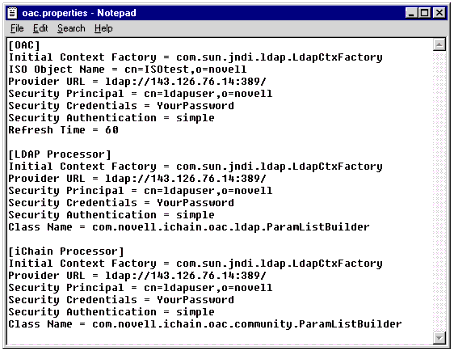
In the first section, modify the ISO Object Name to match the ISO as it resides in your NDS tree, being sure to use LDAP comma-delimitation instead of the usual NDS period-delimitation.
The Provider URL should be modified to point to the IP address of a low utilization server in your NDS tree (this server will become your "Authorization Server"), which will be used by the proxy to retrieve user attribute information from NDS via the LDAP protocol.
Note: If your NDS partitioning and replication strategy can afford it, this server or "Provider" will return LDAP queries faster if replicas are stored locally. However, the best-case scenario is to use Novell's DirXML product to synchronize your tree to a separate "flat tree" structure, where all the NDS information would be local to LDAP Provider server and only one context has to be listed in the LDAP Authentication profile on the iChain 1.5/ICS proxy; Trees with deep hierarchical structures will obtain the most benefit from this procedure. The result will not only be faster LDAP queries/responses, but also faster user binds, or authentication, into the iChain infrastructure.
The Security Principal should be the LDAP back-end authentication user created at the beginning of this AppNote.
Security Credentials should be matched with the password you defined for the LDAP back-end authentication user.
The last two sections need the same information duplicated to them as well (except for the line for the ISO Object Name).
-
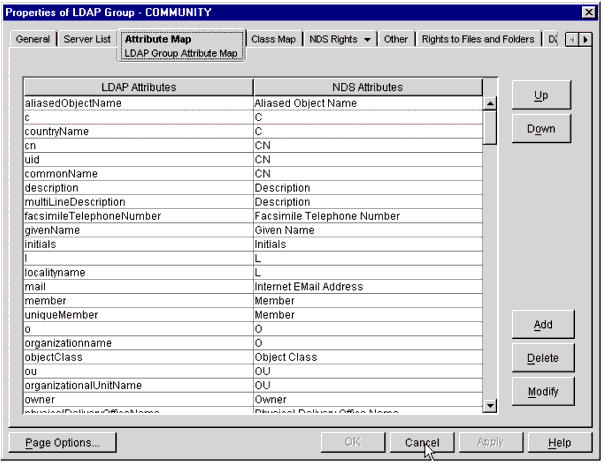
For the second half of this operation, launch ConsoleOne and begin by verifying the Class and Attribute Maps on the LDAP Group object for your LDAP Provider server defined in the oac.properties file (see Figure 35).
Verifying the Class and Attribute Maps on the LDAP Group object for your LDAP Provider.
-
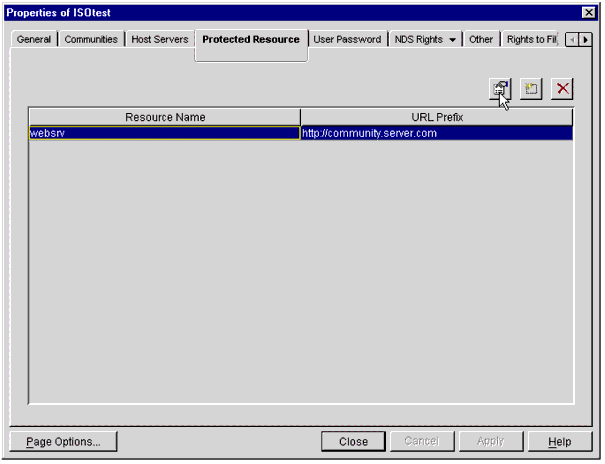
Next, click on your ISO, bring up its Properties window, and select the Protected Resource tab (see Figure 36).
The Protected Resource tab selected in the ISO Properties window.
-
Select the Protected Resource for which you want to customize the HTTP request headers. Click the left-most icon at the top-right of this screen to view the OLAC properties for this resource.
-
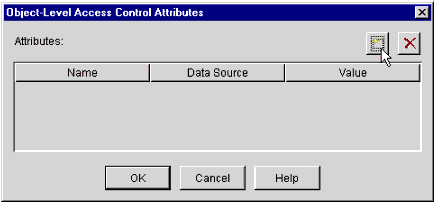
You will see the pop-up window shown in Figure 37. Click the left icon at the top-right of this window to insert a custom attribute to be injected into the HTTP request headers.
The Object-Level Access Control Attributes window.
-
You will see the pop-up window shown in Figure 38, prompting you to enter the attributes.
The Attributes entry window.
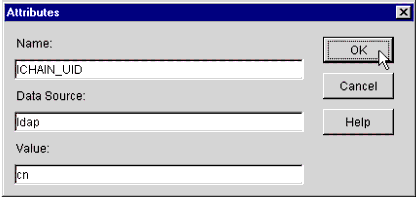
In the Name field, type any name you want to call the attribute that will be passed in the HTTP request header.
The Data Source, in most cases, will be LDAP.
The Value field should contain the real LDAP name for any attribute you want to retrieve from NDS, as demonstrated on the LDAP Group object's Attribute Map.
Click OK when you are finished defining the attribute.
Note: ICHAIN_UID and ICHAIN_PWD (must be in all-caps) are reserved keywords that allow you to assign, on a per-host basis, custom values in the HTTP authorization header. An industry standard, the username;password format of the authorization header is the basis for HTTP Basic Authentication between the proxy and back-end Web Server. This feature is what commonly allows iChain 1.5 to provide single sign-on (SSO) to resources within the iChain infrastructure. Anything other than these two reserved keywords in the Name field will inject the custom attributes into the HTTP query string instead.
-
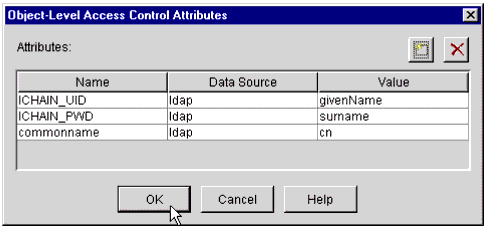
Figure 39 shows the Object-Level Access Control Attributes window listing the custom attributes that have been set up.
The Object-Level Access Control Attributes window with entries.
Continue adding the attributes that you want to be inserted into the header. Once you have entered all necessary customized attributes for this resource, click OK.
-
A pop-up window warns you that for these new settings to take effect, you will need to type "oacrefresh" from the unlocked iChain 1.5/ICS proxy's server console screen, or restart the proxy. Click OK to continue.
-
The final step to this process requires a setting change on the iChain proxy. From the iChain 1.5/ICS browser-based management utility, go to Cache | Web Server Accelerator | Modify <accelerator_name> | Authentication Options and enable "Forward Authentication information to web server".
Conclusion
By following the steps outlined in this AppNote, you will have successfully installed and configured Novell iChain 1.5 Authentication Services. You can now provide authentication and secure access to the resources in your iChain environment to your employees, customers, and partners on the Net.
* Originally published in Novell AppNotes
Disclaimer
The origin of this information may be internal or external to Novell. While Novell makes all reasonable efforts to verify this information, Novell does not make explicit or implied claims to its validity.