Configuring a Fault-Tolerant Messaging System Using GroupWise 5.5 and Novell Cluster Services
Articles and Tips: article
Consultant III
Novell Consulting
spayne@novell.com
01 Jun 2001
This AppNote addresses how to configure GroupWise 5.5 in a cluster using Novell Cluster Services. It is based on real-world experience by Novell Consulting in implementing fault-tolerant messaging systems for various clients. While this article focuses on GroupWise 5.5, the procedures described herein will also work with GroupWise 6. GroupWise 6 has additional features designed for Novell Cluster Services, which will be addressed in detail in a future AppNote.
- Introduction
- Design Guidelines for a Clustered GroupWise System
- IP Name Resolution and Clustered GroupWise Systems
- Installation Guidelines
- Creating a Domain and Post Office Resource
- Connecting to the Internet Through the GroupWise Gateways
- Summary
Introduction
E-mail has become mission-critical for most organizations, with any downtime affecting both user productivity and the ability to service customers. This increased reliance on e-mail as the primary form of intra- and extra-company communication places a great burden on the corporate and Internet messaging system, and makes any outage immediately obvious to the entire organization.
No matter how stable a stand-alone messaging system is, there will always be outages-some planned, some not. From hardware failures to routine system maintenance, organizations need a method of bringing a single server down, while keeping the underlying messaging system operational.
Novell's solution to this need for 24x7x365 messaging is the combination of GroupWise and Novell Cluster Services. By configuring GroupWise in a cluster, any individual server failure will not impact the messaging system as a whole.
This AppNote is written assuming an intermediate-level understanding of GroupWise and Novell Cluster Services. For more information on Novell Cluster Services, refer to the May 1999 AppNote entitled "An Introduction to Novell Cluster Services" found at http://support.novell.com/techcenter/articles/ana19990501.html, as well as the online documentation for the product found at http://www.novell.com/documentation/lg/ncs/docui/index.html. Also look for the Novell Press book, Novell's Guide to Storage Area Networks and Novell Cluster Services (ISBN 0764535811) due in October 2001.
Design Guidelines for a Clustered GroupWise System
Generally, the GroupWise design for a clustered system should not be significantly different than the design for a centrally-located GroupWise system. While the design and GroupWise layout does not differ significantly from a non-clustered system, the configuration of GroupWise components in a cluster has some very important differences.
Many organizations implement GroupWise clustering in conjunction with a server consolidation project, with the intent of centralizing the messaging infrastructure while reducing the number of servers in the organization. While this is a good practice, you should not expect clustering to add performance to your servers. For example, don't expect to consolidate 30 highly utilized servers down to a 3-node cluster and get better performance!
Note: GroupWise 6 adds a new "caching" access mode which significantly decreases client-server traffic and dramatically increases the number of active connections a post office can handle. Add that to the multi- processor improvements in NetWare 6, and you can expect a great deal of messaging server consolidation.
In a centralized GroupWise design, a common practice is to have one GroupWise domain that contains your post offices, with a second GroupWise domain for gateways. As the site grows beyond a few thousand users, it is common to configure the primary GroupWise domain as a domain with neither post offices nor gateways, to function simply as an administrative message domain. The biggest modification to this design that you should make for Novell Cluster Services is to create a secondary domain for each GroupWise gateway, rather than a single domain holding all of them. (More information on this will be given in the "Connecting to the Internet Through the GroupWise Gateways" section of this AppNote.)
Version Requirements
GroupWise 5.5 can be clustered using NetWare 5.0 Support Pack 4 or later, or NetWare 5.1 with Support Pack 1 or later. Novell Cluster Services does not support mixed operating system versions within a cluster, so all GroupWise nodes must be at the same OS revision. Due to improvements in protected memory with NetWare 5.1, you should use NetWare 5.1 or later for your GroupWise cluster if possible.
Novell strongly recommends using the Enhancement Pack version to cluster GroupWise, as the majority of testing with Novell Cluster Services is done using the Enhancement Pack. However, GroupWise 5.5 with Support Pack 3 or later contains the Message Transfer Agent (MTA) modifications that allow you to cluster GroupWise.
Link Guidelines
Clustering GroupWise requires that all links within the cluster be configured using TCP/IP. Links between domain MTAs, Post Office Agents (POAs), and their domain MTA, as well as the links between the gateways (such as GWIA and Web Access) and the post offices, must be configured using TCP/IP.
With the current version of GroupWise, you can configure TCP/IP links for the following communications:
POA to MTA
MTA to MTA
Gateway to POA
For best results, configure your domain links within your cluster in a complete mesh format: each domain MTA having a direct TCP/IP link to every other domain MTA within the cluster. Avoiding indirect links and UNC links improves the performance of the GroupWise system and avoids the polling process necessary with UNC links.
Client Access Mode Guidelines
Communication between the client and the POA must be configured as client-server only (TCP/IP). Direct access to the POA is less efficient, can cause database corruption if the server fails during an active session, and is not supported in a cluster.
Cluster-Enabled Volumes
Depending on the GroupWise components you are clustering, you may or may not want to cluster-enable the shared volume used for GroupWise. If you are not sure whether or not to cluster-enable a volume, then cluster-enable it. Cluster-enabling volumes does not add any additional load to the server, and it only needs to be configured once.
In addition, cluster-enabling the volumes used for GroupWise has many other advantages:
Recurring drive mappings through the virtual server guarantees that you will map a drive to the database no matter which server is running the resource.
The GroupWise snap-ins will work no matter which node is running the resource.
Help desk personnel do not need to be trained to determine where GroupWise is running before they connect to a domain to create a new GroupWise user.
When you rebuild a database, you don't have to determine which server has the database running.
The NDS GroupWise object's UNC path properties will reflect the virtual server, not an arbitrary node which may not currently hold the resource.
Cluster-enabling the domain volume and installing the GWIA agents to the clustered volume will allow the GroupWise administrative snap-ins to consistently find the EXEPATH.CFG file and the GWIA.CFG file for administration, no matter where the GWIA is running.
Cluster-enabling the domain volume and installing the agents to this volume guarantees that the GroupWise snap-ins will be able to correctly find the configuration files they need.
Third-party products which rely on UNC path connections (such as SMTP anti-virus scanners) will function no matter which node the domain is running on.
The primary disadvantage to cluster-enabling the volume is that all of the GroupWise commands must be added to the resource that represents the cluster-enabled volume, rather than using the standard GroupWise template provided with the installation of Novell Cluster Services to create an application resource object. However, this disadvantage is trivial compared to the advantages gained by cluster-enabling the volume.
When you cluster-enable a volume, Novell Cluster Services creates three objects: the virtual server object, the NDS Volume object, and the Cluster Resource object. For example, if you create an NSS volume called "GW1" and the server on which you created the volume is in the CONTEXT container of your tree in a cluster named "CLUSTER", you will have the following objects once you cluster-enable the volume:
.CLUSTER_GW1_SERVER.CONTEXT (This is the Virtual NCP Server.)
.CLUSTER_GW1.CONTEXT (This is the NDS Volume Object, which is actually created through Novell Cluster Services by renaming the NDS Volume Object that was originally tied to a physical server when you cluster-enabled the volume. It is now associated with the virtual server instead of a physical server.)
.GW1_SERVER.CLUSTER.CONTEXT (This is the Cluster Resource object for the cluster-enabled volume.)
Figure 1 shows these objects as they appear in the ConsoleOne utility.
Cluster-enabled Volume objects in NDS.

IP Name Resolution and Clustered GroupWise Systems
Novell Cluster Services requires NetWare 5.x servers and TCP/IP-based connections. This is easy enough to understand, but you may not understand the ramifications if you are not already familiar with accessing resources in an IP-based world.
With IPX, there is rarely a problem finding resources-you ask for a list, and there everything is! This may not be the case with TCP/IP. In an IPX environment every server and router automatically tells the world about everything it knows. TCP/IP does not take this active approach to advertising resources, so you will not necessarily see everything on the network, even if it is properly configured.
Novell Client Protocol Preferences
Figure 2 shows the Protocol Preferences page in the Novell Client Configuration window. This section briefly discusses each of the resolution methods listed under "Protocol component settings" and tells how they relate to finding Novell Cluster Services resources.
The Novell Client Configuration Protocol Preferences page.
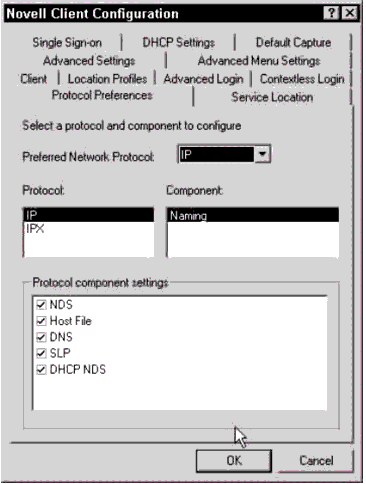
NDS. NDS is a valid name resolution protocol which will resolve names to IP and/or IPX addresses. However, when using NDS as a name resolution protocol, you must remember to consider context in the resolution process. Say you wanted to resolve the virtual server GW1_SERVER.CONTEXT using NDS. If your current context is USERS.CONTEXT, and you tried to resolve GW1_SERVER, would you be successful? No, you wouldn't! This is a common sticking point in using NDS for short name resolution-it relies on the current context being the same as the context of the resource.
More commonly, you will use NDS to resolve an NDS Volume object. In the GW1 example, assume you want to map your M drive to the cluster-enabled GW1 volume. If your NDS Volume object is CLUSTER_GW1, and it is in the CONTEXT container, you can issue the following MAP command:
MAP M: = .CLUSTER_GW1.CONTEXT:\
Mapping drives to the NDS Volume object is the preferred method with Novell Cluster Services. Using this method provides the best automatic client reconnection performance.
Hosts File. The next available IP name resolution method is the HOSTS (or NWHOSTS) file. For Windows 9x clients, you create a NWHOSTS file in the \NOVELL\CLIENT32 directory with TCP/IP name-to-IP address mappings. For Windows NT or Windows 2000, you use the standard HOSTS file in \WINNT\SYSTEM32\DRIVERS\ETC for these mappings. Using these files at the client workstation is tedious and difficult to maintain, and therefore it is not the preferred method for TCP/IP name resolution (except perhaps for the administrator's workstation).
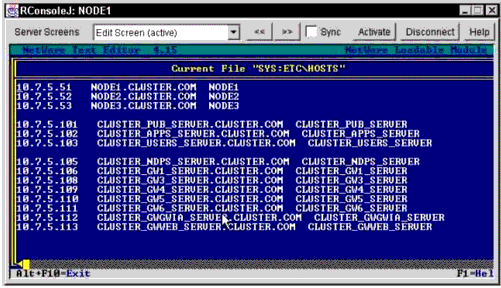
Whenever you cluster-enable a volume, it is a good practice to add the virtual NCP server to the HOSTS file of all servers in the cluster. Modify the SYS:ETC\HOSTS file by adding each virtual server in your cluster, as shown in Figure 3.
The Novell Client Configuration Protocol Preferences page.
DNS. Perhaps the most common IP Name Resolution option is Domain Name Service (DNS). Like the hosts file, it is good practice to place all of your virtual servers into DNS. However, this requires that your DNS server support the underscore ( _ ) character, which may or may not be the case. (The next version of Novell Cluster Services will allow you to name your virtual servers however you want, so you will be able to avoid this issue.) Note that the DNS entry does not need to match the actual resource. For example, you could put CLUSTER-GW1 in DNS, using the TCP/IP address of the CLUSTER_GW1_SERVER virtual server. Clients could then map drives using the DNS name.
For short name resolution to work using DNS, the client workstation must either belong to the same DNS zone (such as consulting.novell.com) as the resource, or the resource zone must be configured in the clients DNS suffix search path.
With the virtual servers configured in DNS, the clients can use DNS to map drives using UNC paths. For example:
MAP M: = \\CLUSTER_GW1_SERVER.CLUSTER.COM\GW1
Or, assuming the client's DNS zone is the same as the resource:
MAP M: = \\CLUSTER_GW1_SERVER\GW1
Or, with the example above where the DNS entry doesn't match the resource (in this case, the DNS entry is configured with a host name of CLUSTER-GW1. CLUSTER.COM):
MAP M: = \\CLUSTER-GW1.CLUSTER.COM\GW1
SLP. NetWare 5.x uses the IETF standard Service Location Protocol (RFC 2165) to advertise service information across TCP/IP based networks. SLP does for a TCP/IP network what SAP does for an IPX network, thus providing short name resolution of TCP/IP-based resources within the network.
Novell Cluster Services versions 1.0 and 1.01 do not propagate virtual server information into SLP by default. (The next version of clustering will automatically add this support.) If you want to propagate virtual server information to SLP, download the CVSBIND utility from the following URL:
http://support.novell.com/cgi-bin/search/searchtid.cgi?/2957434.htm
After installing the utility according to the included directions, you need to add the following command to your cluster load scripts:
CVSBIND ADD <NAME> <IP ADDRESS>
where <NAME> represents the name of the virtual server, and <IP ADDRESS> is the address of this virtual server. This command adds the virtual server into the bindery.novell SLP service within your existing SLP infrastructure.
To your unload scripts, you add the command:
CVSBIND DEL <NAME> <IP ADDRESS>
The primary advantage of using CVSBIND is that it will give you TCP/IP short name resolution regardless of the user's context or DNS zone. This allows UNC paths to be valid using only the short names of the virtual server.
The use of CVSBIND is strongly recommended for GroupWise cluster resources, as TCP/IP name resolution of your virtual servers is critical for any connections to these virtual servers. For example, if your domain UNC path is \\CLUSTER_ GW1_SERVER\GW1\GWDOM1, and you right-click the domain in the GroupWise view and select "Connect", the connection will only work if you are able to resolve the short name "CLUSTER_GW1_SERVER". This resolution can be done by NDS (assuming your context is the same as the virtual server's context), DNS (assuming your DNS zone is the same as the zone with the virtual server, the virtual server is entered in DNS, and your DNS server supports the "_" character), HOSTS files (assuming your workstation has a HOSTS or NWHOSTS file with the resource entered), or SLP (assuming you have an SLP infrastructure that allows the CVSBIND function to propagate successfully). Based on these name resolution options, the simplest method to guarantee short name resolution is using CVSBIND and SLP.
DHCP NDS. This option is not actually a name resolution method, but enabling it tells the client to utilize DHCP to receive SLP information including the SLP Directory Agent, SLP Scope(s), and Compatibility Mode migration agents.
Protected Memory
Using protected memory for GroupWise components adds to high availability by allowing the server to restart a memory space if any component within that memory space Abends. Restarting the memory space creates a new memory space with the same name, and restarts all modules in the new space with the same load order and parameters of the original memory space. This allows for recovery without failing the entire server, which enhances both up time and database integrity.
The tradeoff with protected memory is higher memory utilization, and a slight performance penalty. Make sure your cluster nodes have sufficient memory to handle the number of memory spaces that may reside on them. (Remember to account for failover paths, as well as the preferred nodes.)
Another reason to use protected memory is that it gives you the ability to unload a single instance of a module, rather than all instances. If you have any possibility of the same GroupWise agent loading multiple times on any node in your cluster, you need to use protected memory. Without it, if your unload script unloads GWPOA, it would unload all instances of GWPOA. So instead of migrating one Post Office, you would actually shut down all Post Office Agents on that cluster node.
MTAs. If you have multiple MTAs in your cluster, and there is any possibility that two could meet on the same cluster node, the MTAs should be loaded in protected memory. This will prevent the problem of migrating one MTA, which forces all other MTAs to unload.
In the unload script, when unloading the MTA, you should try to unload the MTA from its own memory space gracefully, using the command "UNLOAD MEMORY SPACE=XXX GWMTA". However, sometimes you may find the MTA hangs while unloading from the protected memory space. To prevent this from becoming an issue, add a DELAY to the unload script (the length of the delay should be based on your knowledge of how long the MTA should take to unload in your system), then add an UNLOAD KILL ADDRESS SPACE=XXX command to guarantee the module is not left partially functioning.
At the time of this writing, there is currently an issue that prevents the MTA from authenticating to NDS when the MTA runs in protected memory. This prevents the NDS User Synchronization event from functioning if the MTA is running in protected memory. (The NDS User Synchronization event is the process that GroupWise uses to scan NDS for changes that were made to user objects without the proper GroupWise snap-ins, and modify the GroupWise database to match these changes made in NDS). To overcome this issue, configure at least one MTA (possibly outside your cluster) in conventional memory to handle the NDS Synchronization event.
POAs. If you have multiple POAs in your cluster, and there is any possibility that two could meet on the same cluster node, the POAs should be loaded in protected memory. This will prevent the problem of migrating one POA, which forces all other POAs to unload.
Just like you did with the MTA, try to unload the agent from its protected memory space, cause a delay, and then kill the address space.
Gateways. Typically you will have multiple MTAs and POAs in a single cluster, but you will probably only have a single instance of the GWIA or Web Access gateway. If you don't have multiple like-typed gateways in the same cluster, there is no requirement to load these gateways in protected memory and add the overhead that protected memory requires.
Protected Memory Commands. Protected memory commands that you may want to use with Novell Cluster Services include:
LOAD ADDRESS SPACE = XXX YYY.NLM
where XXX is the unique name of the address space, and YYY is the name of the module to load. This command causes the given NLM to be loaded in protected memory. If this NLM auto-loads other NLMs, they will also be loaded into that same protected memory space.
UNLOAD ADDRESS SPACE = XXX YYY.NLM
where XXX is the name of the address space, and YYY is the name of the module to unload. This command causes the given NLM to be unloaded from the given address space. If this NLM exists in other address spaces, it will remain active in those spaces.
PROTECTION
The protection command by itself shows you the status of all memory spaces, including all modules that are loaded in each space.
PROTECTION RESTART XXX
This command flags the address space named XXX to be restartable. If any module in that memory space Abends, the space is killed, and then rebuilt using the same name.
UNLOAD ADDRESS SPACE=XXX
Issuing this command without designating a module to unload will unload all modules within that particular address space. This does not provide protection against a module hanging on the way down-there is no guarantee that everything will unload cleanly.
UNLOAD KILL ADDRESS SPACE=XXX
This immediately kills all modules in the given address space and unloads it. It does not gracefully unload the modules, but ensures that all modules in that memory space are stopped.
Ports
The GroupWise agents listen to all IP addresses bound to the server on their specified port addresses. This means that anytime there is a possibility of two of the same agent types loading on the same server, it is important that each agent use a different TCP/IP port, even though they are using unique secondary IP addresses for each agent.
Port Planning. The best way to avoid port conflicts is to plan your cluster so that every agent in the cluster runs on a unique port. This planning should be done prior to installing the first domain or post office in the cluster.
Table 1 demonstrates a sample planning worksheet. Use a similar worksheet to plan out all of your resources prior to installing the first GroupWise component to your cluster.
Notes on Port Planning Worksheet. The sample port planning worksheet includes the first six cluster resources. GWDOM1, GWDOM3, and GWDOM4 are all resources where the GroupWise domain and Post Office are configured together as a single cluster resource (this is not required) on a cluster- enabled volume. GWPO2 is configured as a separate cluster resource (the post office is part of GWDOM1), which is not on a cluster-enabled volume. GWDOM2 was skipped so that the domain numbering would match the post office numbering for each resource.
Table 1: Sample port planning worksheet.
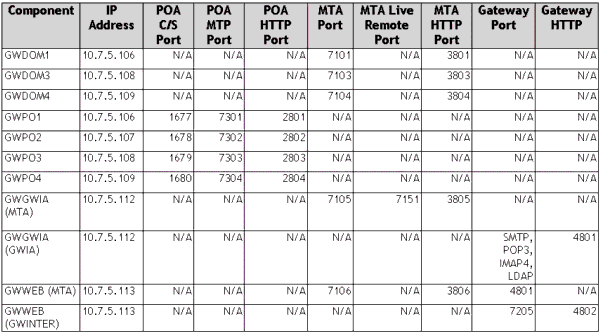
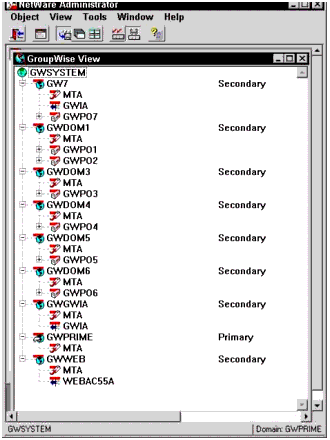
Figure 4 illustrates the entire GroupWise system, as seen in the NetWare Administrator utility.
Sample GroupWise system.
Installation Guidelines
As mentioned earlier, it is recommended that you cluster-enable the volume for any GroupWise domain. Do this before you start the GroupWise installation, and make sure you map a drive to the cluster-enabled volume before you begin your installation.
Drive Mapping/UNC Paths
When you install the domain, make sure you select the domain path by browsing through the drive mapped to the cluster-enabled volume, or by browsing through the virtual server created by cluster-enabling the volume. By doing this, the domain UNC path property will reflect the UNC path through the cluster-enabled volume. This in turn will help you when you install a gateway into this domain. The domain path will be correct, so the gateway will pick up the correct path to the domain.
This also helps with the snap-ins. You can always map a drive to the domain database using the UNC path, and you therefore don't need to know which server has the domain active to connect to it. The same goes for rebuilding the domain. Assuming you have proper TCP/IP name resolution to the virtual server, the virtual UNC path will be all you need to rebuild the database.
Where to Put the Agents: SYS vs. the Shared Volume
When you install GroupWise onto your cluster, you have a couple of choices to make regarding the agent and startup file locations. The installation program will default to installing the agents to SYS:SYSTEM on each server. This means that you will have to either copy the agents and startup files to each node in the cluster that may run GroupWise, or you will need to run the installation program multiple times to get the agents to each node.
The alternative is to create a "SYSTEM" directory on the shared volume that you are using for the GroupWise resource. You can then install the agent and startup files to this location, and install only once. This approach has several advantages:
If you ever need to replace a server in the cluster, all you will need to do is reinstall NetWare and Novell Cluster Services, then assign that node as available for the resource. No extra GroupWise configuration will be necessary.
If you change the startup file information, you only need to change it once.
Having the startup file on the same volume as the resource makes it easy to find.
However, running the NLMs from the resource volume has the following disadvantages:
It may not be obvious to others that are use to these files being on the SYS volume.
You must remember where the agents are when you patch GroupWise. Patching SYS instead of the resource volume could be a problem.
If you have more GroupWise resources than you have nodes in the cluster, you will install the agents more times than you would have if you installed them to the SYS volume.
Some patch installation scripts may not understand (or expect) this type of configuration.
Whichever method you choose, be consistent throughout the entire cluster. Either put all the resources on the resource volumes, or all on the SYS volumes. If you put them on the resource volumes, make sure there are no agent files on SYS to confuse the issue.
Even if you choose to install the agents to the SYS volume, consider storing the startup files on the resource volume. There are no obvious disadvantages to this, and the primary advantage is simplicity: only one file to modify per resource.
The examples in this AppNote have the agents and startup files on the resource volumes.
Modifications to Make After Installation
Once you install the GroupWise component, you must make a few modifications for proper cluster migration/failover functionality. The modifications necessary depend on the GroupWise component you installed.
GroupWise Domain. For the GroupWise domain, you must modify the MTA startup file and GroupWise links. The startup file will be named <Domain>.MTA, where Domain is the first eight characters of the name of the GroupWise domain. Find the "/home-" switch, and modify it to the legacy syntax <volume>:\path, where volume is the shared volume that contains the GroupWise domain, and path is the path to the domain database (see Figure 5).
Editing the MTA startup switch.
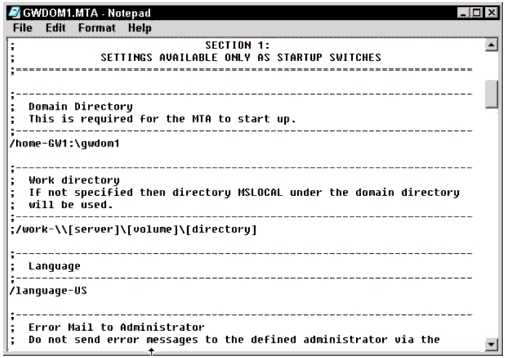
As shown in this example, you would find the line:
/home-\\CLUSTER_GW1_SERVER\GW1\GWDOM1\
and replace it with:
/home-GW1:\GWDOM1\
Note: The "/home-" switch is mandatory.
Another option is to not use the startup file at all, and add the "/home-" switch (and any other desired options) to the load script command for the cluster resource.
Post Office. As with the domain, you must modify the startup file for the Post Office Agent. However, the POA has a few additional modifications that should be made to the startup file.
/home. Just like with the MTA, the POA should have the "/home-" switch. Use the legacy file system syntax (volume:/path). Thus, the "/home-" switch becomes:
/home-GW1:\GWPO1
This switch is mandatory.
/IP. Although you configure the TCP/IP address for the Post Office agent in NDS, the POA tends to disregard that address and bind to the server's primary IP address when it starts up. You can confirm which address the POA is bound to by reviewing the Post Office Agent log file after the POA starts up. You should see an "IP Address:" entry in the client-server settings section of the log file. For example: /IP-10.7.5.108.
Additionally, using this switch causes the client to use the secondary IP address to connect to the POA. This address is then written into the registry of the client workstation, which allows fast reconnection of the client no matter which node the POA is running on.
This switch should be considered mandatory in a cluster.
Note: Note, if you ever change the IP Address of the resource, you must remember to change the startup files also.
Optional Switches. In addition to the "/Home" and "/IP" switches, you can choose from several other switches to use to force the POA to specific ports. These switches are not required, as the POA reads this information from NDS. However, there may be occasions where the snap-ins don't generate the proper administrative message to send to the agent, or cases where the agent is not configured properly to receive these administrative messages. In these cases, you can either resolve this by rebuilding the Post Office database, or forcing the ports through startup switches.
If you decide to use the optional parameters, remember that any time you change the agents TCP/IP address or port in NDS, you must also change the startup files.
The optional switches are listed in Table 2.
SwitchDescription/port
Specifies the port to use for client-server communications
/MTPINIP
Specifies the TCP/IP address to use for inbound MTP communications
/MTPINPORT
Specifies the port to use for inbound MTP communications
/MTPOUTIP
Specifies the TCP/IP address to use for outbound MTP communications (this is the Domain MTA address)
/MTPOUTPORT
Specifies the port to use for outbound MTP communications (this is the Domain MTA port)
Table 2: Optional POA switches.
GWIA
The GWIA has two startup files: GWIA.NCF and GWIA.CFG. In addition, the EXEPATH.CFG file should also be verified prior to starting the resource.
GWIA.NCF. Verify the GWIA.NCF commands are generic enough to be valid on all nodes in the cluster by using the legacy file system syntax. For example:
SEARCH ADD GWGWIA:\SYSTEM LOAD GWGWIA:\SYSTEM\GWIA @GWIA.CFG
GWIA.CFG. The GWIA.CFG file requires several modifications, including the "/home", "/dhome", and "/work" options. All of these options should be modified to reflect the legacy file system syntax, without any server-specific references. For example:
/Home-GWGWIA:\gwgwia\WPGATE\GWIA /DHome-GWGWIA:\gwgwia\WPGATE\GWIA /work-GWGWIA:\gwgwia\WPGATE\GWIA\000.PRC\GWWORK
EXEPATH.CFG. This file is used by the GroupWise snap-ins to locate the GWIA.CFG file, which contains configuration information for the items that are not actually stored in NDS. If this path is wrong, the snap-ins will not show you all of the options available for configuring the GWIA. Unlike all the other files, this file is not found in the agents directory, but in the domain structure (<Volume>:\<Domain Directory>\wpgate\GWIA). This file does not contain any switches, just a path to the GWIA.CFG. For example:
\\CLUSTER_GWGWIA_SERVER\GWGWIA\system
This is another reason to consider installing the agents to the cluster resource volume. If the GWIA.CFG file is left in each server's SYS:SYSTEM directory, any time you make a change in NWADMN32 which is written to this file, you must push the modified file out to all other servers which may run this cluster resource. Optionally, you can move the GWIA.NCF and GWIA.CFG file from the SYS:SYSTEM directory to the shared resource volume, and still run the NLMs from the local SYS volumes. Either way, it is important that this process be documented so that all GroupWise administrators know the location and procedures for making modifications.
Another consideration with the EXEPATH.CFG file is TCP/IP name resolution. In the above example, if your client workstation cannot resolve the short name CLUSTER_GWGWIA_SERVER, then the snap-ins will still fail. The path is right, but your client won't find the GWIA.CFG file. This is an example of why we recommend using CVSBIND to enable short-name resolution for the virtual servers.
Web Access
Web Access is probably the most complicated agent to configure since it has the most components. You may choose to use a non-NetWare platform for the Web Server, a NetWare server outside of the cluster, or to cluster the Web Server. If you choose to cluster the Web Server, you may cluster it as part of the same resource as the Web Access agent, or cluster it separately. Then, you may choose to use an Active/Active Web Server configuration, or an Active/Passive configuration. Any of the options will work; they are discussed later in this AppNote.
No matter which way you decide to go, you must modify the Web Access startup file (STRTWEB5.NCF). Alternatively, you may decide to bypass the STRTWEB5.NCF file altogether and put the entire command line in the cluster resource load script.
The STRTWEB5.NCF file includes the /PH- switch which represents the path to the WEBAC55A subdirectory in the Domain. The NCF file also needs to be modified to use the correct server-generic path to load the GWINTER.NLM from the proper location. For example, the NCF file would contain the following command (all on a single line):
load gwweb:system\gwinter /ph=gwweb:gwweb\WPGATE\WEBAC55A /user=.gwagent.groupwise.context /password=password /http /httpuser=webcon /httppassword=password
Link Configurations
When you create a new GroupWise system with a single domain and Post Office, the installation utility gives you a choice to make the link either UNC or TCP/IP. After the initial installation, all links default to UNC paths. However, with Novell Cluster Services, you need to make all links TCP/IP for the GroupWise components that exist within the cluster. These links include the POA link to the Domain, the domain MTA links to all other domains, and the gateway (GWIA, Web Access, and so on) links to the Post Offices.
Rebuilding the Domain Database. Once you create your new secondary domain or post office, you are ready to modify the links. You connect to the primary domain and modify the links to the newly-created secondary domain. But you haven't created the cluster resource yet, so you aren't actually running the domain MTA. The primary domain needs to send an administrative message to the secondary domain, but it will never succeed because the current link is using an invalid UNC path. To fix this, you can rebuild the secondary domain database after you modify the link configuration. This way, once the domain MTA starts, it is properly configured with a TCP/IP link to (and from) the primary domain.
Similarly, when you create a new post office, the default link is UNC to its domain. Once again, you need to change the link to TCP/IP, but the POA isn't running, so the domain MTA can't send the administrative message to the post office notifying it of the new link configuration. Again, one solution is to rebuild the post office database before you finish configuring the cluster resource and starting the POA agent.
Creating a Domain and Post Office Resource
Up to this point we've discussed all of the general information you need to create a cluster resource with a GroupWise domain and post office. This is a common configuration for the domain resource, although you may also have resources with just a Post Office. To get the best "Fan-out-Failover" performance, you can create cluster resources with as few components as logically necessary in a single resource. The following high-level steps walk you through creating a secondary domain and post office as a single cluster resource.
-
Create a cluster-enabled volume for the domain and post office database, and bring the volume online.
-
Map a drive (M in this example) to this volume using the virtual NCP server or the cluster-enabled volume. Create a directory named "SYSTEM" (required if installing the agents to the cluster volume), a directory for the domain database named "GW2", and a directory for the post office database named "PO2".
-
Launch the NetWare Administrator (NWADMN32) utility with the GroupWise snap-ins, and make your system connection to the primary GroupWise domain.
-
Create a new GroupWise domain. Important considerations are:
For the domain database location, browse through the drive you mapped in step 2 (the M drive).
In the link to Domain, link to your primary domain.
-
Once the domain is created, modify the new MTA object by completing its TCP/IP address and port information.
-
Modify the link configuration for the domain, and make the link to the primary (and all other domains within the cluster) direct TCP/IP. Make sure you modify both the outbound and inbound links.
-
Make sure your GroupWise connection is still to the primary domain, and then rebuild the new domain database. (If you have long names for the cluster and the volume, the UNC path may be incomplete when you rebuild the domain. If this is the case, browse through your M drive mapping).
-
Change your GroupWise connection to be the newly-created domain.
-
Create a new Post Office object. Important considerations are:
For the post office database location, browse through the drive you mapped in step 2 (the M drive).
Change the Access mode to client-server only.
-
Once the Post Office is created, modify the new POA object by completing its TCP/IP address and port information.
-
Verify the GroupWise connection is to the domain that holds the new post office, and then modify the post office link configuration to be Direct TCP/IP.
-
Rebuild the Post Office database.
-
Using your software distribution directory, install the MTA and POA agents. Important considerations include:
The installation path can either be the SYS volume (in which case you must install them on each server that will be in the preferred nodes list), or the SYSTEM directory you created on the shared storage.
For the path to the database, browse the paths using your M drive (the drive mapped to the cluster-enabled volume).
Do not update the AUTOEXEC.NCF file or start the agents now.
-
Modify the startup files as described in the "Modifications to Make After Installation" section.
MTA "/home-" switch should be server-generic using legacy syntax: /home-gw2:\gwdom2\
POA "/home-" switch should be server-generic using legacy syntax: /home-gw2:\gwpo2\
Add the POA /IP, /MTPINIP, /PORT, and /MTPINPORT switches: /IP-10.7.5.106 (required for clustering) /port-1677 (optional) /MTPINIP-10.7.5.106 (optional) /MTPINPORT-7301 (optional)
Load Script
Once you have the domain and post office agents installed, you are ready to make the modifications to the cluster-enabled volume resource. Since you cluster- enabled the volume, you must modify that resource rather than creating an application resource.
Never have two resources that depend on each other, or bad things can happen. Say you decided to use the GroupWise template to create a resource for GroupWise, even though you have the cluster-enabled volume. When the cluster- enabled volume resource is online, the volume is mounted on its preferred node. However, the application template for GroupWise includes the command to activate and load the volume. When this application is brought online, the node will detect the volume is already active, so it will fail to activate the volume and the resource will go comatose before any other commands execute.
What if you just remove the volume commands from the application resource? Now you have two resources: one for the volume with the volume commands, and another for the application with its commands. What happens if you migrate the volume resource? The application has its volume removed from underneath it, and stops functioning. But since the server didn't Abend, Novell Cluster Services thinks the application is still fine. You end up with a resource that is not working. The moral of the story is it's best to stick with one resource object for each logical resource. If you have dependencies, combine all the dependencies into a single resource object. In this case, it is the cluster-enabled volume resource object.
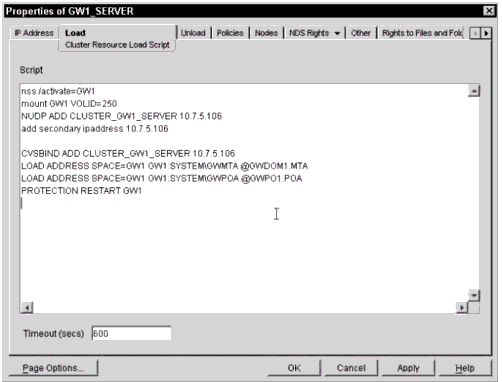
Now that you understand the philosophy, you can modify the cluster-enabled volume resource object. In the load script, add the following commands to the end of the current load script:
CVSBIND ADD <Virtual Server name> <IP Address of Resource> LOAD ADDRESS SPACE=<Name> <Path to GWMTA.NLM>\GWMTA @<Path> <MTA File> LOAD ADDRESS SPACE=<Name> <Path to GWPOA.NLM>\GWPOA @<Path> <POA File> PROTECTION RESTART <Name>
where:
<Virtual Server name> represents the name of the virtual server used for the cluster enabled volume (for example, CLUSTER_GW1_SERVER).
<IP Address of Resource> represents the IP Address you used when you cluster-enabled the volume. (Since this is one resource, the domain MTA, post office POA, and virtual server can all use this address. You don't need a separate address for each.)
<Name> is the unique name you give to the address space. Using the same name as the resource (less the "_SERVER") will help you keep things straight.
<Path to GWMTA.NLM> is self-explanatory. It is either SYS:SYSTEM if you installed the agents to the SYS volume, or the shared cluster volume if you installed them to the resource volume.
<Path to GWPOA.NLM> is also self-explanatory. It is either SYS:SYSTEM if you installed the agents to the SYS volume, or the shared cluster volume if you installed them to the resource volume.
<Path> represents the path to the startup files. As mentioned earlier, the best location for these is on the resource volume.
After you have added these lines, you may remove the TRUSTMIG line. Since you are not using UNC for the domains or post offices, you do not need to use file system trustees on the resource volumes. Removing this line may speed up the migration process of the GroupWise resource.
Figure 6 shows the final resource load script for the domain and post office resource.
Domain and Post Office resource load script.
Unload Script
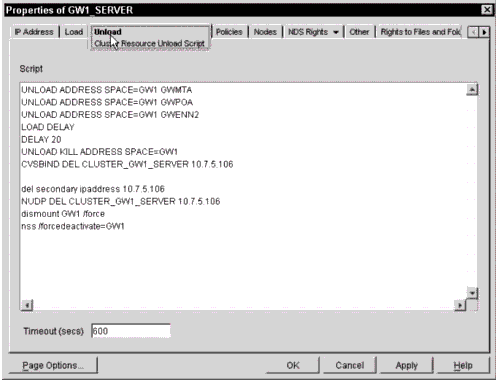
Modify the unload script by adding the commands to unload GroupWise prior to the existing commands to dismount the volume:
UNLOAD ADDRESS SPACE=<Name> GWMTA UNLOAD ADDRESS SPACE=<Name> GWPOA UNLOAD ADDRESS SPACE=<Name> GWENN2 LOAD DELAY DELAY <xx> UNLOAD KILL ADDRESS SPACE=<Name> CVSBIND DEL <Virtual Server Name> <IP Address of Resource>
You may prefer to load DELAY.NLM in the AUTOEXEC.NCF file, in which case you do not need to load it in the unload script. Since you will use this NLM in several scripts, putting it in the AUTOEXEC.NCF negates the need to load it in any of the scripts. The value of <xx> will depend on how long it takes your MTA and POA to unload in your environment. This will vary based on database size, number of active users, and so on.
If you removed the TRUSTMIG statement from the load script, you must also remove it from the unload script.
Figure 7 shows the finished unload script for the domain and post office resource.
Domain and Post Office resource unload script.
Connecting to the Internet Through the GroupWise Gateways
Now that you know how to create a fault-tolerant post office and domain configuration, it's time to connect the system to the Internet. With proper planning and configuration, both the GroupWise Internet Agent (GWIA) and Web Access gateway can be configured for redundancy using Novell Cluster Services.
Cluster Resource
Each gateway should be configured with its dedicated domain as a single cluster resource. This supports the philosophy of "Fan-out-Failover." You aren't tying together any more components than are necessary for the logical function. Because of the UNC nature, the domain should not be configured external to the gateway. (This is also a standard GroupWise design recommendation: don't run the gateway's domain remote to the gateway itself, if it all possible.)
GWIA Installation and Configuration
As mentioned above, to configure the GWIA in a cluster, start with a cluster- enabled volume and a domain dedicated to the GWIA. When you install the domain, make sure you install it using the UNC path through the virtual NCP server, or through a drive mapped to the cluster-enabled volume. Verify that the domain UNC path properly reflects the virtual server, not a physical node in the cluster. Fully test the domain functionality before starting to install the GWIA.
To configure the GWIA for Novell Cluster Services, follow these steps:
-
Create a cluster-enabled volume for the domain and GWIA database, and bring the volume online.
-
Map a drive (M) to this volume. Create a directory named "SYSTEM" (required if installing the agents to the clustered volume), and a directory for the domain database named "GWGWIA".
-
Launch NetWare Administrator (NWADMN32) with the GroupWise snap-ins, and make sure your system connection is to the primary GroupWise domain.
-
Create a new GroupWise domain. Important considerations are:
For the domain database location, browse through the drive you mapped in step 2 (the M drive).
In the link to Domain, link to your primary domain.
When asked for the TCP/IP address, use the address for the cluster-enabled volume.
-
Once the domain is created, modify the new MTA object by completing its TCP/IP address and port information.
-
Modify the link configuration for the domain, and make the link to the primary (and all other domains within the cluster) direct TCP/IP. Make sure you modify both the outbound and inbound links.
-
Make sure your GroupWise connection is still to the primary domain, and then rebuild the new domain database. (If you have long names for the cluster and the volume, the UNC path may be incomplete when you rebuild the domain. If this is the case, browse through your M drive mapping).
-
Modify your cluster-enabled volume resource object with the proper commands to load and unload the MTA.
In the load script, add the following commands after the last command in the script:
CVSBIND ADD <Virtual Server name> <IP Address of Resource> LOAD ADDRESS SPACE=<Name> <Path to GWMTA.NLM>\GWMTA @<Path> <MTA File> PROTECTION RESTART <Name>
In the unload script, add the following commands before the first line in the unload script:
UNLOAD ADDRESS SPACE=<Name> GWMTA UNLOAD ADDRESS SPACE=<Name> GWENN2 LOAD DELAY DELAY <xx> UNLOAD KILL ADDRESS SPACE=<Name> CVSBIND DEL <Virtual Server name> <IP Address of Resource>
-
Change your GroupWise connection to be the newly-created domain.
-
Launch the GWIA installation program from the software distribution directory, and complete the wizard. Important considerations are:
Consider installing the GWIA NLMs to the shared resource volume. Otherwise, you will either need to copy the NLMs to each node that may run the GWIA, or reinstall the GWIA to each of these nodes.
Select the domain database location by browsing through the drive you mapped in step 2 (the M drive).
-
If necessary, modify the GWIA.NCF file to use legacy file system syntax. For example:
SEARCH ADD GWGWIA:\SYSTEM LOAD GWGWIA:\SYSTEM\GWIA @GWIA.CFG
-
Modify the GWIA.CFG file for the "/Home", "/DHome", and "/work" options. All of these options should be modified to reflect the legacy file system syntax, without any server-specific references. For example:
/Home-GWGWIA:\gwgwia\WPGATE\GWIA /DHome-GWGWIA:\gwgwia\WPGATE\GWIA /work-GWGWIA:\gwgwia\WPGATE\GWIA\000.PRC\GWWORK
-
Verify that the EXEPATH.CFG file (found in the domain directory under the WPGATE\GWIA subdirectory) contains the UNC path through the virtual server to the GWIA.CFG file. If you installed the agents to the SYS:SYSTEM directory of each server, you should move the GWIA.NCF and GWIA.CFG files to the shared resource volume so that there is only a single instance of these files. Otherwise, the GWIA.CFG file will only be properly updated on the single server that the EXEPATH.CFG points to when you make modifications in NWADMN32 to these properties.
-
Modify the cluster load and unload scripts to add the command to load and unload the GWIA.
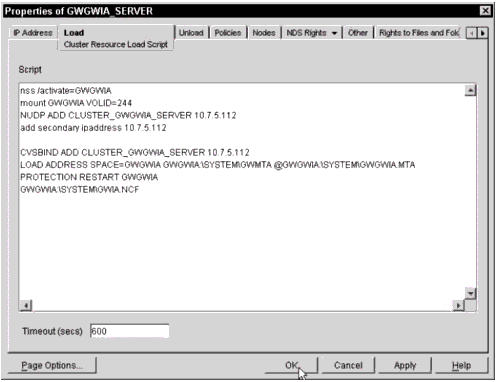
The previous resource load script should now include all of the following commands prior to the commands to activate and load the volume:
CVSBIND ADD <Virtual Server name> <IP Address of Resource> LOAD ADDRESS SPACE=<Name> <Path to GWMTA.NLM>\GWMTA @<Path> <MTA File> PROTECTION RESTART <Name> <Volume to Agents>:\SYSTEM\GWIA.NCF
Figure 8 shows a sample GWIA load script.
GWIA load script.
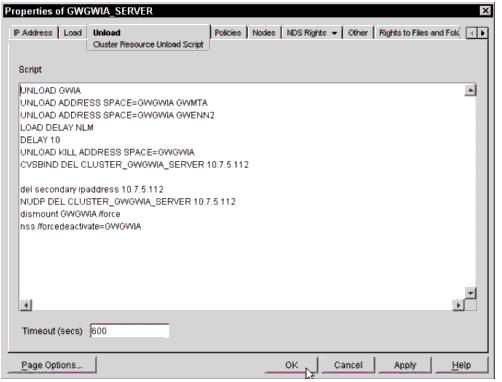
In the unload script, add the following commands before the first line in the unload script:
UNLOAD GWIA UNLOAD ADDRESS SPACE=<Name> GWMTA UNLOAD ADDRESS SPACE=<Name> GWENN2 LOAD DELAY DELAY <xx> UNLOAD KILL ADDRESS SPACE=<Name> CVSBIND DEL <Virtual Server Name> <IP Address of Resource>
Figure 9 shows a sample GWIA unload script.
GWIA unload script.
-
Modify the GWIA links to the post offices to be client-server only (the default is to follow the post office).
-
Finish configuring the GWIA as normal:
Configure Internet Addressing.
Designate a post master.
Verify the Hostname/DNS A record setting.
Firewall Configuration Note
One other factor you must be aware of with the GWIA is the IP addresses and ports used by the GWIA. The GWIA must be able to receive messages on the secondary IP address you use for the resource, for all ports (SMTP, POP3, IMAP4, and LDAP) that it is configured to utilize. You should configure your firewall to allow these incoming messages to the secondary IP address.
However, the GWIA currently only sends messages using the server's primary IP address. This makes configuring the firewall more difficult, as there will be multiple servers that may run the GWIA. Any of these servers must be allowed to send outgoing messages using their primary IP address; otherwise the GWIA will not function properly. Additionally, you should add an MX record for the primary TCP/IP address of each host to your public DNS configuration to allow foreign messaging systems to perform DNS host verification.
One option to ease the firewall configuration is to use an SMTP relay. All outgoing messages can be forwarded to the relay, while incoming messages (based on your MX records) come directly to the GWIA. This would cause outgoing messages to queue up if the relay host were to fail, but incoming messages would be received.
Web Access Gateway
The Web Access Gateway configuration is very similar to the GWIA configuration, except that now you have the Web Server component to deal with too. There are many options for the Web Server, including using a non-NetWare Web Server (such as IIS on Windows NT), using a separate NetWare Enterprise Web Server (EWS) outside of the cluster, using EWS as part of the same cluster resource as the Web Access gateway, or using EWS as a separate cluster resource as the Web Access gateway. All of these configurations are valid, and each has its own set of pros and cons for you to consider.
As with the GWIA, you should start configuring Web Access with a cluster- enabled volume, and a GroupWise domain dedicated to Web Access. This GroupWise domain will be configured as part of the same cluster resource you use for Web Access, and the UNC path should properly reflect the path using the virtual NCP server.
For the purposes of this AppNote, I will assume that you are configuring the Web Server as a separate resource in the Active/Active configuration. To configure Web Access in the cluster, do the following:
-
Verify that the Enterprise Web Server is installed and functioning properly on all nodes that will be in the resource failover path.
-
Set up a cluster resource for the EWS using an Active/Active configuration by following the instructions on Novell's documentation site at: http://www.novell.com/documentation/lg/ncs/docui/index.html#./confgenu/ data/hec6wvlk.html
-
Create a cluster-enabled volume for the Domain and Web Access database, and bring the volume online.
-
Map a drive (M) to this volume. Create a directory named "SYSTEM" (required if installing the agents to the cluster volume), and a directory for the domain database named "GWWEB".
-
Launch NetWare Administrator (NWADMN32) with the GroupWise snap-ins, and make your system connection to the primary GroupWise domain.
-
Create a new GroupWise domain. Important considerations are:
For the domain database location, browse through the drive you mapped in step 2 (the M drive).
In the link to Domain, link to your primary domain.
-
Once the domain is created, modify the new MTA object by completing its TCP/IP address and port information.
-
Modify the link configuration for the domain, and make the link to the primary (and all other domains within the cluster) direct TCP/IP. Make sure you modify both the outbound and inbound links.
-
Make sure your GroupWise connection is still to the primary domain, and then rebuild the new domain database. (If you have long names for the cluster and the volume, the UNC path may be incomplete when you rebuild the domain. If this is the case, browse through your M drive mapping).
-
Modify the cluster-enabled volume resource object with the proper commands to load and unload the MTA.
In the load script, add the following commands after the last command in the script:
CVSBIND ADD <Virtual Server name> <IP Address of Resource> LOAD ADDRESS SPACE=<Name> <Path to GWMTA.NLM>\GWMTA @<Path> <MTA File> PROTECTION RESTART <Name>
In the unload script, add the following commands before the first line in the unload script:
UNLOAD ADDRESS SPACE=<Name> GWMTA UNLOAD ADDRESS SPACE=<Name> GWENN2 LOAD DELAY DELAY <xx> UNLOAD KILL ADDRESS SPACE=<Name> CVSBIND DEL <Virtual Server Name> <IP Address of Resource>
-
Change your GroupWise connection to be the newly-created domain.
-
Launch the Web Access installation program from the software distribution directory, and complete the wizard. Important considerations are:
Install at least these components: Web Access Agent, Web Access Servlet, Administration Files.
Select the domain database location by browsing through the drive you mapped in step 2 (the M drive). It is recommended that you select this path through the cluster-enabled volume, either by browsing through the virtual server or by using a drive mapped to the cluster-enabled volume (see Figure 10).
Specifying the path to the GroupWise domain directory.
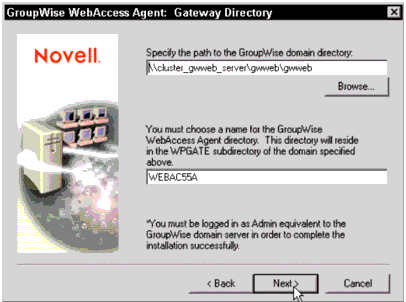
For the agent directory, you may accept the default of WEBAC55A. You will be reinstalling this agent for each node that it may run on, so make sure you use the same directory each time you run the installation. (Note that this name must comply with the 8.3 file naming convention).
The NDS object name defaults to WEBAC55A. You may accept this or change it, but you must use the same name during each installation.
Consider installing the Web Access NLMs to the shared resource volume. Otherwise, you will either need to copy the NLMs to each node that may run the Web Access Agent, or reinstall the Web Access Agent to each of these nodes.
When asked for the TCP/IP address, use the address for the cluster- enabled volume.
The Servlet Gateway must be installed to the SYS:\NOVELL directory of each server that is in the EWS failover path. These may or may not be the same servers that run the Web Access agent.
-
Migrate the GroupWise resource (the cluster-enabled volume) to each of the servers that will be in the EWS failover path, and repeat the Web Access installation selecting just the Web Access Servlet for all servers. If these servers will also run the Web Access gateway (that is, you are configuring them in the same cluster resource), select all of the components again for each reinstallation.
-
If you are using a shared volume for the Web content, copy the SYS:NOVONYX\SUITESPOT\DOCS\COM directory from one of the servers to the Web volume's Document Root directory.
-
If you are using the Spell server, make sure you add the SPELLSRV.NCF file to the AUTOEXEC.NCF file on each of the servers that will be in the Web Server's failover path. Do not add the STRTWEB5.NCF file to the AUTOEXEC.NCF file on any server.
-
Modify the STRTWEB5.NCF file by changing the /PH switch. Remove the UNC syntax and replace it with server-generic legacy file system syntax (for example, /PH-GWWEB:\GWWEB\WPGATE\WEBAC55A). If you are not running the agents and startup files from the resource volume, you will need to modify this file in SYS:SYSTEM of all nodes in the Web Access gateway's failover path. Alternatively, you can put all of the GWINTER switches into the load script, and bypass the STRTWEB5.NCF file altogether.
-
Modify the STOPWEB5.NCF file by removing the "UNLOAD GWENN2" command.
-
If you did not install the Web Access Agents to the shared resource volume and your Web Access agents will have a different failover path than the Web Server, you will need to migrate the domain resource to the next node and repeat the Web Access installation. Repeat this for each node in the Web Access Agent's resource path. If you installed the agents to the shared resource volume, you only need to repeat the installation for the Web Servlet on your Web servers.
-
Modify the gateway links for each post office by changing them from "Follow PO" to client-server only.
-
Copy the COMMGR.CFG file from the Domain WPGATE\WEBAC55A directory to the SYS:\NOVELL\WEBACCESS directory on each server that is in the EWS failover path. This provides the same encryption information and IP address of the Web Access Agent to each of the server's Web Access Servlet.
-
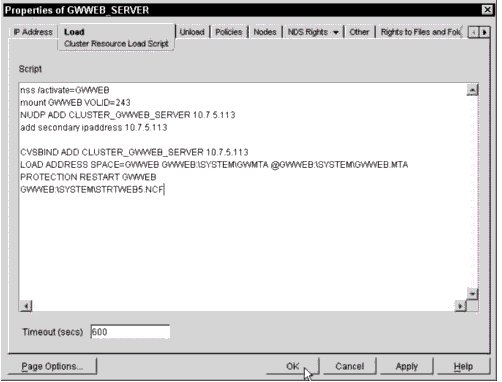
Modify the load script by adding the following command to the end of the file:
<Volume>:\<Path>\STRTWEB5.NCF
Figure 11 shows a sample Web Access load script.
Web Access load script.
Optionally, you may put the entire GWINTER command line with all the switches here instead.
-
Modify the unload script by adding the following command at the beginning of the unload script:
<Volume>:\<Path>\STOPWEB5.NCF
Figure 12 shows a sample Web Access load script.
Web Access unload script.
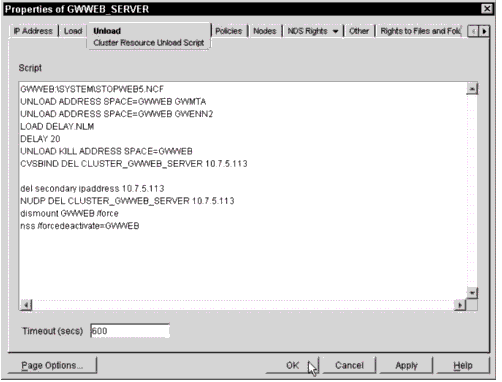
Optionally, you can add the following two commands to the unload script instead:
UNLOAD GWINTER UNLOAD GWCMC
Summary
In this AppNote you have learned the basic procedures for creating a highly available messaging system using Novell's GroupWise 5.5 and Novell Cluster Services. The following list summarizes the key points to remember:
Configure all Post Offices in client-server mode.
Configure all MTA links as direct TCP/IP links.
Configure all Post Office links as TCP/IP links.
Configure all gateway links to the Post Offices as TCP/IP links.
Cluster-enable the volumes you use for all GroupWise domains, particularly domains which contain gateways.
Understand how TCP/IP name resolution affects your ability to map drives to the cluster-enabled volume. Configure the appropriate name resolution for your environment (DNS, Hosts Files, SLP using CVSBIND, and so on).
Modify all startup files to be server-generic, using legacy (non-NDS) file system syntax rather than UNC paths.
Place the startup files on the resource volume.
For the POA startup file, include the "/Home", "/IP", "/Port", "/MTPINIP", "/MTPOUTIP", "/MTPOUTPORT", and "/MTPINPORT" parameters.
Use protected memory for the MTA and POA.
Use cluster-unique ports for all GroupWise components.
Configure each gateway (GWIA, Web Access, and so on) with a dedicated GroupWise domain, with the domain and gateway configured as a single cluster resource.
Modify the cluster-enabled volume's scripts with the GroupWise commands. Don't try to create two resources (volume resource plus application resource) for the same component.
In the unload scripts, unload each component from its protected memory space, add a delay sufficient for the components to unload, then kill that address space.
Test your configuration on all nodes by confirming message flow, administrative ability, and all client functions. Don't just watch the NLMs load and assume everything works.
* Originally published in Novell AppNotes
Disclaimer
The origin of this information may be internal or external to Novell. While Novell makes all reasonable efforts to verify this information, Novell does not make explicit or implied claims to its validity.