How to Use Novell Directory Control (NWDir), Part 2
Articles and Tips: article
Senior Network Analyst
MindWorks, Inc. of Kentucky
porter@digitalme.com
01 May 2001
This AppNote discusses NWEntries, NWEntry, NWPicture, and NWPictures. For Part 1 of this article, see http://support.novell.com/techcenter/articles/ana20010303.html.
- Introduction
- NWEntries Collection
- NWEntry Collection
- NWPictures
- NWPicture
- Schema Methods
- NWDir Basic Tasks
- Summary
Introduction
In order to use the Novell Controls for ActiveX control NWDir, you need to know about the structure of the control. Knowing how objects and attributes are represented and manipulated within an environment is half the battle.
The NWDir control is actually a series of collections:
NWEntries
NWEntry
NWPictures
NWPicture
NWLayout Descriptions
NWLayoutDescription
NWFieldTypes
NWFieldType
NWFieldDescriptions
NWFieldDescription
This AppNote covers the first four collections listed above. The remaining collections-those that deal with the eDirectory schema-will be covered in a future article.
One note for this and future articles on the NWDir ActiveX control: the terms eDirectory and NDS will be used somewhat interchangeably. In reality, NDS refers to NDS version 8 and below, while eDirectory specifically refers to NDS version 8.5 and higher. On another note, the programming skills that you will acquire here will work equally well when logged into eDirectory running on any of the following platforms:
WinNT
Win2000
Linux
Tru64
Solaris
NetWare
However, they must be executed from a machine running a Windows desktop operating system.
NWEntries Collection
The Entries collections will no doubt, be the most useful for you. This property of NWDir is a collection that represents all the objects within the current context. This collection is the one referenced in order to add and delete specific entries in NDS. It can also be used to count objects within a context or to select a specific item.
The Entries collection has three properties:
Count - (Long) the number of objects within a collection
Item - (Index) returns a specific NWEntry object
RelativeIndex - (Boolean) specifies whether an index passed to an item is relative or absolute
There are three methods for the Entries collection:
Add - used to add an item to the collection
Remove - used to delete an item from the collection
Refresh - used to refresh the contents of the collection
If you think about it, there are few things you can do with an entire collection, except displaying it, adding to it, or deleting from it. With that in mind, let's examine these three very important methods.
Add Items Method
To add items to a collection, you must supply the control with the layout and the object name.
NWDir1.Entries.Add(layout,objectName)
A layout represents the recipe for an entire class of objects. A layout describes the very essence of what the object is-for instance, User or Printer or Server. In NDS and eDirectory, the concept of layout is complicated (mostly because of inheritance, super classes and base classes). Layouts will be discussed thoroughly in a future AppNote.
In fact, it's even a bit more complicated than this because X.500 rules state that a user object class must have a surname before it can be created. It may seem a little strange that an entity must have an attribute before it is created, but it's true. This may take a little getting used to, but there are several ways to accomplish it-which we'll explore later in the Appnote. A partial example of adding users is reflected in the following code:
Dim AddObject As NWEntry
Set AddObject = NWDir1.Entries.Add("User","Jan")
Other things we should consider include the context where the User object "Jan" will be created, Jan"s surname, error control-just to name a few. We"ll tackle these issues as they present themselves throughout the article.
Remove Item Method
Removing or deleting objects within a collection is rather simple and merely reference the object in the function. Remember, however, the current collection of entries is represented by the current context-only the named object in the current context will be deleted. (To set the context use the NWDir1.FullName property.)
Dim Success as Boolean
Success = NWDir1.Entries.Remove("Ken")
The variable Success is used here to indicate the completion status of the function. If the removal of "Ken" was successful, Success will be set to True. Likewise, if the function to remove Ken was unsuccessful, Success will be set to False.
Refresh Method
The refresh method is used to reload the contents of a collection.
NWDir1.Entries.Refresh
Several processes can update the contents of a container (ConsoleOne, NWAdmin, Novell Distributed Print Services (NDPS), etc.) Because the contents can change either from these sources or from your own code, refreshing the contents is sometimes necessary to reflect the current contents of the container.
NWEntry Collection
The NWEntry collection is a property of NWDir that represents a single instance of an object and provides a vehicle for accessing specific field data of the object. The NWEntry collection has the following properties:
Alias - (Boolean) indicates if an entry is an alias of another entry.
Entries - (Abstracts the NWEntries collection) returns the contents of a container.
FullName - (String) returns the fully qualified distinguished name of the selected context.
ImageIndex - (String) the index key that's used to locate a corresponding icon or bitmap in NWDir.Pictures.
Layout - (NWLayoutDescription) returns information on the object class of an entry.
OtherNames - (Variant) returns additional values (if present) for the ShortName property.
PartitionRoot - (Boolean) indicates whether an entry is a Partition Root object by returning True or False if the object is not a Partition Root object.
ShortName - (String) returns the relative distinguished name of an object.
Tag - (String) a user-defined property available for programming purposes.
The NWEntry collection has eight methods:
Update/abort
GetFieldValue
UpdateFieldValueFromFile
SaveFieldValueToFile
SetFieldValue
SetPassword
ValidatePassword
Move
As you might expect, the methods for the NWDir.Entry collection deal mostly with an individual object, and its properties.
Update/Abort Methods
Once an entry has been successfully defined, the Update method is used to "seal the deal" and actually create the object in eDirectory. The abort method is the converse of the update method. These methods will be used abundantly throughout this AppNote. They are usually found together and resemble the following:
If Condition then
   Object.Update
Else
   Object.Abort
End if
A better example might include using the variable Success as we did in a previous example and actual working code. Don't worry if you don't understand all the statements yet, you will.
In the following code snippet, a User is added to eDirectory using the Update method.
Dim Success As NWEntry
Set Success = NWDir1.Entries.Add("User", "Anna")
If Success.SetFieldValue("Surname", "Kerr") Then
   Success.Update
Else
   Success.Abort
End If
Notice that a Surname has to be assigned before the user is created. We'll talk more about required attributes in a future AppNote. Suffice it to say that knowing the schema rules is important-knowing why the schema is designed the way it is makes one's programming 'kung-fu' strong!
GetFieldValue Method
This method is used to retrieve the contents of specific attributes of an object. Retrieval can be of any attribute of an object that has populated data, even those attributes that are not part of the base schema. The only requirement-knowing the attribute name and having the rights necessary to retrieve it.
The format of the request to retrieve attribute information takes the following form:
Object.GetFieldValue(FieldName, DefaultValue, ForceAsArray)
where FieldName is a String and indicates the requested attribute of the object. DefaultValue is type Variant and indicates the value to return if no value is present. ForceAsArray is boolean and forces the value to appear as an array even if it is a single value.
Here is an example of the GetFieldValue method:
Private Sub Form_Load()
DIM NDSObj as NWEntry
' find Jan's entry in NDS
Set NDSObj = NWDir1.FindEntry("NDS:\\MINDWORKS_INC\MWI\Accounts\Jan")
' fill the contents of Label1 with information about the subject
Label1.Caption = "Attributes for " + NDSObj.ShortName
' list the contents of all attributes in the array List1
For Each Entry In NDSObj.GetFieldValue("", "", True)
   List1.AddItem (Entry)
Next
End Sub
Figure 1 shows the results of a simple GetFieldValue query that lists the array of attributes assigned to Jan.
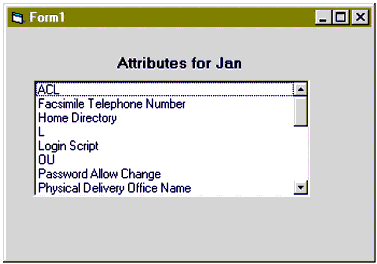
Displaying the attributes for a user is made possible by leaving the FieldValue argument of the GetFieldValue method blank.
Stream File Methods
Two methods deal with stream files. Remember that stream files are the data stored with NDS but in a separate file that is associated with the user. Stream file data usually represents login scripts, print job configuration information, bitmaps, and so on. The two methods are:
LoadFieldValueFromFile()
SaveFieldValueToFile()
These methods provide a mechanism for saving data currently stored in a stream file to a flat file and visa-versa. LoadFieldValueFromFile is used to copy information from a flat file into a stream file. SaveFieldValueToFile is used to copy the contents of a stream file to a flat file. Examples of the two requests are shown below:
Private Sub Form_Load()
Dim Entry As NWEntry
NWDir1.FullName = "NDS:\\MINDWORKS_INC\MWI\Accounts"
Set Entry = NWDir1.Entries("Jan")
Entry.SaveFieldValueToFile ("Login Script", "j:\lognscpt.txt")
End Sub
There are two arguments for LoadFieldValueFromFile -FieldName and FileName. Both are string values. The FieldName indicates the string-based NDS attribute to save, and FileName indicates the file name desired for the output. File pointers can be located in the argument, i.e., C:\loginscript.txt, but pointers must include a drive letter. There are three arguments for SaveFieldValueToFile. Two of them, FieldName and FileName, are the same concepts as for LoadFieldValue- FromFile, only in reverse. The third field, OverWriteExisting, is boolean and gives permission for the program to overwrite an existing file, if it is set to True.
These methods can come in handy; therefore I have provided a short example for both. Don't forget that the Novell Directory Control is necessary for all the examples in this AppNote. To save Jan's login script to a file, we must first identify Jan's location (or context) in the tree. NWDir1.Fullname allows you to set the current context. Next, we set the Entry value to the object of interest, in this case 'Jan' using NWDir1.Entries('Jan'). Finally, use the SaveFieldValueToFile to copy Jan's login script property to j:\lognscpt.txt.
Private Sub Form_Load()
Dim Entry As NWEntry
NWDir1.FullName = "NDS:\\MINDWORKS_INC\MWI\Accounts"
Set Entry = NWDir1.Entries("Jan")
Entry.SaveFieldValueToFile ("Login Script", "j:\lognscpt.txt")
End Sub
Next, let's get fancy. Let's utilize the Photo attribute that exists in most of your trees. This attribute is designed to allow administrators (or users) to add a photograph into eDirectory of the user. You might be asking at this point, 'how do I know if I have this schema extension installed?' You can check several ways, using NDS Manager's Schema Manager, ScheMax, Schemer (an older utility that's no longer available on Novell's web site and is becoming hard to find), or my favorite-NDSSnoop (available in the Free Tools area of Novell's Cool Solutions page http://www.novell.com/coolsolutions/). Launch NDSSnoop and click on the Schema Viewer tab. The example in Figure 2 shows objects on the left and attributes on the right.
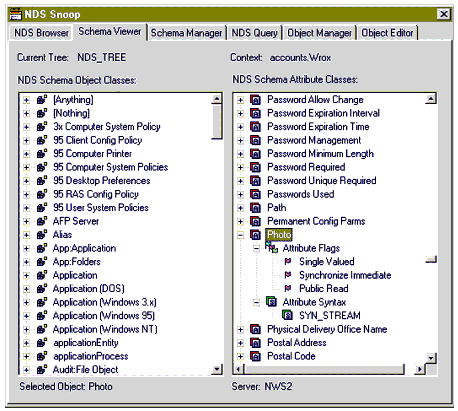
NDSSnoop is a valuable tool for viewing NDS objects, attributes and values. It can also be used to display pertinent information about the NDS schema.
Searching for Photo will determine if your schema has been expanded to allow this attribute. Notice that Photo is a SYN_STREAM file. We'll discuss attribute syntax in detail in another Appnote but for now, SYN_STREAM is the syntax that stores data in the Stream file in NDS-the targeted destination for photo information.
Before we place this information in eDirectory, we must select an appropriate bitmap. It is suggested that a bitmap used for this purpose be less than 35KB in size.
Private Sub Form_Load()
Dim Entry As NWEntry
NWDir1.FullName = "NDS:\\MINDWORKS_INC\MWI\Accounts"
Set Entry = NWDir1.Entries("Ken")
If Entry.LoadFieldValueFromFile("Photo", "L:\Photos\Ken.gif") =
   True Then
Entry.Update
Else
   Entry.Abort
End If
End Sub
We can verify that the Photo attribute was added to Ken's user object by using NDSSnoop. Figure 3 displays the NDS Browser after the above code has run.
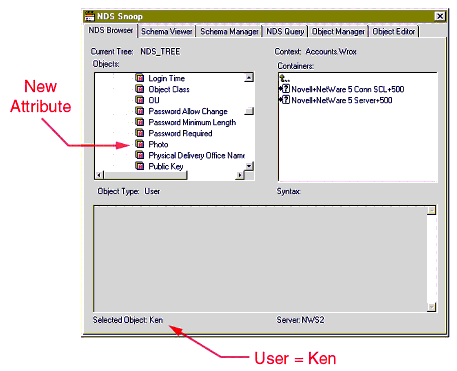
NDSSnoop shows that the Photo attribute has been added to user Ken.
SetFieldValue Method
Inputting information into eDirectory is pretty exciting. In the preceding examples we extracted information from a user's stream file and placed it in a file and then took a picture and placed it in the stream file of another user. Wow! Next, we'll explore the method that allows the update of other types of NDS information.
The SetFieldValue() method is used to populate eDirectory attribute syntax for objects in the eDirectory database. The code that allows this takes the following form:
object.SetFieldValue(FieldName As String, Value as Variant)
The value of the attribute is Variant because of the wide diversity in data stored in NDS. In order to input NDS attribute information, it is necessary to know the exact spelling of the attribute name. You can also use one of the tools mentioned, like NDSSnoop, to view the attributes, their names, and their constraints.
Inputting information into eDirectory is rather simple. In this example, we're going to combine functions from several methods by first completing the job of adding Jan. We started this process in the Add() method section; however, before Jan's object can actually be added to NDS, she must possess a surname. This is accomplished by using the SetFieldValue() method. Lastly, in order to create Jan's object, we use the Update() method.
Dim AddObject As NWEntry
' define the object class and loginID
Set AddObject = NWDir1.Entries.Add("User","Jan")
' define the required field Surname
   If (AddObject.SetFieldValue("Surname","Smith") = True) Then
      AddObject.Update
   Else
      AddObject.Abort
   End If
SetPassword Method
The SetPassword() method really has two forms, one for the user and the other for the administrator. In order for a user to change a password, both the old password and the new password must be supplied to NDS. A user with Supervisor privileges for an object can change that object's password without supplying the old password.
The control takes the following form:
object.SetPassword(NewPassword As String, [OldPassword As String])
The following example sets the entry to Ken's user ID then changes his password.
Private Sub Form_Load()
Dim Entry As NWEntry
NWDir1.FullName = "NDS:\\MINDWORKS_INC\MWI\Accounts"
Set Entry = NWDir1.Entries("Ken")
Entry.SetPassword ("c0m5t0ck4")
Entry.Update
End Sub
Passwords in eDirectory are very confusing. I'm frequently asked 'Where do I find a password stored in eDirectory?' The answer is -there isn't one. Passwords are immediately converted into an object key pair - Private Key and a Public Key. When a password is entered at a workstation, an object key pair is generated and that Public Key is compared to the Public Key stored in NDS. If these keys match, then the password is correct. Therefore, it is obvious that a password is not an attribute of an object and therefore is treated differently than the attributes.
ValidatePassword Method
There are several instances where verification of a password is handy post-authorization code. The Novell Directory Control provides a method to accomplish just that task. The ValidatePassword() method will check a given password against the object's NDS password and return a Boolean True if the two match or a Boolean False if they do not.
The syntax for the method is displayed below:
object.ValidatePassword(Password As String)
An example of password validation for Ken in the MindWorks organization is displayed below.
Private Sub Form_Load()
Dim Entry As NWEntry
NWDir1.FullName = "NDS:\\MINDWORKS_INC\MWI\Accounts"
Set Entry = NWDir1.Entries("Ken")
PWCorrect = Entry.ValidatePassword("c0m5t0ck4")
If PWCorrect Then
   MsgBox "Password is correct"
Else
   MsgBox "Unauthorized, Incorrect Password"
End If
End Sub
Move Method
The Move() methods allows the programmer to move leaf objects from one FullName (context) in the tree to another. Moving, deleting, or changing an object (not its properties) in a tree utilizes the NDS obituary process. This process allows the current object to be present while other replica holding servers in the tree are told of the change. Once all the servers that hold the object agree, the old object is purged (on all the servers), and the new object becomes permanent. Moving and deleting objects in NDS takes more horsepower than nearly any other process.
The syntax of the Move() method involves locating the leaf object and supplying a new FullName for the object.
object.Move(NewFullName As String)
An example of moving Jan from NDS:\\MINDWORKS_INC\MWI\Accounts to the Organization level, or NDS:\\MINDWORKS_INC\MWI is shown below:
Private Sub Form_Load()
Dim Entry As NWEntry
Dim MoveEntry as NWEntry
NWDir1.FullName = "NDS:\\MINDWORKS_INC\MWI\Accounts"
Set Entry = NWDir1.Entries("Jan")
Set MoveEntry = Entry.Move("NDS:\\MINDWORKS_INC\MWI")
End Sub
If a directory entry already exists at the new location with the same RDN, eDirectory will respond with a -606 error, ENTRY_ALREADY_EXISTS this is commonly refered to as a name collision.
NWPictures
Utilizes a list of bitmaps that are accessible from within a visual interface. Bitmaps included represent NDS objects from the Directory, Bindery, and Print Queue controls. The bitmaps that are displayed are directly related to the object in the current context and can therefore be used to count objects or select specific objects in the visual interface. This collection also provides for managing individual pictures in the collection-which means that custom icons are possible.
There are two properties of the Pictures collection:
Count - (Long) the number of objects within a collection
Item - (Index) returns a specific NWEntry object
NWPicture
Identifies a specific bitmap image for a given Layout. This collection is used to identify a specific image and is used to return a reference to an NWPicture object located in an ImageIndex. The resulting bitmap can be used for visual controls such as ImageLists. The control also has no methods and only two properties:
ImageIndex
Picture
Schema Methods
The remaining six collections are:
NWDir.NWFieldTypes
NWDir.NWFieldType
NWDir.NWLayoutDescriptions
NWDir.NWLayoutDescription
NWDir.NWFieldDescriptions
NWDir.NWFieldDescription
These collections represent half the power of the Novell Directory control. They provide a mechanism for the NDS Schema to be extended or modified. Because the power to extend the Schema is so important, and because there is so much to digest with the NDS Schema, it is more appropriate to address them in a separate AppNote.
NWDir Basic Tasks
If you come away from this series of AppNotes with nothing else, you should know how to do a few basic tasks, which include:
Finding a specific object in the tree
Setting the current context
Browsing NDS attributes
Adding and deleting NDS objects
Reading and setting NDS attribute values
These tasks provide a foundation for nearly all others and once you become familiar with them, all other functions will "fall into place." In this AppNote we"ll concentrate on finding an object within the same context. In the next AppNote, we"ll expand to find objects in other contexts throughout the tree and change information stored in those objects.
Finding Local Objects
In this example, you are going to write some simple code to find a known user. This example is basic, but it's better to start with a solid foundation. The code snippet used here will be used in other more complicated examples later.
As we will always do, launch Visual Basic, selecting "Standard EXE" from the Projects menu.
Add the Novell Directory control to the Toolbox menu by pressing Ctrl-T or by selecting "Components" from the "Project" menu. Add Novell Directory control (NWDir) to the form.
We are going to find a known object. In our NDS tree we have a user named Jan. Figure 4 shows a picture of the tree and Jan's contextual position in the tree. Jan's fully qualified name is NDS:\\MINDWORKS_INC\MWI\ Accounts\Jan.
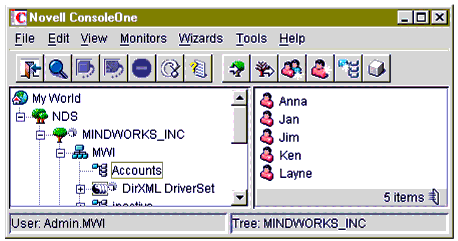
Jan is located in the Accounts container in the Organization MindWorks in the tree, MINDWORKS_INC.
Let's write the code to find and select Jan's user object in the tree. Using the Label tool, draw a long rectangle on the form, as shown in Figure 5.
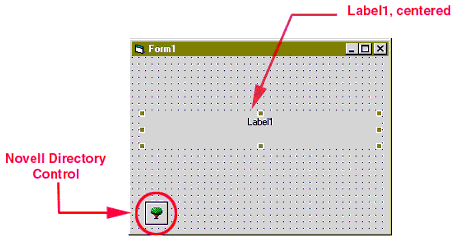
Designing the screen for a simple search utility requires the Directory control and a Label.
Select the form by clicking once in its body, then right clicking and selecting "View code"; this can also be accomplished by double-clicking inside the body of the form. Insert the following code:
Private Sub Form_Load()
Dim NDSObj As NWEntry
Set NDSObj = NWDir1.FindEntry("NDS:\\MINDWORKS_INC
            \MWI\Accounts\Jan")
Label1.Caption = NDSObj.FullName
End Sub
This step is a rather small step but a necessary one as we bridge the gap to search for other entries in NDS. Figure 6 displays the results of the query constructed above.
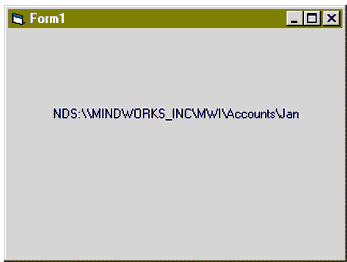
The results of a simple Find.
In the June 1999 issue of Developer Notes, a simple "WhoAmI" program demonstrated retrieving the currently logged-in user"s information. Next, we"re expanding on that code making a modification to find an unknown user using the FindEntry statement. We declared a variable (NDSObj) as type NWEntry-indicating that the object will be viewed as an NDS object. This declaration is not always necessary, but in this case, we are going to use the new object to hold the value that we find using the NWDir1.FindEntry method. Finally, as you did in "WhoAmI", the results are displayed by changing the caption of the Label to display the FullName property of the object.
Try replacing NDSObj.FullName with NDSObj.ShortName. The difference here is the lack of contextual information in the display.
Next, let's build an application that will allow us to find a user based on inputted text.
Using the form that you already have, add a Text box near the top of the form as shown in Figure 7.
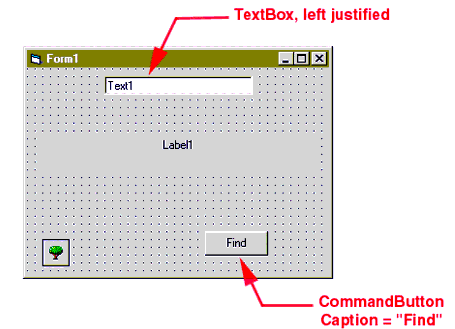
The modified form displaying a TextBox and a CommandButton-added to allow the display of other sibling objects.
Notice that we added a Command Button near the bottom and changed its caption to "Find."
Double-click the command button and insert the following code:
Private Sub Command1_Click()
Dim NDSObj As NWEntry
Set NDSObj = NWDir1.FindEntry("NDS:\\MINDWORKS_INC
            \MWI\Accounts\" & Text1.Text)
Label1.Caption = NDSObj.FullName
End Sub
The difference here is that we are going to use the variable typed into the Text box as the subject of a Find.
Double-click in the background of Form1 and insert the following code:
Private Sub Form_Load()
Text1.Text = ""
Label1.Caption = ""
End Sub
If you run the code above, you will now have the opportunity to type in the name of the user you're interested in. Figure 8 shows the results.
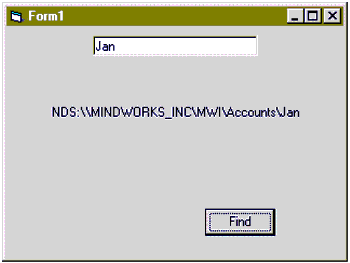
Results of a sibling search Find using the CommandButton.
We do not have options at this point to take care of any possible error situations that may appear, but I think you get the idea of what is becoming possible.
In an upcoming AppNote, you'll discover a method for displaying a tree-view of the NDS environment, which will bring more versatility to our code. For now though, we can find our objects, and other objects in the tree-if those objects are already known to us.
NDS Objects and Syntax
Now that we have discussed the control more thoroughly and have a tool, let's begin to explore eDirectory. We'll first start by displaying information about things we can see (Organizational Units, Organization, [Root], Users, etc.), and in the true nature of discovery, try to investigate things that are hidden just beyond site.
Displaying Container Object Classes
To display Container Object Classes:
Launch Visual Basic and select a "Standard EXE" project.
Design a form similar to the one displayed in Figure 9.
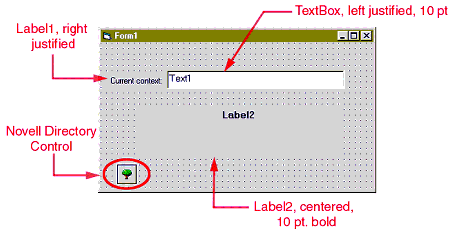
Form1 layout for extracting information about FullName and Object Class.
Double-click in the body of the form and input the following code.
Private Sub Form_Load()
Text1.Text = NWDir1.FullName
Label2.Caption = "The root entry " & NWDir1.Entry.ShortName & " is
               of type " & NWDir1.Entry.Layout.Name
End Sub
The code above displays the FullName of the current context in a TextBox, the Relative Distinguished Name of the current container, and the object class of the current container object.
Logged in as Jan, in the Accounts container of MINDWORKS_INC-the resulting screen looks like the one displayed in Figure 10.
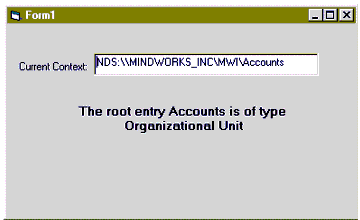
The FullName of the current context is displayed in the text box. The Label below displays the object class of the FullName.
An interesting experiment is to keep backing up the tree and observing the object classes as you go. In order to accomplish this task you must be able to set the context from inside the code. That is accomplished by using the NWDir.FullName property in Write mode. FullName is both Read and Write meaning it can be used to read the current context and it can be used to write or set.
Add the following code, replacing MINDWORKS_INC with the name of your tree and MWI with the name of your organization.
Private Sub Form_Load()
NWDir1.FullName = "NDS:\\MINDWORKS_INC\MWI"
Text1.Text = NWDir1.FullName
Label2.Caption = "The root entry " & NWDir1.Entry.ShortName & " is
               of type " & NWDir1.Entry.Layout.Name
End Sub
Now the context is set to the organization level and the resulting screen indicates that the object class is Organization. Do we dare to take this a step further? I think so!
Change the FullName to the following, replacing MINDWORKS_INC with the name of your tree.
NWDir1.FullName = "NDS:\\MINDWORKS_INC"
As shown in the Figure 11, the object class of the tree root is Top.
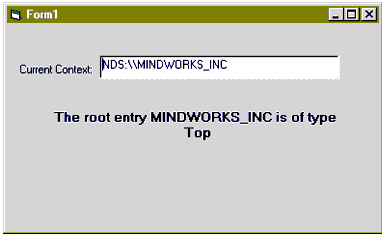
The name of an NDS tree is also the name of the [Root] object, which is of object class Top.
We'll talk more about object classes, class inheritance and attributes in an upcoming AppNote. There are some really cool things about NDS and X.500 and noticing some of their signatures along the way is half the fun. The thing to note here is that Top is the object class at the very top of your tree. The name-or more appropriately, the value of the naming attribute of this object-is the name of your tree. There is another rather odd thing about Top, but I'll leave that for an upcoming AppNote. (I can hardly wait to get there and tell you about it!)
There is one object higher in the tree than Top, an unnamed entity called the virtual root. It was introduced with NetWare 5.
Displaying Attribute Syntax
As we get deeper into attributes, it will become apparent that a strong understanding of attribute types and attribute syntax will be very valuable. An attribute is described by its syntax and a list of flags that define whether it is single or multi-valued, synchronized immediately with other replicas, read-only, or whatever. An important first step with attributes is learning how to deal with different FieldTypes. I listed some of the structured field types in the first AppNote in this series (see "How to Use Novell Directory Control (NWDir), "Part 1" in the March 2001 issue), but with the following code you can discover more about them on your own.
Launch Visual Basic and select "Standard EXE" project.
Add the Novell Directory control to the Toolbox and place it on the Form.
Design a form similar to the one displayed in Figure 12.
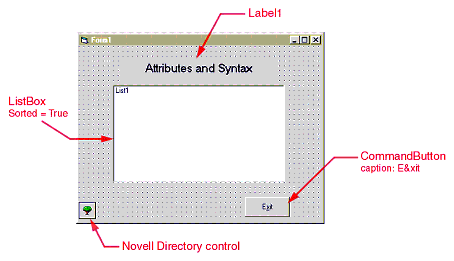
Form used to display NDS attributes and their syntaxes.
Double-click inside the form and add the following code:
Private Sub Form_Load()
Dim NDSAttrs As Variant
Set entry = NWDir1.FindEntry(NWDir1.FullName)
For Each NDSAttrs In entry.Layout.Fields
   List1.AddItem (NDSAttrs.Name & " --  " & NDSAttrs.TypeName)
Next
End Sub
The code above declares NDSAttrs (for NDS Attributes) as Variant. This is necessary because data stored as attributes can be of many different types. Next we bring focus to a specific entry using the FindEntry method-in this case, the entry of focus is the current context (NWDir1.FullName). The focus can be on any object in the tree; we simply need a vehicle to obtain the attributes stored in the NDS Tree. Lastly, we list all the attributes to a ListBox, along with their types using the TypeName property. TypeName is a property of NWFieldType and will be discussed thoroughly in an upcoming AppNote.
It's time we began thinking about the user interface so double-click on the CommandButton and add the following:
Private Sub Command1_Click()
   End
End Sub
This may be trivial, but it is necessary to provide a graceful exit from the program.
When this code is executed, you will be presented with a list of the attributes and their respective syntaxes, as displayed in Figure 13.
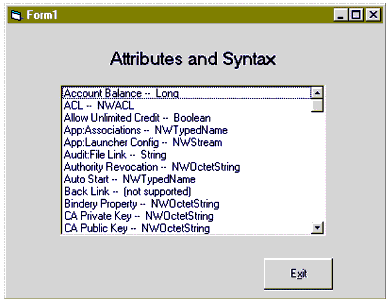
Attributes and their respective syntaxes.
There are several important functions to learn. Listed among them is the retrieval of existing NDS information for objects in the tree. As you can now tell, there is an abundance of objects and attributes in which to choose. Knowing which attribute is stored as what data type makes it easier to extract attribute information in the future. In the next AppNote in this series, we will search for NDS information and alter the contents of the NDS datastore.
Summary
In order to fully utilize the power of the NWDir control, it is important to understand the full functionality of the control. This AppNote serves to introduce the most basic functions of the properties and methods found in the NWDir ActiveX control. Future AppNotes will expand on these basic concepts to reveal the richness and versatility of the Novell Controls.
* Originally published in Novell AppNotes
Disclaimer
The origin of this information may be internal or external to Novell. While Novell makes all reasonable efforts to verify this information, Novell does not make explicit or implied claims to its validity.