Quick Guide to Installing and Configuring Novell ICS and iChain 1.5
Articles and Tips: article
Consultant INovell Consulting
smessick@novell.com
01 May 2001
Special thanks to Stefan Evans of Gulfstream Aerospace for his consulting assistance.
This AppNote covers the initial configuration needed to remotely manage the iChain ICS appliance from a web browser, and then provides a walk-through for activating much of iChain ICS' core functionality
- Introduction
- Installing the iChain 1.5 / ICS Appliance
- Configuring the iChain 1.5 / ICS Appliance
- Configuring iChain
- Conclusion
Introduction
Novell iChain is a set of components for building an electronic business infrastructure. iChain is comprised of the iChain Internet Caching System, iChain Authorization Server, iChain Community Services (running on NetWare Enterprise Web Server), NDS eDirectory 8.5, Public Key Infrastructure Services, the iChain ICS Browser-Based Administration Utility, and iChain Snap-Ins for ConsoleOne.
A key component of the iChain infrastructure is the iChain Internet caching 1.5 server. This component is a specialized and customized release of the Novell Internet Caching System (ICS) 1.3 server. The iChain Internet caching server becomes the primary access point for all users into the infrastructure. To access the Internet services on your network, users must log in through the iChain Internet caching server and authenticate to the iChain authorization server. The iChain Internet caching server communicates with the authorization server to determine access privileges and community membership. All iChain authentications, access privileges and community membership information is stored in NDS. The iChain Internet caching server uses LDAP to access this information. It then enforces the access control policies and serves up a customized interface for the user based on community membership.
The purpose of this document is to demonstrate the initial configuration needed to remotely manage the iChain ICS appliance from a web browser, and then provide a walk through for activating much of iChain ICS' core functionality.
Installing the iChain 1.5 / ICS Appliance
Insert the iChain 1.5 / ICS bootable CD ROM then restart the server. When prompted, accept the Novell License Agreement. The installation of iChain 1.5 / ICS will begin. This will run with no user intervention for approximately 30 minutes.
Once the file copy and final boot process is complete, you are ready to start configuring the iChain 1.5 / ICS appliance.
Configuring the iChain 1.5 / ICS Appliance
To set valid IP address, subnet mask, and default gateway IP address parameters for the "private interface" of the appliance, perform the following steps at the ICS console screen:
Type "set eth0 address=YourApplianceIPAddress, mask=YourSubnetMask".
Type "apply".
To verify that the IP address and mask were set correctly, type "get eth0" at the console.
Type "set gateway nexthop=YourGatewayIPAddress".
Type "apply".
To verify that the gateway address is set correctly, type "get gateway" at the console.
Type "restart" at the server console.
These are the only steps that need to be completed from the ICS server console. The rest should be performed from a remote workstation via the iChain ICS Browser-based Administration Utility.
Note: If the appliance is behind a firewall (as in a Demilitarized Zone, or DMZ, scenario), be sure that TCP ports 1100, 1959, and 2222 are open for the IP of the workstation which will be running the Web management utility.
Starting the ICS GUI Utility and Logging In
Complete the following steps:
Start up the ICS GUI utility by going to http://YourApplianceIPAddress:1959/appliance/config.html.
You will be prompted to log in as username "config" (see Figure 1). Since no password is set yet, just click on OK.
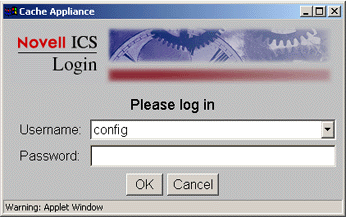
Screen for logging in to the Novell ICS GUI utility.
You will see the Novell Internet Caching System Home screen shown in Figure 2, with the Introduction tab selected. The only other tab on the Home screen is Health Status.
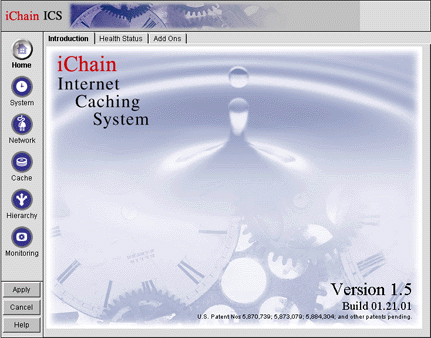
The Novell ICS Home screen with the Introduction tab selected.
Clicking on the Health Status tab takes you to a screen where you will be able to see the status of various services and configurations (see Figure 3).
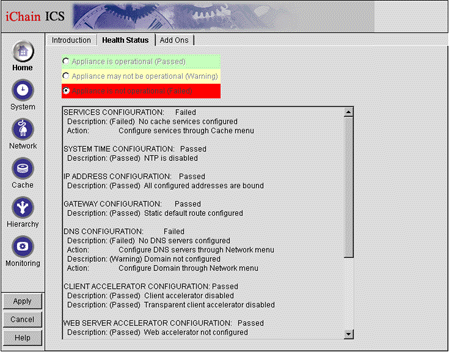
The Novell ICS Home screen with the Health Status tab selected.
Do not be concerned. Almost all of the configurations will initially show as "Failed" until further configuration is completed.
Making the ICS System Settings
To make the ICS system settings, complete the following steps:
Click on the System button on the left-hand side of the screen. You will see the System screen with the Timezone tab selected, as shown in Figure 4.
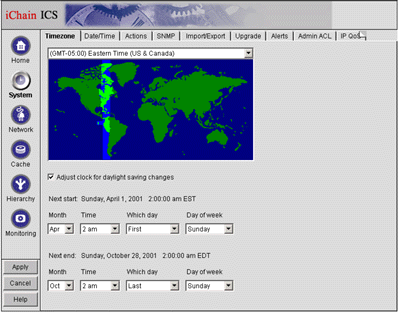
The System screen with the Timezone tab selected.
Select the appropriate time zone and check the box to "Adjust clock for daylight saving changes".
Click on the Apply button in the lower left-hand corner of the screen.
Click the Date/Time tab. You will see the screen shown in Figure 5.
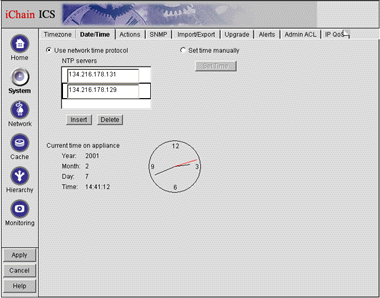
The System screen with the Date/Time tab selected.
Select the "Use network time protocol" setting to use Network Time Protocol (NTP). You will notice that several server IP addresses are already listed in the NTP servers field. You can use the default two addresses if you like (make sure TCP/UDP port 123 is open in the environment"s firewall). If you want to use your own NTP servers, edit the IP addresses to match them.
Click on the Apply button to activate your settings.
Click on the Actions tab. You will see the screen shown in Figure 6.
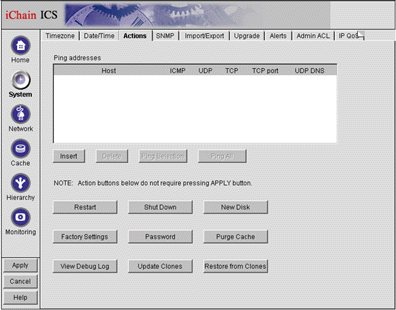
The System screen with the Actions tab selected.
Click the Password button and change the password for both the Config and View users.
Note: The Config username and password is what you use when you telnet in. The View user is the name and password for ftp access. To telnet into the ICS appliance, go to Start | Run and enter your telnet IP address. You will need to insert the password for the Config user. You will see some writing appear. Disconnect and then reconnect once more, again using the Config user password.
Click on the Apply button.
Making the Novell ICS Network Settings
To make the ICS network settings, complete the following steps:
Click the Network button on the left-hand side of the screen. You will see the Network screen with the IP Addresses tab selected, as shown in Figure 7.
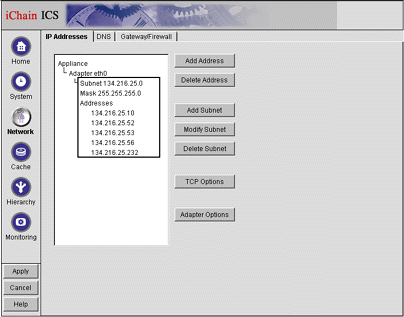
The Network screen with the IP Addresses tab selected.
Verify that the information contained on this page is correct up to this point. You can add additional IP addresses here for all of your protected resources and Web accelerators.
Click on the DNS tab. You will see the screen shown in Figure 8.
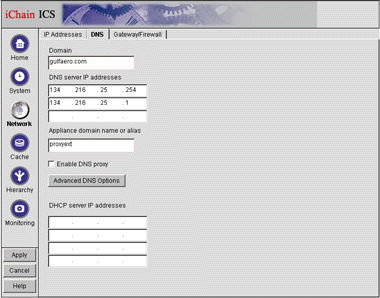
The Network screen with the DNS tab selected.
In the Domain field, enter the server's private domain suffix.
In the DNS server IP addresses fields, enter up to three IP addresses of DNS providers.
In the Appliance domain name or alias field, enter a desired private name for the ICS appliance.
Click on the Apply button.
Click on the Gateway/Firewall tab. You will see the screen shown in Figure 9.
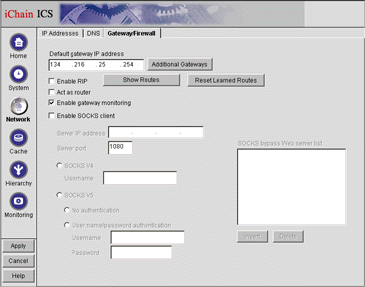
The Network screen with the Gateway/Firewall tab selected.
In the Default gateway IP address field, verify that the Gateway IP address is correct. (If you want to define more than one gateway, click on the Additional Gateways button.)
Click on the Apply button.
Verifying the Configuration Settings
To verify your configuration settings, click the Home button, and then select the Health Status tab. You will see a screen similar to the one shown in Figure 10.
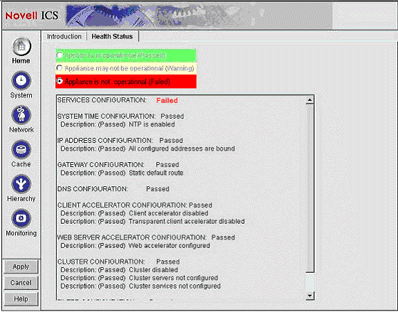
Verifying the configurations via the Heath Status tab.
Here you can make sure all configurations are correct. At this point, Services Configuration should be the only item that shows as "Failed".
This completes the initial setup of the Novell ICS appliance.
Configuring iChain
This section provides the steps for performing the iChain-specific configuration portion of the procedure. If the appliance and the Authorization Server are separated by a firewall, be sure that TCP ports for LDAP (389) and/or Secure LDAP (636) are open for the private IP address of the appliance to request information from the IP of the Authorization Server.
Click the Cache button on the left-hand side of the screen and select the Access Control tab. You will see a screen similar to the one in Figure 11.
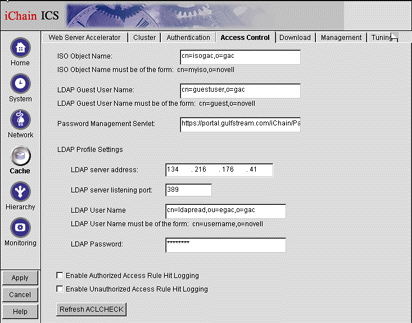
The Cache screen with the Access Control tab selected.
In the ISO Object Name field, enter the typefull-distinguished name of the ISO object. (Use comma-delimited LDAP syntax instead of the usual period-delimited syntax used in NDS.)
In the LDAP Guest User field, enter the typefull-distinguished name of the LDAP Guest User (again using comma-delimited LDAP syntax). This user should have no NDS rights. It should however be used to define what URL's should be publicly accessible without having to sign-on to iChain; this is accomplished within ConsoleOne via ACL Rule objects. (That discussion, however, is outside the scope of this AppNote)
In the Password Management Servlet field, enter: http://your.community- server.com/iChain/PasswordExpired.html, with "your.community- server.com" being the address of the Web server on which iChain Community Services has been installed. Be sure to use https:// instead if the Web Accelerator for that web server has the SSLizer option enabled for it. The Password Management Servlet controls iChain"s ability to determine upon login whether a user"s password has expired, and if it has to then present them with information on how many grace logins remain as well as the ability to change their password before redirecting the browser back to its intended destination. The Password Management Servlet requires eDirectory 8.5 or later to be running on the Authorization Server to function correctly.
In the LDAP server address field, enter the IP address of the server providing LDAP services (the Authorization Server).
Set the LDAP server listening port to 389.
In the LDAP User Name field, enter the typefull-distinguished name of the LDAP administrator (also using comma-delimited LDAP syntax). This user should only have Browse and Inheritable object rights, and Compare, Read and Inheritable property rights beginning at the [Root] of your Tree. Additionally, if you will be employing the user self-registration feature of iChain Community Services (settable on the ISO object through ConsoleOne), this user should also have all object and property rights except for supervisor rights to the default container in which the users will be created.
In the LDAP Password field, type the LDAP Administrator's password.
Click on the Apply button.
Click on the Authentication tab. You will see a screen similar to the one in Figure 12.

The Cache screen with the Authentication tab selected.
Click the Insert button to add an authentication profile. A new pop-up window will open, as shown in Figure 13.
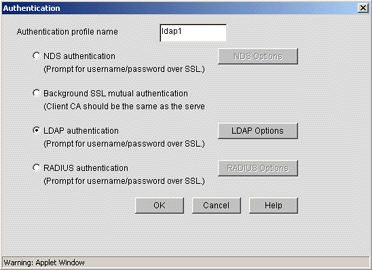
The Authentication pop-up window.
Name the profile in the Authentication profile name field. Also click the third radio button named LDAP authentication.
Click on the LDAP Options button, which opens a new window as shown in Figure 14.
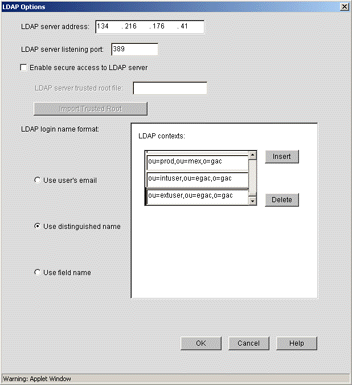
The LDAP options window.
In the LDAP server address field, enter the LDAP server provider's IP address.
Set the LDAP server listening port to 389.
Click the radio button corresponding to your desired LDAP login name format.
In the LDAP contexts field, insert each context that users should be able to login from in your Tree. Essentially, iChain provides a limited-capacity contextless login so users need only remember their username.
Click on OK, and then click OK again in the smaller authentication pop-up window.
Click on the Apply button.
Select the Web Server Accelerator tab. You will see a screen similar to the one shown in Figure 15.
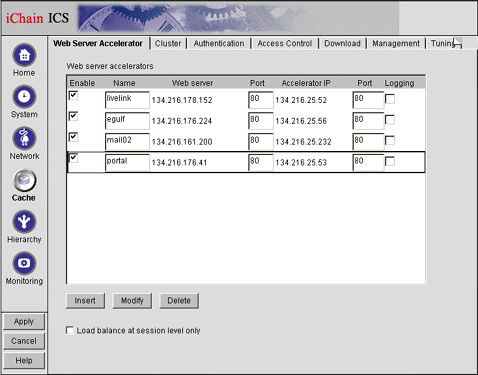
The Cache screen with the Web Server Accelerator tab selected.
Click on the Insert button to add a new Web server accelerator, which will cause a new pop-up window to appear as shown in Figure 16.
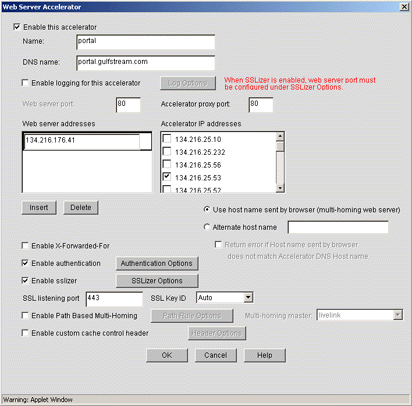
The Web Server Accelerator pop-up window.
Check the "Enable this accelerator" box.
In the Name field, define the name for this accelerator (up to eight characters).
Note: This name should match the Protected Resource name defined on the ISO object through ConsoleOne for ACL Rules to function properly.
In the DNS name field, type the public DNS name for the Web server.
Set the Accelerator proxy port to 80. As always, if the iChain ICS appliance and the back-end web server are separated by a firewall, be sure to open up the TCP ports for HTTP (80) and/or HTTPS (443) for the private IP address of the appliance to pass through to the private IP of the backend web server.
In the Web server addresses field, click on the Insert button and enter the private IP address of the Web server you are accelerating.
In the Accelerator IP addresses field, select the public IP address you want to use.
Check the "Enable authentication" box and click on the Authentication Options button. This will open a new pop-up window as shown in Figure 17.
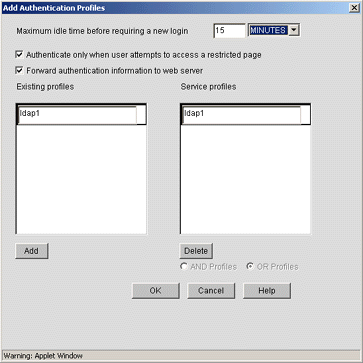
The Add Authentication Profiles window.
Select Auto in the Key ID field.
Check the box for "Authenticate only when user attempts to access a restricted page."
Optionally Check the box for "Forward authentication information to web server" which will inject Basic Authentication credentials (username/password) into the HTTP Authorization Header between the iChain ICS appliance and the back-end web server.
This setting is required for a web server running iChain Community Services.
In the Existing profiles window, you should see the LDAP profiles you created in previous steps. Select the profile you would like to add for this accelerator and click the Add button.
Click the OK button, which brings you back to the Web Server Accelerator pop-up screen (refer back to Figure 16).
Check the "Enable sslizer" box and then click on the SSLizer Options button. This will open a new pop-up window, as shown in Figure 18.
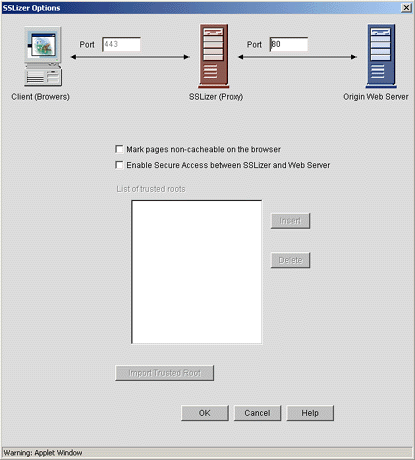
The SSLizer Options window.
Set the SSLizer Key field to Auto, unless you have signed certificates from such companies as VeriSign or Entrust.
Uncheck the box for "Mark pages non-cacheable on the browser."
Click on the OK button, which brings you back to the Web Server Accelerator pop-up screen.
Click the OK button.
Click on the Apply button.
After applying all of these settings, you may have to go back to the SSLizer Options window and uncheck the "Mark pages non-cacheable by browser" box. Currently, even if you do not check this box, it will default to this setting the first time you click Apply.
If you want to add more than one Web server accelerator, repeat steps 20 through 38. Make sure you click on Apply after configuring each accelerator.
Restarting the Server
You must now restart the server from the Actions tab on the System screen.
Click on the System button on the left-hand side of the screen and select the Actions tab. You will see the screen shown in Figure 19.
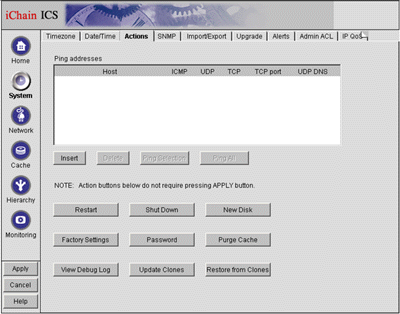
The System screen with the Action tab selected.
Click on the Restart button.
Optionally, once the appliance finishes re-initializing, you can export the entire custom configuration you just completed out to a small text file. If there ever happens to be problems with the appliance, disaster recovery is easily accomplished by re-imaging the appliance from the iChain ICS CD-ROM and then letting the appliance read the configuration from the floppy. At the ICS server console screen, simply type:
"export <filename_with_no_extension< floppy"
Do not store the configuration of more than one appliance per floppy. iChain ICS automatically probes the drive every 30 seconds for an inserted floppy with configuration files, and may become confused as to which one it should be loading.
As an added fault tolerance option, if you have more than one physical drive recognized by the iChain 1.5/ICS appliance, you can take a complete backup image of the configured appliance on the second drive. This is advantageous in the event that the OS becomes corrupted or unstable, you can restore the OS and its configurations.
To do this, on the iChain 1.5 / ICS GUI, go to the Actions tab from the System menu and click the Update Clones button.
This concludes the configuration of iChain 1.5 on the ICS appliance.
Conclusion
Congratulations, you have successfully installed and configured Novell ICS and iChain 1.5. With your iChain Internet Caching Server configured, you can remotely manage the iChain ICS appliance from a Web browser. You are well on your way to extending your traditional business relationships and processes to employees, customers, and partners on the Net.
* Originally published in Novell AppNotes
Disclaimer
The origin of this information may be internal or external to Novell. While Novell makes all reasonable efforts to verify this information, Novell does not make explicit or implied claims to its validity.