Creating the "Digital Airlines" Novell Technology Demo
Articles and Tips: article
Corporate Technology Strategist
Novell, Inc.
jskehan@novell.com
01 Apr 2001
Thanks to John Pugh and the rest of the Corporate Technology Strategist team for their help with this project.
Recently, Novell's Corporate Technology Strategy group undertook the task of creating a demo system that could be used by system engineers worldwide to demonstrate the value of Novell's technology solutions. Thus was born Digital Airlines. This AppNote describes the process the team members went through in creating this demo, and provides information on how others can duplicate this demo system.
About the Demo System
Because I primarily work with the platform division at Novell, my task was to create a complete base demonstration system around Digital Airlines. I assembled a team from among my co-workers in the Corporate Technology Strategy group to undertake this project. My primary partner for the project was John Pugh.
To start the project, we first clearly defined the objectives we wanted to achieve. We envisioned a complete system that would be able to demonstrate any aspect of the NetWare platform. It was important to us not just to have a working installation, but one that included most, if not all, the features in NetWare. Some of the features we wanted to be able to demonstrate included:
Novell Directory Services (NDS) eDirectory
Dynamic Host Configuration Protocol (DHCP)
Domain Name System (DNS)
HyperText Transfer Protocol (HTTP)
File Transfer Protocol (FTP)
WebDAV (Document Authoring and Versioning)
Network News Transfer Protocol (NNTP)
eGuide
ScheMax
Certificate Server
NetWare Management Portal
Search Server
Streaming Media Server
Scripting
User home directories
Another objective was to create an "image" of this system that could be copied to almost any system in less than 20 minutes. This would allow others to quickly set up a fully functional demo.
We began with a base installation of NetWare 5.1. During the install, we selected all components with the exception of Oracle and WebSphere, which would be part of other demonstration bundles. When we were prompted for NDS tree information, we named the tree "DIGITALAIRLINES-TREE" and the Organization "DigitalAirlines". Once the base installation of the NetWare 5.1 operating system was complete, we installed the current support pack, which at the time was SP1.
We named our server "nw-da1" and configured an IP network address of 10.0.0.2, a mask of 255.255.255.0, and a default router of 10.0.0.2. For DNS we configured the server as its DNS server (10.0.0.2), with a domain name of digitalairlines.com.
Configuring the Demo System
To create the complete demo system, it was necessary to configure many aspects of the installation. The following sections will go through each of the items to be configured, although not necessarily in the order they were actually done.
NDS Tree Design
The NDS tree design for Digital Airlines is based on a layout conceived by Justin Taylor, another of Novell's Corporate Technology Strategists. This design includes full multinational support down to the individual airport level, as well as a full corporate configuration. The NDS tree design is shown in Figure 1.
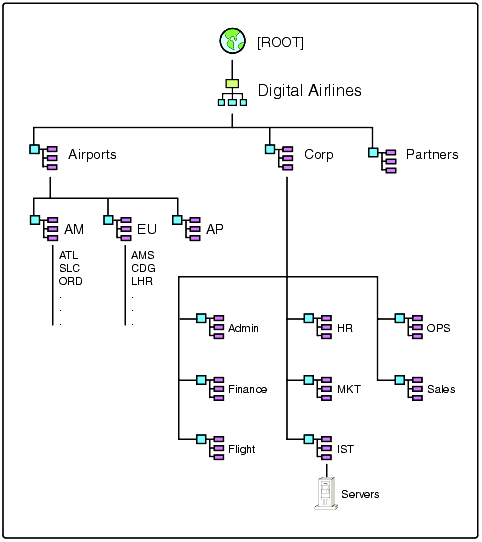
NDS tree design for Digital Airlines.
With the skeleton of the tree created, we installed ScheMax prior to adding users. Our purpose for including ScheMax was to have the ability to easily modify attributes not accessible through ConsoleOne or the NetWare Administrator (NWAdmin) utility. ScheMax extends the NDS schema and adds itself to NWAdmin. The specific attributes we wanted to access for each user were:
Photo
Full Name
Given Name
Last Name
Employee ID
Telephone
Title
Email
Home Directory
Home Page
Description
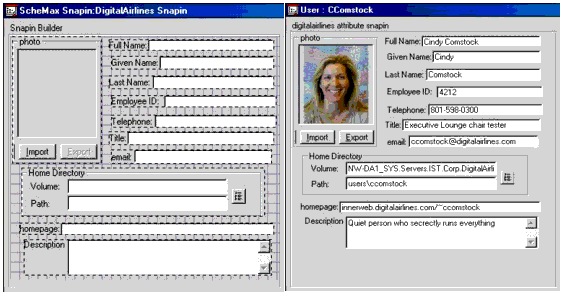
Once ScheMax was installed, we built a screen to provide quick access to the attributes listed above. This screen was stored in the Directory, with rights to it granted at the Organization level. In Figure 2, the screen's design in ScheMax is shown on the left, while the final usable screen is depicted to the right.
Design for user screen in ScheMax along with the final, usable screen.
With full access to the desired attributes, we began to create users. It was important that users and their attributes be populated in a manner consistent with our goals. Therefore, each user, although fictitious, needed to have reasonably accurate information; for example, users' area codes or country codes generally matched their city or country. For each user, a home directory was created as well as a public_html directory.
At this point, the NDS design was complete and all users had been added with attributes fully populated as needed.
DNS and DHCP
Our next step was to configure DNS and DHCP. To start, we went to the SYS:PUBLIC/DNSDHCP directory and ran SETUP.EXE to install the NDS-based configuration utility on a workstation.
Because this demo is designed to be run on a private network, we used 10.x addressing and took liberties with our DNS configuration as well. Our DHCP server was configured to lease address between 10.0.0.20 and 10.0.0.50, with a lease time of 8 hours. The DHCP server also responds with a network mask of 255.255.255.0, a DNS server of 10.0.0.2 and domain name of digitalairlines.com.
We left the 10.0.0.1 address open in case someone wanted to put a router there, since routers typically hold the first or last address of a subnet. We also left addresses 10.0.0.3 through 10.0.0.19 unused for other planned additions to the demonstration systems.To complete the DHCP configuration, we added a "DHCPSRVR" entry in the AUTOEXEC.NCF file to load the server, and included a comment line to this effect.
For DNS, all we needed was a few entries under digitalairlines.com. So, we created an entry for the server (nw-da1) as an a record. All of our other resolvable entries were cnames back to nw-da1. The entries we use include: www, innerweb, eGuide, news, nntp, and original.
To complete the DNS configuration, we added a "NAMED" entry in the AUTOEXEC.NCF file to load the server, and included a comment line to this effect.
Novell eGuide
Before loading eGuide, we extended the NDS schema and added additional LDAP mappings. We extended the schema to include the attributes of homepage, employeenum, keywords, photo, and abprefs on User objects. Homepage, employeenum, and keywords are string types, whereas photo and abprefs are stream types. The homepage attribute is used to provide a link from eGuide to the user's home page. The employeenum attribute represents the employee's ID number. The keywords attribute is used for storing custom data. Photo contains an image of the user. The abprefs attribute is used by eGuide to store eGuide preference data.
With the NDS schema extended for eGuide, we then needed to apply the LDAP mappings for these attributes. To accomplish this, an LDI file is loaded and processed by SCHMAP.NLM. As can be seen in the following excerpt from the LDI file, it simply provides a link between an NDS attribute and LDAP name.
dn: cn=schema

changetype: modify

dn: cn=schema

changetype: modify

add: newattribute

name: photo

syntax: SYN_STREAM

map: photo
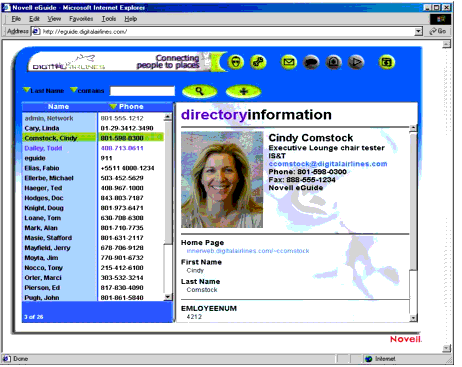
With the schema extended and the NDS-to-LDAP mappings complete, we next installed eGuide and created an eGuide user. We wanted to include the custom skin for Digital Airlines shown in Figure 3.
Theme7=Digital

Dir7=digital

Icon7=digital-thumbnail.gif
Our final configuration piece for eGuide was to create the ability to simply enter the URL "http://eguide.digitalairlines.com" into a browser and have it load. Normally, to load eGuide a user would have to include the path to eGuide on the URL line. Thus we needed to redirect eguide.digitalairlines.com to the correct home page. In addition to a standard redirect (easily accomplished with a software virtual server), eGuide needs its own document root. To do this, after we added the software virtual server in the Admin Server, we opened the file sys:novonyx/ suitespot/https-NW-DA1/config/obj.conf and found the software virtual server entry that looks like this:
<Client urlhost="eguide.digitalairlines.com"<<
NameTrans fn="home-page" path="sys:/novonyx/suitespot/docs/eguide"

</Client<
We then added the following document root entry directly under the home-page entry:
Personal Home Pages
Each of the users has a personal home page. The goal here was for this home page to be accessible from the user's link in eGuide. A few things come together to make this possible.
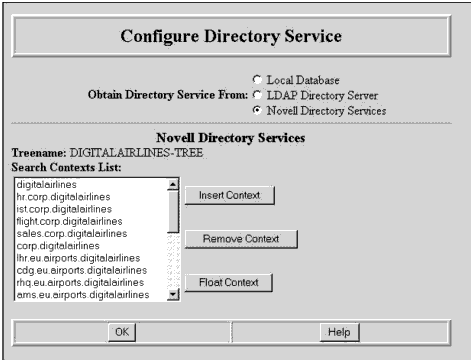
First, each user must have a home directory, specified in NDS as such. The home directory must have a subdirectory called public_html, which we created earlier. In this directory, there needs to be an INDEX.HTML file which is the user's personal home page. Also, the NDS homepage attribute needs to be populated with the correct value, such as 'innerweb.digitalairlines.com/~ccomstock'. The Web Server can resolve '~username' to the value of the user's homepage attribute, but for this to happen, the user's context must be included in the Web Server's directory search path. This search path is edited in the Admin Server under Global Settings ' Configure Directory Service. The path is specified in the format of 'ist.corp.digitalairlines' as shown in Figure 4.
Configuring directory service search paths.
Certificate Server
The certificate server creates its own signed certificate by default. To use it, we simply needed to import the certificate into our browser. To import the certificate we just double-clicked on the certificate sys:public/rootcert.der and followed the prompts to import the certificate. Once this was complete, we could use those credentials as long as we were accessing the server with the designated DNS entry of nw-da1.digitalairlines.com. If we are presented that certificate from a Web site resolved via a DNS entry other than nw-da1.digitalairlines.com, we will be notified of the naming discrepancy.
NetWare Management Portal
The NetWare Management Portal utility is already configured by default. There were only a few items to be addressed. First, we documented two entries in the AUTOEXEC.NCF file: "httpstk" and "portal". Then we added a superadmin password. Finally, we added a link in our browser to access the management portal at "http://nw-da1.digitalairlines.com:8008".
NNTP Server
For the NNTP server, we wanted several newsgroups created. The news server is administered from the Admin Server at "https://nw-da1.digitalairlines.com:2200". We added four newsgroups: news-finance, news-human-resources, news-ist, and news-promotions.
We wanted to have some content in the form of news articles for the demo, so a couple of volunteers from Systems Engineering sat down and added several items to each newsgroup. (Special thanks to our volunteers, Marci Orler and Michael Ellerbe.) We then added an "nsnews" entry to the AUTOEXEC.NCF file for the news server and documented it as such.
FTP Server and WebDAV
The FTP server is already configured by default. All we did was document its existing entry "nwftpd" in the AUTOEXEC.NCF file. WebDAV also was already configured by default and required no further attention.
Web Home Pages
We desired each user to have a Web home page. Therefore, we created a default user home page and copied it to each user's default_html directory under their home directory. Then we edited the page to include the user's name and a link to a photo, which was stored in sys:novonyx/suitespot/docs/photos.
The Digital Airlines Web Site
Many of the other features we wanted to demonstrate would be exposed through the Digital Airlines Web site, which consists of internal as well as external Web pages. To do this, we started by designing a look and feel for the Web site and then built from there. The technologies we wanted to showcase from this interface include the Search Server, WebDAV, News Server, scripting, eGuide, and the Streaming Media Server. Because many of these technologies are typically used within a company for its employees, they are exposed in an "innerweb" environment. The Digital Airlines innerweb home page is shown in Figure 5.
Digital Airlines innerweb home page.
The following sections cover each of the elements on this home page and explain how their functions were accomplished.
Streaming Media Server
In the main window of the innerweb home page are two links to video greetings. While video files can be presented to an end user as simply a link to the file system, there is no intelligent throttling of content and it's very easy for the message to become lost in garbled confusion. The Novell Streaming Media Server offers load-based throttling of content via RTSP (Real Time Streaming Protocol). We wanted the RTSP client on the workstation to be invoked. Thus, these links are of the format 'rtsp://innerweb.digitalairlines.com/ceo_int_hi.rm'. When the link is activated, RealPlayer loads and requests the content from the streaming media server.
We configured the Streaming Media Server to provide content stored in the sys:novonyx/suitespot/docs/innerweb directory. With the help of another team member, Alan Mark, we taped the videos ourselves and then transferred them to a PC with a capture device. After we edited the videos, we exported them to RealPlayer format.
The Streaming Media Server is loaded via a MEDIA.NCF file in the AUTOEXEC.NCF file. (See "Multimedia Streaming with NetWare 5.1" in the August 2000 issue of Novell AppNotes for complete details on our configuration).
Miscellaneous Links
The next two links on the innerweb home page are for filler content, such as company newsletter articles and press releases. The ones shown in Figure 5 link to two fictitious company-related articles.
In the upper right hand corner of the page there are links labeled "Index", "Help", and "Home". The index link leads to a page of links to all the Digital Airlines pages. The help link takes the user to a page offering online assistance. The home link returns the user to the innerweb home page.
Common Links for All Web Pages
On the left-hand side of the innerweb home page is a series of links common to all of the Digital Airlines Web pages.
The first of these is labeled "Quick Search" and includes a text entry box and a graphic of a button labeled "GO". The intent of this feature is to allow a user to enter any text string into the text entry field and perform a search on all the Digital Airlines Web pages by clicking the "GO" button. We accomplished this by creating a search collection in the NetWare Search Server that included all of the Digital Airlines Web pages. When the user clisk the "GO" button, the following html command is invoked:
<form method = get action="\Nsearch\SearchServlet?"<<
<input type="text" name="query0" size="10"<<
</form<
The Search Server servlet processes the request based on the text in the input box and returns to the user a results page. From here, the user can jump directly to the page containing the search string.
The next item on the left-hand side of the page is a link labeled "Advanced Search". Clicking this link passes the following command to the Web Server:
href="Nsearch\SearchServlet?"
This takes the user to the standard advanced search page. From this page the user can perform a search with any of the available advanced options.
The next link, labeled "Corporate Directory", is for access to the Digital Airlines white pages application (eGuide). The link calls http://eguide.digitalairlines.com, which opens up eGuide in another browser window.
The "My Files" link is designed to create secure access to a user"s home directory. This link draws upon the WebDAV client within a browser and, after authenticating the user, opens up a window in Explorer. To create this function, we obtained a script that authenticates the user and sets up the WebDAV connection in explorer. To use the script, copy the homewebfolder.asp file into the sys:novonyx/suitespot/docs/innerweb directory and then flag the file as "Execute." To do that, load the Admin Server (https://nw-da1.digitalairlines. com:2200) and move through the volume object to the script file itself. Once there, you can flag the file as "execute" by clicking in the box (see Figure 6).
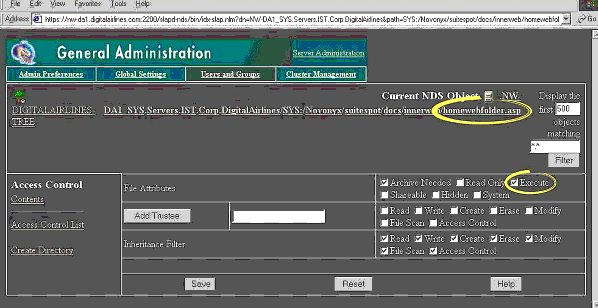
Flagging the script file as "execute."
Once the attributes on the script file are set correctly, you need only create the link from the Web page. The "My Files" link passes the following command:
href="https://innerweb.digitalairlines.com/innerweb/homewebfolder.asp"
The "IS"T" link takes users to a page where they can invoke a script to allow them to change their password (note that this function is also available in eGuide). Again, we obtained a "change password" script and placed it in the same docs/innerweb directory as the WebDAV script. We also need to flag it as executable in the Admin Server, just as we did with the WebDAV script. With these steps complete, we needed only to call the script from the IS"T page with the following link:
href="https://innerweb.digitalairlines.com/innerweb/chgpwd.asp"
The "Human Resources" link was added as a placeholder for a DirXML demonstration. The HR page itself has text entry boxes for adding a new user. Once my team members had completed their extensions, it became a secure way to create a user in NDS and then have that user created in the myriad of systems that make up most networks.
The next link, "Discussion Groups", calls the client"s NNTP application, thereby allowing the user to participate in ongoing group discussions. Because our newsgroups were already set up, we simply created a link to take users to a page where they can then select any of the four existing newsgroups. When the user selects one of the newsgroups, the local NNTP client is loaded and the user is taken directly to the selected newsgroup. The link that calls the local NNTP client takes the form of "news://news.digitalairlines.com/news-human-resources".
Finally, the "After Hours" link takes the user to a page with pictures from a recent company outing. We wanted to have a little fun included as well.
Conclusion
In this AppNote, I have outlined the process that John Pugh, myself, and our team went through to produce the Digital Airlines demonstration system. I have left out the many late hours and enrolling conversations with engineers, testers, and co-workers that came together to make this project possible. The output of this effort is being used daily by Novell System Engineers throughout the world to demonstrate the value of Novell solutions.
To obtain any of the files needed to reproduce this project for your own demonstration purposes, or to incorporate any of these functions in your own environment, visit http://www.digitalairlines.com/appnote.
* Originally published in Novell AppNotes
Disclaimer
The origin of this information may be internal or external to Novell. While Novell makes all reasonable efforts to verify this information, Novell does not make explicit or implied claims to its validity.