How to Write a Simple DirXML Stylesheet
Articles and Tips: article
Senior Software Engineer
DeveloperNet University
lfisher@novell.com
01 Apr 2001
This article is an excerpt from the DirXML Custom Driver Development course now available at Novell's DeveloperNet Web site.
- Introduction
- Business Rules
- DirXML Stylesheets
- XSLT and XPATH Programming
- Stylesheet Initialization
- Document Processing
- Conclusion
Introduction
The purpose of this article is to enable a person who already understands NDS, basic DirXML configuration, and XML to write a simple stylesheet. This article is an excerpt from the DirXML Custom Driver Development course soon to be released at Novell's DeveloperNet Web site.
Any discussion about DirXML must, at some point, refer to an external system or directory that is to be hooked up to NDS with a DirXML driver. For the purposes of this discussion, this article makes references to a fictitious application called PBXSimulator that could use a DirXML driver to synchronize the phone numbers maintained in a PBX with User phone numbers in NDS. You don't really have to know much about PBXes or PBXSimulator to understand the article. Just understand that it is a simple example of an external system for DirXML.
Business Rules
Most real-world environments will have unique exceptions in how data and/or events are transferred between their external systems and NDS. These exceptions are called "business rules." Let"s use a couple of environmental considerations for PBXSimulator as an example of simple business rules.
PBXSimulator allows only the "-" character to delimit groups of digits in its phone numbers. For managing phone account information inside of a PBX, this might be fine. But when that value is sent to NDS, where it could be forwarded to many other special purpose directories, it is conceivable that one or two of them might require that their phone numbers be delimited by different characters.
For the purposes of this discussion, let's assume that the most common delimiter needed in a particular installation is the '.' (dot) character. To solve this incompatibility, a simple business rule could be implemented stating that all phone numbers in the core directory must be delimited by dots. To accommodate this business rule in PBXSimulator's DirXML driver, the hyphens in PBX- Simulator's phone numbers must be converted to dots as they are sent to NDS.
We don't have to worry about the phone number coming back through PBXSimulator's Subscriber channel because the phone number isn't listed in the Subscriber's filter, so changes to the phone number won't even be seen by the engine on the Subscriber side. This was a conscious design decision to prevent the phone number from being changed by anyone but the PBX administrator. (This is an example of yet another business rule that was implemented by simple filter configuration.)
So the question is, how do we implement this hyphen/dot phone number business rule on the Publisher side? "Easy", you say, "just program the translation from hyphens to dots into the driver"s Publisher shim."
Well, that would work. However, if PBXSimulator were a real product, we might want to distribute its driver into other business environments, some of which might require a different delimiter than either dots or hyphens. Coding the business rule into a shim (a compiled executable) implements the rule for every installation. What we really need is a flexible way to implement the business rule, allowing the use of whatever delimiter may be required at a given installation if and when implementation is necessary.
DirXML Stylesheets
The flexible solution for implementing business rules is usually a stylesheet. Stylesheet programming is different from the code in shims in that stylesheet code is not compiled. Instead, stylesheet programs are composed using languages called the Extensible Stylesheet Language Transformation Language (XSLT), which is interpreted by XSLT processors to manipulate/construct XML documents. Since XSLT and XPATH are interpreted, this means that the administrator can modify stylesheets as needed for each installation without having to rebuild/recompile the driver.
Stylesheets provide programmatic access to XDS (DirXML's XML vocabulary for communicating directory information) event documents as they travel along from the Publisher shim to the DirXML engine or from the engine to the Subscriber shim. Stylesheets implement the unique business rules for the environment by adding, deleting, or modifying nodes in these documents.
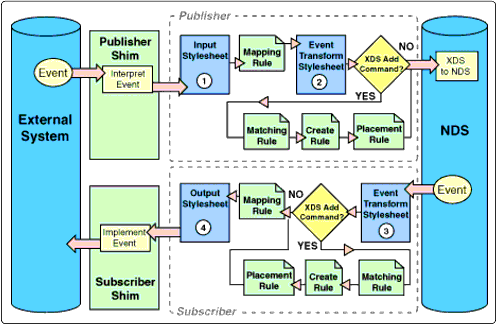
The flow of XDS on the Publisher and Subscriber sides.
There are four usages of stylesheets shown in Figure 1. (Stylesheets may also be used to replace any rule.)
-
The input stylesheet has two main tasks. The first task will always be to implement data specific business rules such as the phone number requirement described above. Whether or not the stylesheet has a second task depends on the version of XML outputted by the Publisher shim. If the shim outputs a non-XDS version of XML, then the stylesheet's second task is to translate that XML into XDS.
The output of the Publisher shim should always be some form of XML. The form of XML outputted by the shim depends on the way the shim was designed. It is mainly a balance between convenience and flexibility. In the simplest case, if the external system already outputs in XML, the shim could implement the most flexible transformation possible by simply outputting the external system's XML documents directly so that they can be applied to the input stylesheet.
This is most efficient because the XSLT processor already works with XML and with the help of an appropriate stylesheet, it can transform the external application's XML documents to XDS quite handily.
The flexibility benefit becomes evident later if changes are needed in the directory data models being synchronized by the driver. The XSLT and XPATH in the stylesheet can be modified to accommodate these changes without needing to be recompiled.
If the external system is not XML conversant (as is the case in PBX- Simulator), the transformation from the system's event information is most efficiently performed in the Publisher shim using the DOM APIs standardized by the World Wide Web Consortium (see http://www.w3.org/ for more information on DOM) or SAX APIs (another standard for XML parsing code).
In this scenario, the input stylesheet's only task is that of implementing data-oriented business rules. And if there are no data-oriented business rules on the Publisher side, then there is no need for an input stylesheet.
-
After the mapping rule has mapped the external system's attribute and class names to NDS attribute and class names, the engine will send the resulting XDS document to the Event Transformation stylesheet (if one is associated with the Publisher side). Here the administrator has a chance to add stylesheet logic to modify the event elements in the XDS documents.
For example, recall that the PBXSimulator driver currently deletes corresponding NDS objects when one of its accounts is deleted. A PBX being allowed to delete User objects from an enterprise's core directory would be a very unusual behavior in a real world environment.
More likely, the administrator would write some code in the Publisher's Event Transformation stylesheet that would capture XDS elements describing PBX account delete events. The stylesheet would convert the delete elements to XDS elements to remove the driver's association to the NDS object and then delete the NDS object's current 'Telephone Number' attribute values.
-
Events coming from NDS to the Subscriber side are already expressed in XDS, so Event Transformation business rules capturing NDS events and modifying them for the external system can be invoked right away.
-
The output stylesheet is like the input stylesheet in that it has two tasks. The first one, like the input stylesheet, is to implement any business rules applying to the data being sent from NDS to the external system.
The second is only needed if the external system understands XML. If it does, then the output stylesheet could transform the XDS event information from NDS to the external system's native XML vocabulary. The Subscriber shim can then pass that XML directly to the external system without having to perform any of the transformation in its compiled code. This is the most flexible way to perform the transformation for the same reasons as those described in item 1.
However, if the external system does not understand XML, then the output transformation should be performed in the Subscriber shim's code where DOM or SAX APIs can be mixed with external system APIs to achieve the most efficient integration possible in that scenario.
XSLT and XPATH Programming
Now that we understand how stylesheets are used in DirXML, I will demonstrate how to program one to solve the telephone number transformation problem described above.
Note: This module is only intended to give you the most general of understandings in the usage of XSLT and XPATH. For a more detailed understanding, refer to the XSLT and XPATH specifications available from the W3C web site.
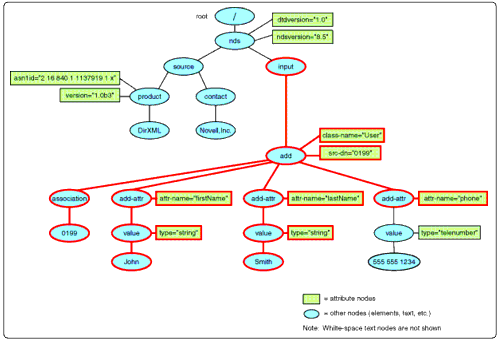
A PBXSimulator XDS document describing the creation of an account is shown in Code Snippet 1. This is a typical input document for the input stylesheet in the PBXSimulator driver.
Code Snippet 1


<nds dtdversion="1.0" ndsversion="8.5">
   <source>
      <product asn1id="2 16 840 1 113719 1 x" version="1.0b3">DirXML</product>
      <contact>Novell, Inc.</contact>
   </source>
   <input>
      <add class-name="User" src-dn="0199">
            <association>0199</association>
            <add-attr attr-name="firstName">
               <value type="string">John</value>
            </add-attr>
            <add-attr attr-name="lastName">
               <value type="string">Smith</value>
            </add-attr>
            <add-attr attr-name="phone">
               <value type="telenumber">555-555-1234</value>
            </add-attr>
      </add>
   </input>
</nds>
Notice that the phone number value in the XDS document in Code Snippet 1 is delimited by hyphens, just as it would come from PBXSimulator. The job of the XSLT/XPATH program we are going to examine is to capture this value and modify it so that it is delimited by dots instead of hyphens.
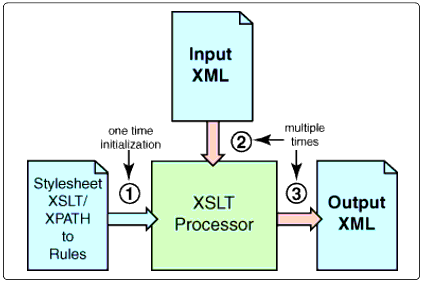
As shown in Figure 2, there are three main stages in XSLT processing.
The major functional elements in DirXML stylesheet processing.
-
First, the XSLT/XPATH stylesheet is loaded, parsed, and evaluated by the XSLT processor to produce rules. This initialization happens one time, at startup.
-
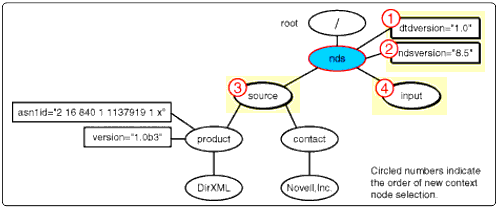
Second, the processor parses the input document into a node document. Figure 3 is a node diagram showing how the XSLT processor looks at the PBXSimulator add account input document shown in Code Snippet 1.
Before proceeding, examine the input document in Code Snippet 1 and the node diagram in Figure 3 until you thoroughly understand the relationships between the two.
-
Third, the processor applies the rules from the stylesheet to the input document node tree to build a resulting output document.
Note: Stage one occurs only at initialization. Stages two and three occur for every input document processed for the stylesheet.
Code Snippet 2 is an XSLT/XPATH stylesheet solution for the telephone transformation problem we described earlier. The following discussion is divided into two stages. The first stage describes the code as it relates to stylesheet rule initialization. The second describes the code as it relates to the processing of input document node trees against the stylesheet rules to produce output documents.
Code Snippet 2


1.   <?xml version="1.0" encoding="ISO-8859-1" ?>
2.   <xsl:stylesheet xmlns:xsl="http://www.w3.org/1999/XSL/Transform"
     version="1.0" >

3.       <xsl:template match="/">
4.         <xsl:apply-templates select="node()|@*"/>
      </xsl:template>

5.      <xsl:template match="node()|@*">
6.         <xsl:copy>
7.            <xsl:apply-templates select="node()|@*"/>
         </xsl:copy>
      </xsl:template>

8.      <xsl:template match="add-attr[@attr-name='phone']">
9.         <add-attr attr-name="phone">
10.            <value type="teleNumber">
11.               <xsl:value-of select="translate(.,'-','.')"/>
            </value>
         </add-attr>
      </xsl:template>
   </xsl:stylesheet>
Stylesheet Initialization
|
Line |
Explanation For Stylesheet Code Snippet 2: Stylesheet Initialization Stage |
|
1 |
XSLT is itself XML. The first line is the standard XML declaration. The encoding attribute value "ISO-8859-1" refers to the character encoding used in the document. |
|
2 |
This line declares a namespace URI for the "xsl" prefix (Universal Resource Identifier) and must be typed exactly as shown (it is case sensitive). A URL serves to point to something somewhere. A URI serves merely as an identifier and may or may not point at anything. In this case, the URI is used to identify all XSLT elements in the stylesheet document. As the stylesheet is parsed by the XSLT processor, whenever the prefix "xsl" is encountered in the stylesheet, it will be expanded to the URI, "http://www.w3.org/1999/XSL/Transform". It is not the prefix, but the expanded URI that keys the processor to recognize an element as XSLT. This is because after initialization processing, the prefix doesn"t exist in the rules developed from the stylesheet. The prefix is only a shorter convenience for programming purposes. |
|
3-7 |
This is the start tag for an XSL template. In the XSLT specification, an XSL template is referred to as a template rule. The content of the template rule is the template, i.e., the instructions, text, and literal result elements used to construct the result tree. For the purposes of this explanation, you can look at templates like little sub-programs that can be invoked in different ways to do different things. During initialization, the XSLT processor organizes the templates from the stylesheet into rules. The XSLT match pattern "node( )"@*" selects a set of nodes from the input node tree and specifies a pattern to compare them to. Don"t worry, we will explain the expression later in the section on document processing. At any rate, when a selected node"s characteristics match the pattern described in line 5 (we"ll explain later how they are selected), then the operations specified by the elements in lines 4, 5, 6, and 7 will be invoked. In essence, this is the rule for this template. |
|
8-11 |
This is the start tag for another XSL template. This particular template is invoked when a selected node in the input document matches the node pattern expressed by "add-attr[@attr-name="phone"]". Again, we will explain these lines later in the processing explanation for this code. So, the rule for this template is, when a selected node matches line 8, then elements 9, 10, and 11 will be invoked. |
Document Processing
After the code in the stylesheet has been initialized into rules as described above, the XSLT processor is ready to process input documents.
Initial Document Contexts
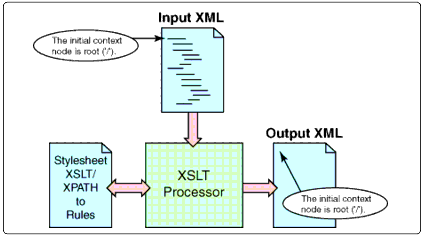
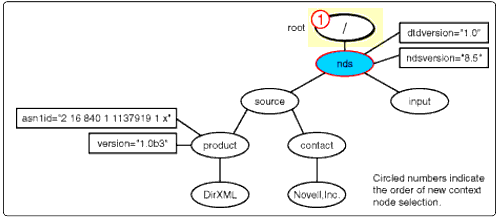
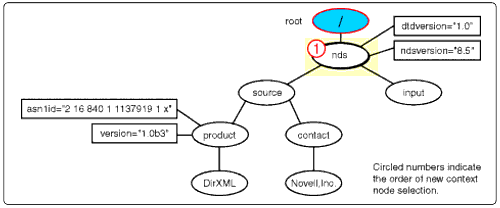
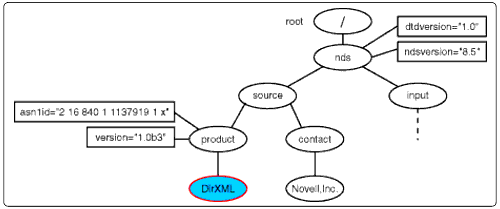
As mentioned earlier, the XSLT processor views both input and output documents as node documents. The processor maintains a separate selection in both the input document and the output document. In the input document, this selection is called the context node and can be programatically picked from anywhere in the document. In the output document, it is the node currently being written to as the document is being constructed. Initially, the context for both is set to the root node, as shown in the Figure 4.

Context set in the root node.
Initially, the output document is empty. As the input document is processed, its selected context node changes, traversing the document. After each change, the XSLT processor evaluates the nodes from the current context of the input document, as specified by the stylesheet template rules, to construct nodes at the current context of the output document.
Template/Context Node Pattern Matching
The rules in a stylesheet are specifically designed to match against significant nodes in the input document's node document. This process of template matching is performed by the XSLT processor each time a new context node is selected in the input document.
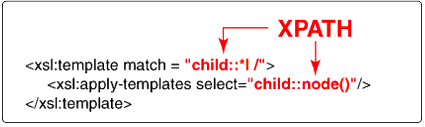
To understand this process of traversing the input node document by matching templates with selected context nodes, let's dissect Template A from the rules shown below.
Code Snippet 3


TEMPLATE A - Built-In Rule
A1      <xsl:template match="child::*|/">
A2         <xsl:apply-templates select="child::node()"/>
      </xsl:template>

TEMPLATE B - Identity Rule
B1      <xsl:template match="child::node()|attribute::*">
B2         <xsl:copy>
B3            <xsl:apply-templates select="child::node()|attribute::*"/>

         </xsl:copy>
      </xsl:template>

TEMPLATE C
C1   <xsl:template match="child::add-attr[attribute::attr-name='phone']
     /child::value">
C2      <value type="teleNumber">
C3         <xsl:value-of select="translate(child::text(),'-','.')"/>

      </value>
   </xsl:template>
Note: If you look back at our original stylesheet, you won't find a template defined like Template A because it is one of two templates built in to the XSLT processor. The other built-in template isn't used to process our input document example. However, Template A is used and is a very simple template. As such, Template A is a good case for us to start with.
First, let's look at Template A in XML terms.
XPATH can be embedded in XSLT.
We have an element named "template" with an attribute named "match." Everything outside of the quoted attribute value in the XSL element is XSLT. The match attribute"s value (everything in quotes) is an XPATH expression.
Interpreting XPATH
An XPATH expression identifies input document nodes with relation to the context node, and returns references to them in what is called a nodeset.
The "location path" in an XPATH expression is composed of steps delimited by slashes, describing a path from the context node to a single node or many nodes in the document.
Paths in XPATH are delimited by steps.
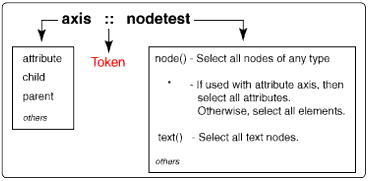
Many times an XPATH expression will consist of just one step. Each step is composed of two main parts delimited by a token. The first part of a step is called the axis and the second part is called a nodetest.

A step is comprised of an axis and a nodetest.
The axis defines a line of selectable nodes extending from the context node. Possible axes include child, parent, attribute, and others.The nodetest further qualifies the selectable nodes by specifying a type or name.
In addition, we can compound expressions with logical operators, like the ''' union operator which combines the nodesets resulting from two expressions.
Consider the XPATH expression, "
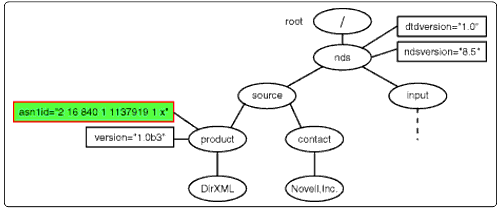
child::node()"attribute::*
" applied to the document fragment below with "nds" selected as the context node.
<nds dtdversion="1.0" ndsversion="8.5">
   <source>
      <product asn1id="2 16 840 1 113719 1 x" version="1.0b3">DirXML</product>
      <contact>Novell, Inc.</contact>
   </source>
   <input>
   </input>
</nds>
Consider the fragment's node document diagram in Figure 8.
The nodeset resulting from applying "child::node()"attribute::*" to "nds".
Let's apply the first part of the XPATH expression, '
child::node()' attribute::*
' to the node document. You can see that 'source' and 'input' are node children of 'nds'. This puts them on the child axis and makes them potentially selectable. To further constrain the selection the node() nodetest is applied. The node() nodetest allows any node. So the returned nodeset for the subexpression would include both of them.
Now, let's apply the second part of the XPATH expression, '
attribute::*
' to the node document. You can also see that 'dtdversion' and 'ndsversion' are attributes of 'nds'. This puts them on the attribute axis of the 'nds' node and makes them potentially selectable. To further constrain the selection, the '*' nodetest is applied. With the '*' nodetest applied to an attribute axis, it allows the selection of any or all attributes on the axis. So, a nodeset from this subexpression would include both attributes.
The combined nodesets resulting from the XPATH expression, "
child::node() "attribute::*
" would be the ordered list shown as numbered nodes in the diagram.
An XPATH expression of "
parent::*
" would obtain the node set shown in Figure 9.
The nodeset result from applying "parent::*" to "nds"
However, an XPATH expression of "
parent::text()
" would obtain an empty nodeset because the parent of "nds" is not a text node (text nodes can"t be parents anyway) but an element node.
An XPATH expression of "
child::source
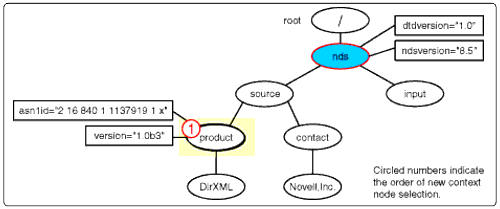
" would obtain the node set shown below because only the "source" node is on the child axis and has the name of "source" .
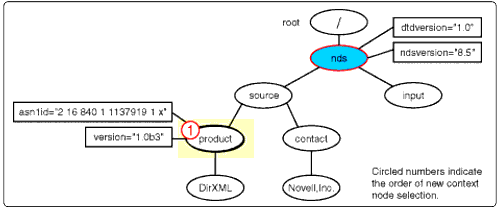
The nodeset result from applying "child::source" to "nds".
A step can be added to select the children of <source< in the XPATH expression. For example, the expression <
child::source/child::node()
< produces the nodeset shown in Figure 11.
The nodeset result from applying "child::source/child::node ()" to "nds".
Each XPATH step can be further qualified with predicates. Predicates are sub-expressions enclosed by the square bracket characters '[ ]'.
For example, the XPATH expression in the second step of "
child::source /child::node()
" can be further defined to identify "product" by adding a predicate like this:
"
child::source/child::node()[attribute::version]
"
This is because only the <product< child of <source< has an attribute with the name of version. So, the expression with the predicate produces the node set shown in Figure 12.
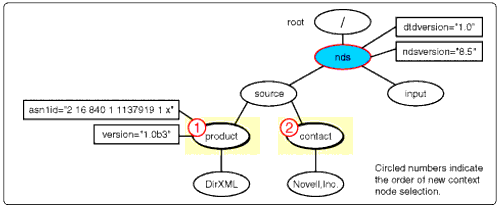
The nodeset result from applying "child::source/child::node () [attribute::version]".
Abbreviation symbols are often used in place of XPATH terms. The following are a couple of items showing common substitutions for axes:
-
'@' = attribute::
-
= child::
The first item shows that the '@' character can be used in place of the '
attribute::
' axis specifier, (e.g., '
child::source/ child::node()[@version]
').
The second item shows that whenever an axis is not specified, the axis is always, "
child::
".
For example, the XPATH expression, "
source/node()[@version]
") would produce the same nodeset as "
child::source/child::node()[@version]
" shown in Figure 13.
The nodeset from applying "source/node()[@version]" to "nds".
For the purposes of this course, those axes, nodetests, functions, instructions, and others defined in this section should be sufficient. However, there are many other axes, nodetests, functions, instructions, and others defined in XPATH. Refer to a good reference book for more information on them.
Apply-Template Node Selection Process
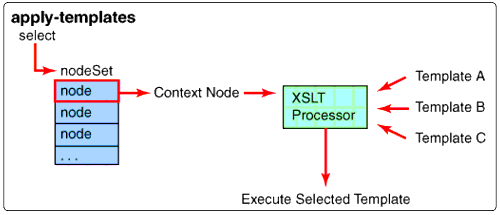
Each template pattern matching operation is invoked by the XSLT apply- templates instruction (see Figure 14).
Apply-templates gets a set of selected nodes.
The XPATH expression in the apply-templates instruction selects an input document node set. The XSLT processor iterates through the list, sequentially making each node the context node. The template match patterns are compared to each context node to determine which template is to be invoked next.
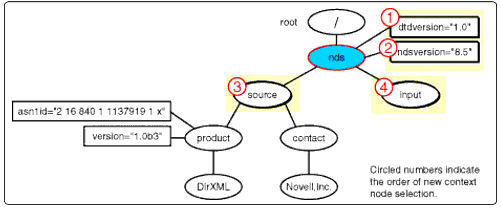
Again, each template is like a separate program. A template is invoked when the pattern specified by its XPATH "match" expression is the closest match to the selected context node. As the template is processed, it can then use an apply-templates instruction of its own to specify another set of nodes for immediate processing, each of which can also call apply-templates and so on.Because most templates generally target children of the current context node in their apply-templates instructions, node document processing generally traverses from top to bottom.Let"s process the PBXSimulator add account document node tree we defined earlier as an input document example in Code Snippet 1.
Template A Matches the root Node
Matched Template A.1


A1 <xsl:template match=<child::*|/<<<
A2 <xsl:apply-templates select=<child::node()</<<
</xsl:template<<
Line A1
Essentially, the processor performs two steps to kick off processing the input document. First, it selects the input document's root node and then performs a default apply-templates instruction to apply all of the templates from the stylesheet to it. Since the pattern in Template A specifically calls out root, it is the most specific pattern and is therefore selected as the next template to be invoked.
Note: Template A is actually built into the XSLT processor and is not in the stylesheet.
Line A2
After Template A is invoked, it performs its only instruction, the apply-templates instruction in line A2. Since the input document's current context is the root node, the XPATH expression in line A2 returns all of the children of root, in this case just 'nds', in a nodeset. (For a description of how XPATH is used to obtain a nodeset, read Interpreting XPATH.)
The apply-templates instruction selects <nds< as the next context node and compares its characteristics against the patterns of all of the templates to determine which template to invoke for that node.
There is no output resulting from template A.
Root nodeset selection.
Output Document: Nothing, output s root was created implicitly.
Template B Matches the <nds< Element Node
Matched Template B


B1      <xsl:template match="child::node()|attribute::*">
B2         <xsl:copy>
B3            <xsl:apply-templates select="child::node()|attribute::*"/>
         </xsl:copy>
      </xsl:template>
The apply-templates instruction from Template A produced a nodeset consisting of root's only child 'nds' which was made the new context node and had all templates compared to it. Of the three rules, the XSLT processor selects Template B as a match for the 'nds' node.
Template B is called the identity-template. Its purpose is to copy nodes to the output document. It has a very general match pattern and so in most stylesheets is invoked frequently to copy most of the input document nodes to the output document.
Generally, the only nodes not matched by the identity-template are those that are being specifically targeted by the stylesheet. Other templates in the stylesheet are designed to specifically match the significant target nodes so that they can perform their special transformations on them. A template with a specific match has precedence over one with a general match like the identity template.
Line B1
Let's examine the 'nds' node to see how it matches Template B's match pattern in line B1 below. This match expression has two parts. The first part sets the axis to all of the children of the context node which, at the time of the apply-templates instruction, was root. The nodetest specifies that the selection can be any kind of node. Well, the 'nds' node is the only child of root and is definitely a node, so it goes into the nodeset for the first part of the expression.
The second subexpression is looking for any attribute children of the context node. As you can see in the diagram, with root as the context node, this expression produces an empty nodeset.
Both nodesets are merged with the union operator, resulting in a nodeset with one node, namely <nds<.
Template A doesn't match because built-in rules are only tried if none of the stylesheet rules are matched. Template C doesn't match because it is looking for a very specific child node named '
add-attr
'. So, 'nds' is made the context node and Template B is invoked.
Line B2
The copy instruction in line B2 copies the context node and all nodes that are developed within its opening and closing tags. Since this is an apply-templates instruction and will include all of the rest of the document (resulting from recursive calls to apply templates with deeper nested nodes) this will ultimately result in the entire output document.
Another instruction called copy-of would copy the context node and all of its children and attributes. However, this would not give the stylesheet a chance to match on the significant target nodes that it wants to transform with special template code. So, the identity template is designed to copy that stuff as well, but in a much more selective way, allowing each node to be examined, step-by-step along the way.
Line B3
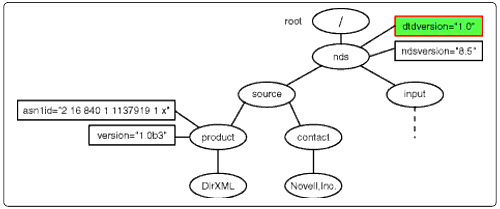
The identity-template's apply-templates instruction selects all nodes on the child and attribute axis of the context node. Since 'nds' is the current context, 'dtdversion ', 'ndsversion', 'source', and 'input' are returned in the nodeset. 'dtdversion' is selected as context node and all template patterns are compared to it.
The <nds< nodeset selection.
Contribution to Output Document
<nds>
</nds>
Template B Matches the "dtdversion" Attribute Node
Matched Template B


B1      <xsl:template match="child::node()|attribute::*">
B2         <xsl:copy>
B3            <xsl:apply-templates select="child::node()|attribute::*"/>
         </xsl:copy>
      </xsl:template>
The dtdversion attribute node was selected as the context node in the previous apply-templates instruction.
Line B1
Let's examine the dtdversion attribute node to see how it matches Template B's match pattern in line B1 below. This match expression has two parts. The first part sets the axis to all of the children of the context node which at the time of the previous apply-templates instruction was 'nds'. The nodetest specifies that the selection can be any kind of node. Well, the 'source' and 'input' nodes are the only children of 'nds'.
So, we go to part 2 of the expression, which is looking on the attribute axis for any attribute. The dtdversion attribute node definitely qualifies and since none of the other templates match, Template B (the identity-template) is invoked again.
Line B2
Since the dtdversion is the current context node, it is copied to the output document.
Line B3
The apply-templates instruction is called, but since dtdversion is an attribute and can have no children or attributes, the returned nodeset is empty. So, the next node from the previous apply-templates nodeset, ndsversion is made the current context node and is compared to the templates.
The dtdversion nodeset selection.
Contribution to Output Document
<nds dtdversion="1.0">
</nds>
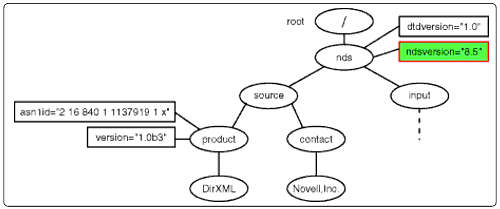
Template B Matches the "ndsversion" Attribute Node
Matched Template B


B1      <xsl:template match="child::node()|attribute::*">
B2         <xsl:copy>
B3            <xsl:apply-templates select="child::node()|attribute::*"/>
         </xsl:copy>
      </xsl:template>
The ndsversion attribute node was selected as the context node in the previous apply-templates instruction.
Line B1
The identity-template's match pattern matches the ndsversion attribute node for the same reasons that it matched the dtdversion attribute node explained earlier.
Line B2
The context node, the ndsversion attribute node is copied to output.
Line B3
Again, ndsversion is an attribute and can have no children or attributes, so the returned nodeset is empty. So, the next node from the previous apply-templates nodeset, <source< is made the current context node and is compared to the templates.
The ndsversion nodeset selection.
Contribution to Output Document

   <nds dtdversion="1.0" ndsversion="8.5">
      </nds>
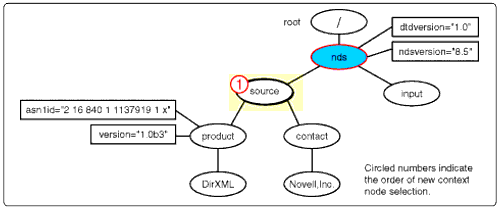
Template B Matches the <source< Element Node
Matched Template B


B1      <xsl:template match="child::node()|attribute::*">
B2         <xsl:copy>
B3            <xsl:apply-templates select="child::node()|attribute::*"/>
         </xsl:copy>
      </xsl:template>
The <source< element node was selected as the context node in the previous apply-templates instruction.
Line B1
The identity-template's match pattern matches the ndsversion attribute node for the same reasons that it matched the 'nds' node explained earlier.
Line B2
The context node, the <nds< node is copied to output.
Line B3
The <nds< node has two children, <product< and <contact<. So, the first of the two, <product< is made the current context node and compared to the templates.
The <source < nodeset selection.
Contribution to Output Document
<nds dtdversion="1.0" ndsversion="8.5">
   <source>
   </source>
</nds>
Template B Matches the <product< Element Node
Matched Template B


B1      <xsl:template match="child::node()|attribute::*">
B2         <xsl:copy>
B3            <xsl:apply-templates select="child::node()|attribute::*"/>
         </xsl:copy>
      </xsl:template>
The <product< element node was selected as the context node in the previous apply-templates instruction.
Line B1
The identity-template's match pattern matches the ndsversion attribute node for the same reasons that it matched the 'source' node explained earlier.
Line B2
The context node <product< node is copied to output.
Line B3
The <product< node has two attribute nodes, <asn1id< and <version<. It also has one text child node, <DirXML<. These nodes are returned in one nodeset. The attribute node <asn1id< is taken from the nodeset to be made the current context node and compared to the templates.
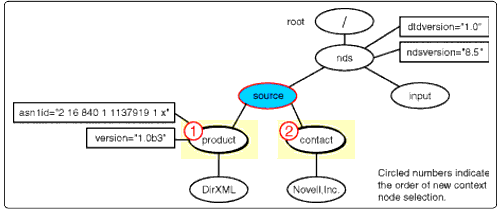
The <product< nodeset selection.
Contribution to Output Document
<nds dtdversion="1.0" ndsversion="8.5">
   <source>
      <product></product>
   </source>
</nds>
Template B Matches the "asn1id" Attribute Node
Matched Template B


B1      <xsl:template match="child::node()|attribute::*">
B2         <xsl:copy>
B3            <xsl:apply-templates select="child::node()|attribute::*"/>
         </xsl:copy>
      </xsl:template>
The "asn1id" attribute node was selected as the context node in the previous apply-templates instruction from the "product" node"s identity-template invocation.
Line B1
The identity-template's match pattern matches the ndsversion attribute node for the same reasons that it matched previously explained attribute nodes.
Line B2
The context node "asn1id" is copied to output.
Line B3
Again, asn1id is an attribute and can have no children or attributes, so the returned nodeset is empty. The next node from the <product< node<s apply-templates nodeset is made the current context node and is compared to the templates. This node is the attribute node, <version<.
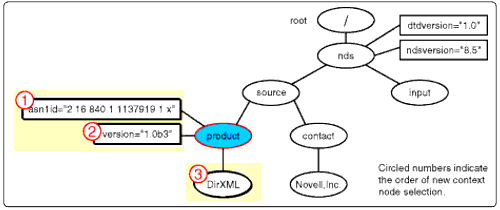
The asn1id nodeset selection.
Contribution to Output Document
   <nds dtdversion="1.0" ndsversion="8.5">
      <source>
      <product asn1id="2 16 840 1 113719 1 x"></product>
      </source>
   </nds>
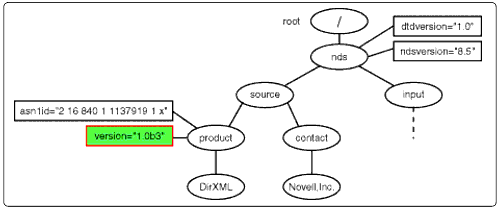
Template B Matches the "version" Attribute Node
Matched Template B


B1      <xsl:template match="child::node()|attribute::*">
B2         <xsl:copy>
B3            <xsl:apply-templates select="child::node()|attribute::*"/>
         </xsl:copy>
      </xsl:template>
The "version" attribute node was selected as the context node in the previous apply-templates instruction from the "product" node"s identity-template invocation.
Line B1
The identity-template's match pattern matches the version attribute node for the same reasons that it matched previously explained attribute nodes.
Line B2
The context node "asn1id" is copied to output.
Line B3
Again, asn1id is an attribute and can have no children or attributes, so the returned nodeset is empty. So, the next node from the <product< node<s apply-templates nodeset is made the current context node and is compared to the templates. This node is the text node, <DirXML<.
The version nodeset selection.
Contribution to Output Document
   <nds dtdversion="1.0" ndsversion="8.5">
      <source>
         <product asn1id="2 16 840 1 113719 1 x" version="1.0b3"></product>
      </source>
   </nds>
Template B Matches the "DirXML" Text Node
Matched Template B


B1      <xsl:template match="child::node()|attribute::*">
B2         <xsl:copy>
B3            <xsl:apply-templates select="child::node()|attribute::*"/>
         </xsl:copy>
      </xsl:template>
The "DirXML" text node was selected as the context node in the previous apply-templates instruction from the "product" node"s identity-template invocation.
Line B1
The first part of the identity-template's match pattern matches the DirXML text node because 'DirXML' is a child of 'product' and is a node.
Line B2
Line B2 - The context node "DirXML" is copied to output.
Line B3
"DirXML" is a text node and can have no children or attributes, so the returned nodeset is empty. "DirXML" is the last node from the previous apply-templates nodeset for "product", so, the next node from the "source" node"s apply-templates nodeset is made the current context node and is compared to the templates. This node is the element node, "contact".
The <DirXML< nodeset selection.
Contribution to Output Document
   <nds dtdversion="1.0" ndsversion="8.5">
      <source>
      <product asn1id="2 16 840 1 113719 1 x" version="1.0b3">DirXML</product>
      </source>
   </nds>
Template B Matches the <contact< Element Node
Matched Template B


B1      <xsl:template match="child::node()|attribute::*">
B2         <xsl:copy>
B3            <xsl:apply-templates select="child::node()|attribute::*"/>
         </xsl:copy>
      </xsl:template>
The <contact< element node was selected as the context node in the previous apply-templates instruction from the <source< node<s identity-template invocation.
Line B1
The first part of the identity-template's match pattern matches the 'contact' element node because 'contact' is a child of 'source' and is a node.
Line B2
The context node <contact< is copied to output.
Line B3
<contact< is an element node with one child text node named <Novell, Inc.<, so that is the only node in the nodeset. <Novell, Inc.< is made the current context node and is compared to the templates.
The <contact< nodeset selection.
Contribution to Output Document
<nds dtdversion="1.0" ndsversion="8.5">
   <source>
      <product asn1id="2 16 840 1 113719 1 x" version="1.0b3">DirXML</product>
      <contact></contact>
   </source>
</nds>
Template B Matches the "Novell, Inc" Text Node
Matched Template B


B1      <xsl:template match="child::node()|attribute::*">
B2         <xsl:copy>
B3            <xsl:apply-templates select="child::node()|attribute::*"/>
         </xsl:copy>
      </xsl:template>
The "Novell, Inc." text node was selected as the context node in the previous apply-templates instruction from the "contact" node"s identity-template invocation.
Line B1
The first part of the identity-template's match pattern matches the 'Novell, Inc.' text node because 'Novell, Inc.' is a child of 'contact' and is a node.
Line B2
The context node "Novell, Inc." is copied to output.
Line B3
"Novell, Inc." is a text node and can have no children or attributes, so the returned nodeset is empty. And the "contact" element node is the last node from the previous apply-templates nodeset for "source". So, the next node from the "nds" nodes apply-templates invocation is made the current context node and is compared to the templates. This node is the element node, "input".
The <Novell, Inc.< nodeset selection.
Contribution to Output Document
<nds dtdversion="1.0" ndsversion="8.5">
   <source>
   <product asn1id="2 16 840 1 113719 1 x" version="1.0b3">DirXML</product>
   <contact>Novell, Inc.</contact>
   </source>
</nds>
Template B Matches All Nodes From <input< to <add-attr<
Matched Template B


B1      <xsl:template match="child::node()|attribute::*">
B2         <xsl:copy>
B3            <xsl:apply-templates select="child::node()|attribute::*"/>
         </xsl:copy>
      </xsl:template>
In ways that are similar to the matches that have been previously described, the identity-template will match all nodes in the input document from <input< to <add-attr<, copying them to output.

Complete input document node tree for Code Snippet 1.
Contribution to Output Document
<nds dtdversion="1.0" ndsversion="8.5">
   <source>
      <product asn1id="2 16 840 1 113719 1 x" version="1.0b3">DirXML</product>
      <contact>Novell, Inc.</contact>
   </source>
   <input>
      <add class-name="User" src-dn="0199">
         <association>0199</association>
         <add-attr attr-name="firstName">
            <value type="string">John</value>
         </add-attr>
         <add-attr attr-name="lastName">
            <value type="string">Smith</value>
         </add-attr>
         <add-attr attr-name="phone">
         </add-attr>
      </add>
   </input>
</nds>
Template C Matches the <add-attr/value< Element Node
Matched Template C


C1   <xsl:template match="child::add-attr[attribute::attr-name='phone']
/child::value">
C2      <value type="teleNumber">
C3         <xsl:value-of select="translate(child::text(),'-','.')"/>
      </value>
   </xsl:template>
The last node from the <add-attr < node<s apply-templates nodeset is its <value< child element node.
Line C1
When the XSLT processor makes <value< the context node and compares template patterns to it, Template C<s match pattern is found to be the most specific match for two reasons:
The <value< node<s parent is an <add-attr< element with an attr-name attribute whose value is <phone<.
The <value< node<s name is <value<.
Line C2
When the XSLT processor encounters a non-XSLT tag in a template, it simply copies it directly to the context node location in the output document. So, <value type=<teleNumber<< is copied directly to the output document as the child of the <add-attr< element already there.
Note: Read the "Interpreting XPATH" section above for more information about resolving XPATH expressions.
Line C3
The XSL value-of instruction converts the results of its XPATH select value into a string and then outputs the string.
In this case, the XPATH expression calls an XPATH function named "translate( )" to operate on an XPATH sub-expression that is one of translate( )"s parameters. The translate( ) function has the following arguments:
String value-this can be a string variable, an explicit string, or a nodeset returned by an XPATH expression
Characters to be replaced
Replacement characters
As with the rest of the XPATH you learned about, the expression "child::text()" is implemented by the XSLT processor in reference to the current context node, which in this case is "value" node. So, the expression sets the axis to the children of "value" and selects the text nodes there. Of course, only child of "value" is a text node, so that is resolved to its value which is the "555-555-1234" string.The translate( ) function then searches out the "-" characters in this string and replaces each of them with the "." character. The resulting string is output by the value-of instruction to complete the output document and the implementation of the phone number translation business rule.
The <value< nodeset selection.
Output Document
<nds dtdversion="1.0" ndsversion="8.5">
   <source>
   <product asn1id="2 16 840 1 113719 1 x" version="1.0b3">DirXML</product>
   <contact>Novell, Inc.</contact>
   </source>
   <input>
      <add class-name="User" src-dn="0199">
         <association>0199</association>
         <add-attr attr-name="firstName">
            <value type="string">John</value>
         </add-attr>
         <add-attr attr-name="lastName">
            <value type="string">Smith</value>
         </add-attr>
         <add-attr attr-name="phone">
            <value type="telenumber">555.555.1234</value>
         </add-attr>
      </add>
   </input>
</nds>
Conclusion
Now you have seen how DirXML stylesheets can help you implement specific business rules into diverse environments. With a little practice you will be doing things like modifying events, creating initial passwords, and creating unique common names for objects being published by your drivers into NDS.
You will find an updated version of this article in the form of a lab in the DirXML Custom Driver Development course on the DeveloperNet web site at:
http://developer.novell.com/servlet/devnet/education/index.html
For explanations of more sophisticated stylesheet samples, refer to Novell's DirXML Developers Guide.
* Originally published in Novell AppNotes
Disclaimer
The origin of this information may be internal or external to Novell. While Novell makes all reasonable efforts to verify this information, Novell does not make explicit or implied claims to its validity.