How to Build an NDS-Enabled Application Using Visual Basic and the Novell Controls for ActiveX, Part 2
Articles and Tips: article
Software Engineer
Novell Consulting Custom Development
madair@novell.com
01 Feb 2001
This article shows how to write the OrgBuilder part of this application, using Visual Basic and the Novell Controls for ActiveX. Part 3 will tell how to write OrgChart. This article is based on an online DeveloperNet University course available at http://developer.novell.com/servlet/devnet/education/lecture.html.
- Introduction
- OrgBuilder Description
- Using OrgBuilder to Extend the NDS Schema
- Using Schema Manager to Extend the Base Schema
- Using OrgBuilder to Create an Organization
- Conclusion
Introduction
Way back in July 2000, I described an application called OrgChart that uses data stored in NDS to hold information about an organization's structure. This application has two parts:
OrgBuilder extends the NDS schema with OrgChart-specific layouts that will hold information about departments within the organization: who the department manager is, and who reports to that manager. It builds an organization by reading object specifications from a text file and creating the organization, organizational unit, user, and OrgChart-specific objects specified in the file.
OrgChart allows you to browse the organization OrgBuilder creates. You can see who reports to whom, and view a picture of each member of the organization, their phone number, etc.
This article shows how to write the OrgBuilder part of this application, using Visual Basic and the Novell Controls for ActiveX. Part 3 will tell how to write OrgChart. This article is based on a web-based course available from Novell's DeveloperNet University at http://developer.novell.com/servlet/devnet/education/lecture.html. This article will lead you, step by step, through development of the OrgChart application, while the DeveloperNet University course describes the concepts behind NDS programming, provides some example code, then has you write your own code to add NDS functionality to finish the OrgChart application. You can choose the approach that's best suited to your needs.
OrgBuilder Description
OrgBuilder is a utility that populates a directory with sample data so that the OrgChart browser has something to browse. To do this, OrgBuilder extends the schema in an NDS directory and then instantiates the following types of objects into it:
Organization
Organizational Unit
User
DNU:OrgChart (OrgBuilder adds this layout to the directory schema)
For more information on the structures OrgBuilder adds to the NDS directory, see the description of the OrgChart Directory Object Model in Part 1 of this article (available at http://developer.novell.com /research/appnotes/2000/july/07/a000707.htm).
Writing OrgBuilder will teach you how to:
extend the NDS directory for new fields and layouts
remove extensions you have made to the NDS directory
create and delete entries in an NDS directory
write string values to NDS fields
reference other NDS database entries in an NDS field
write stream values to NDS fields
As shown in Figure 1 below, OrgBuilder will create an organization called "TopTenInc" at the root of the directory to contain objects describing employees in a fictitious corporation of the same name. The information for these sample objects is obtained from a text file called TopTen.txt. This file and the picture files (JPEG format) for employees of Top Ten, Inc. are included in the OrgBuilder.zip archive, which you can download from http://developer.novell.com/ servlet/devnet/education/tutorials/vbactivex/download.htm.

Using ConsoleOne to view the TopTenInc organization.
Writing OrgBuilder
OrgBuilder can be broken down into 5 functionalities, which you will develop in a sequence of 5 programming steps:
Logging In
Adding Layouts to the Directory
Creating and Deleting Entries
Writing Fields
Writing Stream Fields
If you are ready to start writing OrgBuilder, download the OrgBuilder.zip archive from http://developer.novell.com/servlet/ devnet/education/tutorials/vbactivex/download.htm and unzip it. The archive contains two subdirectories:
LAB contains a copy of OrgBuilder with some of the code missing. The user interface has been designed, but some of the code that performs NDS functions associated with some of the controls has not been included. You will write the code to make a fully functional OrgBuilder utility.
FINAL contains a fully functional version of OrgBuilder. You can use this solution code to compare with the code you have written.
Logging In
In this step you will write the code associated with controls on two forms: one displays a list box containing a list of directories the user is logged in to (see Figure 2), the other allows the user to log in to another directory (see Figure 3).

OrgBuilder's list of connected directories.
When the "NDS Connection" form loads, the "Connected Trees" list should display a list of directories the user has logged in to. The "Login to Another Tree" button should load the login form (Figure 3). The "Use Selected Tree" button will be used in the next step.
Logging in to another directory.
When the "Login to NDS Tree" form loads, it should display a list of all available NDS directories. When the user clicks the "Login" button, OrgBuilder should read what the user has entered in the "User Name" and "Password" text boxes, attempt to log the user in to the directory the user has selected from the list, and use a MsgBox to display the results.
The version of OrgBuilder in the LAB subdirectory has the forms shown in the figures above, but some of the code is missing. Your task is to add the code for the "Use Selected Tree" and "Login" button controls. Search the code for comments containing "LOGGING IN" for the places you need to add code. Add the code below to the ConnectionsForm"s SelectedBtn_Click subroutine.
DefaultTree = ConnectedTreesLst.Text

ConnectionsForm.MousePointer = vbHourglass
Add the code below to the LoginForm's LoginBtn_Click subroutine
DefaultTree = AvailableTreesLst.Text

loggedIn =

   NWSess1.Login(NWSess1.DefaultFullNameFromTreeName(DefaultTree),

   UserNameTxt.Text, PasswordTxt.Text, False)

If loggedIn Then

   OrgBuilderForm.Show

   Unload Me

Else

   MsgBox "Unable to log in to server " + DefaultTree"
End If
Adding Layouts to the Directory
In this step, you will use the Novell Directory ActiveX control to extend an NDS director''s schema (or in ActiveX parlance, add layouts to the directory).
OrgBuilder needs to create objects that describe employees and their relationships to each other. As is often the case, not all the information OrgChart needs can be installed into the standard layout and field types of the NDS schema, so you must add three additional fields to the user layout and a new object type to the target directory.
In order to write code that adds layouts to the directory, you need to understand the application's object model. To find out more about the object model needed for OrgChart refer to Part 1 of this article.
You should now modify the OrgBuilder application in the Lab subdirectory so that it will make the necessary OrgChart extensions to the schema in the target directory. The schema extension code should execute when the user clicks the button labeled "Extend Schema" on OrgBuilder"s main form (OrgBuilderForm, See Figure 4).

OrgBuilderForm.
The handler for the Extend Schema button is called ExtendSchemaBtn_Click. There are 6 code fragments that need to be added to this procedure (look for the "ADDING LAYOUTS" comments). The first fragment adds 3 new field types that will be used by fields in the OrgChart object.
Define new field types

newFType(0).name = GroupTitleFieldName

newFType(0).SingleValued = True

newFType(0).Syntax = NWDirLib.SYN_CI_STRING


newFType(1).name = GroupManagerFieldName

newFType(1).SingleValued = True

newFType(1).Syntax = NWDirLib.SYN_DIST_NAME


newFType(2).name = GroupMemberFieldName

newFType(2).SingleValued = False

newFType(2).Syntax = NWDirLib.SYN_DIST_NAME


For i = 0 To 2

   added = (NWDir1.FieldTypes.Add(newFType(i)))

   If added Then

      ResultsTxt.Text = ResultsTxt.Text + "Added field: " + "
         newFType(i).name + vbCrLf

   Else

      ResultsTxt.Text = ResultsTxt.Text + "Unable to add field: " + "
         newFType(i).name + vbCrLf

   End If

Next
The second code fragment creates field descriptions for the 4 fields of the OrgChart layout.
'newFDesc(0).name = GroupTitleFieldName'
newFDesc(0).Optional = False


newFDesc(1).name = GroupManagerFieldName

newFDesc(1).Optional = False


newFDesc(2).name = GroupMemberFieldName

newFDesc(2).Optional = True


newFDesc(3).name = "CN""
newFDesc(3).Optional = False
The next fragment defines the OrgChart layout as inheriting from the Top layout, and can be contained by Organization, Organizational Unit, Country, or Locality entries, or at the root of the NDS tree.
newLayout.name = OrgChartLayoutName

newLayout.BasedOn = "Top""
newLayout.Containment = "Organization, Organizational Unit, Country, Locality,"
Tree Root""
Next, we add the 4 previously-defined fields to the OrgChart layout.
For i = 0 To 3

   added = newLayout.Fields.Add(newFDesc(i))

   If added Then

      ResultsTxt.Text = ResultsTxt.Text +

         "Added field to OrgChart layout: " + newFDesc(i).name + vbCrLf"
   Else

      ResultsTxt.Text = ResultsTxt.Text +

         "Unable to add field to OrgChart layout: " + "
         newFDesc(i).name + vbCrLf

   End If

Next
Next, we'll add the OrgChart layout to the NDS schema. An OrgChart entry's common name (CN) field is the naming field for the entry. Identifying the fields that typically identify entries speeds searches for entries with the specified layout.
newLayout.NamingFields = "CN""


'add OrgChart layout to schema'
added = NWDir1.Layouts.Add(newLayout)

If added Then

   ResultsTxt.Text = ResultsTxt.Text + "Added layout: " + "
      newLayout.name + vbCrLf

Else

   ResultsTxt.Text = ResultsTxt.Text + "Unable to add layout: " + "
      newLayout.name + vbCrLf

End If
Finally, we'll add some extensions to the User layout. Actually, we'll just add 3 fields to the directory. You'll have to use the Schema Manager utility to add these fields to the User layout, because the NWDir control currently can't add fields to layouts in the NDS base schema (like the User layout).
newFType(0).name = UserManagerFieldName

newFType(0).SingleValued = True

newFType(0).Syntax = NWDirLib.SYN_DIST_NAME


newFType(1).name = UserOrganizationFieldName

newFType(1).SingleValued = True

newFType(1).Syntax = NWDirLib.SYN_DIST_NAME


newFType(2).name = UserPictureFieldName

newFType(2).SingleValued = False

newFType(2).Syntax = NWDirLib.SYN_STREAM


For i = 0 To 2

   added = (NWDir1.FieldTypes.Add(newFType(i)))

   If added Then

      ResultsTxt.Text = ResultsTxt.Text + "Added field: " + "
         newFType(i).name + vbCrLf

   Else

      ResultsTxt.Text = ResultsTxt.Text + "Unable to add field: " + "
         newFType(i).name + vbCrLf

   End If

Next


'Can't use NWDir control to extend base schema, so use Schema Manager'
ResultsTxt.Text = ResultsTxt.Text + "You must now use NDS Manager to "
   add DNU user fields to User layout." + vbCrLf"
   ResultsTxt.Text = ResultsTxt.Text + "See program documentation." + "
      vbCrLf

ResultsTxt.Text = ResultsTxt.Text + "Done." + vbCrLf"
See "Using Schema Manager to Extend the Base Schema" later in this article for instructions on how to add the new fields to the "User layout.
Removing Layouts from the Schema
After extending the NDS schema, you may want to remove extensions you have made. Extensions must be removed in the reverse order of how they were added. Look for the "ADDING LAYOUTS" comment in the "Remove Extensions" handler, RemoveExtenstionsBtn_Click, and add the following code to remove the OrgChart layout and the fields we added to the directory.
'Must remove OrgChart layout first, then field types'
If (NWDir1.Layouts.Remove(OrgChartLayoutName)) Then

   NWDir1.Layouts.Refresh

   ResultsTxt.Text = ResultsTxt.Text +

      "Removed OrgChart layout from schema" + vbCrLf"
Else

   ResultsTxt.Text = ResultsTxt.Text +

      "Unable to remove OrgChart layout" + vbCrLf"
End If


If (NWDir1.FieldTypes.Remove(GroupTitleFieldName)) And

   (NWDir1.FieldTypes.Remove(GroupManagerFieldName)) And

   (NWDir1.FieldTypes.Remove(GroupMemberFieldName)) Then


   NWDir1.FieldTypes.Refresh

   ResultsTxt.Text = ResultsTxt.Text +

      "Removed OrgChart field types from schema" + vbCrLf"
Else

   ResultsTxt.Text = ResultsTxt.Text +

      "Unable to remove OrgChart field types" + vbCrLf"
End If
Because the User object is a core NDS class, the OrgChart attributes added to it cannot be removed. You can restore the original NDS core classes by removing NDS and reinstalling it. See the documentation for NWConfig (NetWare 5) or Install.NLM (NetWare 4) for instructions on how to reinstall NDS.
Creating and Deleting Entries
Now we'll look at how to use the Novell Directory ActiveX control to create and delete entries in an NDS directory.
After OrgBuilder has added the OrgChart extensions to the directory, it can then add the entries needed to populate a directory. Based on specifications contained in a text file, OrgBuilder creates organization, organizational unit, user, and OrgChart entries in the NDS directory. OrgChart entries are entries containing information about the structure of organizational groups: group names, members, and managers.
Each line in an OrgBuilder specification file begins with the type of entry OrgBuilder is to create. Fields within are separated by tildes (~). To create an organization entry, just specify the organization's name:
ORGANIZATION~TopTenInc
To create an organizational unit, specify the OU's full name:
OU~TopTenInc\Theft
The organization must be created first, and OUs must be created before their subordinate OUs. For example, you must tell OrgBuilder to create:
OU~TopTenInc\Theft
before it can create:
OU~TopTenInc\Theft\Burglary
To create a user entry, you must specify the user entry's full name, surname, title, phone number, and the name of a file containing the user's picture:
USER~TopTenInc\Jacquiline Lebaron~Lebaron~Vice President

 of Theft~555-6318~pics\lebaron.gif
For OrgChart entries, specify the full name for the entry within the directory, the department name, and the full names of the manager and each member of the department:
DNU:OrgChart~TopTenInc\OrgChartTop~Top Ten Inc Executive

Board~TopTenInc\Usama "Big Cheese" bin"
Laden~TopTenInc\Jacquiline Lebaron~TopTenInc\Julio

Bonchea~TopTenInc\Eric Rudolph~TopTenInc\Desiree Dawn

Lingo-Perkins~
The "Lab" version of OrgBuilder has the code that allows the user to select a specification text file, parse the file, and call the appropriate subroutine for creating or deleting each type of entry. Code needs to be added to create and delete organization, organizational unit, user, and OrgChart entries in an NDS directory, based on specifications in a text file.
Search for comments that say "CREATING ENTRIES" for the places you need to add code to the OrgBuilder Lab program.
The first place to add code is in the CreateOrganization function. This code creates a new organization object.
Set newEntry = NWDir1.Entries.Add("Organization", name)"
newEntry.Update
If an error occurs while creating the new entry, the function's error handler should call the Abort method to deallocate the new entry.
newEntry.Abort
Similar code creates an organizational unit entry:
Set newEntry = NWDir1.Entries.Add("Organizational Unit", name)"
newEntry.Update
And aborts in event of error:
newEntry.Abort
The CreateUserEntry function has four places you need to add code to create a user entry. First, there is the code that creates the new entry:
Set newEntry = NWDir1.Entries.Add("User", name)
And the code that updates the directory after the user entry has been created and its field values set (we'll discuss how later):
newEntry.Update
Finally, there are two places where creation of the new entry must be aborted in event of error:
newEntry.Abort
Creating an OrgChart entry is similar to creating a user entry. You first create the new entry:
Set newEntry = NWDir1.Entries.Add("DNU:OrgChart", nameStr)
After setting the field values, you update the directory:
newEntry.Update
And once again, there are two places where you need to abort creating the entry in event of error:
newEntry.Abort
When creating NDS entries, you can use NWAdmin or ConsoleOne to inspect the directory and verify that all entries have been created in the proper places in the directory.
Deleting Entries
The code that deletes entries has been included in the Lab version of OrgBuilder, so you do not need to add it. It's a very simple process; you just pass the name of the entry to be deleted to the Remove method:
NWDir1.Entries.Remove (nameStr)
Writing Fields
At this point, OrgBuilder creates entries in the directory, but does not establish the relationships between the entries that are necessary for OrgChart to run. For OrgChart to run, each OrgChart entry must have values assigned to its fields that identify the manager and members of each department. OrgChart also reads data from fields in user entries.
The "DNU:OrgChart" layout contains fields that describe the manger/employee/department relationships in a hierarchical organization. For more information on the OrgChart object model, refer to the description of OrgChart"s Directory Object Model in "Part 1 of this article.
After OrgBuilder creates a "DNU:OrgChart" entry, it must assign values to the OrgChart entry"s fields:
The "DNU:OrgChart:Group Title" field must be assigned the name of the organizational unit (the company, division, or department name).
The "DNU:OrgChart:Group Manager" field must be assigned the full name of the organizational unit"s manager.
The "DNU:OrgChart:Group Member" field must be assigned the full names of the user entries of all members of the department, including the manager.
OrgBuilder must also assign values to the "Surname", "Title", and "Telephone Number" fields in user entries.
Locate the "WRITING FIELDS" comments in the OrgBuilder Lab file. These comments tell you where and how to add code that writes values in the fields listed above.
The CreateUserEntry function, besides creating the user entry, sets the values of the new entry's 'Surname', 'Title', and 'Telephone Number' fields to the values passed as parameters to the function.
If (newEntry.SetFieldValue("Surname", surname) = True) And "
   (newEntry.SetFieldValue("Title", title) = True) And "
   (newEntry.SetFieldValue("Telephone Number", phone) = True)) Then"
The CreateOrgChart function had five places where code must be added to write field values. The first two modifications build the full name of the department manager, then set the value of the group manager field.
'build full name of manager'
fullEntryName = NWDir1.FullNameFromTreeAndContext(DefaultTree, "")"
fullEntryName = fullEntryName + "\" + ownerStr"


'set the value of the group manager field'
managerSet = newEntry.SetFieldValue(GroupManagerFieldName, fullEntryName)
The next modification builds the full name of a department (group) member, so it can be added to the OrgChart entry's member list.
'copy name of one member to oneMember, then strip it off'
oneMember = Left$(memberStr, InStr(1, memberStr, "~", vbTextCompare))"
memberStr = Right$(memberStr, Len(memberStr) - Len(oneMember))

oneMember = Left$(oneMember, Len(oneMember) - 1)


'build full name of member'
fullEntryName = NWDir1.FullNameFromTreeAndContext(DefaultTree, "")"
fullEntryName = fullEntryName + "\" + oneMember"
The last two modifications set the value of the member list field that we assembled, then update the OrgChart entry in the NDS directory.
'copy name of one member to oneMember, then strip it off'
oneMember = Left$(memberStr, InStr(1, memberStr, "~", vbTextCompare))"
memberStr = Right$(memberStr, Len(memberStr) - Len(oneMember))

oneMember = Left$(oneMember, Len(oneMember) - 1)


'build full name of member'
fullEntryName = NWDir1.FullNameFromTreeAndContext(DefaultTree, "")"
fullEntryName = fullEntryName + "\" + oneMember"
Some notes on writing field values:
When populating an organization, OrgBuilder performs a very fragile parse of its data file (the code for parsing is supplied as part of the lab project). If an error occurs, it suspends parsing and requires you to clean up the directory manually. To manually remove OrgChart-related objects from the directory, use ConsoleOne or NWAdmin to select and delete them.
Because the User object is a core NDS layout, the Novell Directory control cannot add fields to it. For instructions on how to do so, see "Using Schema Manager to Extend the Base Schema."
Because the User object is a core NDS layout, the OrgChart fields added to it cannot be removed.
Writing Stream Fields
OrgBuilder has added a field called "DNU:OrgChart:Picture" to the user objects in your test directory, so that each user object can contain a picture of the employee. This new attribute has been defined as having a Stream syntax. OrgBuilder must be able to write the picture to each user entry.
Only one line of code in the Lab version of OrgBuilder needs to be changed to make it write picture data into user objects in the directory. Locate the "WRITING STREAM FIELDS" comment in the CreateUserEntry function. Change the line of code that sets the user entry fields to look like this:
If (newEntry.SetFieldValue("Surname", surname) = True) And "
   (newEntry.SetFieldValue("Title", title) = True) And "
   (newEntry.SetFieldValue("Telephone Number", phone) = True) And "
   (newEntry.LoadFieldValueFromFile(UserPictureFieldName, pictureFile)

      = True) Then
This change will enable OrgChart to write a picture data stream to the specified user's 'DNU:OrgChart:Picture' field. The picture files OrgBuilder reads into the directory are provided in a subdirectory called 'Pics'.
Using OrgBuilder to Extend the NDS Schema
OrgBuilder extends the schema in an NDS directory for the OrgChart application and then creates the "TopTenInc" organization and the objects it contains. The OrgChart and User objects inside the "TopTenInc" organization describe an imaginary corporation"s employee hierarchy. Using the information in these objects OrgChart can be used to browse the employee hierarchy in "TopTenInc".
To Run OrgBuilder:
Assure that you have Admin or Admin-equivalent access to a non-production NDS directory. You will make changes to the NDS directory that can only be removed by reinstalling NDS.
Double-click OrgBuilder.EXE or run the program from the Visual Basic IDE. The "Connections" form is the first window displayed (see Figure 5). This displays the NDS directories (trees) you are currently connected to. You can either select a directory name from the list, or click on the "Login to Another Tree" button to connect to another directory.

Connections Form.
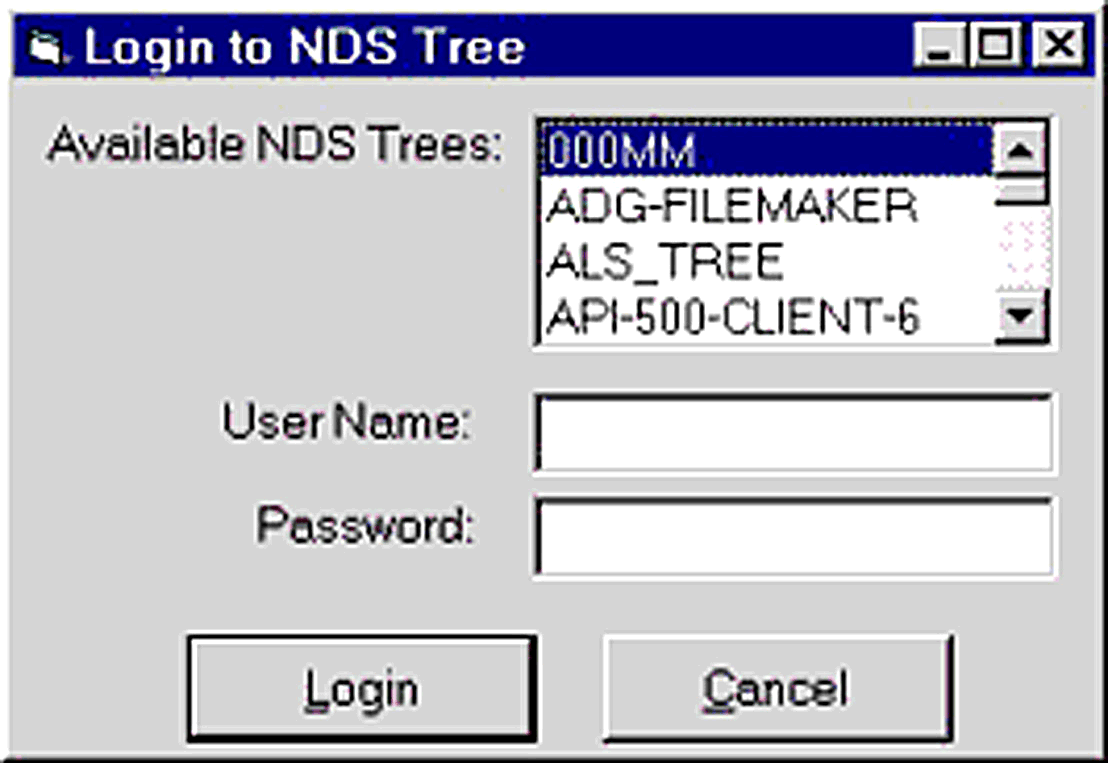
If you click the "Login to Another Tree" button, OrgChart displays the Login window (see Figure 6).

Login Form
Select an NDS directory from the list and enter a user name and password to log in to the selected tree.
Once you have selected the directory tree you want to operate on, OrgBuilder displays the OrgBuilder form (See Figure 7). When you click the "Extend Schema" button, OrgBuilder adds 6 fields to the NDS directory you have selected, creates the OrgChart layout, and adds 4 fields to the OrgChart layout.
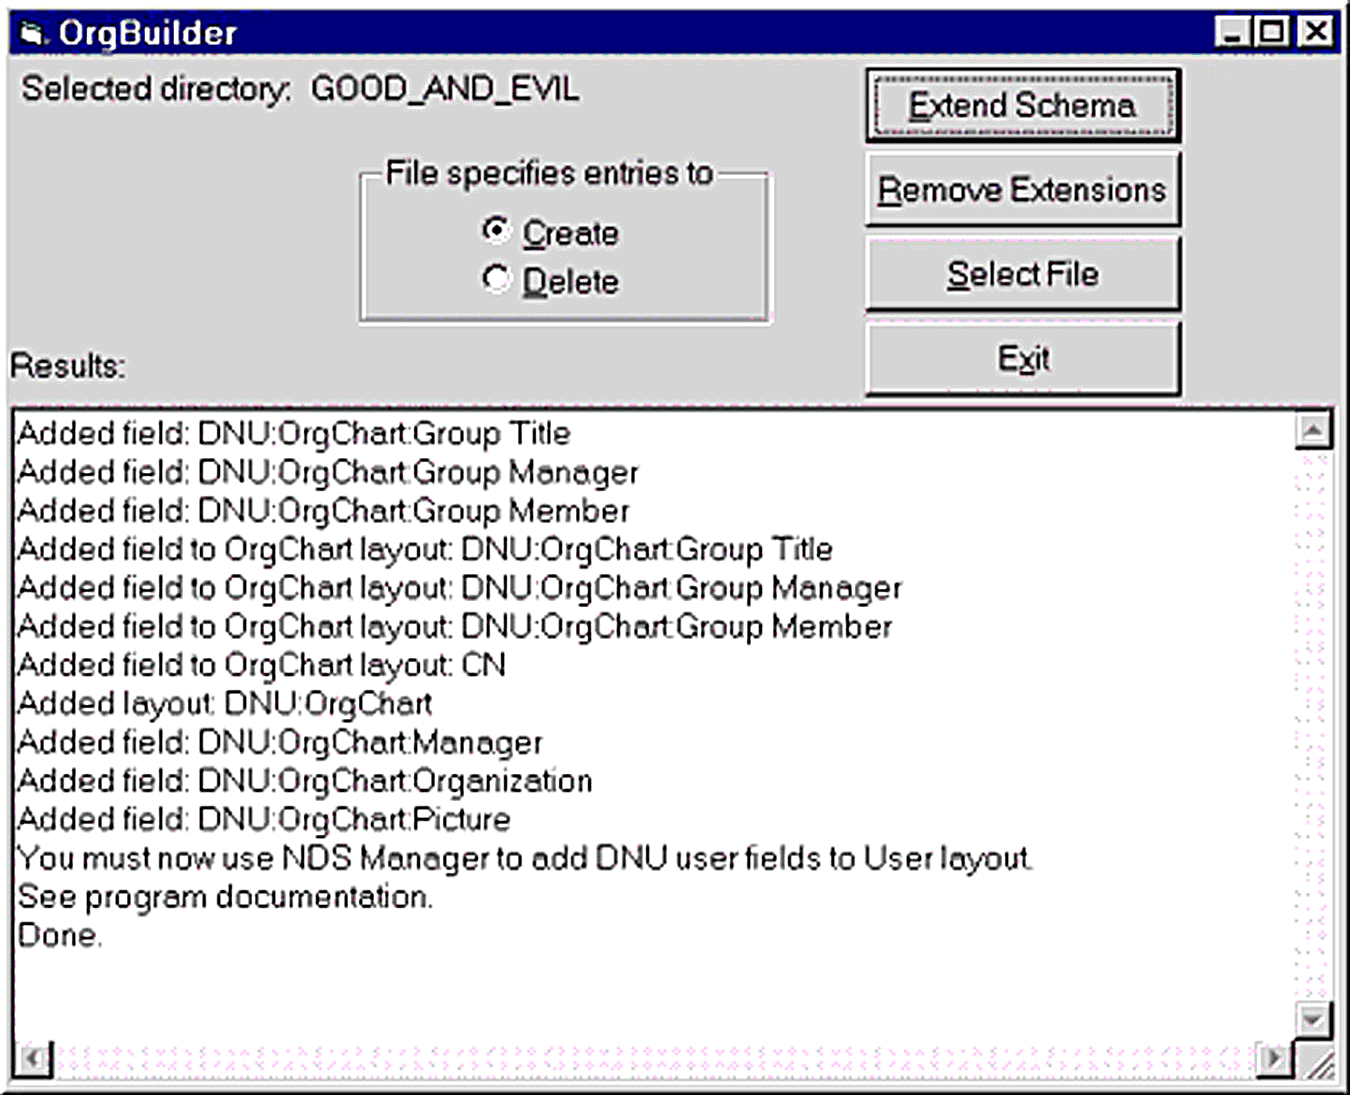
OrgBuilder form.
Once you have used OrgBuilder to extend the NDS schema, you must use the NDS Schema Manager utility to add 3 fields to the User layout (see "Using Schema Manager to Extend the Base Schema," below).
If an error occurs while extending the directory, OrgBuilder typically just displays an error message and quits. You may have to use the NDS Manager utility's Schema Manager feature to manually delete the extensions OrgBuilder added to the directory.
Because the User object is a core NDS class, the OrgChart attributes added to it cannot be removed. You can restore the original NDS core classes by removing NDS and reinstalling it. See the documentation for NWConfig (NetWare 5) or Install.NLM (NetWare 4) for instructions on how to reinstall NDS.
Using Schema Manager to Extend the Base Schema
The Novell Directory ActiveX control currently does not allow you to extend layouts in the NDS base schema (the set of layouts and fields in a default NDS installation). So you must use the NDS Schema Manager to complete the NDS schema extensions required to run OrgChart.
NDS Schema Manager is a module of the NDS Manager utility. Before you can run OrgChart, you must use Schema Manager to add three fields to the User layout:
The NDS Manager utility is in the SYS:\PUBLIC\WIN32 subdirectory. Double-click on Ndsmgr32.exe.
If your development directory is not displayed, select "Set Context" from the View menu and select your development tree from the drop-down list.
Select "Schema Manager" from the Object menu.
Verify that OrgBuilder correctly added the six DNU:OrgChart fields to the selected directory (see Figure 8).
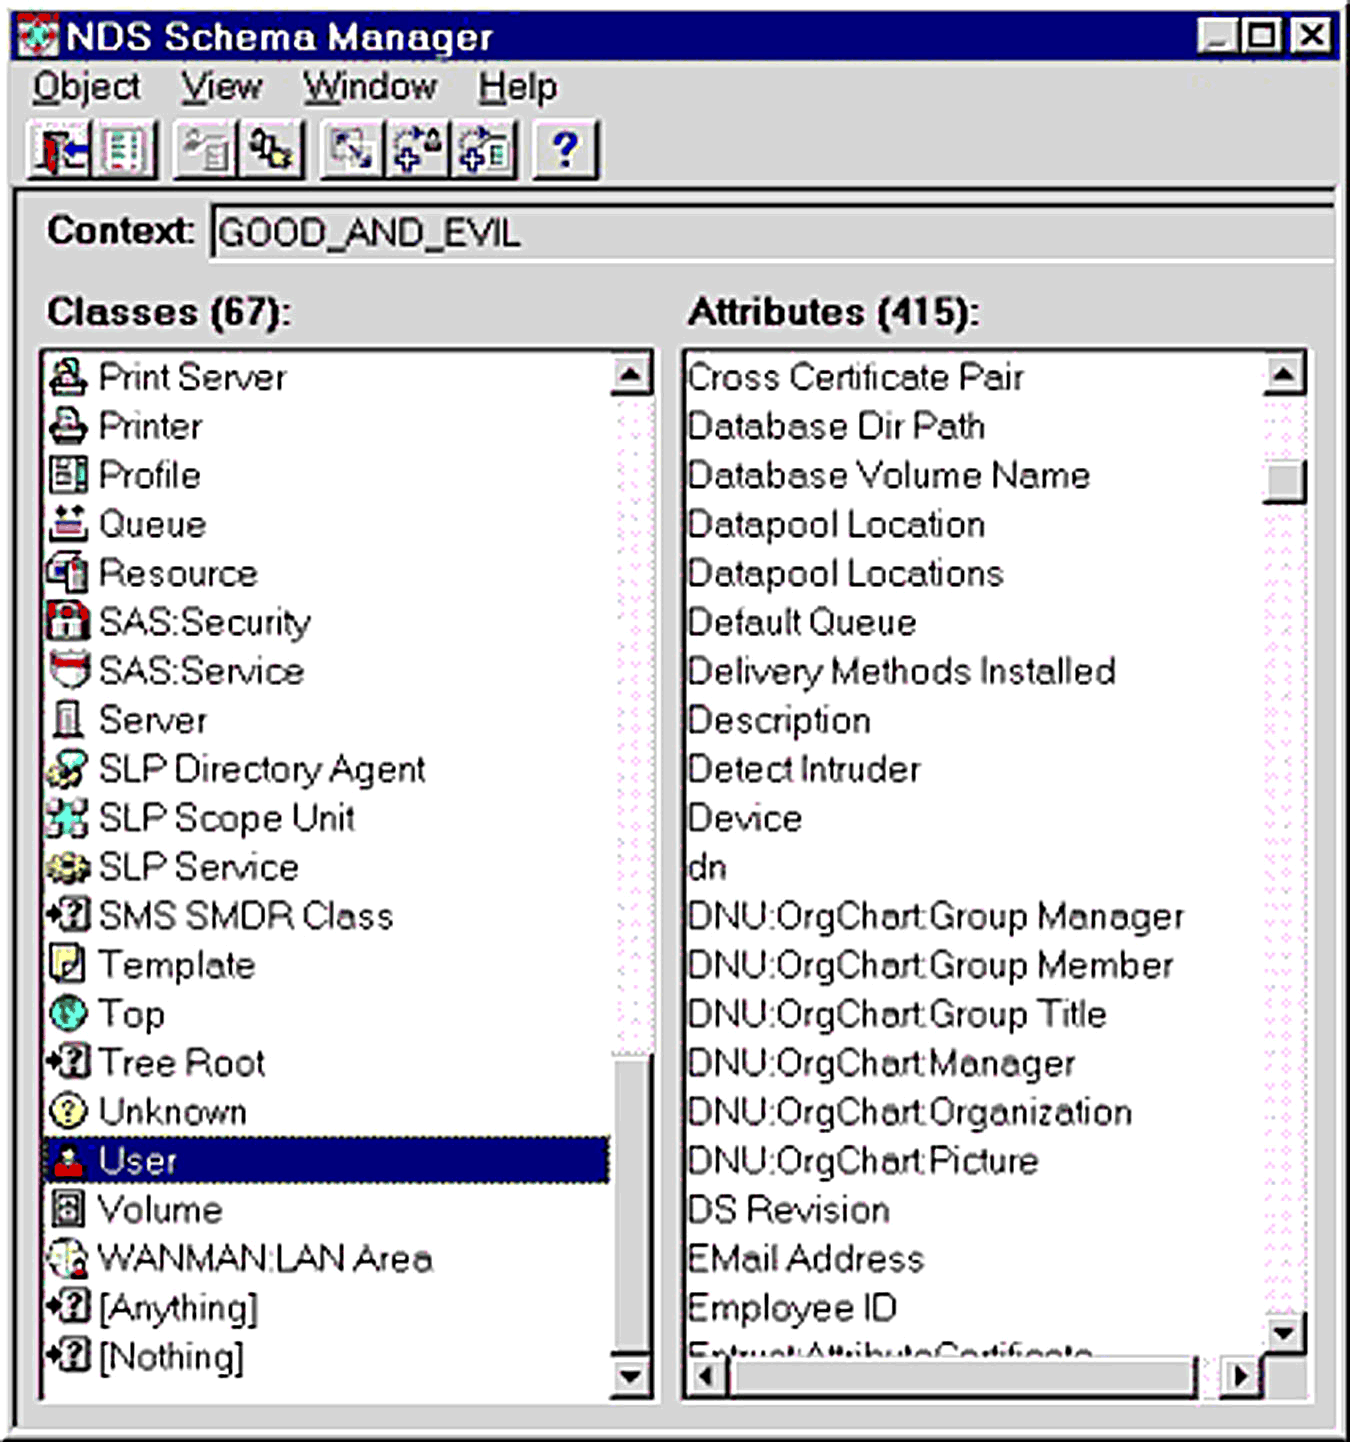
OrgChart fields.
Double-click on the User layout (class).
Click on the "Add Attribute" button. Select the DNU:OrgChart:Manager, DNU:OrgChart:Organization, and DNU:OrgChart:Picture fields from the list of available attributes and click on the right-arrow to add them to the User layout"s optional fields (see Figure 9).
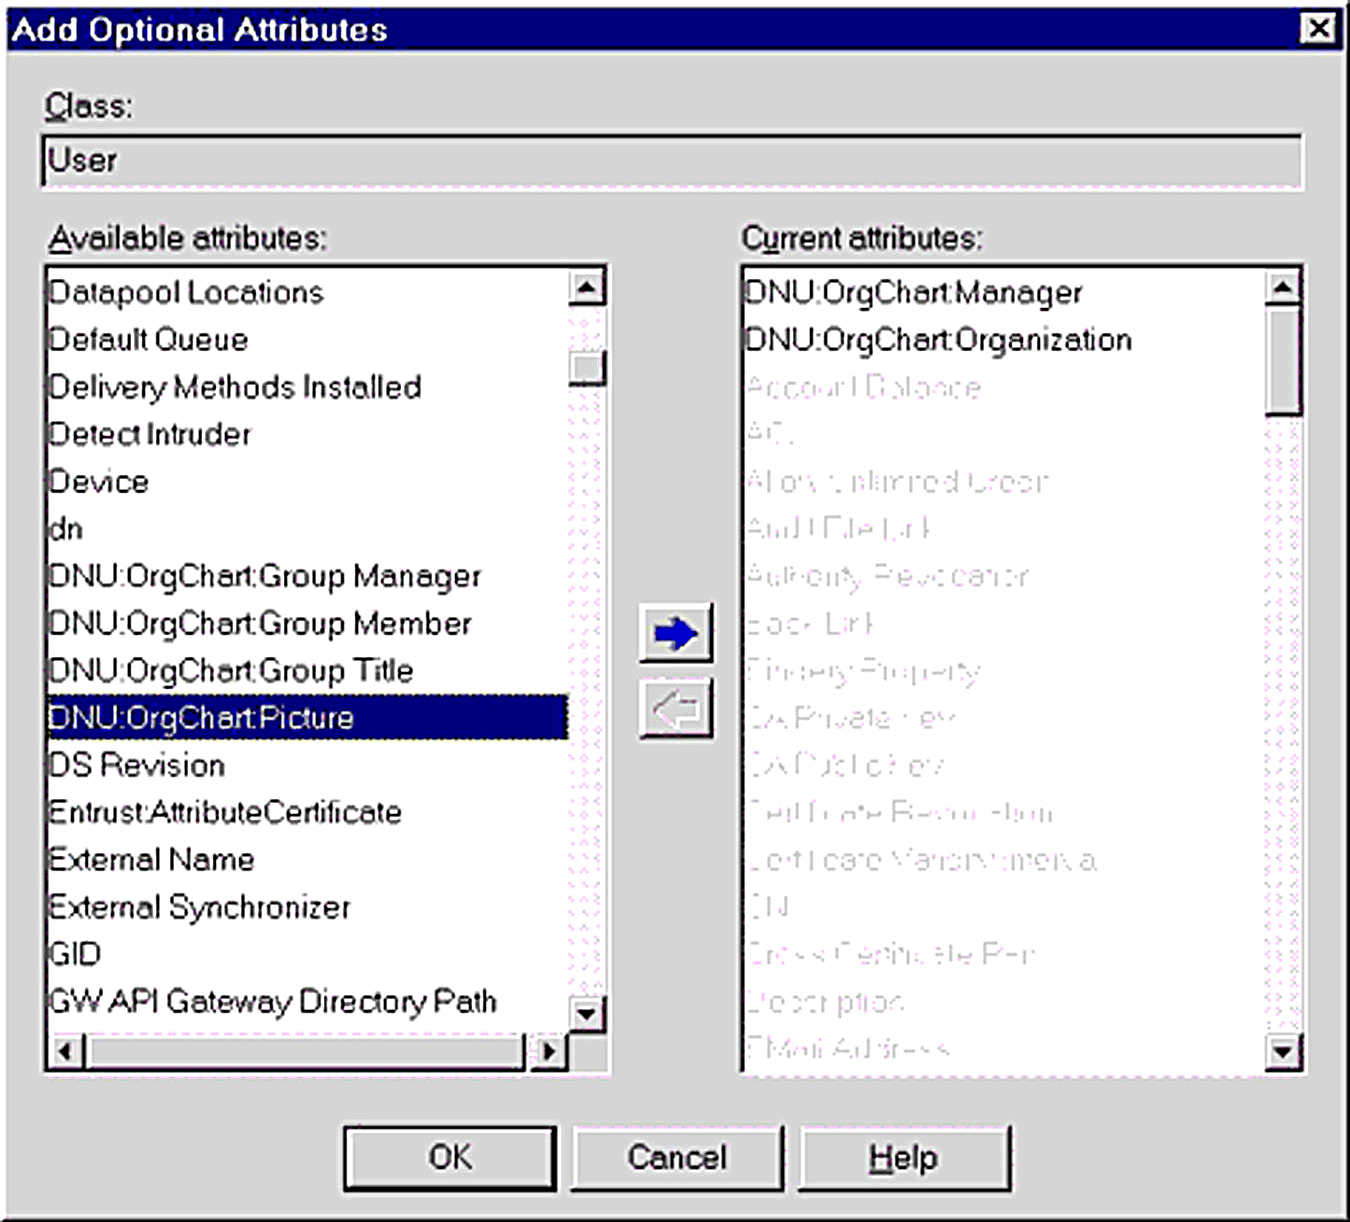
Adding fields to the User layout.
Click "OK" to close the dialog. Exit NDS Manager.
Using OrgBuilder to Create an Organization
Now that the NDS schema has the fields and layouts required to run OrgChart, the next step is to use the OrgBuilder utility to install an organizational structure and user data for OrgChart to browse.
In addition to extending the NDS schema, OrgBuilder creates an organizational structure in the NDS directory. Based on specifications contained in a text file, OrgBuilder creates organization, organizational unit, user, and OrgChart entries in the NDS directory. OrgChart entries are entries containing information about the structure of organizational groups: group names, members, and managers.
Each line in an OrgBuilder specification file begins with the type of entry OrgBuilder is to create. Fields within are separated by tildes (~). To save you some work and to give us a common frame of reference, the download files for this lesson includes all the data you need to create the Top Ten, Inc. organization. To create the Top Ten organization:
Run OrgBuilder.
Select the directory in which you want create the Top Ten, Inc. organization (if necessary, log in to the desired directory).
Make sure that the radio button to "Create" entries is selected, click on the "Select File" button and select the file named "TopTen.txt".
OrgBuilder will create the organization, as shown in Figure 10.
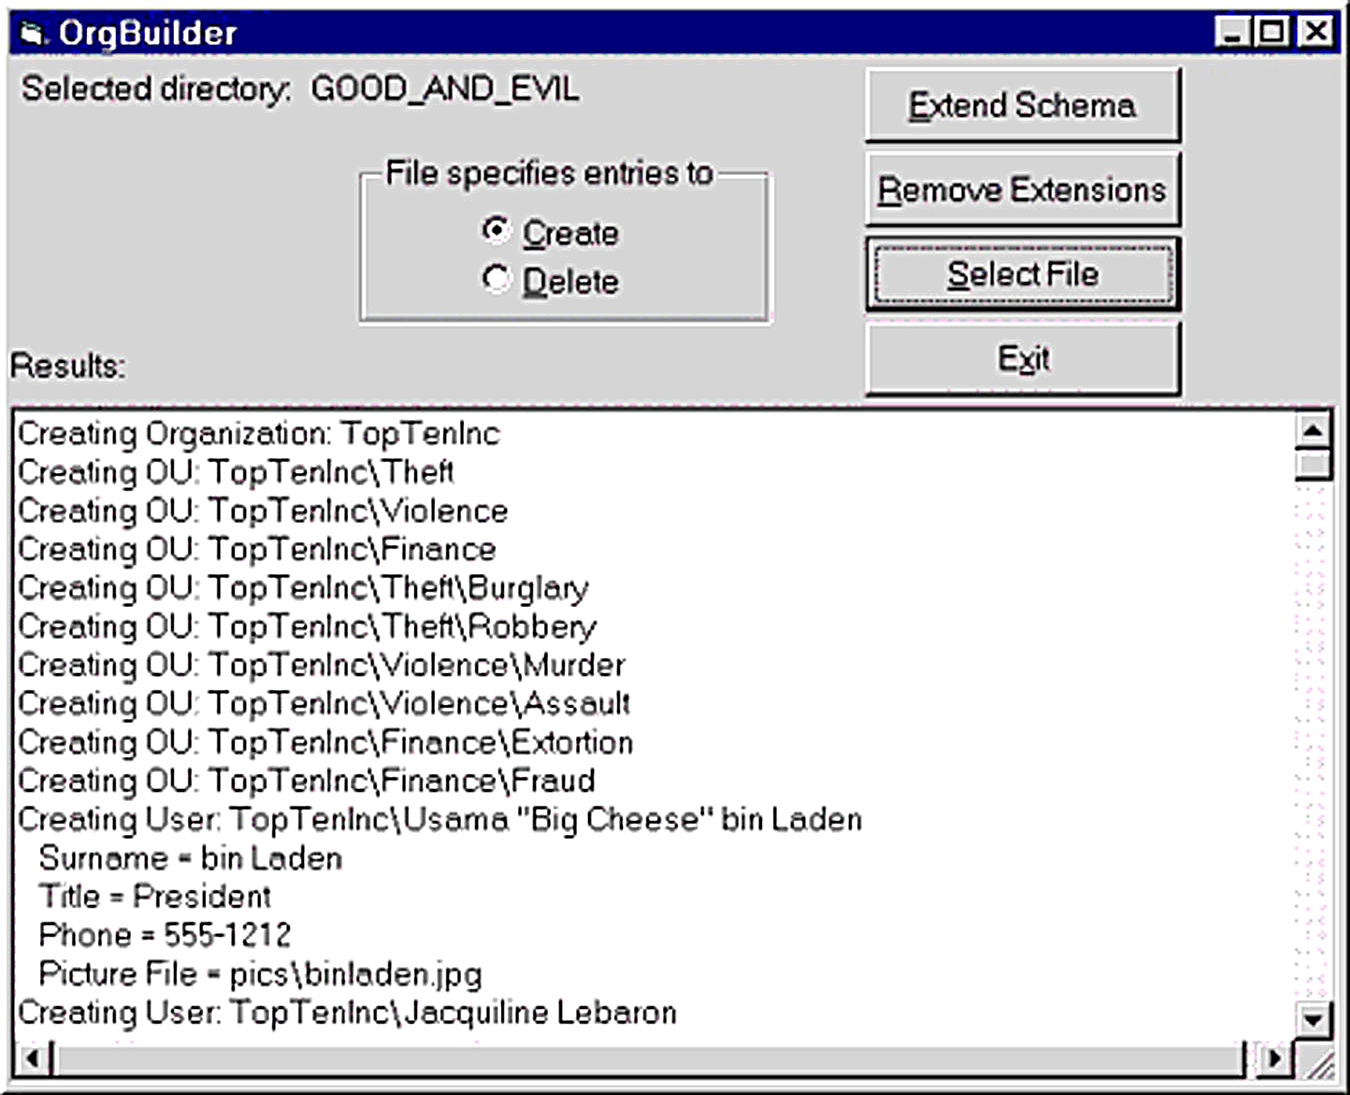
OrgBuilder creating Top Ten, Inc.
To delete the Top Ten organization, you must specify the directory entries in pretty much the reverse order that they were created: all user and OrgChart entries must be deleted from an OU container before the container can be deleted; all subordinate OUs must be deleted from an OU before the OU can be deleted; and the TopTenInc organization entry must be deleted last. We could write OrgBuilder to process the TopTen.txt file in reverse order, but we want to keep the program simple (it's just an example, after all). Instead, we've just provided a file (StopTopTen.txt) that has the entries listed in reverse order. So, to delete the Top Ten organization:
Run OrgBuilder.
Select the directory from which you want delete the Top Ten, Inc. organization (if necessary, log in to the desired directory).
Make sure that the radio button to "Delete" entries is selected, click on the "Select File" button and select the file named "StopTopTen.txt".
Conclusion
Part 3 of this article will cover how to write the OrgChart browser, so you can view the organization structure OrgBuilder has created.
* Originally published in Novell AppNotes
Disclaimer
The origin of this information may be internal or external to Novell. While Novell makes all reasonable efforts to verify this information, Novell does not make explicit or implied claims to its validity.