How to Use the ODBC Driver with NDS, Part 1
Articles and Tips: article
Software Engineer
NamSys Inc.
jparkin@home.com
01 Nov 2000
This AppNote, the first in a three part series, addresses how to integrate the ODBC driver to assist in making reports on network use polled from the NDS tree.
- Introduction
- What is ODBC?
- DSN Connections
- DSN-less Connections
- Building Reports in MS Excel
- Conclusion
Introduction
A couple of years ago Novell released the ODBC driver for NDS. Over the years improvements were made and now the ODBC driver is a very lightweight, easy to use, way of retrieving information from the NDS tree. The ODBC driver is read-only. ODBC drivers are lightweight, and easy to script. They are designed to allow users access to all different data stores with simple SQL queries. This way you can quickly retrieve data without lines upon lines of excessive coding or understanding the way certain controls work. Also, the ODBC driver and the underlying scripting is very similar to its newest cousin, JDBC.
Novell has released an Early Access version of a JDBC to connect to NDS. The JDBC driver is for use with Java, whereas you can incorporate the ODBC driver into your Visual Basic and Visual C++ programs to run on the client machine.
This article will show you how to integrate the ODBC driver to assist in making reports on network use polled from the NDS tree. The information can be stored in MS Excel or a report writing tool like Crystal Reports to work with as you like.
This is a three part series on the ODBC driver from Novell. In this series we will cover:
How to connect the driver to the tree
Building reports in MS Excel and Crystal Reports
Structured Query Language (SQL) and building queries for NDS
NDS enabling your applications using the ODBC driver
Tips and tricks
What is ODBC?
ODBC stands for Open DataBase Connectivity. These drivers allow users to connect to multiple data stores, including relational databases and generate reports, modify, edit, and delete records in the data store via SQL queries.
I use the term data store versus database due to the fact that many files such as spreadsheet files are databases but are more appropriately designated data stores as their file structure is not the same as a database file. Spreadsheets and NDS data stores are not formatted the same and thus the field relationships are not the same. This will be covered in much more detail later in this series.
There are many types of drivers available for many of the most common data stores, including Microsoft Excel, Corel Quattro Pro, DB2, Oracle, SQL Server, Microsoft FoxPro, and Microsoft Access just to name a few. There are many third-party ODBC drivers available from the Internet for a cost, but most companies include the drivers with their data stores.
You can download the newest ODBC driver for NDS from DeveloperNet at: http://developer.novell.com/ndk/odbc.htm.
DSN Connections
DSN or Data Source Name connection are used by your computer to know which ODBC driver you want to use and you get to make special modifications for each DSN connection. It is possible to make DSN-less connections however I will cover that in the next section. DSN connections help you to organize your connections and they can be shared among your programs. There are generally three types of DSN connections, depending on your configuration you may only have two. The basic two are File and System DSN, the third if you are on a network is User DSN.
System DSN connection information is stored in the Windows Registry. This has many advantages over file. First off, if someone accidentally deletes the .dsn files (used by file DSN), you loose your connection. As we all know, the registry is much harder to manipulate than files and therefore this is a much more reliable connection. With all of my examples I will be using System DSNs.
If you are using Microsoft Visual Interdev to create web pages, a file DSN is appropriate. With file DSNs, Interdev reads the information and stores the information in a binary file, your data environment. Interdev creates a DSN-less connection at that point. DSN-less connections will be covered later. That of course also implies that you are also using .asa files in your web application. If you are not using a global.asa file for you web application, it is not recommended you use File DSN connections.
User DSN connections are connections specific to the logged in user at the time of the DSN creation. I do not recommend using this type especially if you are in a work environment that shares systems. Lets assume that you created an application that uses a data store and you created a User DSN. Someone else logs onto your machine but needs to use the application that you created. They will get an error, because the DSN connection doesn't exist and therefore the program cannot access the data store. Another problem is in case two people have created a User DSN connection and called it the same thing, however pointing to different data stores. You can surely imagine how messed up the report will turn out if at all!
If you use a DSN connection you have the ability to limit the amount of code that you enter into you application. A simple connection line pointing to a DSN such as conn = "DSN=NDSTest" is all that is really needed because all the other connection information already exists in the DSN entry in the registry. This a very quick method of developing applications and quick to debug because there is a lot less code. To RAD developers this would be a very important feature.
Creating a DSN Connection
There are three ways to create DSN connections. Two are easy and one can be time consuming. Two use the GUI DSN connection wizard and one is via coding it directly into your application. There are many reason to use both. If you are building an application for distribution then coding the create connection information wouldn't be a bad idea. On the other hand I know that InstallShield provides the functionality to create it for you on install. You even get to pick which connections you want distributed with your application. All that and easy-to-use too! (No I don't work for InstallShield). As a result I will show you the easy methods.
The two methods are like two roads leading the same place. If you have installed the NDS ODBC driver:
A shortcut has been added to your Start Menu under the Novell ODBC driver for NDS menu called Data Source Administrator. This is a shortcut to the ODBC Data Source Administrator in the Control Panel.
Or you can go to Control Panel and select ODBC Data Sources (32-bit). This loads up the DSN Connection Wizard. From here you can create, modify and delete DSNs.
Figure 1: Data source administrator.
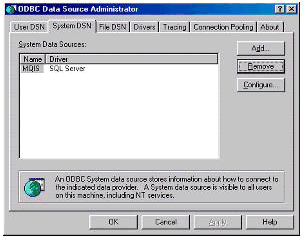
To create a System DSN:
Select the System DSN tab. A list is then displayed of all your current System DSN connections pulled out of your registry. From here you can add, configure, and remove each DSN.
Select the Add button to create a new one.
Now you need to select a driver. All the ODBC drivers that are installed on your system are displayed. You can also get version, company, and diver file name information. This is handy when there is an error and you want to track it down. Remember to always check the version numbers of the ODBC driver on your system to that on the remote system. A lot of modification have been made to the ODBC driver for NDS over the last year. Things were added and things were taken away. As a result the queries that you write on your system might get entirely different results on another system using an older driver. Also many errors can occur.
Figure 2: Select a driver to set up a data source.
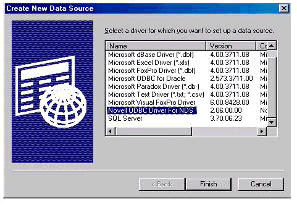
To connect the NDS tree:
Select Novell ODBC Driver for NDS.
Click Finish.
Figure 3: Data source setup.
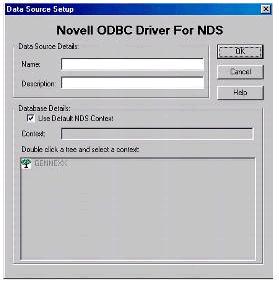
The next window, shown in Figure 3, is different than your usual Data Source Configuration screen. This screen is where you will configure all the fine details of the driver, such as which tree you want to select and the name. The name is quite important. You will want an easy name to remember.
The description field is where you enter information so that just in case you forget what DSN does what you can select it and find out for sure.
In the name field enter NDSTest.
In the description field enter Connection for the samples in this series.
Select the tree you are going to access and the context you want to access or you can just check the Use Default Context. That is up to you to choose. This would depend on the layout of your tree.
Select OK and your connection is created for you. It is that easy but very important.
DSN-less Connections
The DSN-less connection information is still based in a DSN, but the DSN information is stored within the application itself. In the case of a web application the information would be stored in the global.asa. Essentially, the program then creates a DSN connection to the appropriate data using the proper drivers. The advantage of this would be that you can move your web application from web server to web server, and you wouldn't have to worry about recreating the DSN connection properly on each deployment.
DSN-less connection have the possibility of being faster. The reason for this is that the computer doesn't have to search through the system registry. This speed can be noticeable on systems that have a large registry.
If you are into developing fast applications then a DSN-less connection would be for you. However this is not easy and not as quick to set up as a DSN-connection. You need to be able to analyze the intended use of your application to figure out whether this is an option. If you are pressed for time and need to develop an application in a short period of time, and that application has a small deployment area, the time used in the coding and debugging of a DSN-less connection may not really be an option.
Both ADO and RDO support DSN-less connections. All the information is then passed through command lines in your code to the appropriate ODBC driver, which also has to be stated in your code. This can be more time consuming, and give rise to bugs because of the greater amount of code. On the up side to this, depending on your deployment area (large area) and time crunches (as in very little--I know there is no such things as no time crunches), it may be more appropriate to use this style of connection.
In a DSN-less connection the following things will have to be laid out:
Server name
Driver Name (i.e. Microsoft Visual FoxPro Driver)
Data store name (NOT Data Source Name - DSN)
With ADO use the following line for a DSN-less connection where [treename] would be your tree name you want the query to be run on:
VarDSN = "driver={Novell ODBC Driver for NDS}; Server=NotTheServer;Database=[treename]"
When using a DSN-less connection with RDO you to need to set the DSN name to "" and the prompt to rdDriverNoPrompt. This forces RDO to create a DSN-less connection without prompting the user with the ODBC Administrator to set up a DSN connection.
Building Reports in MS Excel
Now that you have a good understanding of DSN connections I will finish up this article by showing you something practical to use with your new found knowledge--building reports in MS Excel.
First off we need to use the connection you created above. It is a good idea to use a DSN connection as it makes building a query in Excel easier.
In the Excel menu:
Go to the Data menu and select Get External Data... New Database Query. The query wizard then appears with a list of the available connections (Jet and ODBC).
Figure 4: Choose data source window.
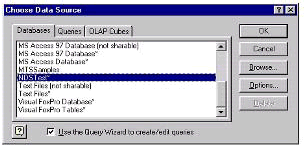
Scroll through the list and find the one we created above.
Click OK to move to the next screen in the wizard.
We are then prompted with a list of the available columns we want included in our query. Since NDS is not structured like most databases, the ODBC driver provides a type of filtering to make NDS work like a standard database. In this case it tells the computer that NDS Objects are actually columns. This will be covered in greater detail in future articles in this series.
Figure 5: Choose columns of data to include in query.
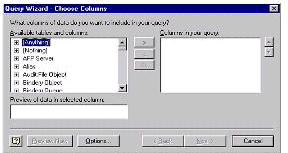
Now for simplicity's sake and to get you going, we will do a basic users report retrieving group membership and e-mail addresses.
Scroll down until you find UserNDS.
This is the User object in the NDS tree. The reason for the addition of NDS on the end is that User is also an SQL command and thus error would result when the query is run. There are other little quirks that need to be kept in mind when using the ODBC driver, but they will be covered in more detail later in the series.
Click on UserNDS to get a listing of all the attributes of the object.
Figure 6: Select from available tables and columns.
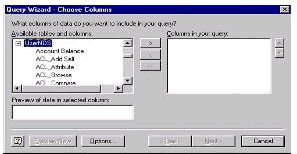
Select attributes you want entered into query.
Figure 7: Attributes entered into query.
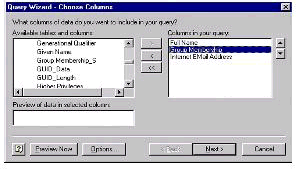
You will also see attributes that have an S (i.e. Group Memebership_S). This is another one of those ODBC/NDS quirks. The _S tells you that only a single value will be returned. Since NDS objects can store multiple entries for a given object (and thus completely mess up a report) you would you the _S attribute.
Click Next when you have everything you need from this screen. Use the next screen to modify your report to fit into a set criteria.
Figure 8: Filter data to specify which rows to include in your query.
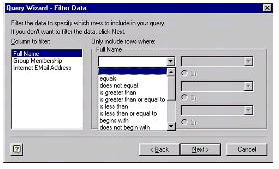
This way you can limit the results by setting it to only collect the A's the first time or membership to specific groups or what have you. This is very beneficial as NDS tree can contain large amounts of users and the result set could be quite large and thus cause your system to loose resources and crash.
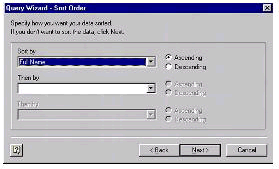
The final two screens simply allow you to sort your query by field and what you want done with the newly generated query. You can choose to save the query if you plan on running the query again at a later date.
Figure 9: Specify how you want data sorted.
When you add the data to Excel you are then prompted to where you want it put into the spreadsheet. You have the options of putting the result set into a new worksheet or a pivot table. That entirely depends on you and what you are going to do with the data.
Conclusion
In this first part of a three-part series, you were introduced to the ODBC driver for NDS. We also discussed how to make a DSN connection and use that connection in conjunction with MS Excel to build a simple report.
A couple of strong points which must be remembered were brought out in this article regarding the ODBC driver for NDS. Remember that NDS is different that a standard database. As a result the SQL queries might not be exactly what you would expect. To cases of such were introduced in this article -- the renaming of the User object to UserNDS and the _S for single values. The documentation that comes with the ODBC driver covers this in more detail. We will also be delving into this in greater detail in the next article of this series.
The second point that is important to remember is that the ODBC driver will pull the entire result set of a query into memory. This is a problem if you run a, general query on a large tree. The result set could quickly eat up your systems resources and cause your system to crash. You should have a pretty solid understanding of your tree and the potential size of a result set.
Stay tuned for the next in the series which delves deeper in SQL and the ODBC driver. We will also build a small VB application using the ODBC driver for NDS.
* Originally published in Novell AppNotes
Disclaimer
The origin of this information may be internal or external to Novell. While Novell makes all reasonable efforts to verify this information, Novell does not make explicit or implied claims to its validity.