Migrating from NT to NetWare with the NetWare Migration Wizard
Articles and Tips: article
Senior Software Engineer
Core Operating System
bcutler@novell.com
01 Sep 2000
Thanks to Bruce Thorne and Denise Jewkes who contributed information and took the time to ensure that this information was accurate.This AppNote addresses migration from NT to NetWare with the NetWare Migration Wizard. The new NetWare Migration 4.0 utility is a reincarnation of the Novell upgrade and is available for free from http://www.novell.com/download.
- Overview
- Why Migrate from Windows NT to NetWare
- Merging with Existing NDS Users
- Working with Roaming Profiles
- Operational Overview
- Other Useful Information
Overview
The new NetWare Migration 4.0 utility is a reincarnation of the Novell Upgrade Wizard that currently only supports NT to NetWare 5.x migrations. The NetWare 3.x to 4.x and NetWare 4.x to 5.x options are grayed out but will be available in later versions of the NetWare Migration Wizard. Novell Upgrade Wizard 3.1 still supports the NetWare 3.x to 4.x and NetWare 4.x to 5.x migrations. Both the NetWare Migration 4.0 and the Novell Upgrade Wizard 3.1 are available for free from http://www.novell.com/download.
The NT to NetWare option of the NetWare Migration Wizard allows you to migrate information from an NT Domain with NT 3.51 or NT 4 servers to a NetWare 5.0 (or newer) NDS tree. It migrates NT users to NDS users and NT Global and Local groups to NDS groups. NT folders and files are migrated to NetWare directories and files. The NT folder and file permissions are also migrated to NetWare trustees.
If your NT users have User Profiles, they will be copied to NetWare to be used with ZENworks' User Policy Packages. You can apply the NDS Template object properties to your NT users as they are migrated to NDS users. If your NT users have home directories stored on an NT server, they will be copied to the home directory associated with the NDS user. You can associate your NT Global and Local groups with ZENWorks User Policy Packages, thus allowing you to take full advantage of the benefits of ZENworks for Workstations.
Why Migrate from Windows NT to NetWare
The faster access speed of NDS on NetWare versus the speed of accessing NT Domain information, should be incentive enough to migrate. You will also have the full benefit of NetWare, NDS, and ZENWorks over the primitive management challenges of NT Domain administration. You can use the NT to NetWare Migration Wizard to consolidate all of your NT servers onto NetWare servers and begin managing a single networking paradigm, including the file system, profiles, and system policies. The only thing your users will notice once the migration is complete is a speed-up of their processing.
Platforms Supported
Since the APIs that are used in migrating domain information only work on NT or Windows 2000 servers and clients, the NT to NetWare Migration Wizard only works on Windows NT servers and clients or Windows 2000 servers and clients. You can't run the NT to NetWare Migration on a Windows 3.1, 95, or 98 workstation. We haven't tested on WindowsMe yet, but it probably won't work.
We encourage you to run the NT to NetWare migration from the NT server itself. This will speed up the migration process because it will not have to go through a client when copying data. Of course this will require installing the Novell client on the NT server.
Source NT Domain and Servers Not Affected
For your peace of mind, the NT to NetWare migration does not affect (with one exception discussed below) the source NT Domain or your NT servers since we are only reading from, not writing to, the NT Domain and NT servers. You can continue to use your NT network until the migration is complete. You will need to install the Novell client on all your workstations before having your users log into NDS on the NetWare server.
One exception to modifying your source server is that we do update the registry on the NT Domain Primary Domain Controller. When you migrate an NT user or group, the NT migration writes the NT User or Group name and its associated NDS User or Group name into the NT Registry of the Primary Domain Controller (PDC). For your information, the registry key is HKEY_LOCAL_MACHINE\Software\NetWare\NUW40.
By storing the NDS User or Group name in the registry of the PDC, you can migrate your NT users and groups during one migration operation and migrate your NT folders and files during subsequent migration operations. You do have the option to clear out this registry in the Migration Wizard.
NT User Passwords
NT User passwords are not automatically migrated, but you are allowed three methods of assigning user passwords.
Put the user names and passwords into a text file. Use this method if you have all of the NT Users' passwords. The Migration Wizard will read the text file and assign the passwords to the NDS users as they are created. (Details on how to create this file and its name is included in the on-line documentation at http://www.novell.com/documentation/lg/migwiz/docui/index.html.)
Assign each user a random password (if you don't have access to all your NT Users' passwords). Then distribute the new password to your network users after the migration is complete. We log the passwords into a text file for you to use.
Assign all users the same password then notify your network users to change the password when they log in to the NetWare server. This is the easiest in a management sense, but it is also the least secure.
Merging with Existing NDS Users
If you already have existing NDS User objects that represent the same network users as your NT User objects, you can merge the NT User objects with the existing NDS User objects. For safety purposes, the NDS User object's properties are never overwritten.
NT Group Object Migration
The NDS container paradigm may eliminate the need for some of your NT Global Groups. NDS does not require Global groups. The Global group concept has to do with giving access to trusted domains. Since NDS has a hierarchical structure, instead of trusted domains, there is no need for the Global and Local group concept. You control access via Container and Group trustees. As I see it, Organization Unit objects take the place of Global Groups.
By default, when a new folder is created in Windows NT, the Everyone group receives all rights to the folder. Therefore, you may or may not, want to migrate these permissions. If you do migrate the Everyone permissions, they are assigned to a single NDS Organizational Unit object. The Everyone group itself, is not migrated.
The other default system groups, SYSTEM, INTERACTIVE, NETWORK, CREATOR OWNER, and Authenticated Users, also are not migrated. Permissions that are assigned to these groups will be lost. These special purpose groups don't have corresponding group types in NDS.
Folders and File Migration and Access Control
NT allows a folder to have both NTFS and Share permissions. When you migrate a Share that represents an NTFS folder, both sets of permissions are migrated. They are merged together with the least restrictive permissions. You do have the option not to migrate any permissions. If you want to redo your directory permissions once you migrate the files to NetWare, this would be a good choice. Otherwise, you will probably want to migrate the permissions.
Note: With this release of the NetWare Migration Wizard, the permissions associated with groups or users in trusted domains will not be migrated. You will need to reassign these.
Because the standard Microsoft libraries are used to copy the files, we recommend that you run the Migration Wizard from the NT server. This eliminates the need to copy the files to the local workstation and then to the NDS server.
The NT User profile directories will be migrated if the NT User object has a roaming profile (the profile is stored on an NT server) and the associated NDS User object has a home directory property. ZENworks for Workstations allows you to take advantage of these profiles.
NT Permissions to NetWare Rights
|
NT Special Permission
|
NW Right
|
|
FILE_ALL_ACCESS |
ALL |
|
DELETE |
DELETE and FILE SCAN |
|
WRITE_DAC |
ACCESS CONTROL and FILE SCAN |
|
WRITE_OWNER |
ACCESS CONTROL and FILE SCAN |
|
FILE_READ_DATA |
FILE_SCAN and READ |
|
FILE_WRITE_DATA |
ACCESS CONTROL and WRITE and CREATE and MODIFY |
|
FILE_EXECUTE |
FILE SCAN and READ |
If there is more than one of these permissions, they are combined. For example: DELETE plus WRITE_DAC = DELETE plus FILE SCAN plus ACCESS CONTROL
Applying User Templates
You will generally want to apply the properties of a Template object to the newly created NDS User objects. You should create a Template object via NetWare Administrator or ConsoleOne. Add as many properties as desired to the Template object. During the verification phase of the Migration Wizard, you will supply the Migration Wizard with the name of the Template object to apply during the migration.
Because you don't have to migrate all users at once, you can drag and drop the NT users that you want to associate with the first template and migrate them. Then you can go back and Back-out these NT users, and drag and drop the second group of NT users to associate with the second template. Migrate these and repeat the process for as many templates as you desire. You could also create multiple Migration Wizard projects for the same source domain and destination tree and specify a different template object for each project.
If you want to copy the NT Home directories or Roaming Profile directories, make sure to specify a home directory for the Template object.
Working with Roaming Profiles
ZENworks allows your users to have the same Roaming profile as they had on Windows NT. Here's how you need to set up ZENworks to do this.
Make sure that when you migrate your NT users that you apply a Template object. Make sure that the Template object has a Home Directory property defined for it.
In NetWare Administrator or ConsoleOne, create a Windows NT/2000 User Policy Package.
Associate the NT user with this policy in one of two ways:
Associate an NT Local group to which the user belongs with the NT User Policy package using the Migration Wizard. We will discuss how to do this later in this article.
In NetWare Administrator or ConsoleOne, associate the NT User Policy package with the container into which you are going to migrate your NT users. If you do this, you don't have to do anything else in the Migration Wizard.
Edit the NT User Policy Package and check the Dynamic Local User check box.
Check the NT Desktop Preferences check box.
Edit the NT Desktop Preferences by clicking on Details.
Click the Roaming Profile button.
Check the Use Roaming Profiles check box.
Check the Enable Roaming Profiles check box.
Click the button to store Roaming Profiles in the User's Home directory.
Once this is done, your former NT network users will have the same profiles that they had in the NT Domain when they log into the NetWare NDS tree.
Note: NT User profiles stored on an Windows NT 3.51 server are not migrated.
Required NT Permissions
Before performing the migration, you need to have the following permissions:
Write/Modify permissions to the NT Domain.
Write/Modify permissions to the Registry of the PDC.
Read permission to all folders and files that you are migrating.
Keep in mind, if you are not familiar with NT Permissions, that NT has no such thing as Inherited rights or Inherited Rights Filters. Parent folder permissions are not automatically inherited like they are in NetWare. In other words, simply because you have Full Control at the Root of the top folder, does not imply that you will have Full Control at the bottom folder. In NetWare, you can't filter the Supervisor privilege but in Windows NT no privilege exists that is equivalent to Supervisor in NetWare.
When home or profile directories are created using the Domain User Manager, only the NT User object has permission to access these directories. The administrator can see these directories, but doesn't automatically receive rights to read the data. As the administrator, you can, however, grant yourself rights to the file system.
Operational Overview
To illustrate the NT Migration process, this section provides a step-by-step overview. If you have used previous versions of the Novell Upgrade Wizard to upgrade a 3.x server, the user interface will seem very familiar. Here are the steps:
The first screen asks you whether you want to Open an Existing Project or Create A New one. Since this is the first time through, the only available option is to Create a New project.
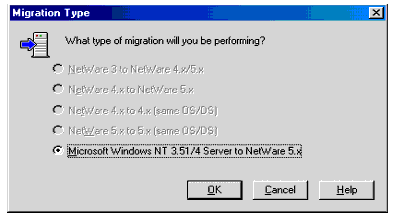
In the Migration Type window select the only option you can, "Microsoft Window NT3.51/4 to NetWare 5.x". Migration Wizard 4.0 only allows a NT to NetWare migration (see Figure 1).
Figure 1: Selecting the Migration Type.
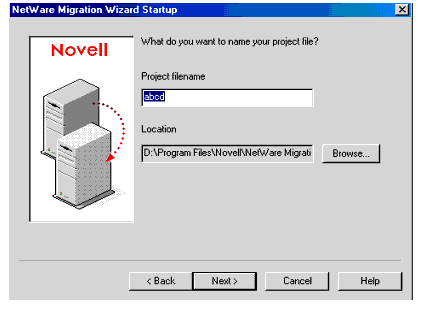
The Migration Wizard will then display a screen with some preliminary steps. Enter a name for the Migration Wizard project, as shown in Figure 2. All of your settings, including what you want to migrate and how, will be stored in this project. Because you do your modeling off-line, this project file is what allows the Migration Wizard to remember what you have done. You can store this project anywhere you want. The project file is created after this step. The database has a Microsoft Access database format. The Migration Wizard will add an .mdb extension to whatever file name you supply.
Figure 2: Entering a Project filename.
Review the source NT Domain and select the destination NDS tree (see Figure 3). If you are not logged in to the NDS tree, you can do so from this screen.
Figure 3: Selecting the Destination NDS tree.
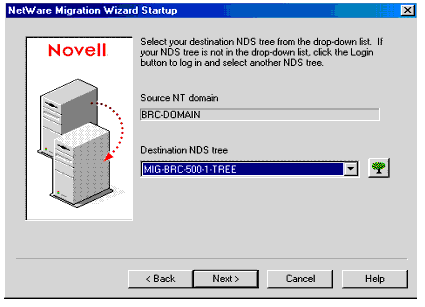
Note: The NT domain in which your workstation (or server) belongs is, by default, the source domain. If your workstation doesn't belong to a domain or if it belongs to the wrong domain, you will need to either use an NT server in the correct domain or an NT workstation that is in the domain. You can also change the domain to which a workstation belongs. If you don't know how to change the domain for your workstation, see the online documentation for the Migration Wizard at http://www.novell.com/documentation/lg/migwiz/docui/index.html.
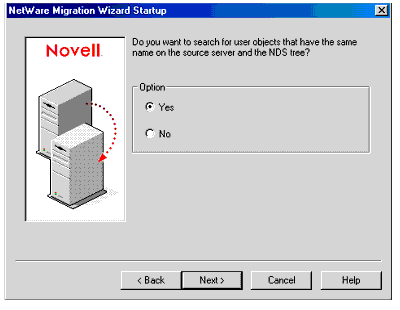
If you have existing NDS users that you want to match up with you NT users (the names must be identical), you can have the Migration Wizard search for them as shown in Figure 4.
Figure 4: Setting the NetWare Migration Wizard to search for matching users.
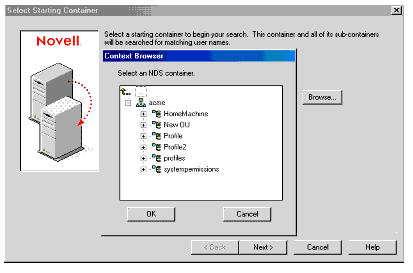
If you selected to match up existing NDS users, you will be able to select the beginning context in which to search for matching user names (see Figure 5). All subordinate containers of the selected container will be searched.
Figure 5: Selecting the NDS context to begin the user search.
The final screen (Figure 6) of the project creation wizard allows you to decide which NDS user matches each of your NT users. Only those NT users that have one or more NDS users with identical names will be listed.
Figure 6: Matching existing users.
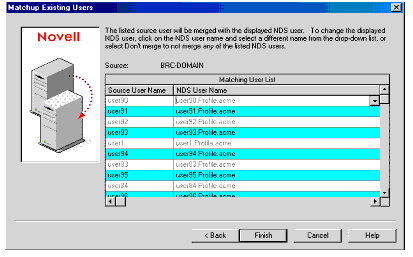
If there are multiple matches, you will need to decide which NDS user matches which NT user. To match a user:
Click on the row of the NT user that you want to change. A drop-down list button will be displayed.
Click the down-arrow button and from the drop-down list, select the NDS user you want the NT User to be merged with.
When finished, click the Finish button. These users will appear as dropped objects in the Project window.
The Project window (Figure 7) is where you drag and drop NT users and NT groups into NDS Organizational Units. You also drag and drop NT Shares and Folders into NetWare directories or volumes.
Figure 7: The Project Window.
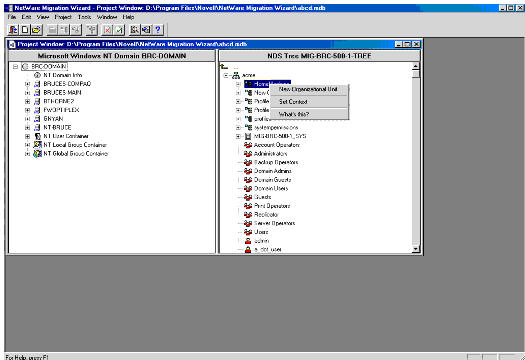
To create new Organizational Units or new directories:
Right-click the container in which you want to create a new container.
Select New Organizational Unit (as shown in Figure 7) or New Folder.
Enter the name of the new container or folder.
Note: Remember, this procedure only creates a record in the database. It doesn't really create the OU or folder.
After you have completed your modeling, you can proceed to migrate the data, or you can go through the Validation procedure first. We will only go through the Migration Wizard in this article.
Migration and Verification Wizard
The Validation procedure checks to make sure that the migration should succeed, but doesn't continue with the migration. The Migration procedure goes through the Validation procedure first, and then, if you have no errors, you can proceed to do the migration. The Validation procedure is for those who want to make sure they don't go on when they don't want to. The Validation procedure allows you to verify that the migration will occur without errors. If errors are noted, you can reconfigure and revalidate before actually doing the migration.
Select the Migration button or the Migration menu item. The Verification and Migration wizards display the same dialogs.
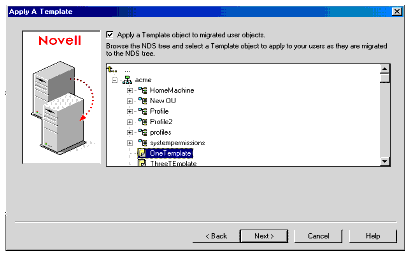
Select the Template object (as shown in Figure 8) that you want to apply to your NT users when they are migrated. This only applies to newly created NDS users. Remember, existing NDS users are not modified. So for those NT users you are merging with existing NDS users, this template won't be applied.
Figure 8: Selecting a template to apply to migrated user objects.
If you have selected to migrate NT Global or Local groups, you will be allowed to select the WinNT/2000 Policy Packages and Win95/98 Policy Packages that you want to associate with the groups (see Figure 9).
Figure 9: Selecting a ZENworks User Package.

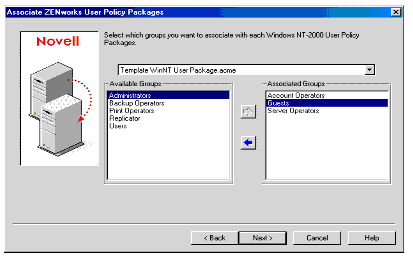
Once you select the Policy Packages, you are asked which groups are to be associated with each policy package (see Figure 10). Only one type of Policy Package is allowed for each group. Move the groups with the arrow keys. One screen is displayed for the WinNT/2000 policies and one screen for the Win95/98 policies.
Figure 10: Associating ZENworks User Policy Packages.
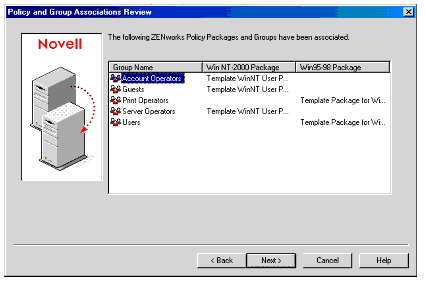
In the next screen (see Figure 11), you can review all the associations you have made on the previous two screens. Click Back to make any corrections
Figure 11: Reviewing Policy and Group Associations.
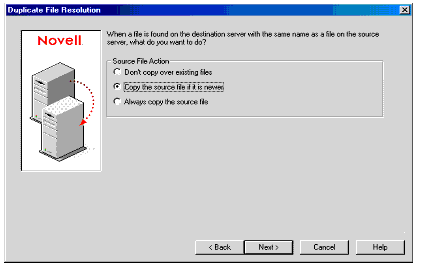
When copying file system data, you may want to refresh the file data. Therefore, the next screen (Figure 12) asks what you want the Migration Wizard to do when it encounters a duplicate destination file. Your choices are to do nothing, overwrite the destination file if the source file is newer, or to always overwrite the destination file with the NT source file. Generally, you will select Overwrite the destination file if the source file is newer.
Figure 12: Selecting the option for Duplicate File Resolution.
This is the password screen (see Figure 13). Because the Migration Wizard doesn't migrate NT passwords, you need to decide how you want to set up the passwords.
Figure 13: Microsoft Windows NT Passwork Options.
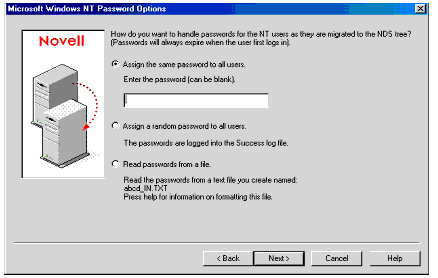
Your options are:
Give everyone the same password, which may be blank or any character you choose. This is the easiest and least secure.
Give everyone a random password. There is a typo on the screen shot and in the product. The passwords are not logged to the success log. The passwords are logged to a file with the same name as the project file with a _OUT.TXT extension. (If the name of your project is MyProject, the name of the password file is MyProject_OUT.TXT). This is the most secure.
If you have discovered all the passwords for your users, you can create a text file which will be used as input during the creation of user passwords.
As mentioned earlier, you may or may not want to migrate file/folder permissions, or you may want to migrate all permissions but the Everyone permissions. It is at the next screen (see Figure 14) that you specify how you want to handle these permissions.
Figure 14: Microsoft Windows NT Migration Options.
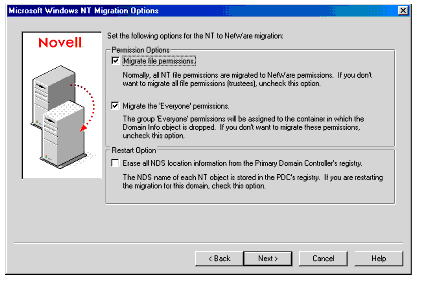
As also mentioned previously, once migrated, the "where did it go" information is stored in the registry of the PDC. If you are starting over and want to erase all previous NT to NDS user name matching information, select to Erase all NDS information from the PDC registry.
Here are some of the things that are checked:
Your rights to the folders and files you have selected to migrate.
You must have at least read rights to all folders you want to migrate.
Your rights to the NT Domain.
You must have rights to read the NT Domain objects.
Existing NDS users and groups with the same names as NT users or groups.
This also happens when you drop an object. If the verification finds matching users, you are allowed to select to merge them or to not migrate the NT user or group.
Determines and warns you about users and groups you have not selected to migrate.
If this is what you wanted to do, ignore the warning.
Your rights to user's home directories and profile directories.
Be aware, as we have already mentioned, that the administrator does not have permissions to these directories by default. You will need to give yourself these permissions. If a user has a home direcotry or profile directory specified in the NT User object, but no such directory exists, you will get the same error as you would if you didn't have rights to access it.
Group members not migrated. If you have chosen to migrate a group but have not chosen to migrate all members of the group, you will get a warning. If you have Local groups with a lot of embedded Global groups, this may take a while to verify.
Other miscellaneous checks.
The next few series of screens display errors and warnings found during the verification process. The Verification screen, shown in Figure 15, displays all miscellaneous errors, warnings and informational items. Errors are displayed with a red X. Warnings are displayed with a yellow exclamation point. Information only items are displayed with a white "i". Errors must be resolved before going on. Warnings and information items need not be resolved before proceeding.
Figure 15: Verification Results.
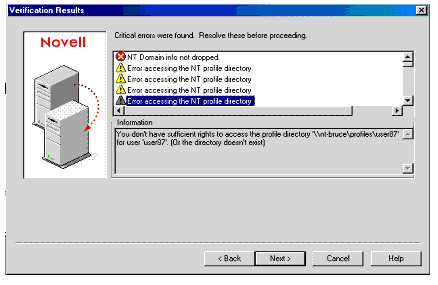
In Figure 15 you see the most common error. The NT Info object has not been dropped. This object must be dropped into an NDS container, preferably high up in the tree. If you migrate the Everyone permissions, the container in which you drop the NT Info object will be granted all permissions that were assigned to Everyone. Therefore, all objects subordinate to this container will be granted the same rights. If all of your NT users are dropped in containers subordinate to the container in which you drop the NT Info object, you have effectively given "everyone" these rights.
Proceeding with the Migration
Once you have resolved all errors, you may proceed to do the migration. Here is the order of migration:
Creates new Organizational Units
Migrates NT users
Migrates NT local groups
Migrates NT global groups
Copies User Home directories
Copies User Profile directories
Creates new directories
Migrates dropped directories
That's it. The Windows NT Domain information is now in NetWare and NDS.
Other Useful Information
Here's a collection of information that may be of benefit to you.
When migrating the user profiles, the NTUSER.DAT or NTUSER.MAN is temporarily copied to the TEMP directory on your local drive in order to perform an operation that fails if it is on the NetWare server. If you are very tight on space on the local drive, this operation may fail. Make sure you have at least 1MB free on the temp drive.
If the group or user already exists in NDS, none of the properties are ever overwritten.
You must use the Template object with Home directory specified if you want to migrate the NT Home Directory and Profiles. Either that, or the NDS user must already exist with a home directory property.
Users with invalid NDS characters, such as a period (.), will be changed to underscores when you drop the object.
Logon scripts are not migrated.
The description and title of the NT user takes priority over the Template description and title.
The password, since it is new, will always expire after they log on for the first time. This will allow the user time to log in to the NDS tree and change the password.
If an NT User Object account is set to never expire in NT, it will be set to expire in 365 days in NDS.
Account lockout policies (NDS Intruder Detection Info) is migrated to each newly created container. This information can be found in the NT Domain User Manager by selecting the Policies/Account menu option. The Lockout After, Reset Count After and Lockout Duration are migrated to the Organizational Unit's Intruder Detection page in NetWare Administrator or ConsoleOne.
* Originally published in Novell AppNotes
Disclaimer
The origin of this information may be internal or external to Novell. While Novell makes all reasonable efforts to verify this information, Novell does not make explicit or implied claims to its validity.